How to Build an Oracle Database Non-Production Sandbox Environment: A Step-by-Step Guide from Design to Implementation
|
ORACLE TECHNOLOGY
|
Build a reproducible Oracle Database sandbox environment from design to implementation with Oracle Database 19c Enterprise Edition, VirtualBox, and Oracle Linux. Apply the same method to other non-production environments.
|
Date of publication: January 25, 2025 (updated September 15, 2026).
Authors: Matthieu SIMONNET and Uttam PANDA
◉ View PDF ⬇ Download Sources
|
|
This publication is provided by OMTCO, an advisory company registered in Munich, Germany. For further publications, visit https://omtco.eu/search.
This publication is an independent work and is not affiliated with, sponsored by, endorsed by, or otherwise associated with Oracle Corporation or any of its affiliates.
Link to the publication: https://omtco.eu/publications/how-to-build-an-oracle-database-non-production-sandbox-environment.
Download the publication PDF: https://omtco.eu/publications/how-to-build-an-oracle-database-non-production-sandbox-environment.pdf.
Download the source materials used in this publication: https://omtco.eu/publications/how-to-build-an-oracle-database-non-production-sandbox-environment.zip.
Read OMTCO’s Statement of Independence, Statement of Confidentiality, and Disclaimer:
https://omtco.eu/StatementOfIndependence.pdf
https://omtco.eu/StatementOfConfidentiality.pdf
https://omtco.eu/disclaimer
For comments or questions, please reach out to an OMTCO representative at https://omtco.eu/contact or email publication@omtco.eu.
Abstract
This publication explains how to design and build an Oracle Database sandbox using five design decisions: Environment, Configuration, Platform, Growth, and Security. It implements this approach with Oracle Database 19c Enterprise Edition, Oracle Linux 7.9, and Oracle VirtualBox 7.1.6.
The method is then extended to non-production environments illustrated with three anonymized OMTCO projects: SQL performance troubleshooting, database consolidation, and DBA training. Their objectives, design choices, and results are compared.
This publication does not provide an Oracle licensing assessment. For further information, refer to the OMTCO publication Licensing Oracle Database in Non-Production Environments [➜ https://omtco.eu/search].
Background
An Oracle Database environment requires more than database software. The selected release, edition, architecture, and features determine operating-system, platform, and infrastructure requirements.
These requirements also depend on the environment’s purpose. A Sandbox / Learning environment can be small, isolated, and disposable, while Production Replication or Proof of Concept may require production-like configurations or a planned target architecture.
Data, security, capacity, access, and lifecycle requirements must therefore be considered alongside technical choices.
Methodology
Five steps guide the publication from design to implementation and application in other projects.
Step 1. Design the reference sandbox environment – Define its purpose, database configuration, platform, growth, and security requirements. Validate technical prerequisites and assess licensing requirements [➜ Chapter 1].
Step 2. Set up the virtualization environment – Install VirtualBox, obtain the Oracle Linux installation media, and configure the virtual machine [➜ Chapter 2].
Step 3. Install and configure Oracle Linux – Install Oracle Linux 7.9 and verify the operating system configuration [➜ Chapter 3].
Step 4. Deploy Oracle Database 19c – Prepare and install Oracle Database 19c Enterprise Edition and create the reference database [➜ Chapter 4].
Step 5. Extend the method to other non-production environments – Compare three OMTCO projects covering SQL performance troubleshooting, database consolidation, and DBA training [➜ Chapter 5].
Results
The guide provides DBAs with a step-by-step procedure for building a reproducible Sandbox / Learning environment using Oracle Database 19c Enterprise Edition, Oracle Linux 7.9, and VirtualBox 7.1.6, with one Container Database (CDB) and one Pluggable Database (PDB).
It also examines three types of non-production environments: Production Replication, New Project / Proof of Concept, and Sandbox / Learning.
Three anonymized OMTCO projects illustrate how the five design decisions are adapted to different objectives, technical requirements, and validation needs.
Conclusion
Define the environment’s purpose and requirements before installing software. Use the five design decisions to determine its configuration, platform, capacity, and security controls.
The reference sandbox demonstrates their implementation, while the three projects show how the same method applies to different non-production environments. The comparison also distinguishes validated results from questions that remained outside the scope of each project.
Review and adapt the design whenever requirements, workloads, data, security, or operating conditions change. Document the changes and their validation results to maintain a reproducible environment that remains suitable for its intended purpose.
Contents
1. Design the Reference Sandbox Environment
1.1. Environment – Purpose, Users, Sandbox Boundaries
1.2. Configuration – Oracle Database Release, Options and Packs
1.3. Platform – Technical Prerequisites, Oracle Linux, and VirtualBox
1.4. Growth – Resource Allocation, Resizing, and Sandbox Lifecycle
1.5. Security – Production Isolation, Data Protection, and Access Controls
2. Set Up the Virtualization Environment
2.1. Download and Install VirtualBox
2.2. Get Oracle Linux Installation Media
2.3. Set Up the Virtual Machine
3. Install and Configure Oracle Linux
3.1. Configure the Oracle Linux Installation
3.2. Complete the Oracle Linux Installation
3.3. Configure and Verify Oracle Linux
4. Deploy Oracle Database 19c
4.1. Prepare the Oracle Database Deployment
4.2. Install and Configure Oracle Database 19c
5. Design Oracle Database Non-Production Environments
5.1. Environment – Purpose and Production Fidelity
5.2. Configuration – Database Release, Edition, Capabilities
5.3. Platform – Operating System and Deployment Platform
5.4. Growth – Scalability and Lifecycle Planning
5.5. Security – Data Protection and Access Controls
5.6. Building a Scenario – Applying the Five Design Decisions
5.7. Scenario Illustrations – Three Examples
5.8. Comparing the Three Projects
6. Glossary
7. Download the Publication Package ZIP-File
8. Index of Exhibits
9. Trademarks
10. Authors and Notices
1. Design the Reference Sandbox Environment
Chapter 1 defines the sandbox that will be built in chapters 2 to 4. It explains what the environment is for, which database configuration it uses, and what it needs from the operating system and virtual machine. It also sets the rules for capacity, data, and access.
Sections 1.1 to 1.5 cover these five design decisions in order. Complete a separate licensing review before using the environment.
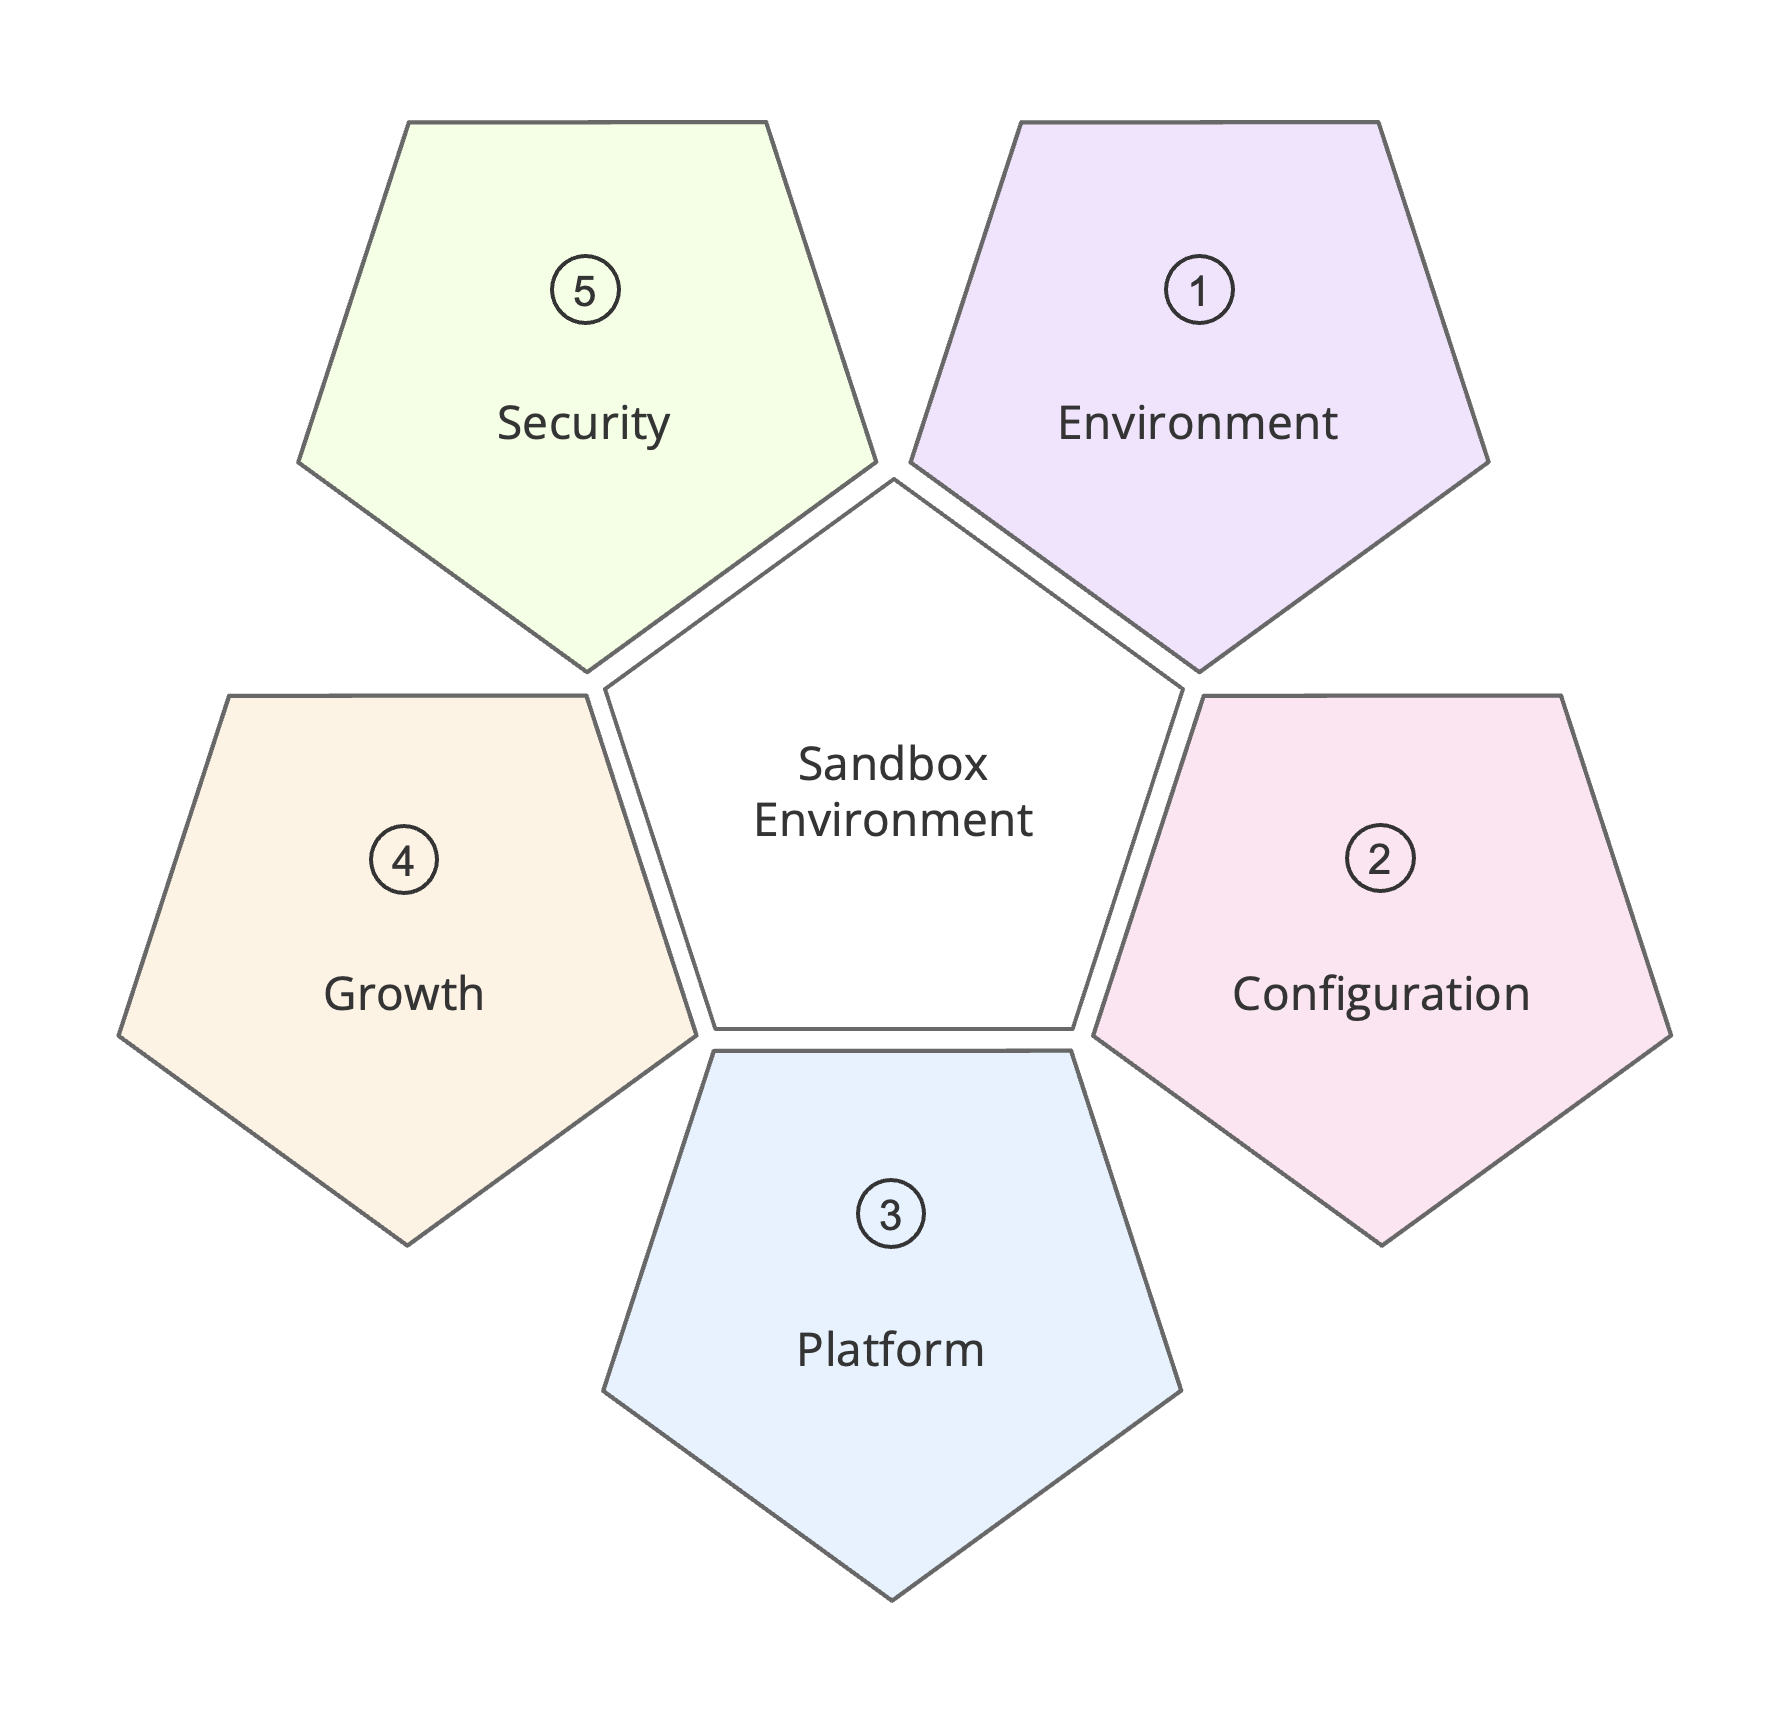
Exhibit 1: Sandbox Design – Five Decisions to Build the Environment
(1) Environment – Define the sandbox environment purpose, users, data, and boundaries. The reference environment is intended for learning, installation practice, and repeatable experiments; it does not need to replicate production.
(2) Configuration – Choose the Oracle Database release, edition, CDB/PDB architecture, and features required by the environment purpose. This choice determines the technical prerequisites that the platform must satisfy.
(3) Platform – Select the operating system, virtualization layer, and virtual-machine settings against those configuration prerequisites. The sandbox environment uses Oracle Linux 7.9 on VirtualBox 7.1.6.
(4) Growth – Allocate enough CPU, memory, and storage for the platform based on its intended use, while allowing for future expansion. Resize, reset, or rebuild the sandbox when requirements change rather than designing production-scale infrastructure.
(5) Security – Keep the environment separate from production. Use non-sensitive data, dedicated credentials, restricted connectivity, and a defined process for resetting or removing the sandbox.
Note about Licensing
Before using Oracle Database or any separately licensed capability in the sandbox (or in any environment for that matter), confirm the applicable licensing rights for the database edition, Enterprise Options, Management Packs, and any optional VirtualBox components.
Consult the following licensing information:
-
VirtualBox [➜ Link reference #01, VirtualBox Licensing Information]
-
Oracle Database 19c [➜ Link reference #02, Oracle Database 19c Licensing Information]
-
Oracle Technology Network (OTN) [➜ Link reference #03, Oracle Technology Network (OTN) Developer License Terms]
Note: The reference links are listed in the Link References file in folder 05_External_Links (refer to the downloadable publication package, chapter 7).
The companion publication
Licensing Oracle Database in Non-Production Environments
provides broader licensing analysis. Review it together with the applicable agreements and Oracle documentation, available at:
https://omtco.eu/publications
https://omtco.eu/search
https://omtco.eu/search/?search=oracle%20non%20production
1.1. Environment – Purpose, Users, Sandbox Boundaries
Start by defining who will use the sandbox and what they need to practice.
For the reference environment, the four design guidelines below keep the build small, repeatable, and separate from production.
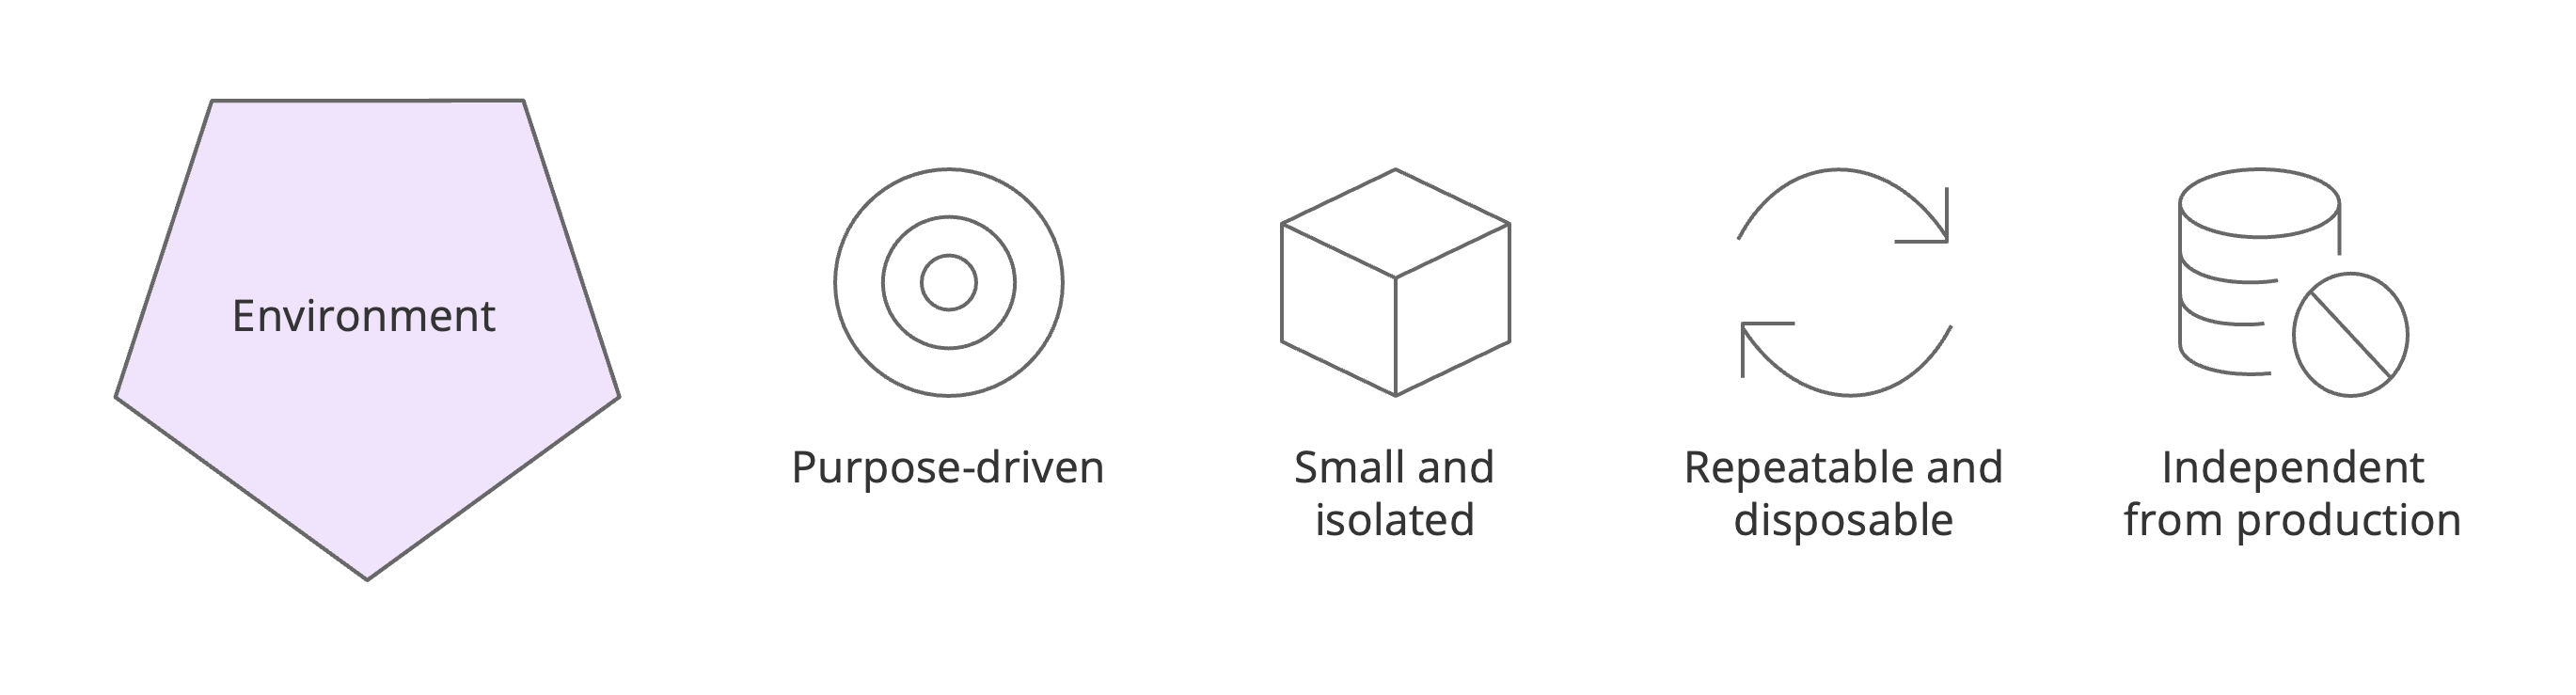
Exhibit 2: Environment – Sandbox Design Principles
Purpose-driven – The sandbox supports Oracle Database installation practice, technical experimentation, internal demonstrations, learning database administration, practicing software inventory collection, and testing of documented procedures.
Small and isolated – The environment is limited to the components and resources required for its intended activities. Simplicity, isolation, and controlled resource consumption take precedence over production-scale infrastructure.
Repeatable and disposable – The sandbox can be stopped, reset, decommissioned, and rebuilt using documented procedures, allowing experiments and exercises to be repeated consistently.
Independent of production – The sandbox may replicate production systems, configurations, or data, if necessary, but operates in a controlled and isolated environment without affecting production operations.
Build, Run, Change
Six steps take the sandbox from its intended use to a working environment.
Steps 1 to 3 – BUILD – The process begins by defining the intended use (step 1), selecting the appropriate Oracle Database configuration (step 2), and validating the resulting technical prerequisites (step 3).
Steps 4 to 6 – RUN – Once these decisions are made, the technical environment is confirmed (step 4). The applicable Oracle licensing requirements must then be assessed (step 5) before the sandbox is implemented and used (step 6).
Step 0 – CHANGE – The process is iterative. Any change in purpose, database architecture, or resource capacity may require the configuration and technical prerequisites to be adapted.
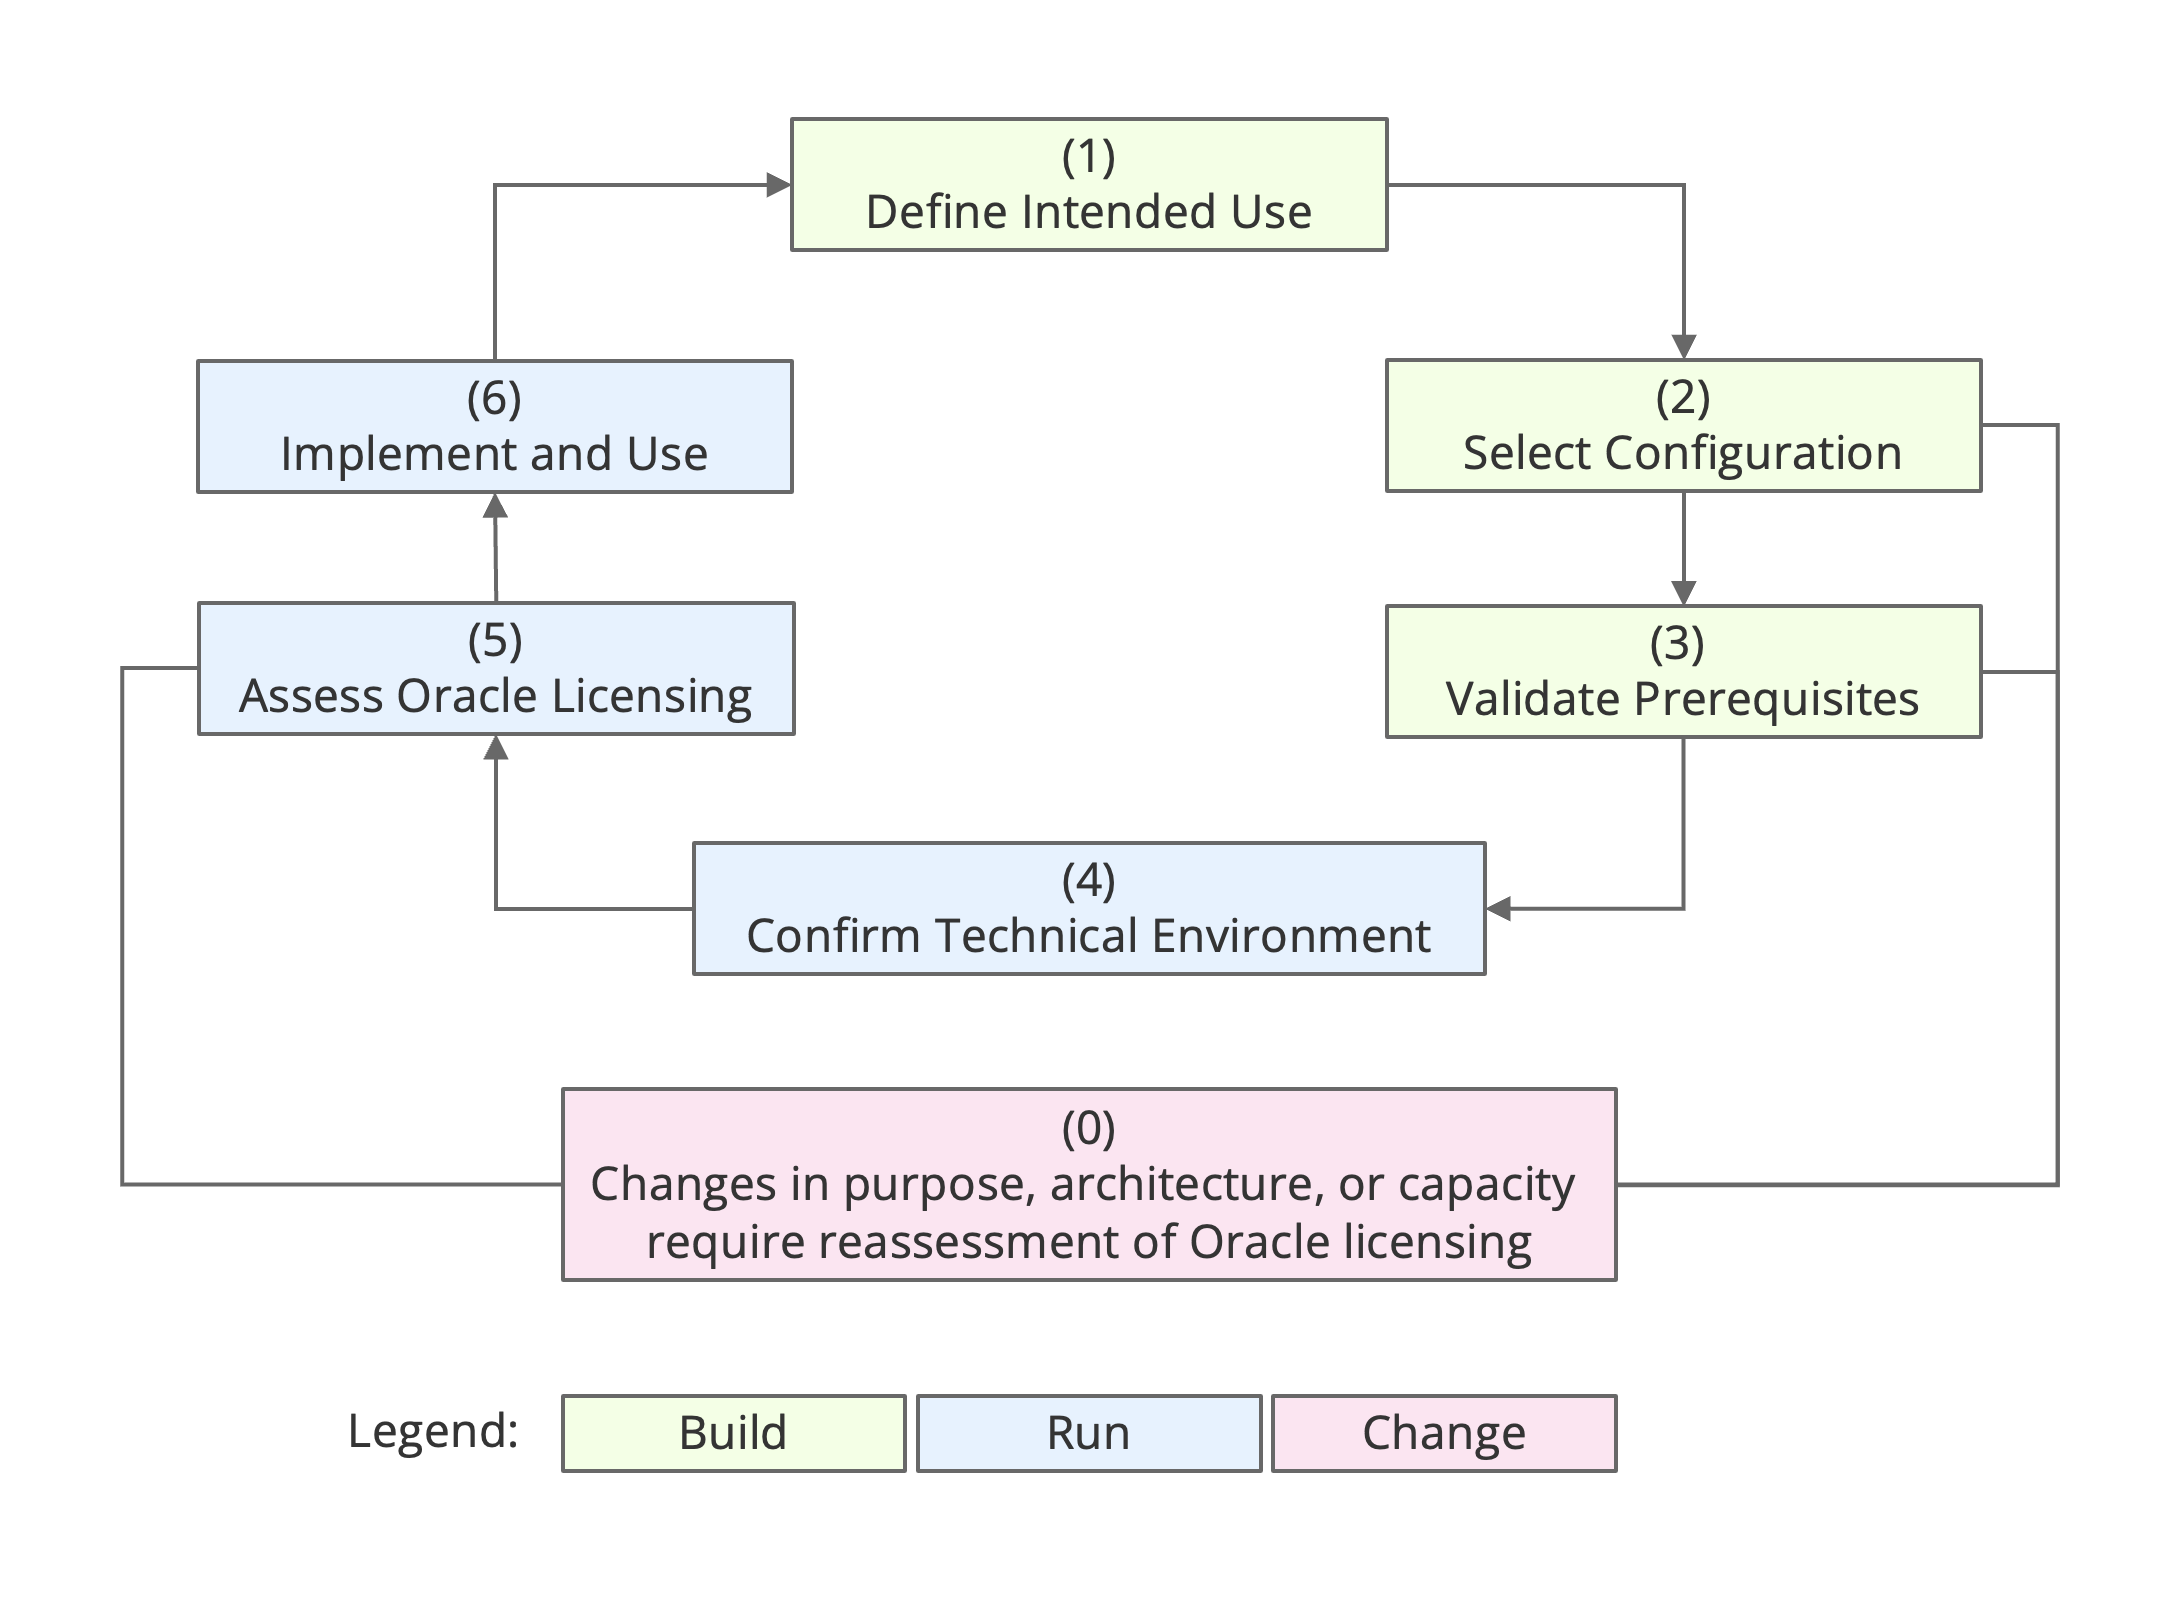
Exhibit 3: Sandbox Design – Define and Validate the Environment
The BUILD / RUN / CHANGE process illustrates the iterative nature of the sandbox design process. Each iteration aligns the intended use with the configuration and technical requirements. The same process applies when the sandbox is modified or extended.
Before implementing a change, review the relevant design decisions and verify that the selected configuration, technical prerequisites, and Oracle licensing requirements remain appropriate.
Any necessary adjustments should be documented and validated before the updated sandbox is used.
1.2. Configuration – Oracle Database Release, Options and Packs
Next, choose the database release, edition, architecture, and features needed for the exercises. These choices establish the requirements for the operating system and virtualization platform.
The four design guidelines below define the reference database configuration.
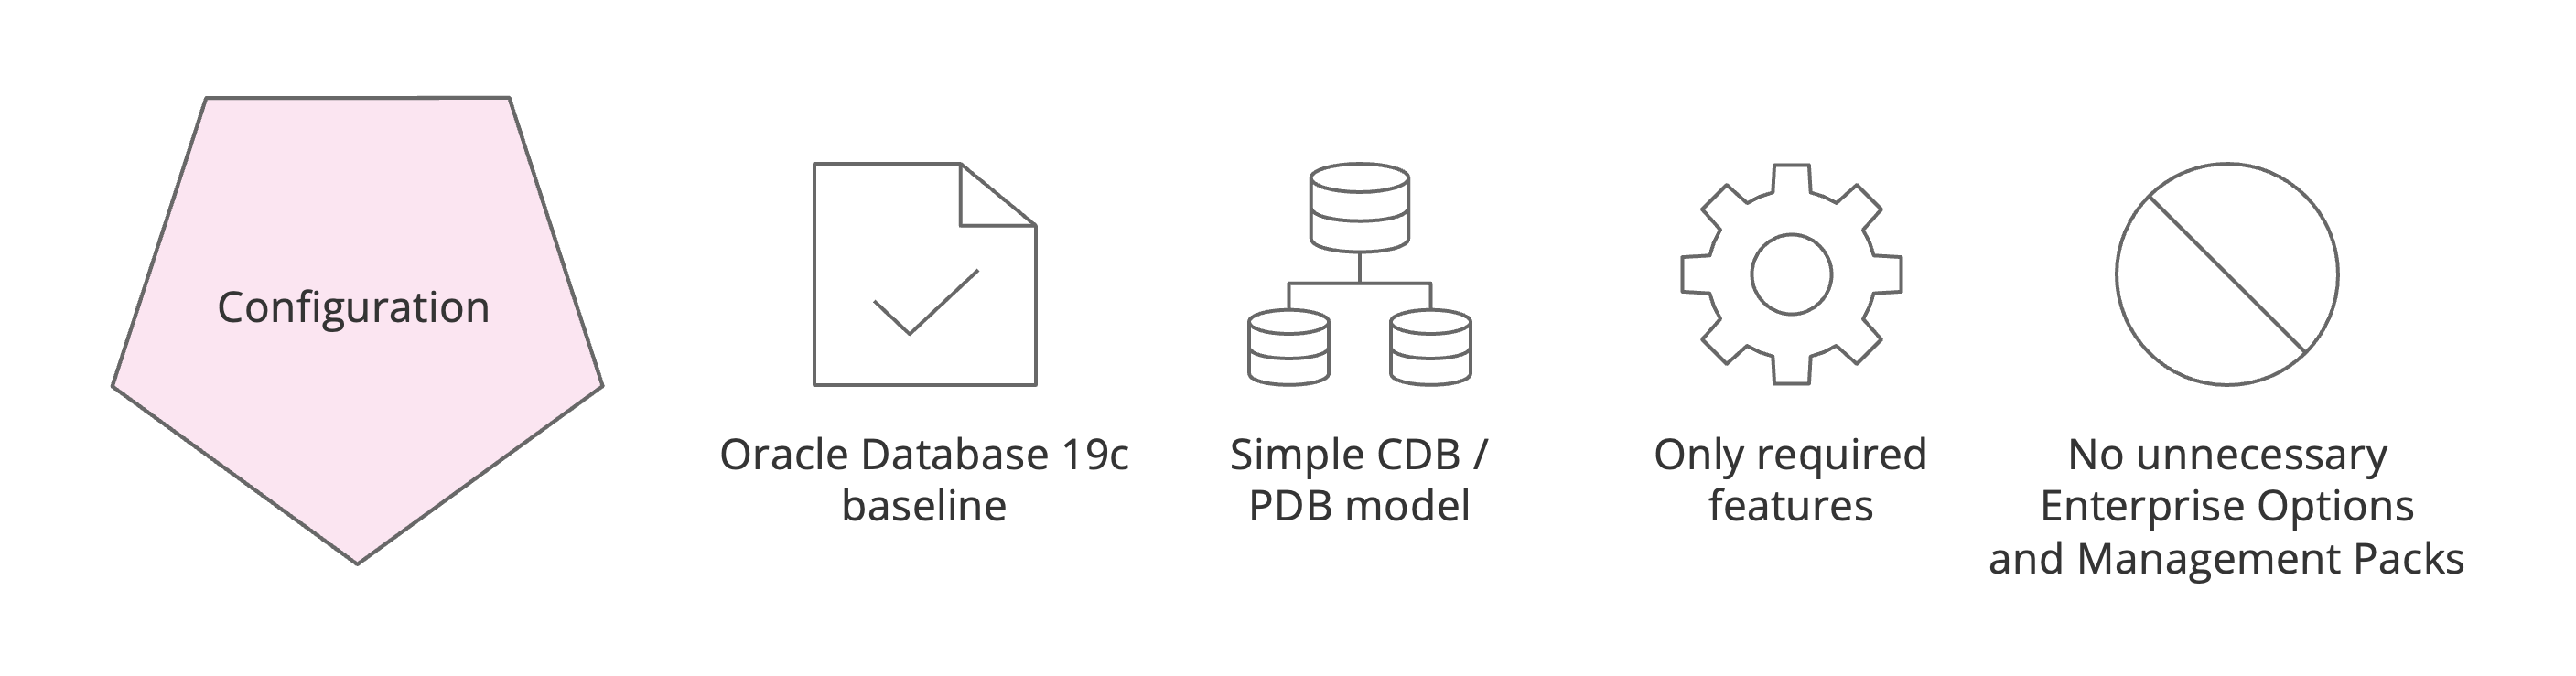
Exhibit 4: Configuration – Reference Sandbox Configuration
Oracle Database 19c baseline – Oracle Database 19c Enterprise Edition provides a consistent baseline for installation, administration, and experimentation. Using a fixed release simplifies documentation, troubleshooting, and verification of technical procedures.
Simple CDB / PDB architecture – The sandbox uses one container database (CDB) and one pluggable database (PDB). This configuration demonstrates the Oracle Multitenant architecture while limiting complexity and costs (no Oracle Multitenant Enterprise Option – paid license – is needed).
Only needed features – The environment includes only the database capabilities required for its intended exercises. Additional features can be introduced when needed, keeping the configuration simple and making feature usage easier to identify and monitor.
No unnecessary Enterprise Options and Management Packs – Keep the default options proposed during installation and add an Enterprise Option or Management Pack only when an exercise needs it and its use is authorized. Some of them would require a paid Oracle license.
The selected database configuration determines the operating-system compatibility, software packages, memory, storage, and network requirements. Verification of these requirements is mandatory before choosing the platform.
Oracle Database Release
Oracle Database 19c Enterprise Edition is selected for the reference sandbox.
This database edition and release supports the exercises covered by this guide: installation, administration, multitenant architecture, measurement and observation of feature usage, and software inventory. Enterprise Options and Management Packs may be introduced if a specific exercise requires them.
Multitenant Architecture
The sandbox uses the Oracle Multitenant architecture with one (1) container database (CDB) and one (1) user-created pluggable database (PDB).
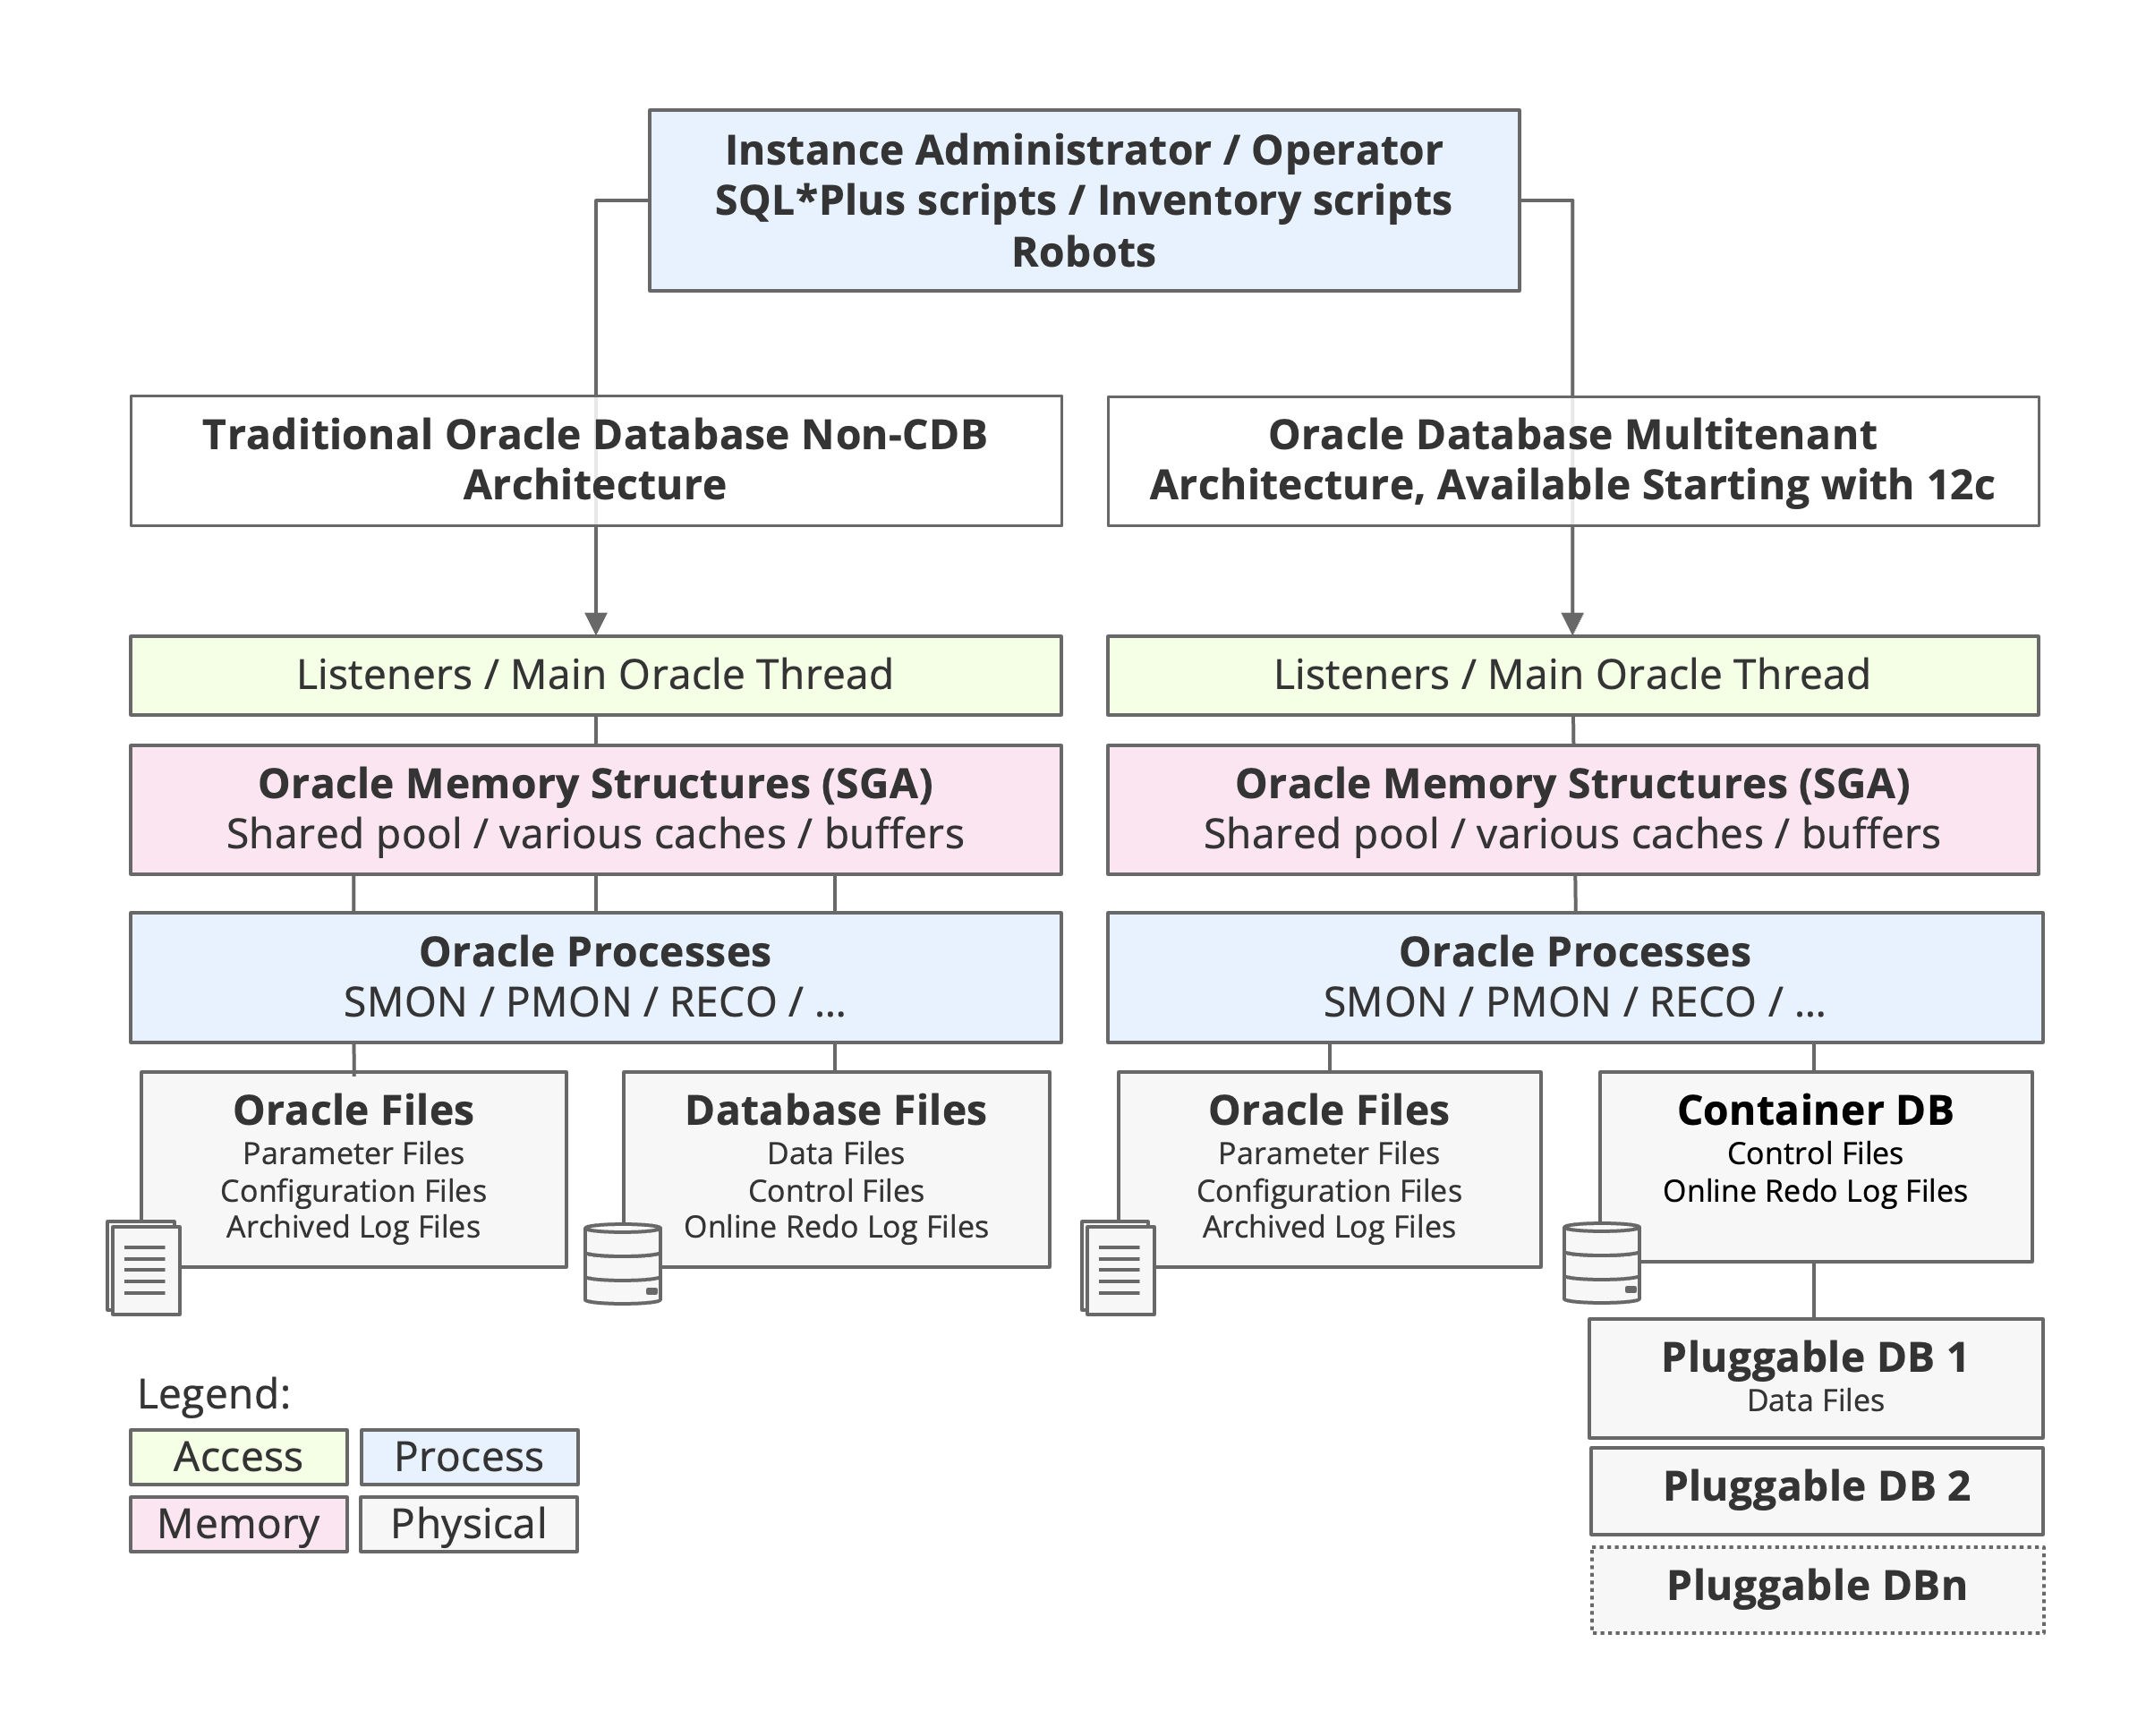
Exhibit 5: Oracle Database Architectures – Non-CDB and Multitenant Comparison
This keeps the environment simple while allowing the guide to demonstrate the CDB/PDB model used by current Oracle Database releases. For Oracle Database 19c Enterprise Edition, this single-PDB design remains within the base multitenant capability (no added cost for a Multitenant license) used by the guide.
Note: Without an Oracle Multitenant license, an installation may have up to three user-created PDBs in one CDB. Beyond this limit, any expansion of the sandbox (four user-created PDBs or more) requires an Oracle Multitenant license with costs.
Features, Enterprise Options, and Management Packs
The Enterprise Edition software distribution includes a broad set of database capabilities.
Some features may be present or enabled by default; others require explicit configuration for a specific exercise. This makes the environment suitable for observing the deployment and usage of Oracle Database features, Enterprise Options, and Management Packs, and for verifying how the Oracle Collection Tool identifies that usage (which may affect licensing requirements).
Technical presence or availability must be distinguished from actual use. The presence of a component in the software distribution, database configuration, or inventory does not, by itself, establish a right to use it.
Note: The Oracle Collection Tool, provided by Oracle Global Licensing Advisory Services (GLAS), formerly Oracle License Management Services (LMS), uses operating system commands and SQL queries to collect information about installed Oracle products and their usage, including Database Options and Management Packs. The results help identify potential licensing requirements but do not, by themselves, establish license entitlements or compliance. These must be assessed against the applicable Oracle licensing terms. For further information, see the related OMTCO publications at https://omtco.eu/search.
1.3. Platform – Technical Prerequisites, Oracle Linux, and VirtualBox
With the database configuration defined, choose a compatible operating system and virtualization platform.
The four design guidelines below establish the technical prerequisites for the reference sandbox and keep the environment easy to install, use, and rebuild.
Especially the easiness to (re)build the environment permits the environment to be disposable.
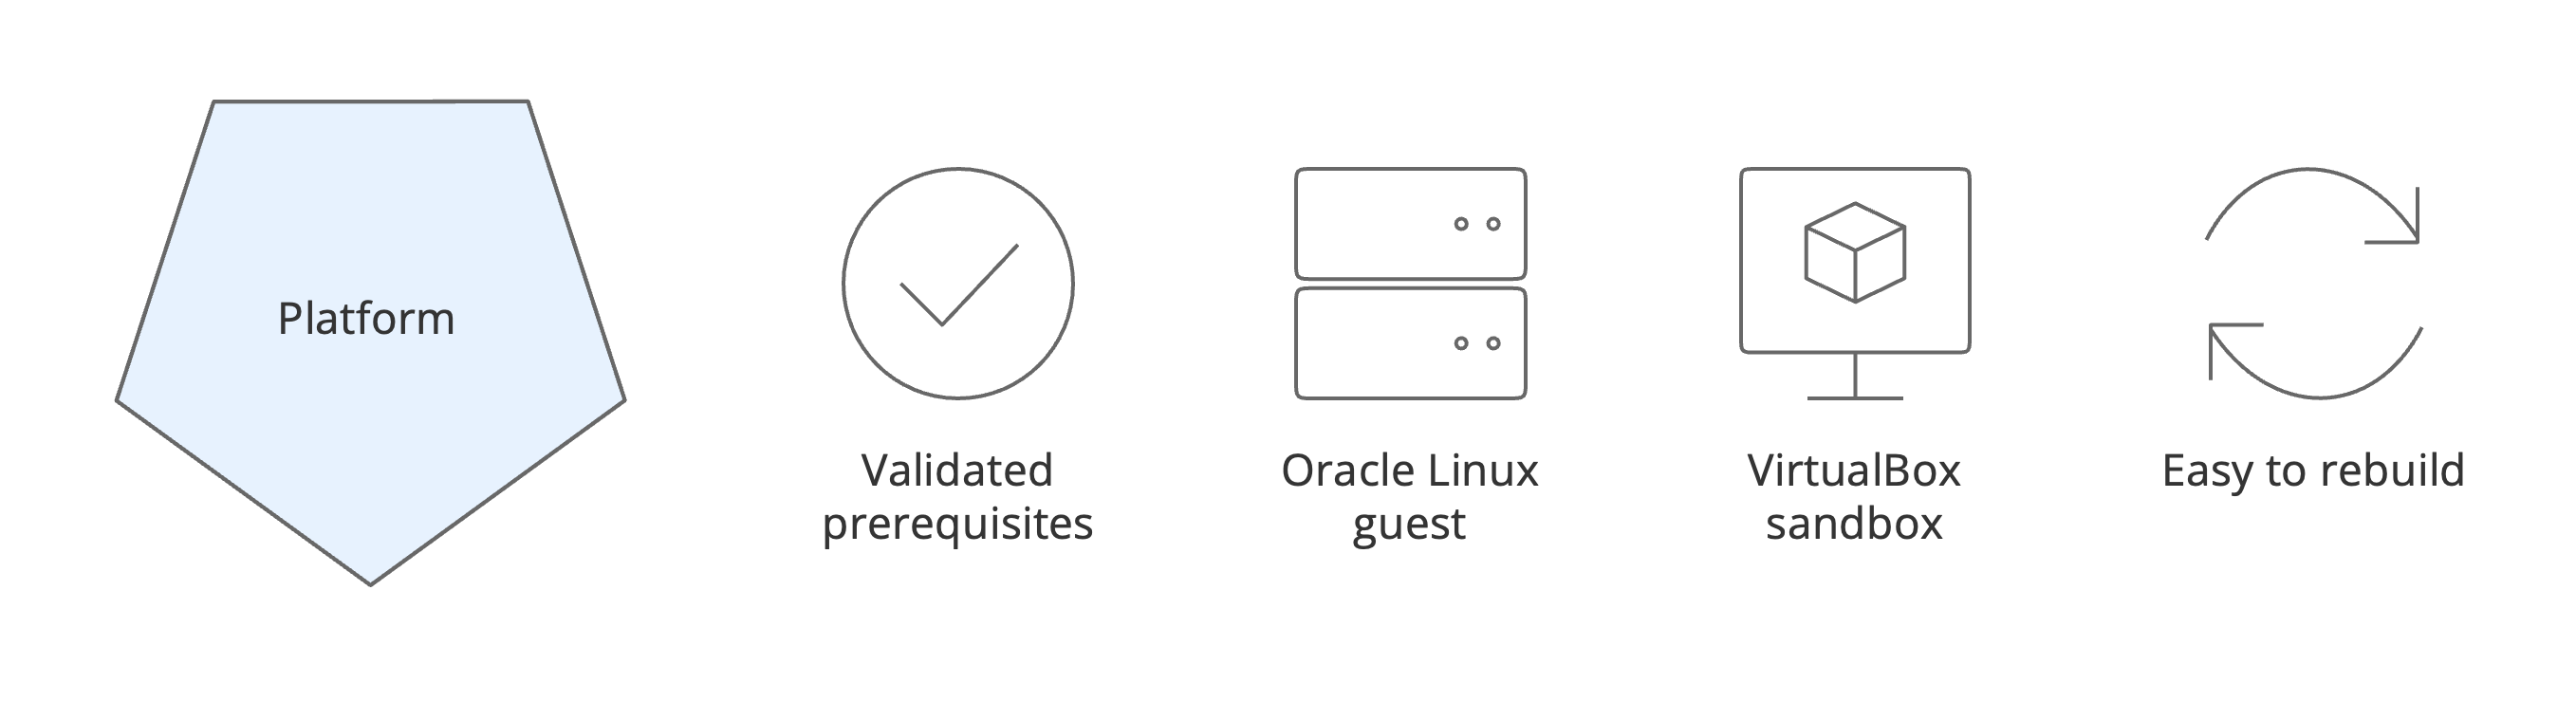
Exhibit 6: Platform – Reference Sandbox Platform
Validated prerequisites – The platform must satisfy the technical requirements of the selected Oracle Database (here Oracle Database 19c Enterprise Edition), i.e., operating system compatibility, processor and memory, storage, and network requirements.
Oracle Linux guest – Oracle Linux 7.9 provides the guest operating system for the reference sandbox. It offers a consistent Linux environment for Oracle Database installation, configuration, administration, and repeatable technical exercises.
VirtualBox sandbox – Oracle VirtualBox 7.1.6 provides the virtualization layer, allowing the sandbox to run as an isolated virtual machine on a compatible workstation.
Easy to rebuild – The virtual machine can be stopped, reset, or recreated using documented procedures. This enables repeatable exercises and allows the environment to be restored after experimentation.
The following sections explain the prerequisite checks and platform choices. Chapters 2 and 3 then install VirtualBox and Oracle Linux.
Technical Prerequisites for Oracle Database
The selected Oracle Database configuration determines the prerequisites for the sandbox platform. Select the operating system and virtualization layer based on those database requirements.
For this sandbox, the prerequisite check covers:
-
Certification of the Oracle Database 19c Release Update with the operating system release and kernel
-
Required packages, libraries, users, groups, kernel parameters, and resource limits
-
Minimum CPU, memory, storage, temporary space, file system, network, and hostname requirements
-
Compatibility with the selected CDB/PDB architecture and database capabilities
Validate the sandbox in detail as follows:
Certification and software prerequisites – Verify that the selected Oracle Database 19c Release Update is certified for the intended operating-system release and kernel. Confirm that all required operating system packages and libraries are available before installation.
Operating system configuration – Configure the Oracle operating-system users and groups required for the database installation, together with the applicable kernel parameters and resource limits.
Resource, network, and architecture requirements – Confirm that the sandbox provides sufficient processor, memory, storage, temporary space, and file system capacity, and that the network configuration, hostname resolution, CDB/PDB architecture, and selected database capabilities are compatible with the intended deployment.
Complete these checks before installation. Repeat the affected checks if the database Release Update, architecture, or required features change.
Operating System – Oracle Linux 7.9
Oracle Linux 7.9 is used because that operating system provides a validated OS for Oracle Database 19c. Retain this operating system to follow the installation steps in this guide exactly.
Adaptation – Keep or change the operating system only after confirming certification for the selected Oracle Database release and Release Update, kernel, and packages. For a new or persistent sandbox, prefer a currently supported Oracle Linux release and revalidate all installation prerequisites before deployment.
Virtualization Platform – Oracle VirtualBox 7.1.6
The reference build uses Oracle VirtualBox 7.1.6 so that the sandbox can run on a workstation (or a small physical or virtual server), remain isolated from production, and be easy to create, stop, snapshot, reset, and rebuild. It provides a simple Oracle Linux guest environment without introducing a separate server or virtualization infrastructure.
For this sandbox, VirtualBox provides controlled CPU, memory, storage, virtual networking, installation-media mounting, and snapshot capabilities. Host portability depends on supported host and guest combinations and on hardware architecture; the x86-64 Oracle Linux guest documented here requires a compatible x86-64 host.
The Oracle VirtualBox base package is sufficient for the procedures in this guide. Optional components governed by separate terms are not required for the reference sandbox and must be assessed before they are installed or used.
Adaptation – Move this sandbox to another virtualization platform only if it supports the selected guest operating system and host architecture and provides the CPU, memory, storage, networking, and media-handling capabilities required by the Oracle Database prerequisites. Adapting and revalidating the implementation steps for the replacement platform is mandatory.
Reference Architecture and Technology Stack
The reference sandbox architecture is intentionally straightforward:
-
Database: Oracle Database 19c Enterprise Edition
-
Guest operating system: Oracle Linux 7.9
-
Virtualization platform: Oracle VirtualBox 7.1.6, managing one virtual machine
-
Host: A compatible workstation or small server
The objective is to provide a compact, controlled environment for database exercises without requiring a dedicated database server.
The architecture consists of four layers: the host operating system, the virtualization platform, the guest operating system, and the Oracle Database engine.
Each layer has a specific role and must be compatible with the others. This layered approach separates the database environment from the underlying physical hardware and supports a consistent, reproducible installation.
The design starts with the database requirements. These determine the choice of guest operating system and the CPU, memory, and storage resources allocated to the virtual machine. The virtualization platform and host must then be checked for compatibility with the selected configuration. This sequence helps avoid installation issues caused by incompatible components or insufficient resources.
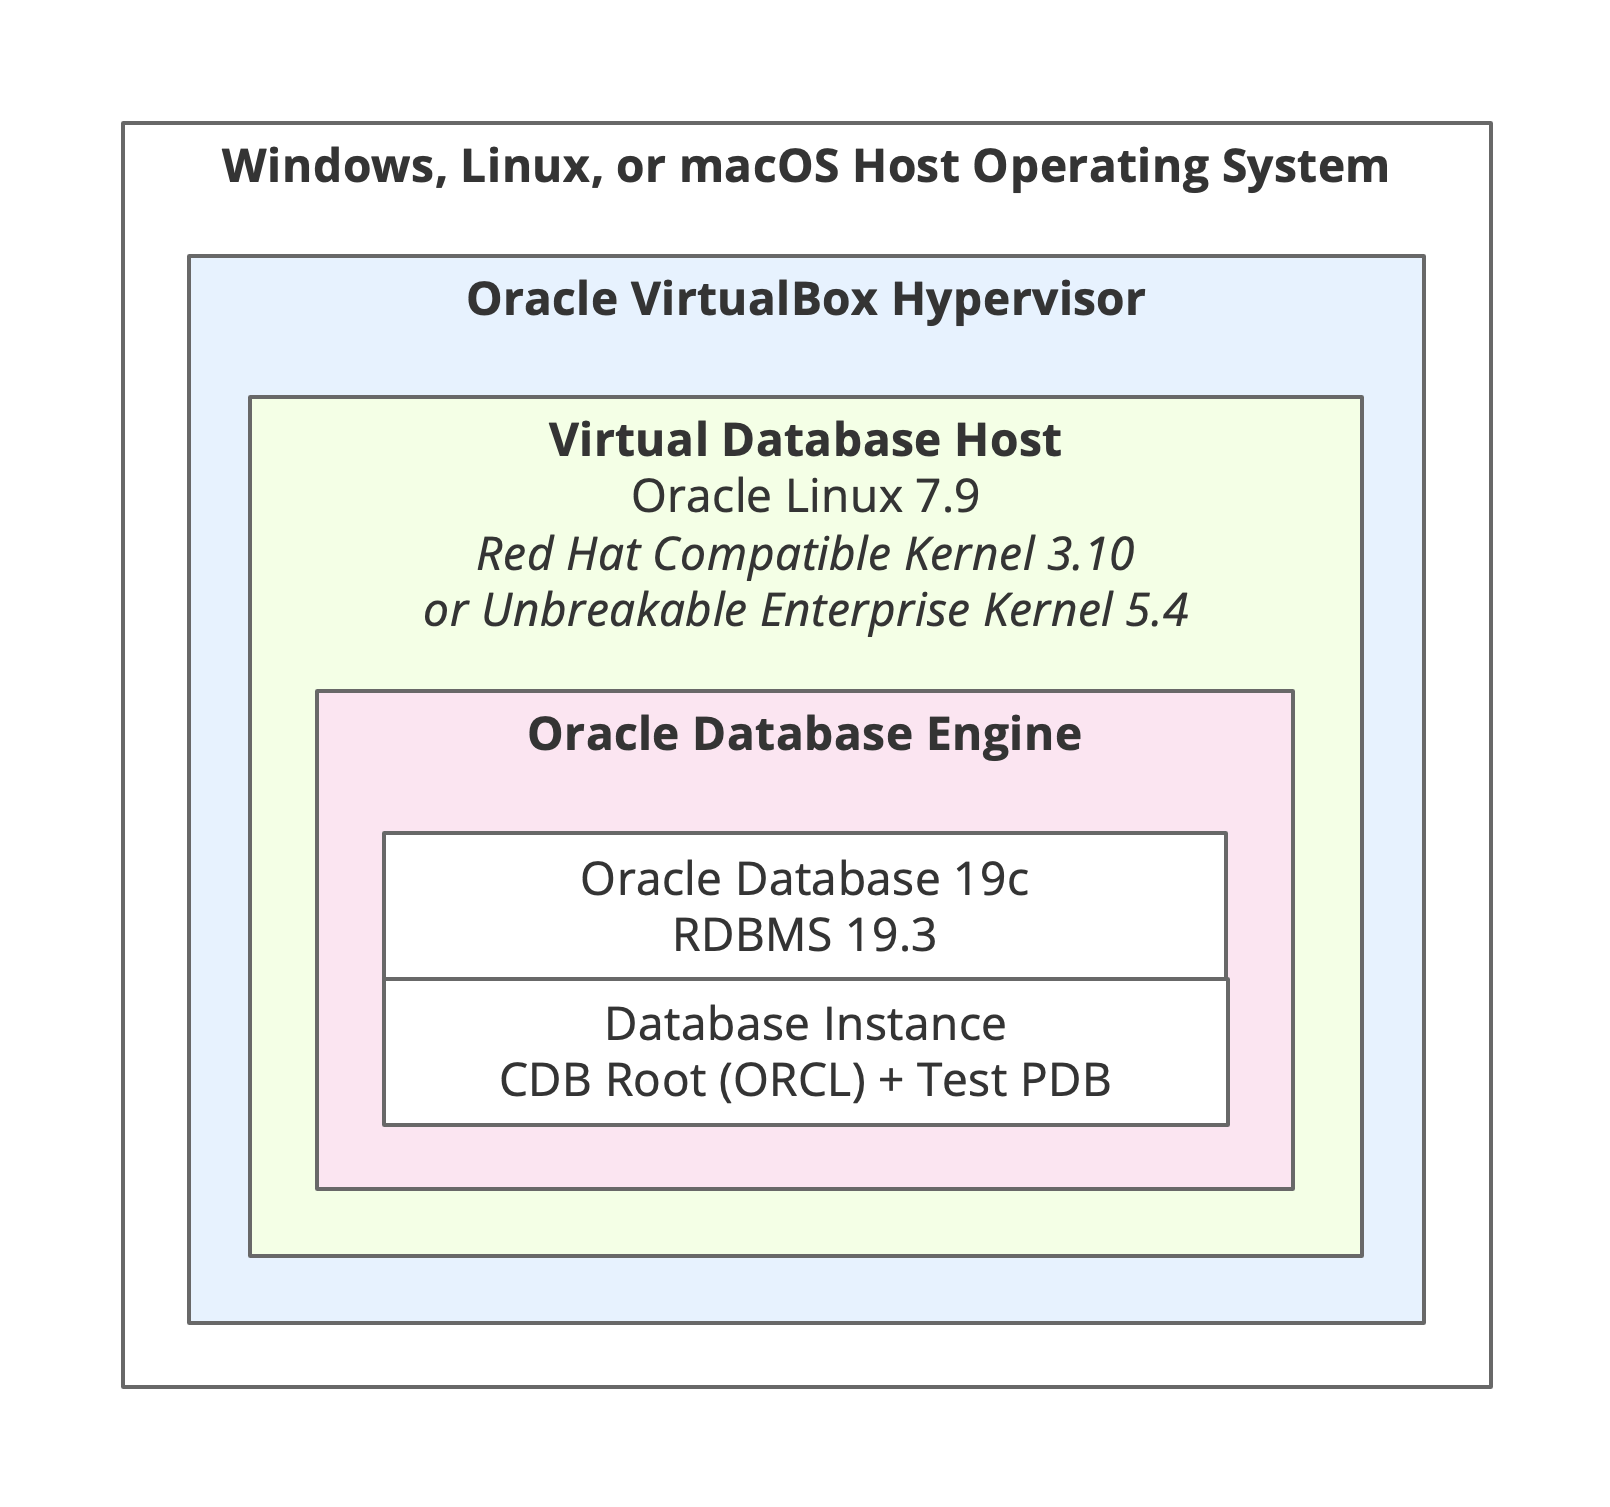
Exhibit 7: Sandbox Architecture – Reference Technology Stack
The single virtual machine contains the Oracle Linux operating system and the Oracle Database installation, while VirtualBox provides virtual CPU, memory, storage, and network interfaces. This arrangement simplifies environment management and allows the sandbox to be stopped, restored from a snapshot when available, or rebuilt using documented procedures.
The separation into layers also facilitates troubleshooting and future adaptations: Issues can be investigated at the appropriate level, from host resources and virtualization settings to operating system configuration and database operation.
Changes are also easier to deal with. When requirements change, the affected layer(s) can be reassessed and redesigned without redesigning the entire environment.
1.4. Growth – Resource Allocation, Resizing, and Sandbox Lifecycle
Once the platform is selected, decide how much CPU, memory, and storage the environment needs.
The four design guidelines below explain how to start with a small VM, increase resources when needed, protect the environment before making changes, and rebuild it when it is no longer needed.
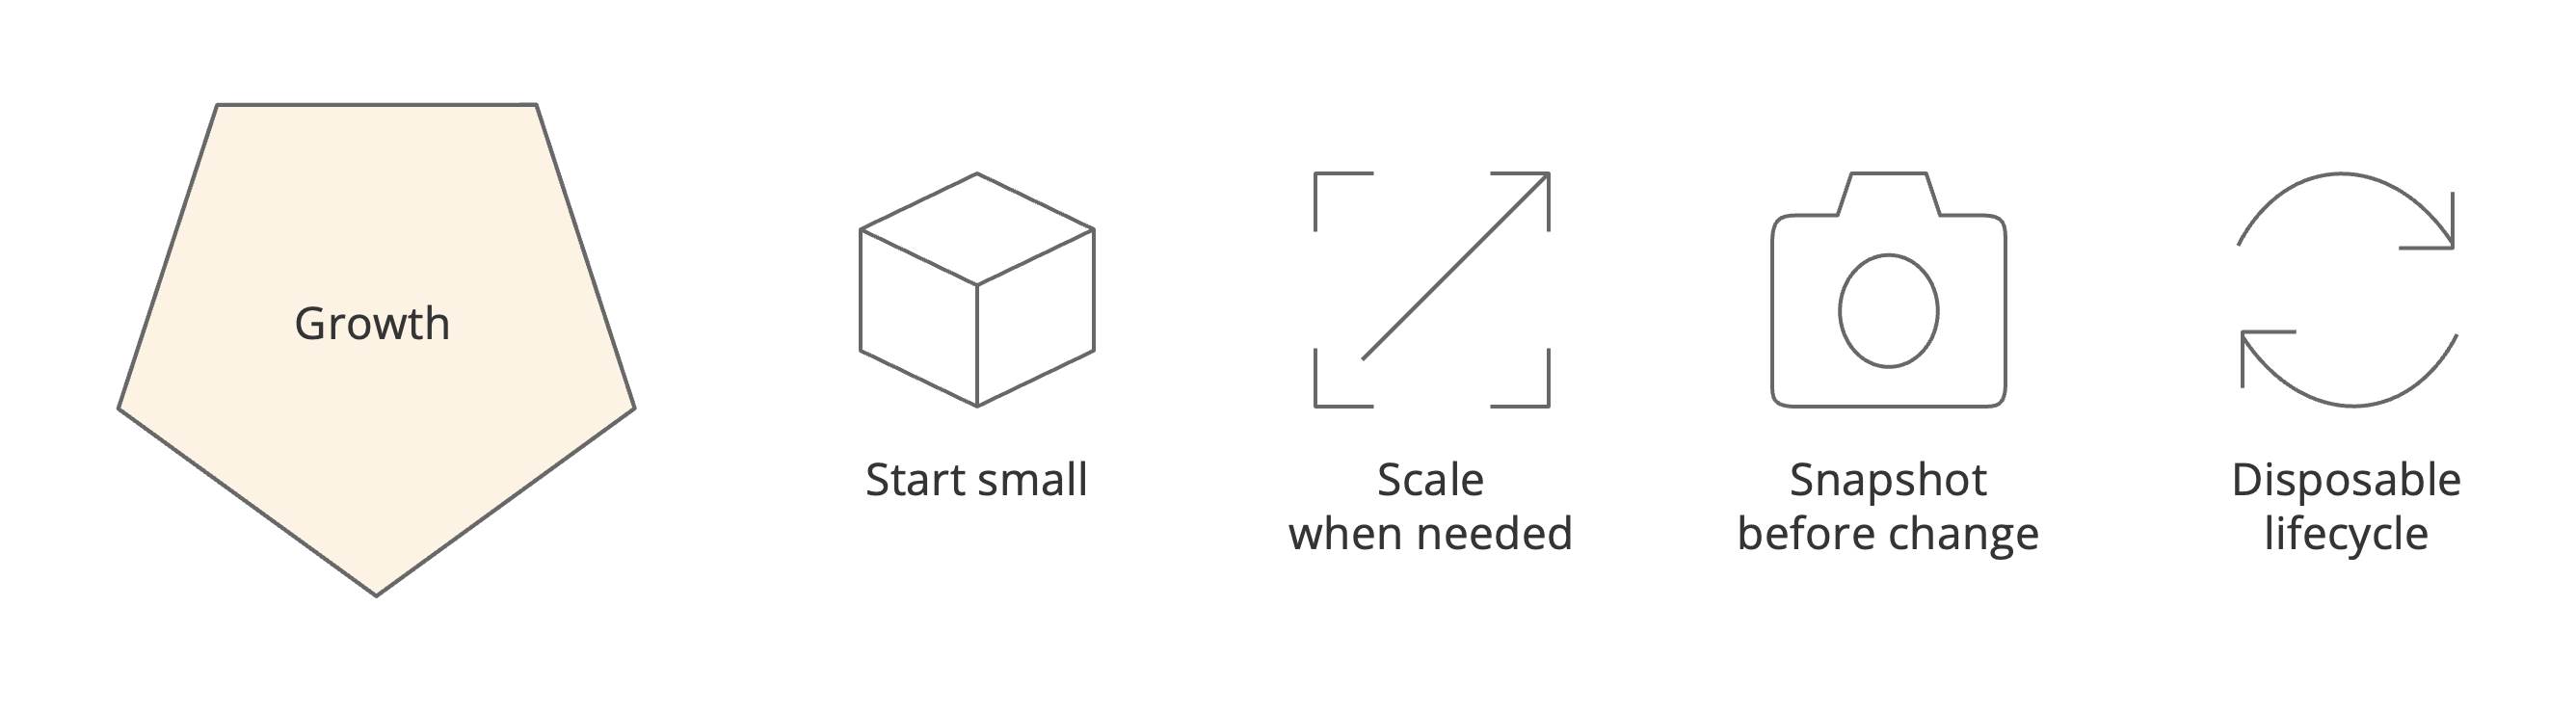
Exhibit 8: Growth – Resource and Lifecycle Principles
Start small – The sandbox begins with the minimum CPU, memory, and storage resources required for installation and initial exercises. This avoids unnecessary resource allocation while maintaining sufficient capacity for its intended activities.
Scale when needed – Increase resources when an exercise requires them. VirtualBox allows CPU and memory allocations to be modified easily. Creating a new sandbox should only be considered when the existing environment cannot be adapted to the new requirements.
Snapshot before change – Virtual machine snapshots provide recovery points before significant configuration changes, experiments, or software updates. They allow the sandbox to return to a known state if an exercise produces unexpected results.
Disposable lifecycle – The sandbox can be stopped, reset, decommissioned, or rebuilt when it is no longer needed. Documented procedures support a repeatable lifecycle without maintaining unnecessary infrastructure.
Keep a record of resource changes and the exercise that required them. After the exercise, return to the reference configuration or remove the VM if it is no longer needed.
Resource Allocation for the Sandbox
The reference virtual machine is intentionally kept small because it is a learning and experimentation sandbox, not a model of production capacity. It provides only the resources that meet the Oracle Database prerequisites and the exercises documented in this publication. There are no production workload expectations for that environment.
Resizing and Lifecycle Management
If an exercise requires more capacity, increase CPU, memory, or storage without changing the basic architecture, provided that the resulting configuration remains supported and the reason for the change is documented.
The environment is designed to be disposable. Snapshots may be created before significant configuration changes, and the complete virtual machine can be stopped, reset, rebuilt, or removed when it is no longer required.
Sandbox rule – Prefer resizing, snapshotting, resetting, or rebuilding the environment before introducing production-grade scalability, availability, or recovery mechanisms that are not part of the exercise.
1.5. Security – Production Isolation, Data Protection, and Access Controls
The final design decision covers data protection, user accounts, and network access.
The four design guidelines below explain how to keep the reference sandbox separate from production, use dedicated accounts, limit access, and restore the environment to a clean state when needed. The reference sandbox uses non-sensitive data and dedicated credentials and does not require any connection to production.
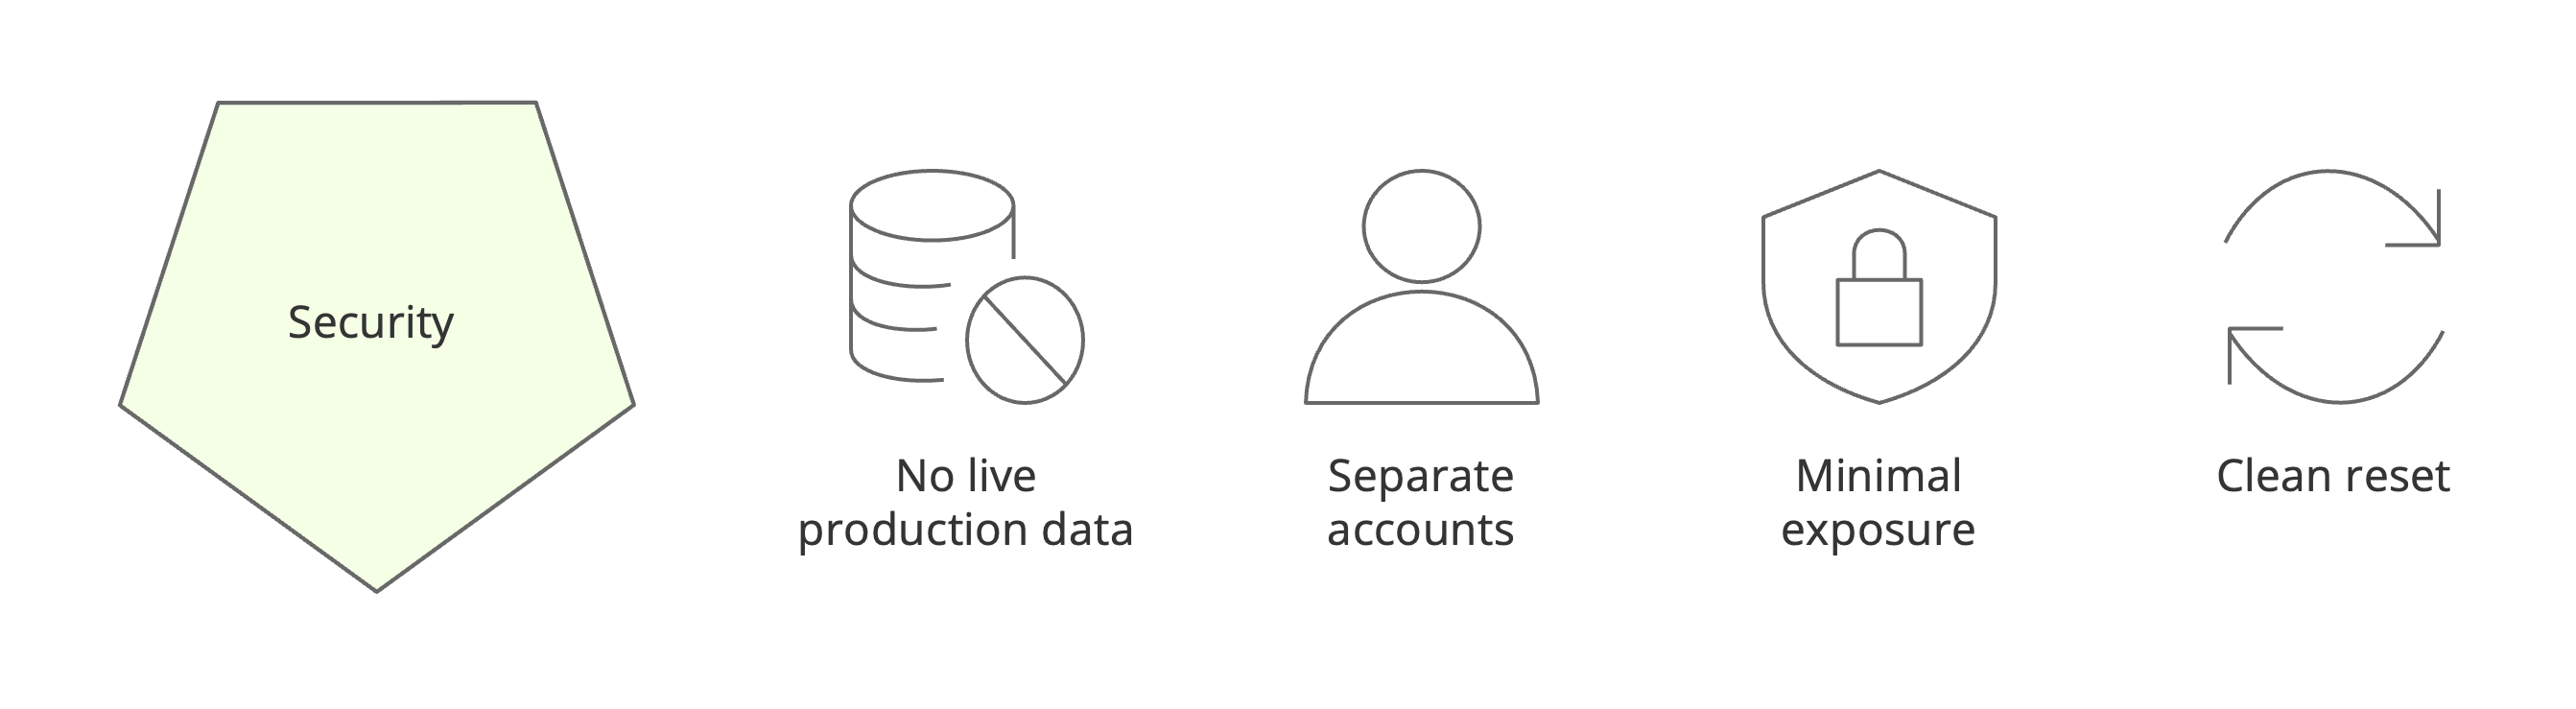
Exhibit 9: Security – Sandbox Security Principles
No live production data – The sandbox uses synthetic or approved non-sensitive datasets instead of live production data. This reduces confidentiality risks and avoids unnecessary exposure of operational information.
Separate accounts – Dedicated operating system and database accounts are used for sandbox activities. Production credentials are not reused, ensuring that experiments and administrative exercises remain independent of operational systems.
Minimal exposure – Network connectivity, user permissions, and enabled services are restricted to what the exercises require. Unnecessary external access and production connections are avoided to reduce the sandbox’s attack surface.
Clean reset – The sandbox can be reset or rebuilt after testing, removing temporary configurations, experimental data, and unnecessary software changes. This restores a controlled environment for subsequent exercises.
Production Isolation and Connectivity
The virtual machine contains the guest operating system and Oracle Database. It is logically separated from production and uses dedicated sandbox accounts, credentials, data, and network settings.
No production credentials, secrets, database connections, application connections, or live data feeds are required for the procedures described in this guide.
The environment may access the internet or approved internal repositories when software, packages, or updates must be downloaded. This access does not require connectivity to a production database or application.
Sandbox Data and Security Controls
The reference sandbox requires neither live production data nor connectivity to production systems.
-
Use synthetic data, or other data confirmed to be non-sensitive, for installation practice, demonstrations, learning activities, and software-inventory exercises. This keeps the sandbox useful without importing production-data handling obligations that the exercise does not need.
-
Use dedicated sandbox accounts and credentials. Do not reuse production accounts, passwords, or keys (no routes back to production).
The sandbox security baseline is practical: isolate the environment from production, use least-privilege access and dedicated credentials, expose only the services required by the exercise, keep the operating system and database securely configured and patched, retain data only as long as needed, and remove or reset the environment when the exercise is complete.
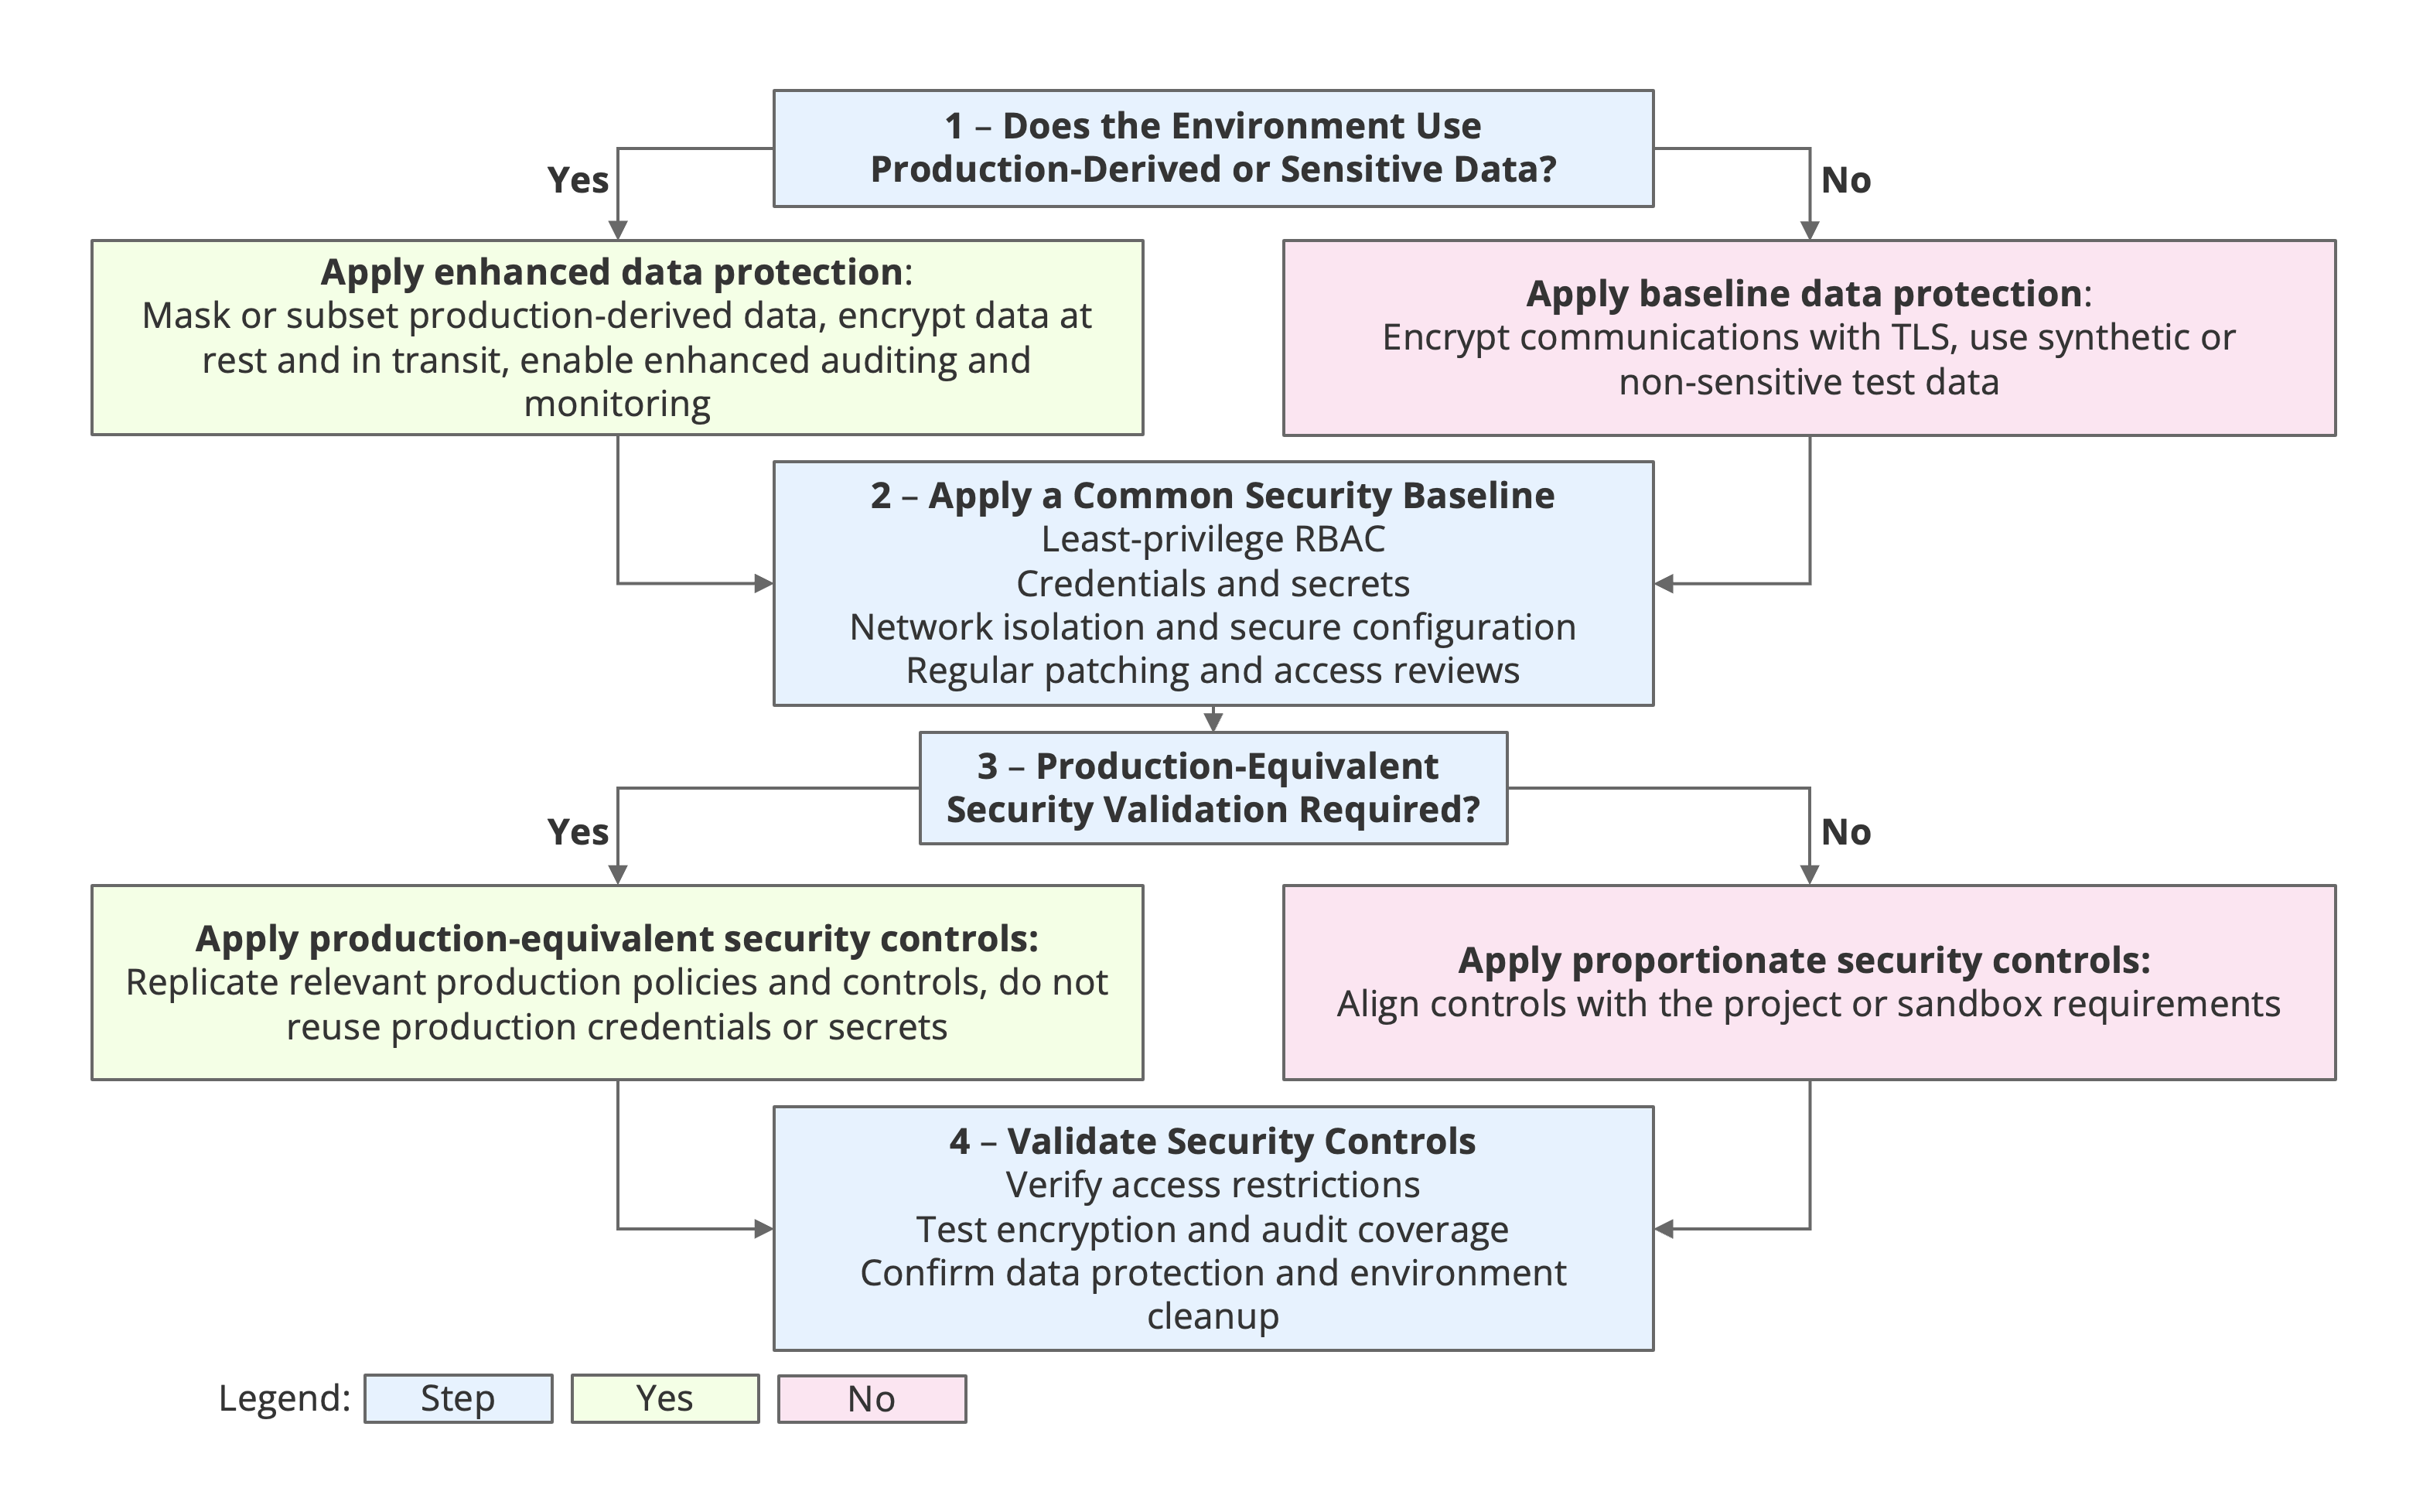
Exhibit 10: Security – Controls and Validation by Data Sensitivity
The reference sandbox follows the non-sensitive-data path in this diagram. Chapter 5 compares the controls needed for production replication, proof of concept, and DBA training.
Chapter Outcome
The reference design is now defined: one VM, operating system Oracle Linux 7.9, application Oracle Database 19c Enterprise Edition, one CDB, and one PDB. It uses non-sensitive data and separate accounts. Chapter 2 prepares the virtual machine for this build.
2. Set Up the Virtualization Environment
Chapter 1 defined the sandbox. This chapter prepares the virtual machine: install VirtualBox, download the Oracle Linux 7.9 ISO, and set the VM’s CPU, memory, disk, network, and boot options.
2.1. Download and Install VirtualBox
This section prepares the virtualization layer on the host workstation. It identifies the required VirtualBox package, installs the base hypervisor, and reviews the host components needed to run the reference virtual machine.
The procedure in this publication has been validated with Oracle VirtualBox 7.1.6. VirtualBox 7.1.6 is not the current release but remains available in the release archive [➜ Link reference #04, VirtualBox 7.1.6 Release Archive]. Use a more recent supported release for a new, long-lived production environment. For an overview of the platform and its main components, consult the VirtualBox introduction [➜ Link reference #05, VirtualBox Introduction].
Note: The reference links are listed in the Link References file in folder 05_External_Links (refer to the downloadable publication package, chapter 7).
The steps in this section are:
Step 1 – Download the VirtualBox Platform Packages
Step 2 – Install the VirtualBox Platform Base Package
Step 3 – Use of Additional System Components
Step 1 – Download the VirtualBox Platform Packages
Access the official Oracle VirtualBox website and open the download page [➜ Link reference #06, VirtualBox download page]. Identify the installation package corresponding to the host operating system and verify that the selected version is compatible with the reference sandbox configuration.
This guide uses Oracle VirtualBox 7.1.6. Download the installation package for this release to follow the installation instructions in this guide exactly. If the reference version is no longer displayed on the main download page, consult the official VirtualBox archive for previous releases.
Before downloading, review the VirtualBox user guide [➜ Link reference #07, VirtualBox user guide] and the installation instructions [➜ Link reference #08, VirtualBox installation instructions]. Pay attention to supported host operating systems, processor architecture, and hardware virtualization requirements.
Download the VirtualBox installation package and save it in an identified local folder. Keep the installation file available throughout the sandbox setup so that the same version can be reinstalled if the environment needs to be rebuilt.
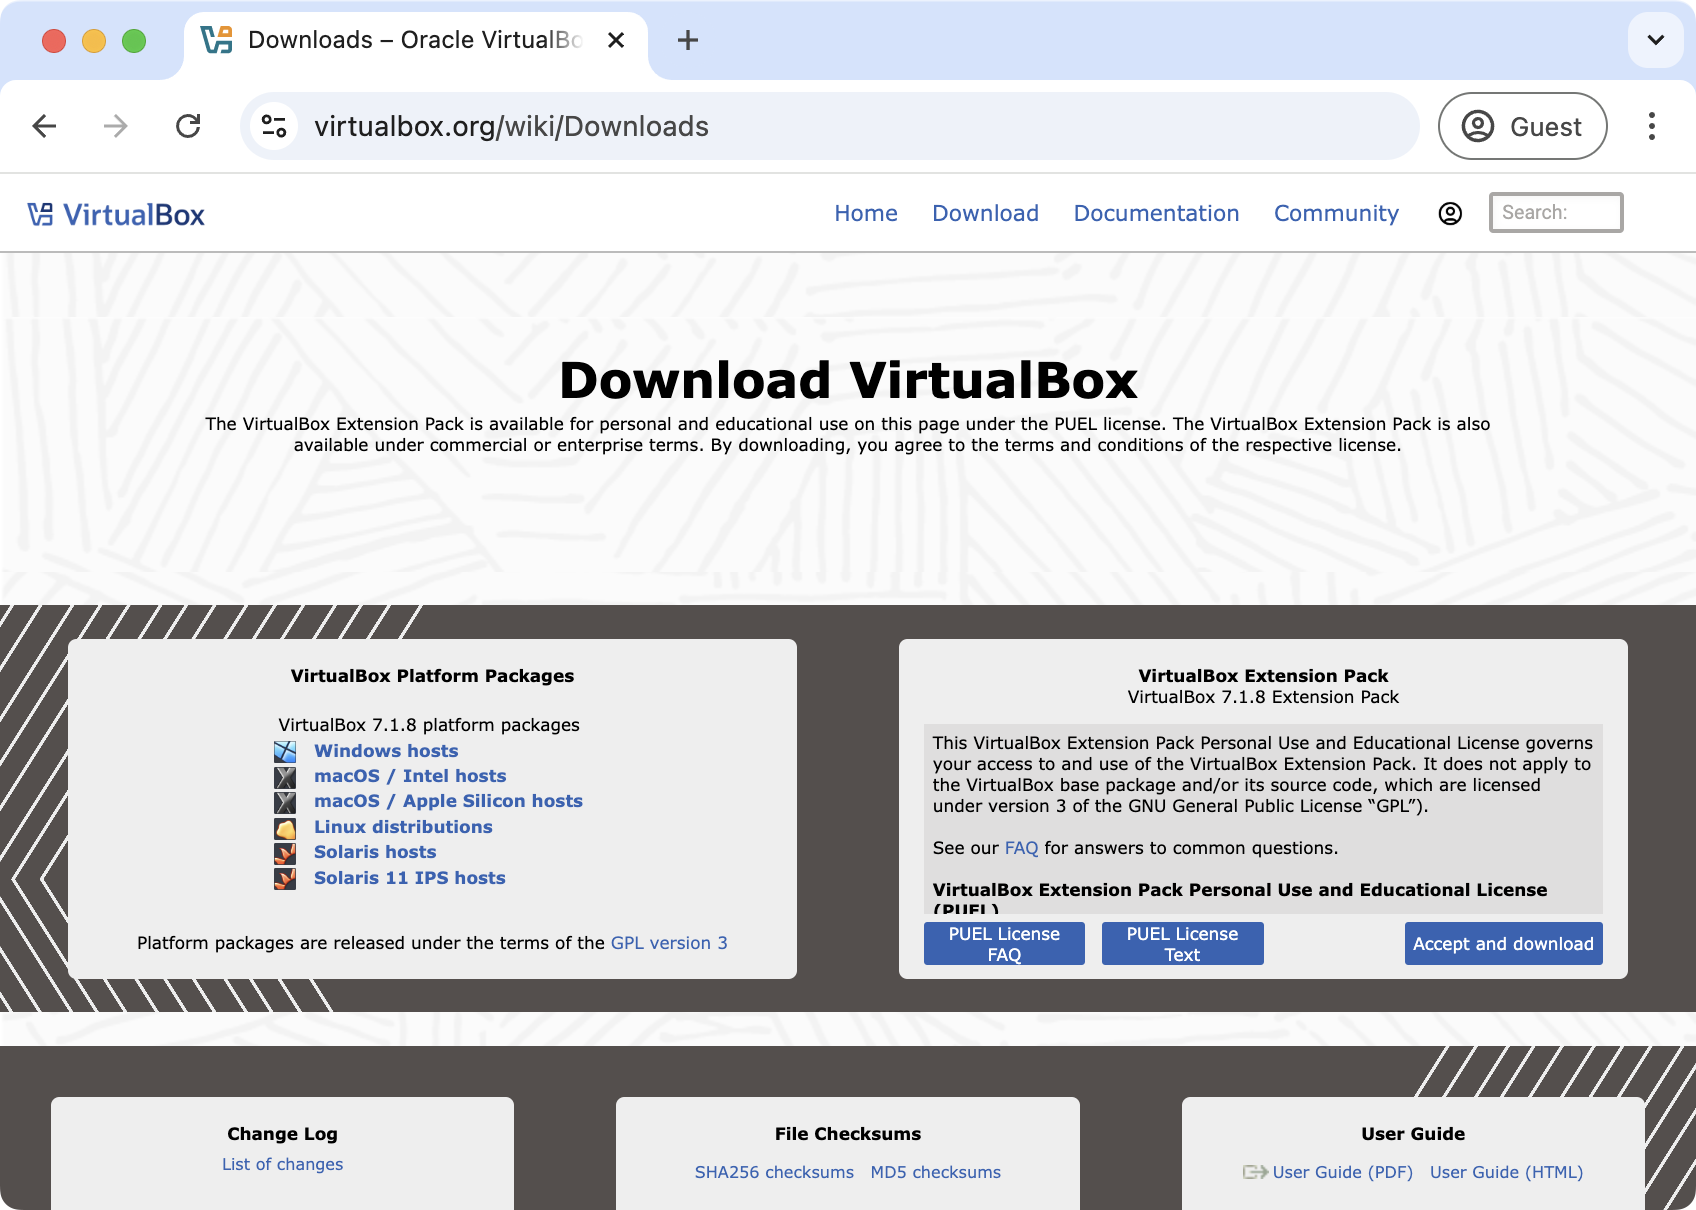
Exhibit 11: VirtualBox – Download VirtualBox
VirtualBox consists of the GPLv3-licensed base package, optional Guest Additions for the guest operating system, and an optional Extension Pack governed by separate terms.
Only the Oracle VirtualBox base package is required for this procedure. This package is open-source software distributed under the GNU General Public License version 3 (GPLv3). It includes the core virtualization platform, essential guest support, and basic functionality.
The VirtualBox Extension Pack is optional and adds advanced capabilities to the base package: among others, support for USB 2.0 and 3.0 devices, disk encryption, VirtualBox Remote Desktop Protocol (VRDP), and PXE boot for Intel network cards. The VirtualBox Extension Pack is governed by terms separate from the GPLv3 base package. VirtualBox 7.1 removed the evaluation option from the Extension Pack’s PUEL download; evaluation requires the appropriate distribution from Oracle Software Delivery Cloud. Before installing it for organizational use, check the applicable Oracle entitlement. The reference sandbox does not require the Extension Pack.
The VirtualBox Guest Additions are a set of drivers and utilities installed within the virtual machine to enhance performance and usability. These features include seamless mouse integration, shared folders, and improved display handling. Guest Additions are distributed under the GPLv3 license, just like the base package, and may be modified and redistributed in accordance with the same terms.
Select the platform package that matches the host workstation.
|
Version
|
7.1.6
|
|
Platform Package
|
macOS / Intel hosts
|
|
Package file
|
VirtualBox-7.1.6-167084-OSX.dmg
|
|
Package size
|
156.4 MB
|
Exhibit 12: VirtualBox – Select the Platform Package
Step 2 – Install the VirtualBox Platform Base Package
Locate the downloaded Oracle VirtualBox 7.1.6 installation package corresponding to the host operating system. Before starting the installation, verify that the package matches the host platform and that the necessary permissions are available to install software and configure virtualization components.
Run the installer and follow the instructions displayed by the installation wizard. The installation process may require administrator privileges and permission to install virtual networking components or device drivers, depending on the host operating system.
The VirtualBox user guide (UserManual.pdf) is available with the installation documentation and can also be accessed online as a PDF [➜ Link reference #09, VirtualBox 7.1 User Manual PDF]. Consult the guide if additional information about installation options or host-specific requirements is needed.
Note: The reference links are listed in the Link References file in folder 05_External_Links (refer to the downloadable publication package, chapter 7).
Launch the installer.
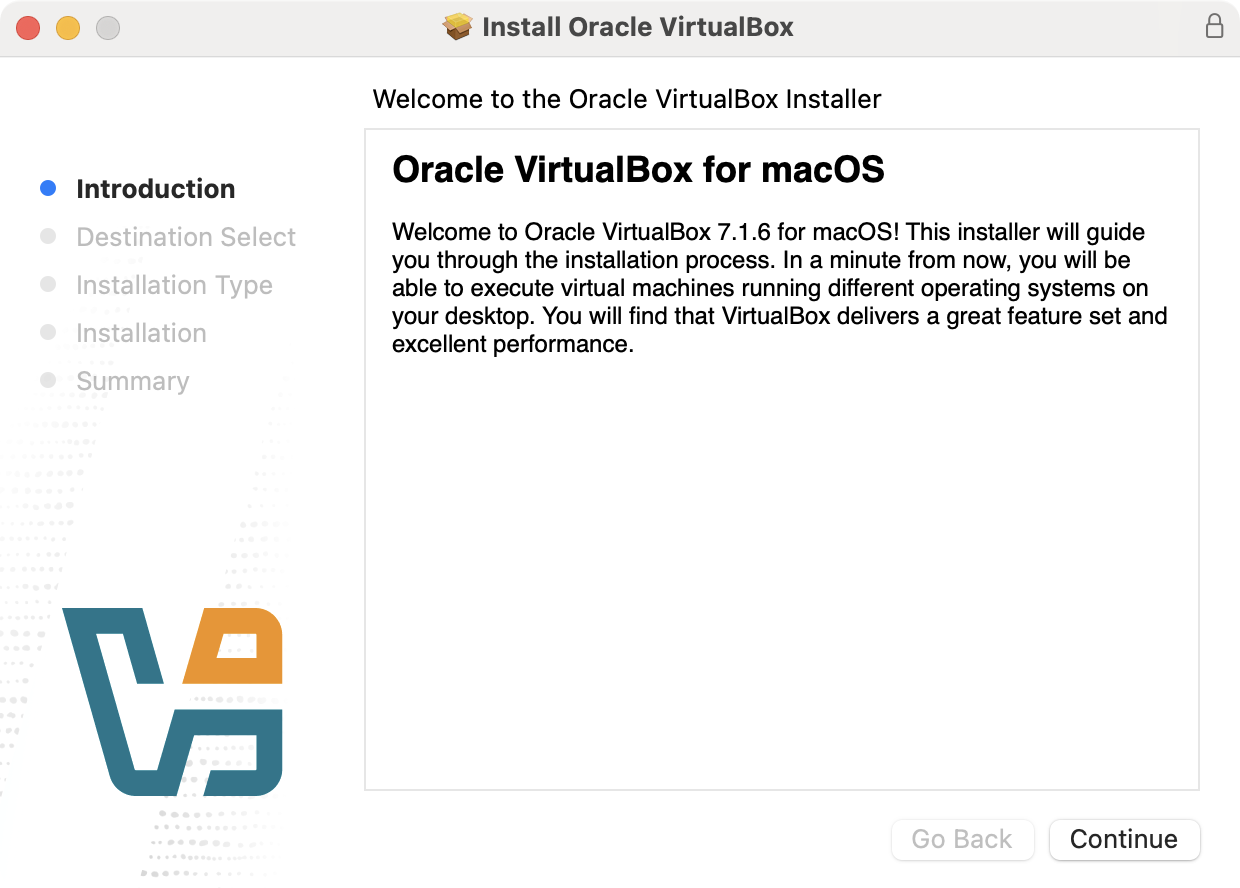
Exhibit 13: VirtualBox Installer – Launch the Installer
Select Continue.
Select the installation mode (all users, current user, or specific disk).
The available installation options depend on the host operating system, user permissions, and system configuration. For the reference macOS workstation, select Install for all users of this computer to make VirtualBox available to all local user accounts. Other installation options may be unavailable or restricted by the system. Before proceeding, verify that the selected destination has sufficient free disk space and that the required administrator privileges are available.
The reference procedure in this guide uses the default installation destination.
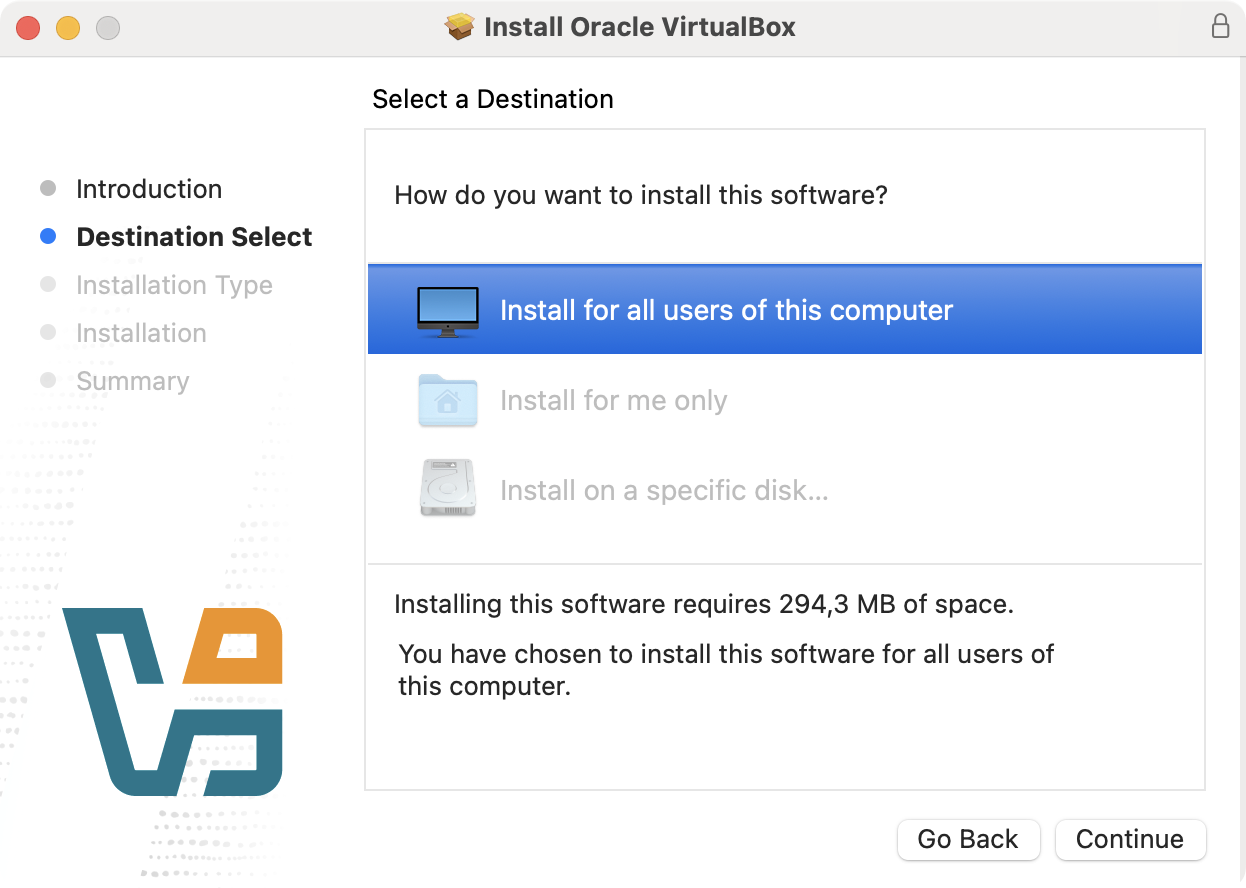
Exhibit 14: VirtualBox Installer – Select the Installation Destination
Select Continue. Select the installation type.
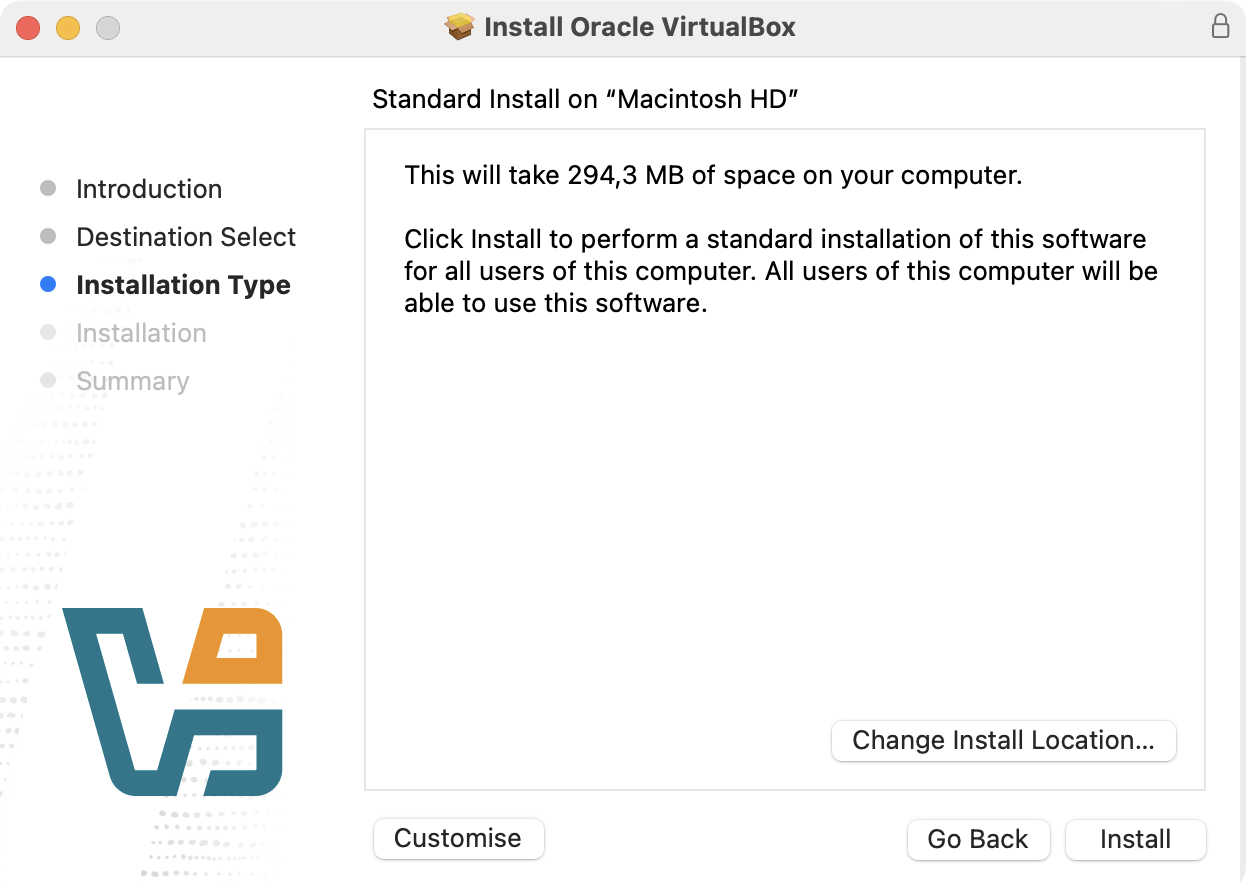
Exhibit 15: VirtualBox Installer – Review the Default Installation Type
Selecting the Customize button in the previous window displays additional configuration options. Select Standard Install to return to the previous window.
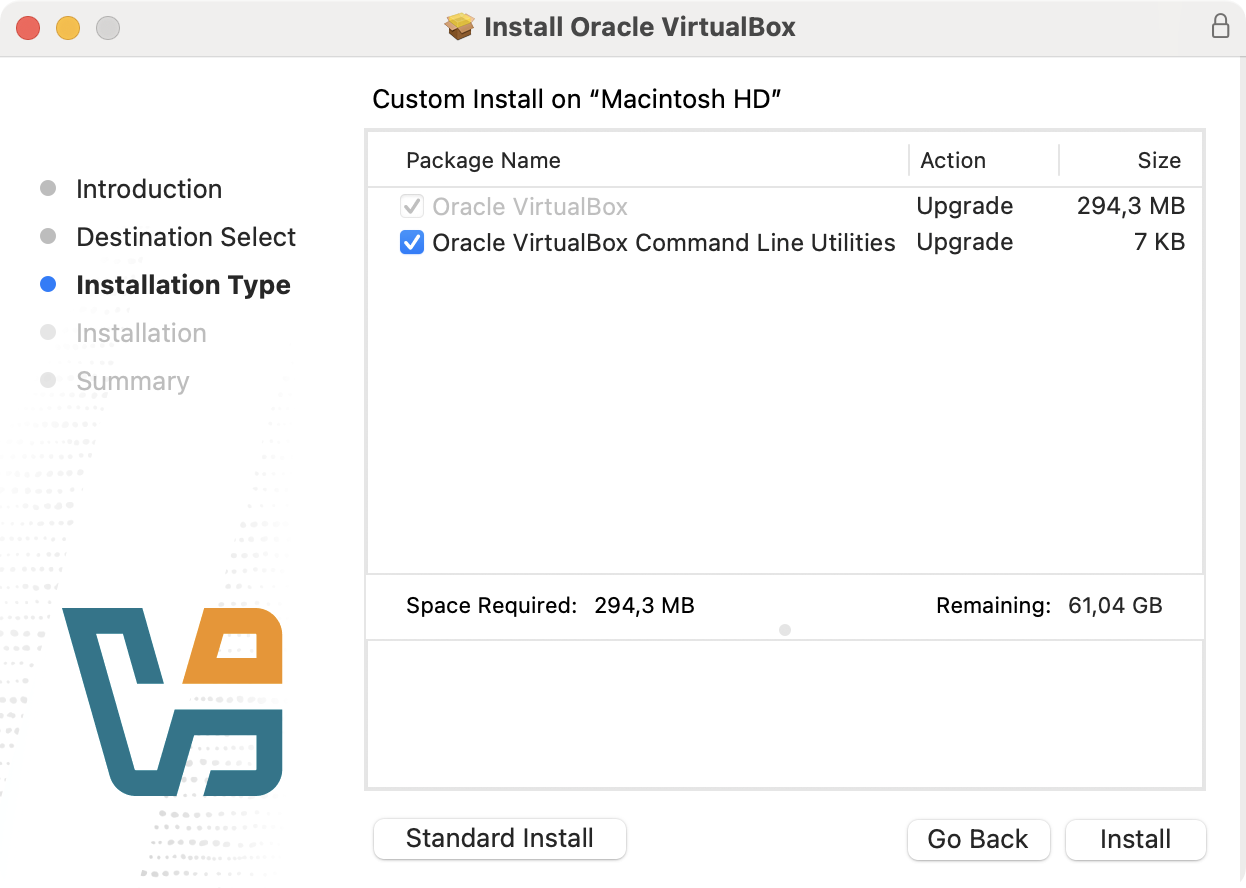
Exhibit 16: VirtualBox Installer – Review Custom Installation Options
Select Install in either the Standard Installation or Custom Installation window.
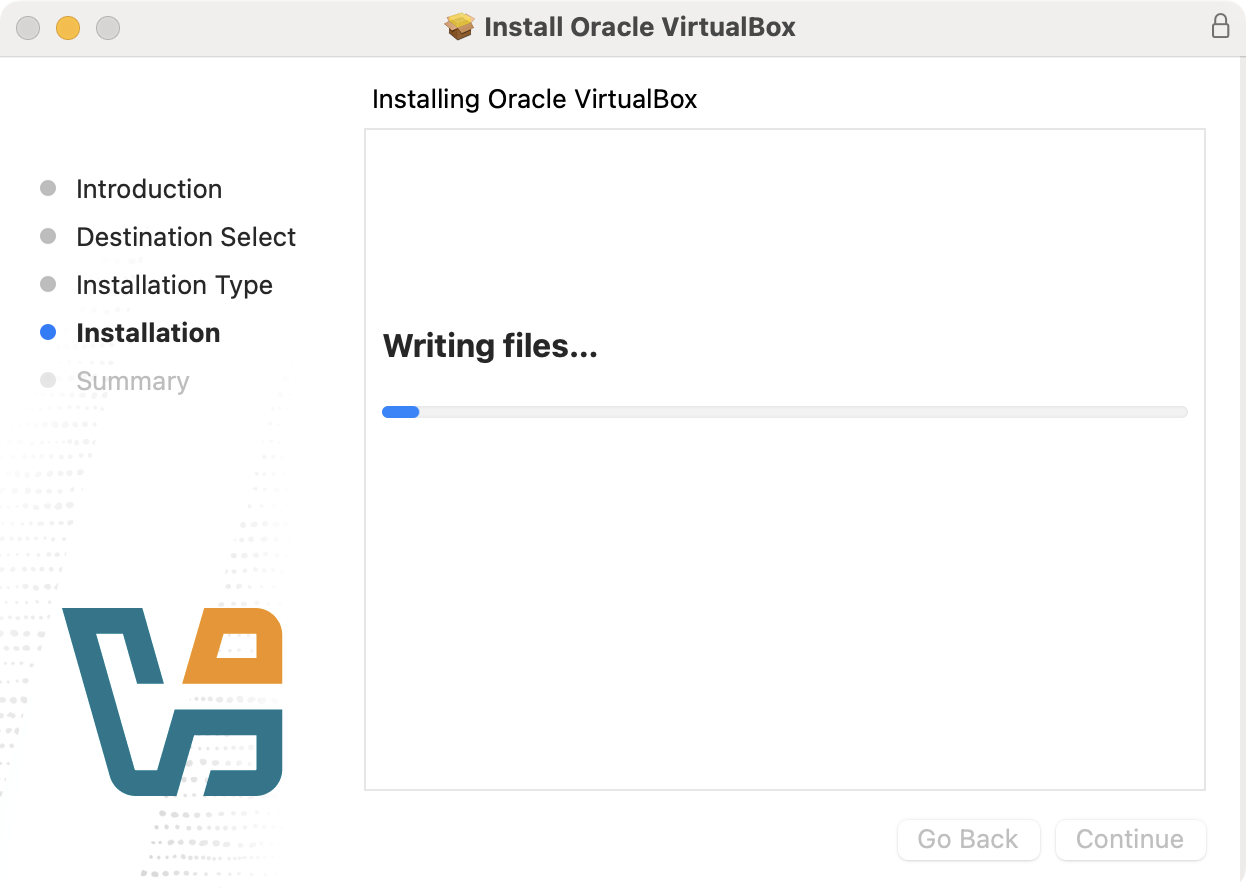
Exhibit 17: VirtualBox Installer – Install VirtualBox
Wait for the installation to complete.
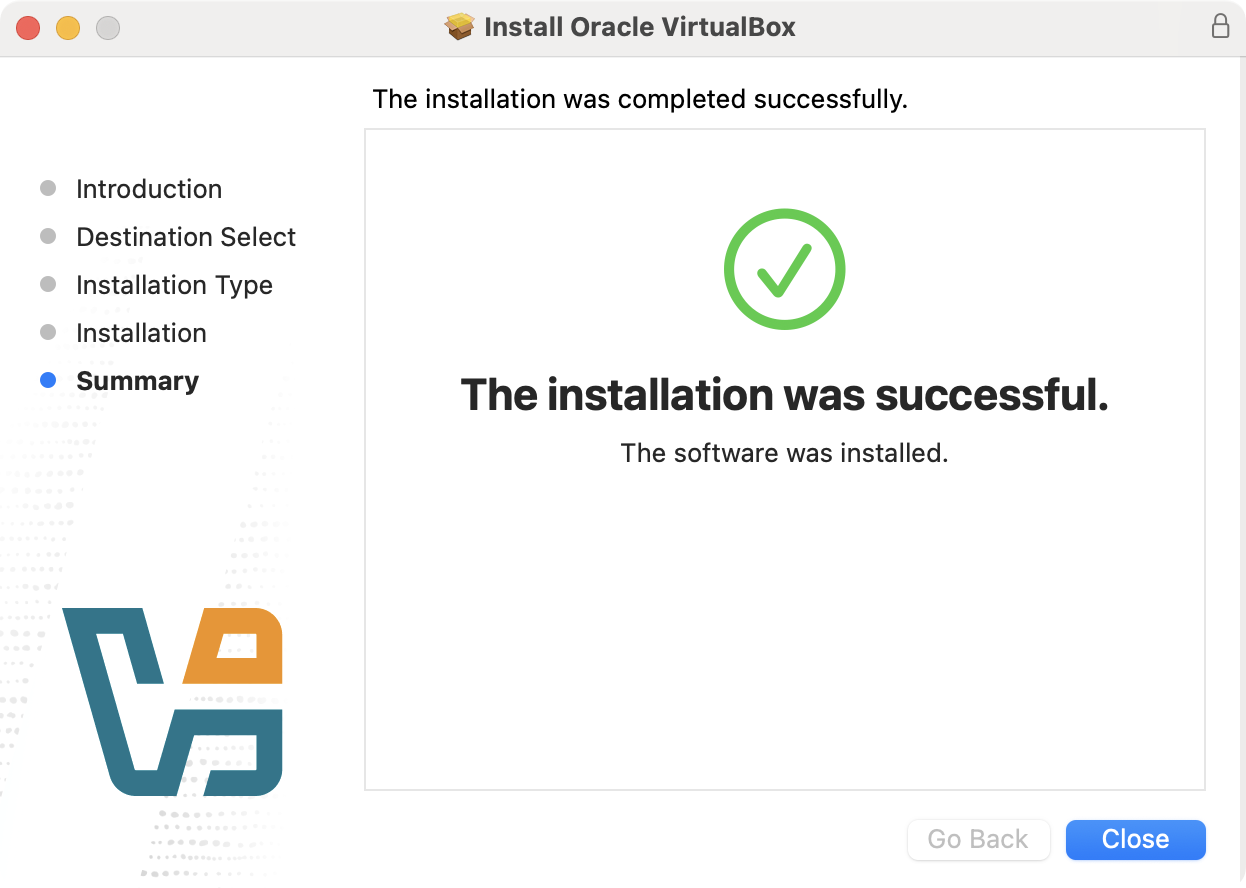
Exhibit 18: VirtualBox Installer – Complete the Installation
VirtualBox is now installed on the host system.
Step 3 – Use of Additional System Components
At first launch, VirtualBox may request permission to install additional system components.
These components handle host integration and startup tasks for virtualization, networking, and system-level integration.
Disabling these components may require changes to system settings and permissions and may involve knowledge of permissions and configuration files on the target server or workstation.
For regular VirtualBox use, keep the required login item and system extension enabled, as they are essential for hypervisor and virtual machine performance. For occasional use, they can be disabled, but some services may then need to be started manually before a virtual machine can run.
Section Outcome
VirtualBox is installed and its required host components are enabled. Next, download the Oracle Linux ISO for the guest operating system.
2.2. Get Oracle Linux Installation Media
Download the Oracle Linux 7.9 installation ISO from an official Oracle source and verify (checksum) the downloaded file before attaching it to the virtual machine. This ISO contains the operating system installation files required to build the reference sandbox environment.
The step in this section is:
Step 1 – Get the Installation Media
Step 1 – Get the Installation Media
This procedure uses Oracle Linux 7.9 installation media available through the Oracle website [➜ Link reference #10, Oracle Website] and the Oracle Linux download site [➜ Link reference #11, Oracle Linux Product Page].
Note: The reference links are listed in the Link References file in folder 05_External_Links (refer to the downloadable publication package, chapter 7).
Locate the Oracle Linux 7.9 installation image for the x86-64 architecture. Select the full installation ISO rather than a minimal installation image. Download the ISO file to a local folder on the host workstation and verify its integrity (SHA-256 checksum). Keep the verified ISO available for mounting as a virtual optical disk when configuring the VirtualBox virtual machine.
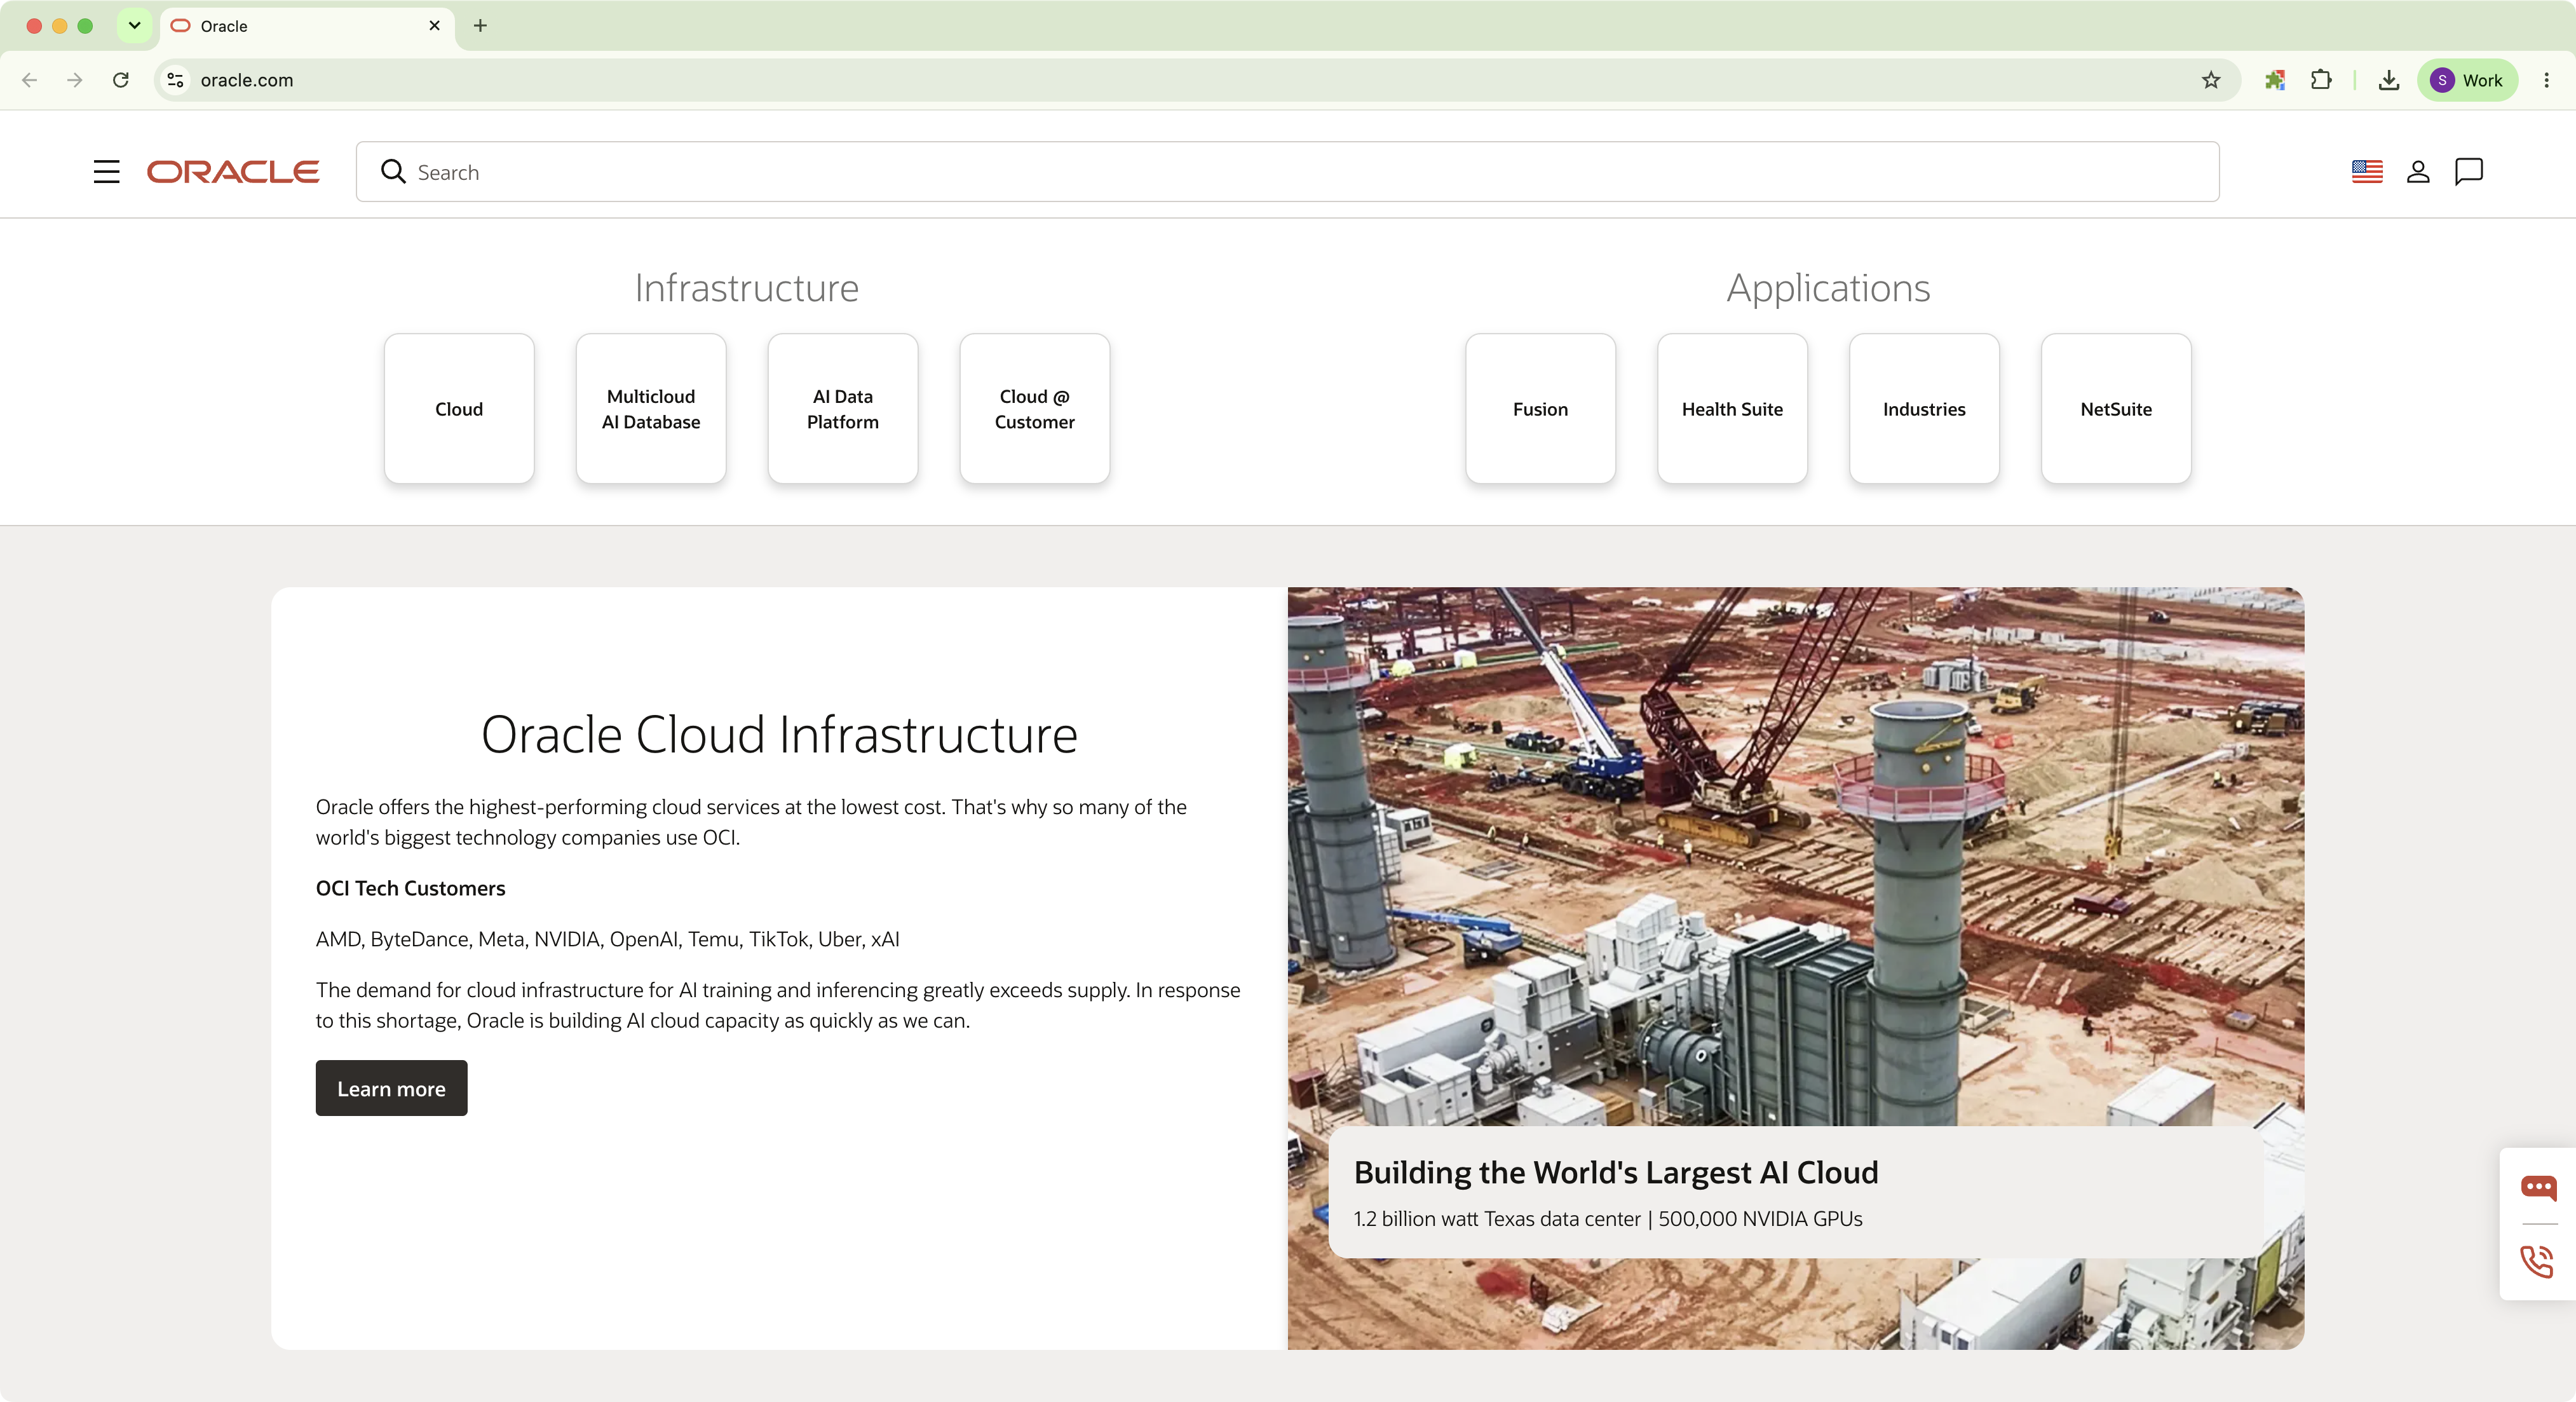
Exhibit 19: Oracle Website – Open the Oracle Website
Go to the Hardware and Software section and choose Linux.
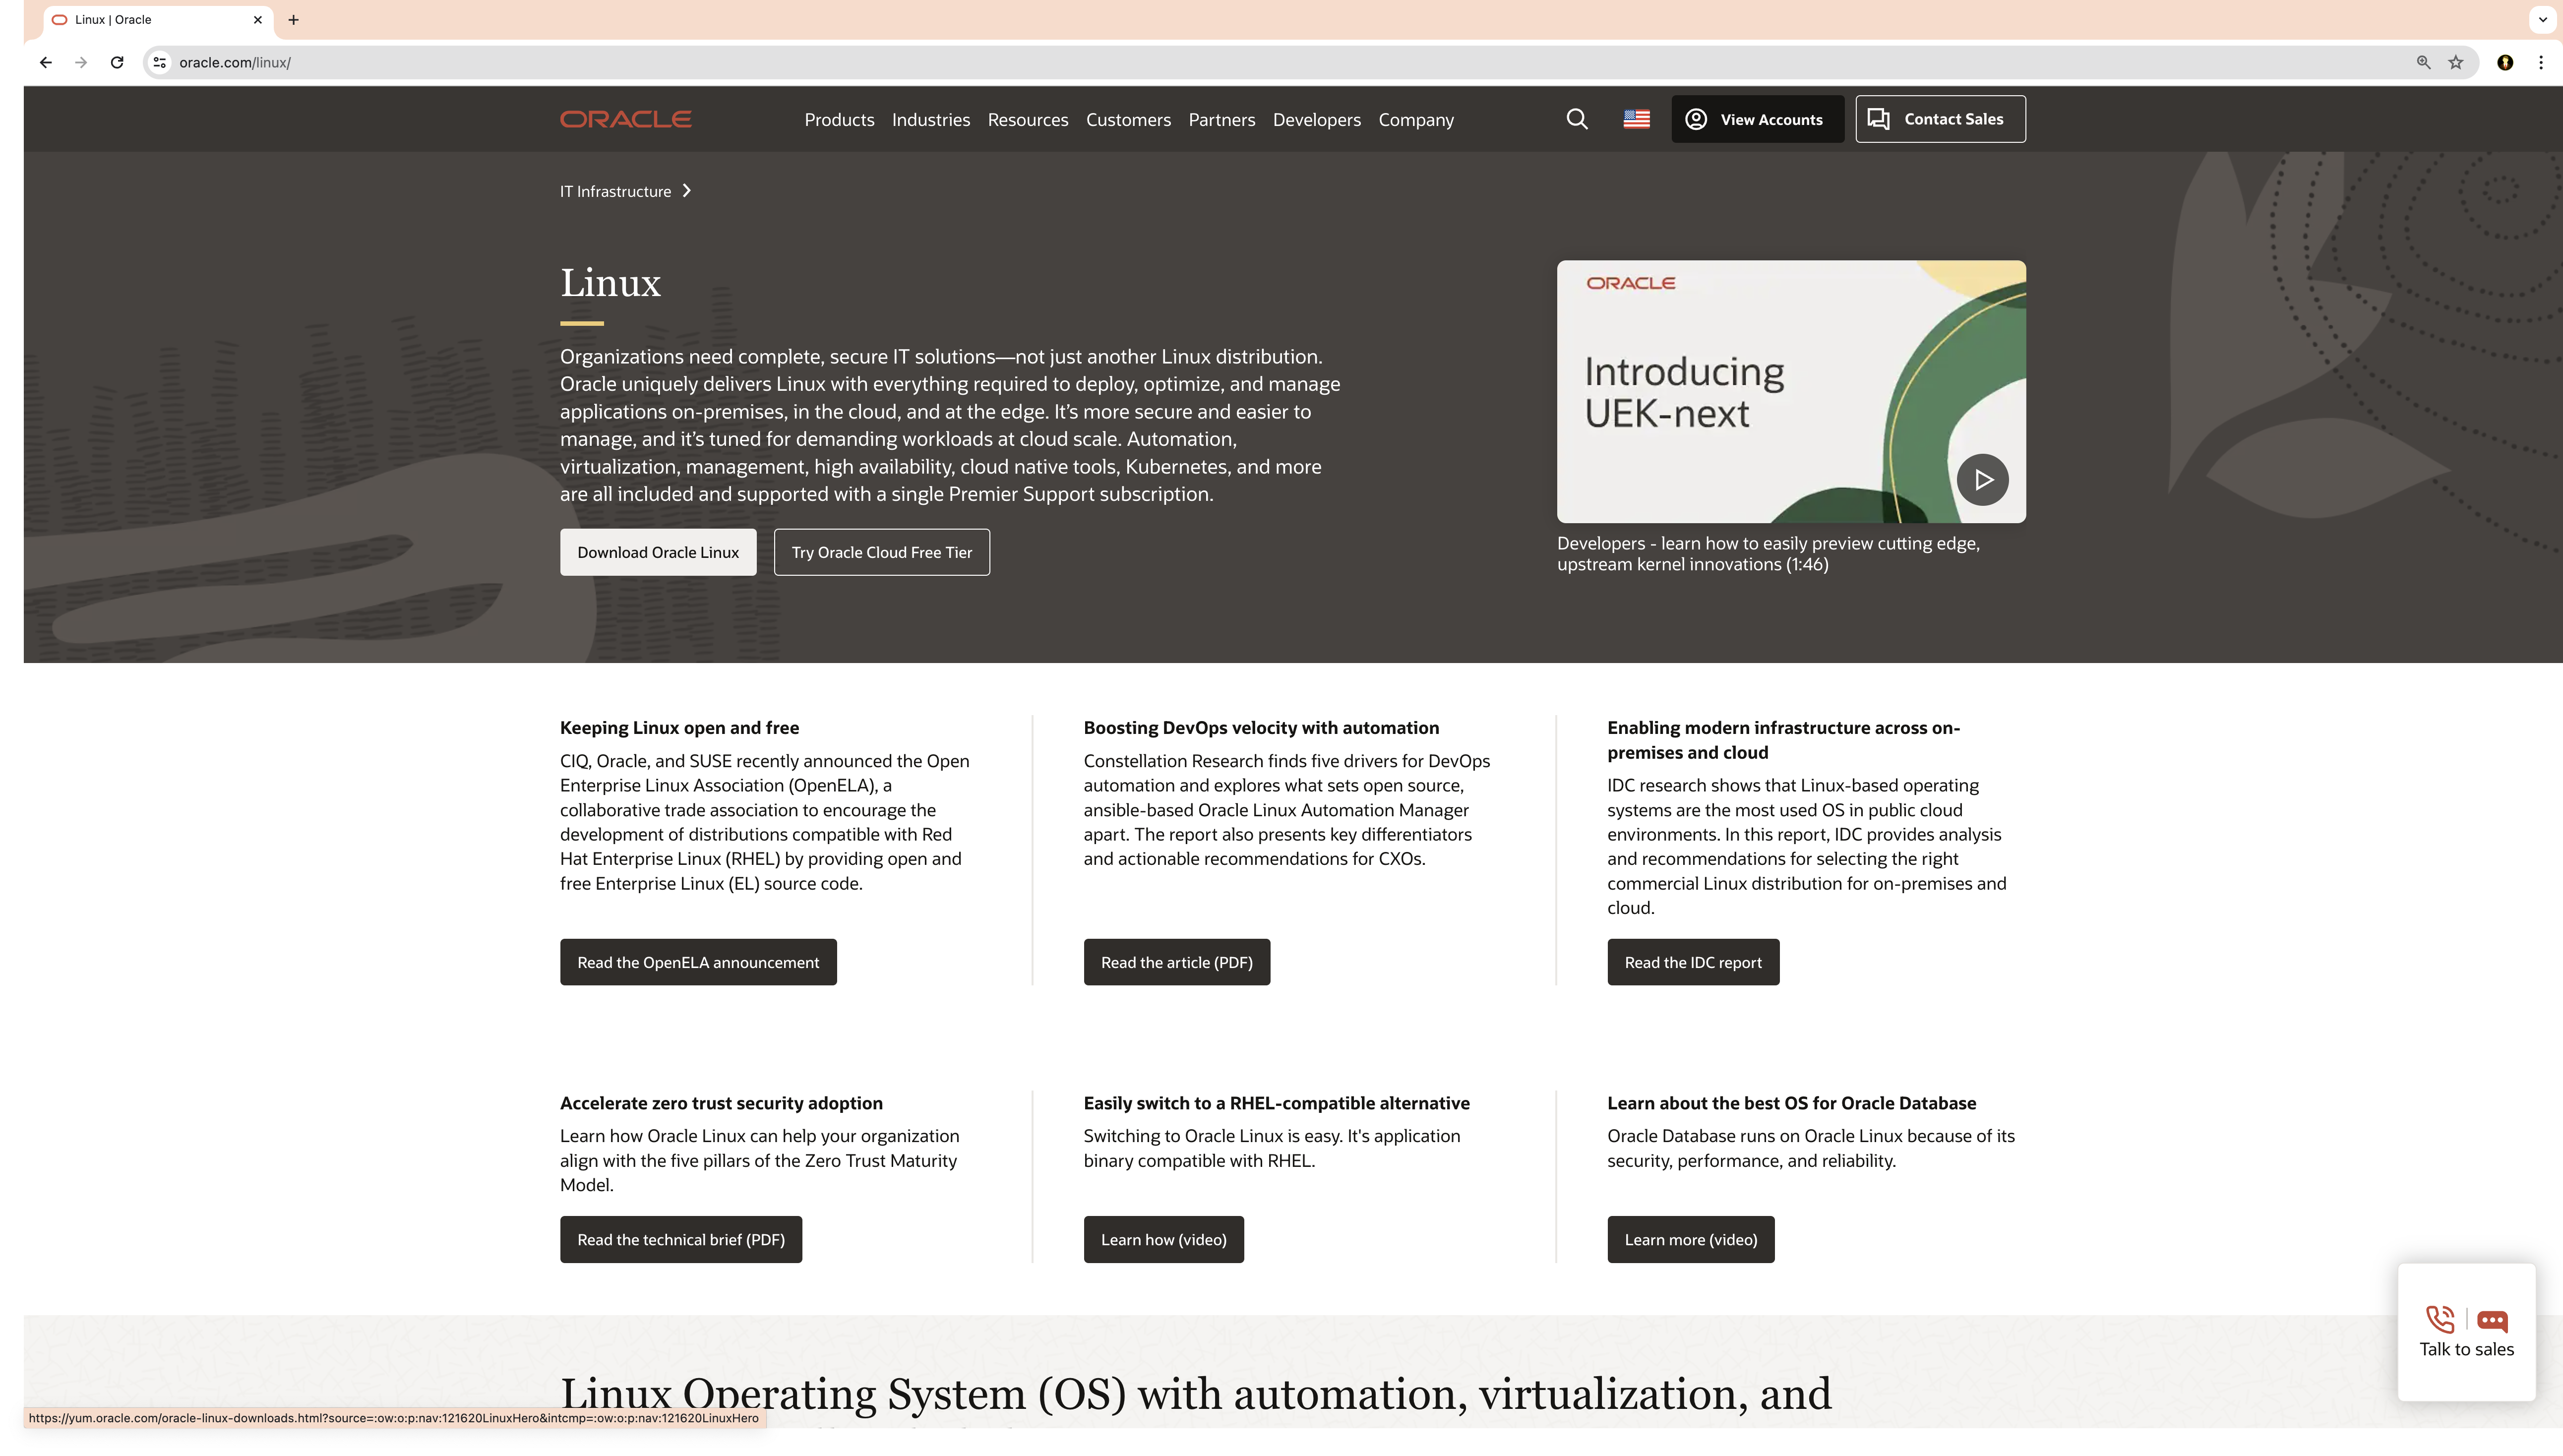
Exhibit 20: Oracle Website – Open the Oracle Linux Page
In the Get Started with Oracle Linux section, select Download Oracle Linux.
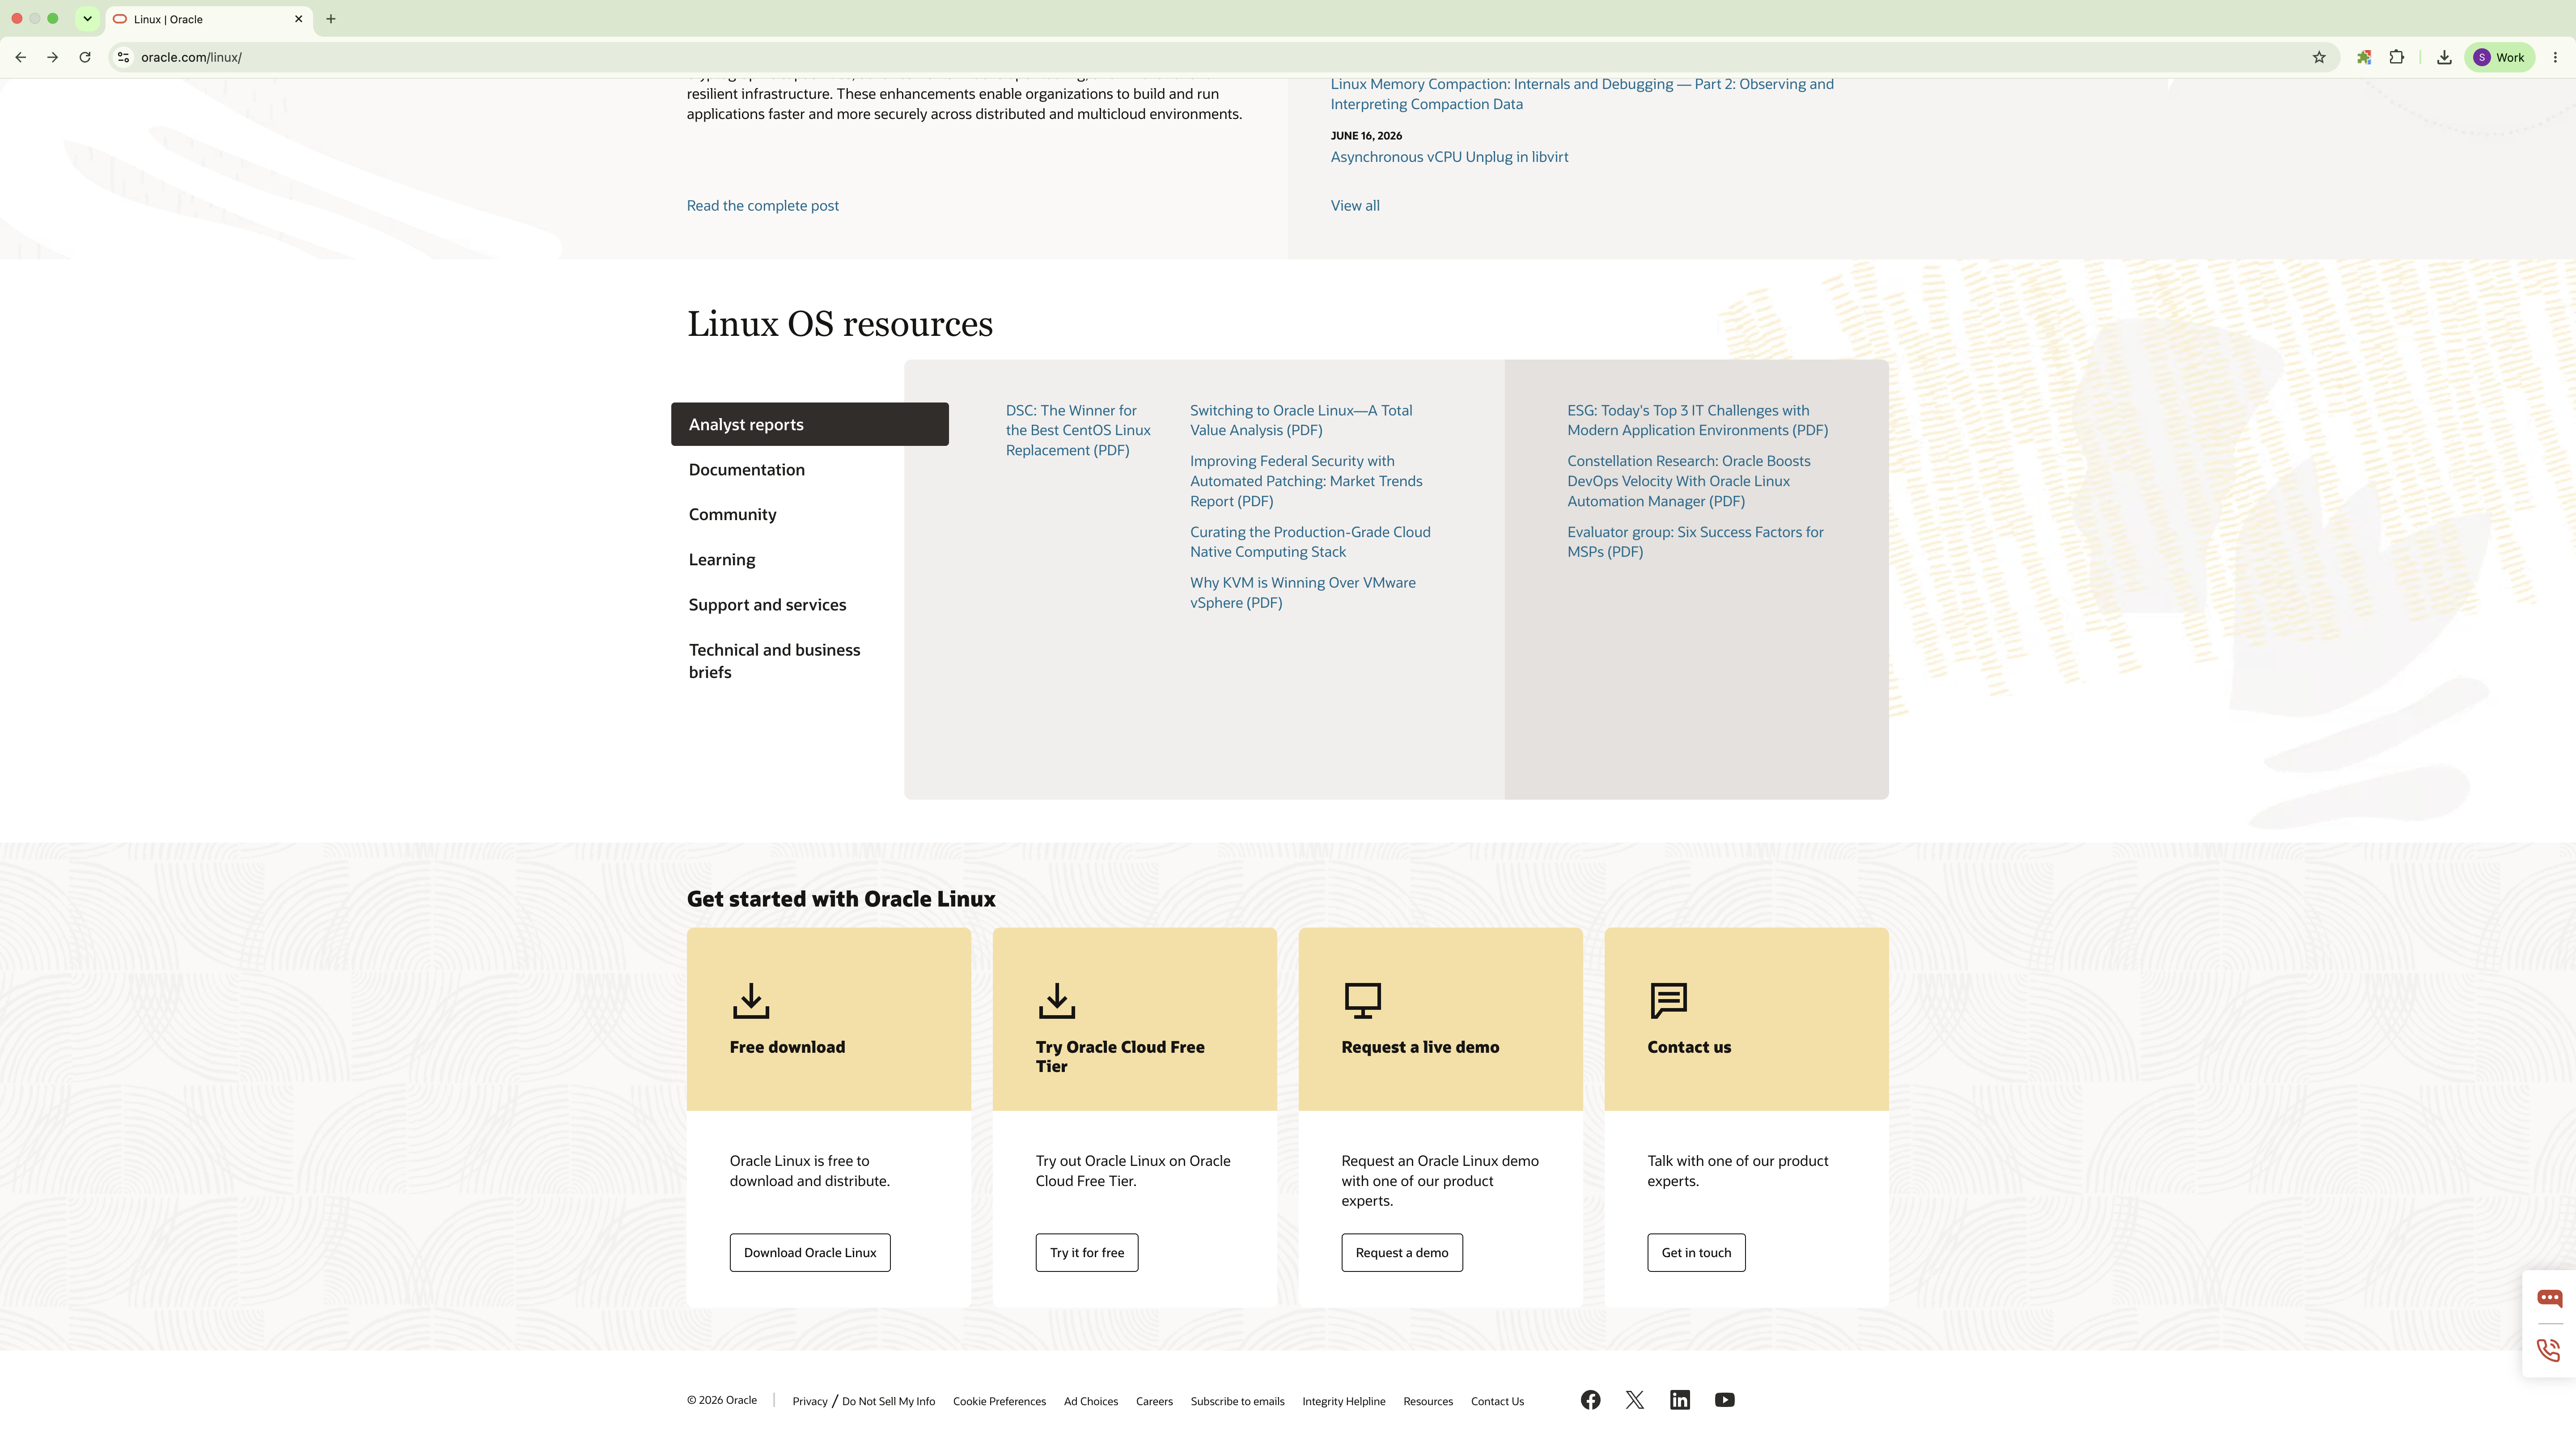
Exhibit 21: Oracle Website – Select Download Oracle Linux
This opens the Oracle Linux Downloads page [➜ Link reference #12, Oracle Linux Downloads Page] to access the available Oracle Linux installation media.
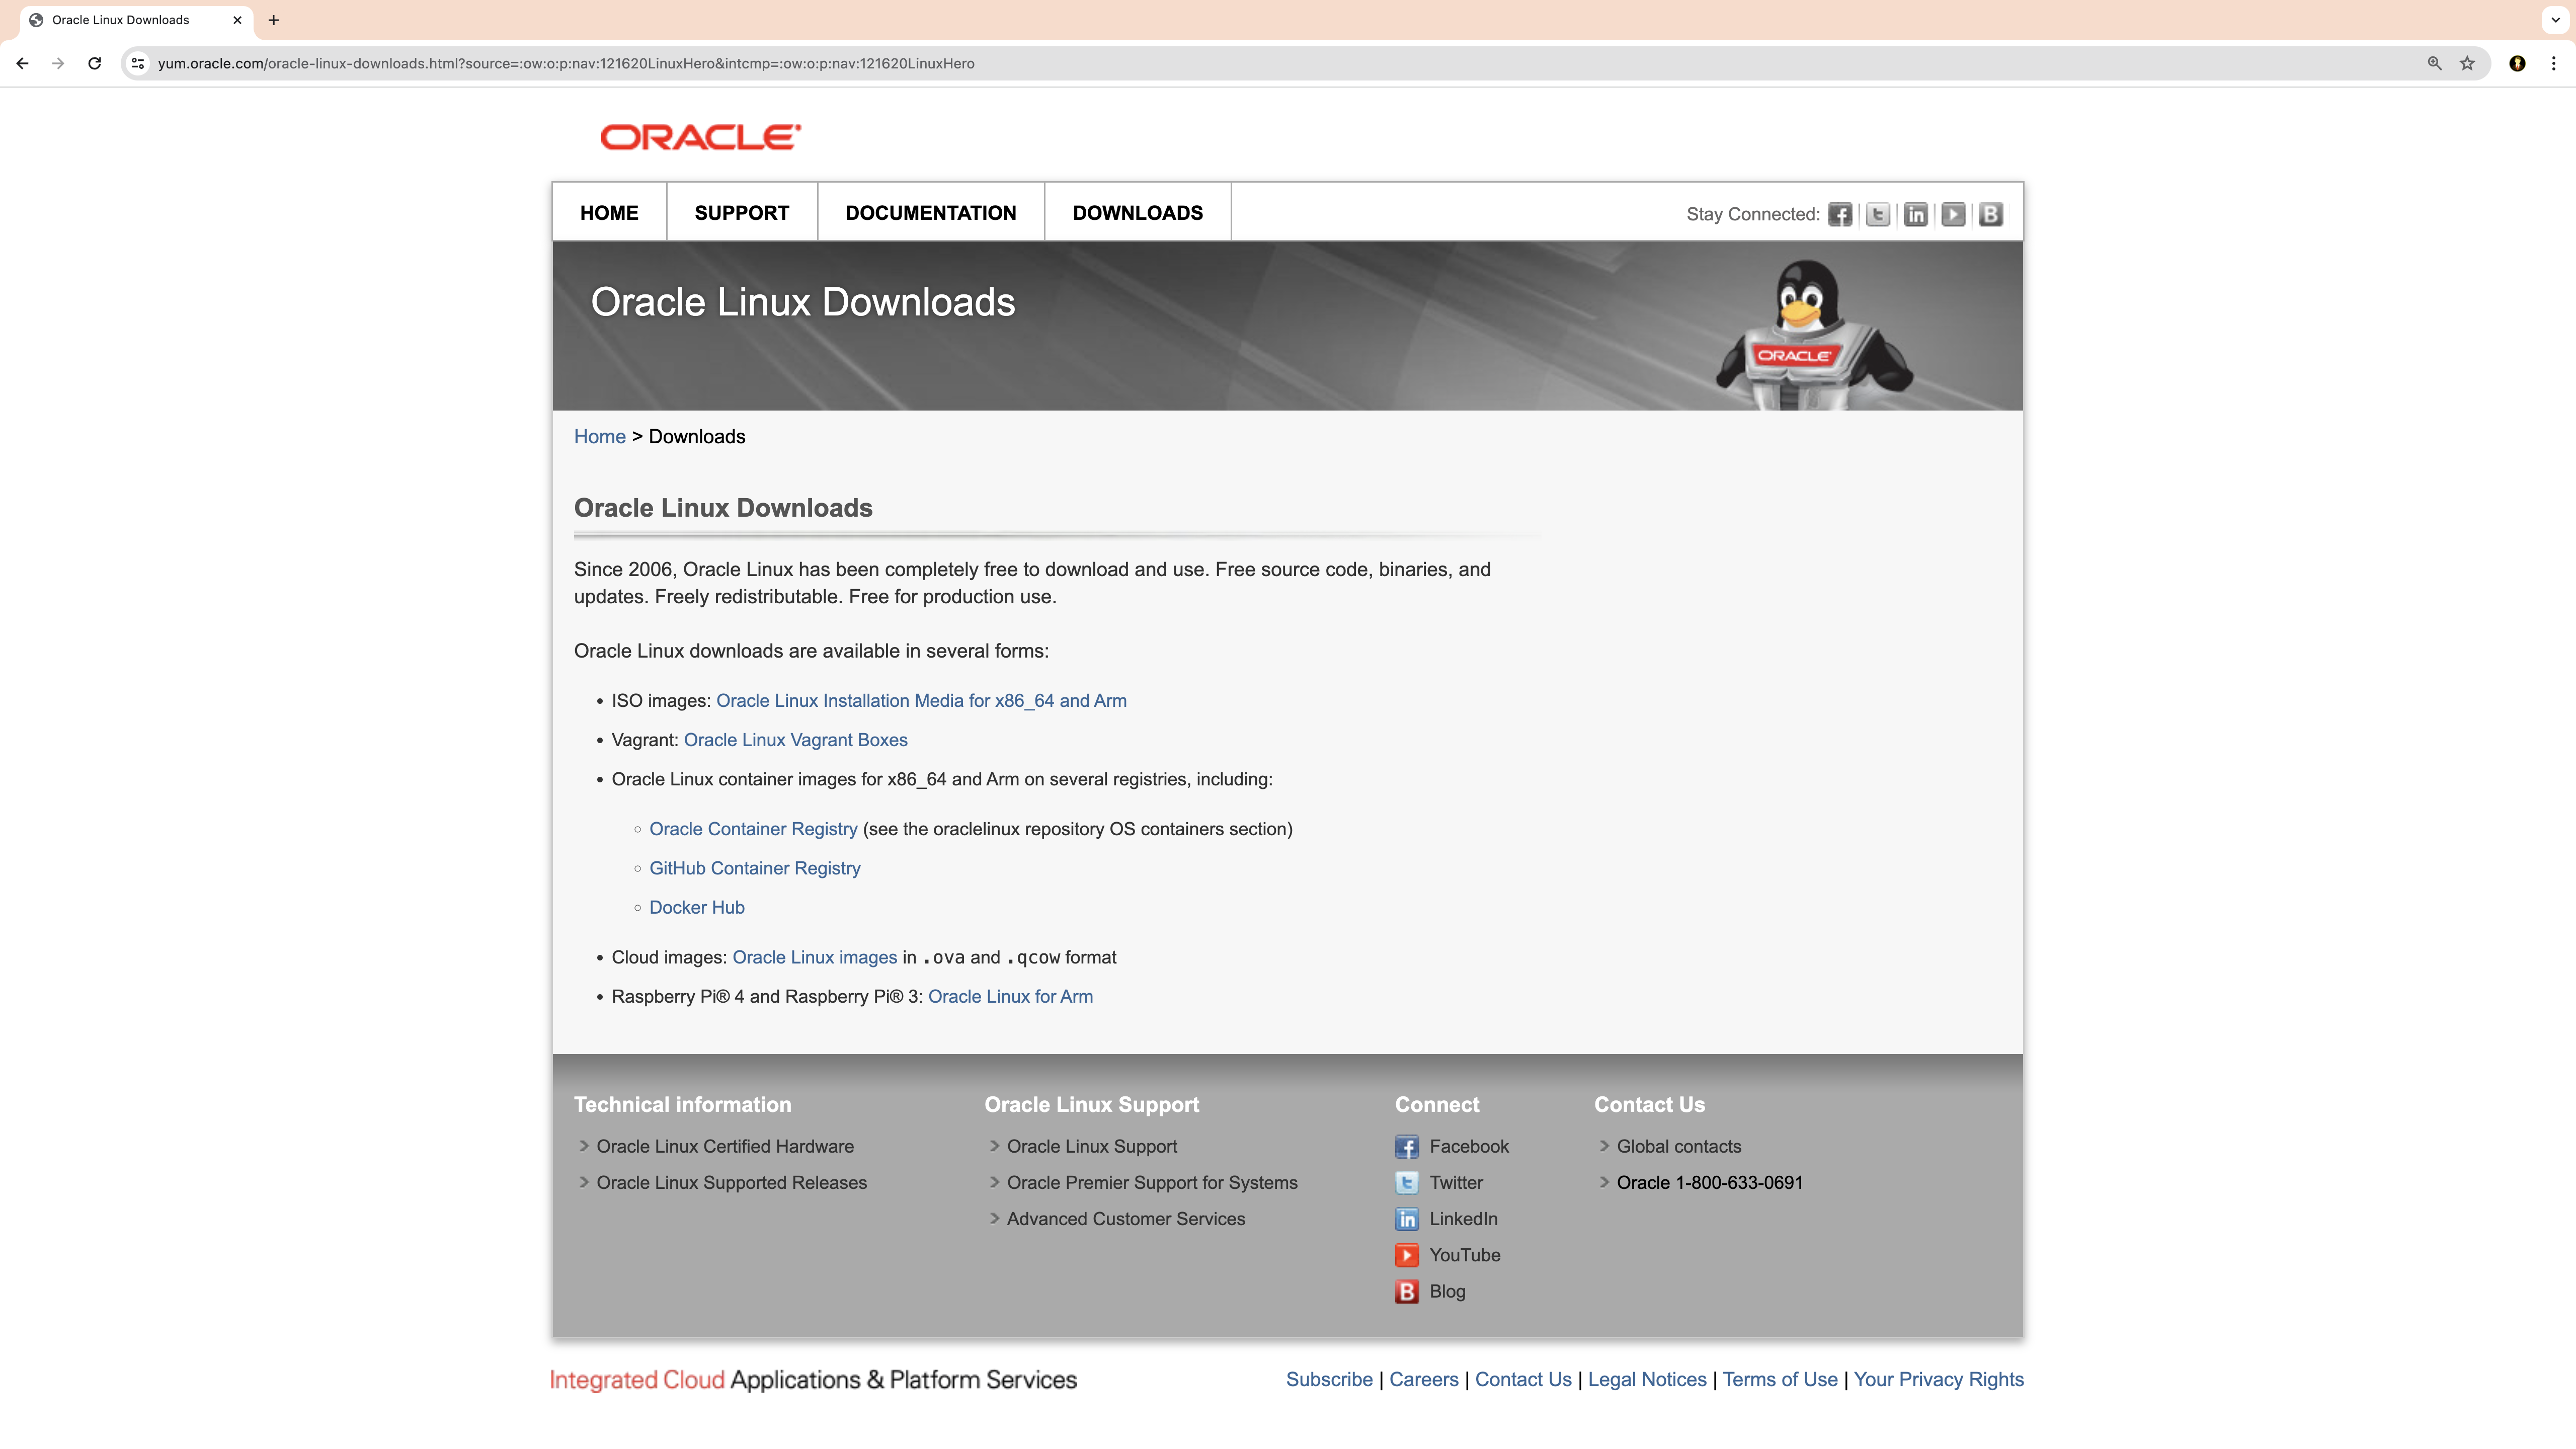
Exhibit 22: Oracle Website – Open Oracle Linux Downloads
Download the system ISO [➜ Link reference #13, Oracle Linux ISO Installation Media].
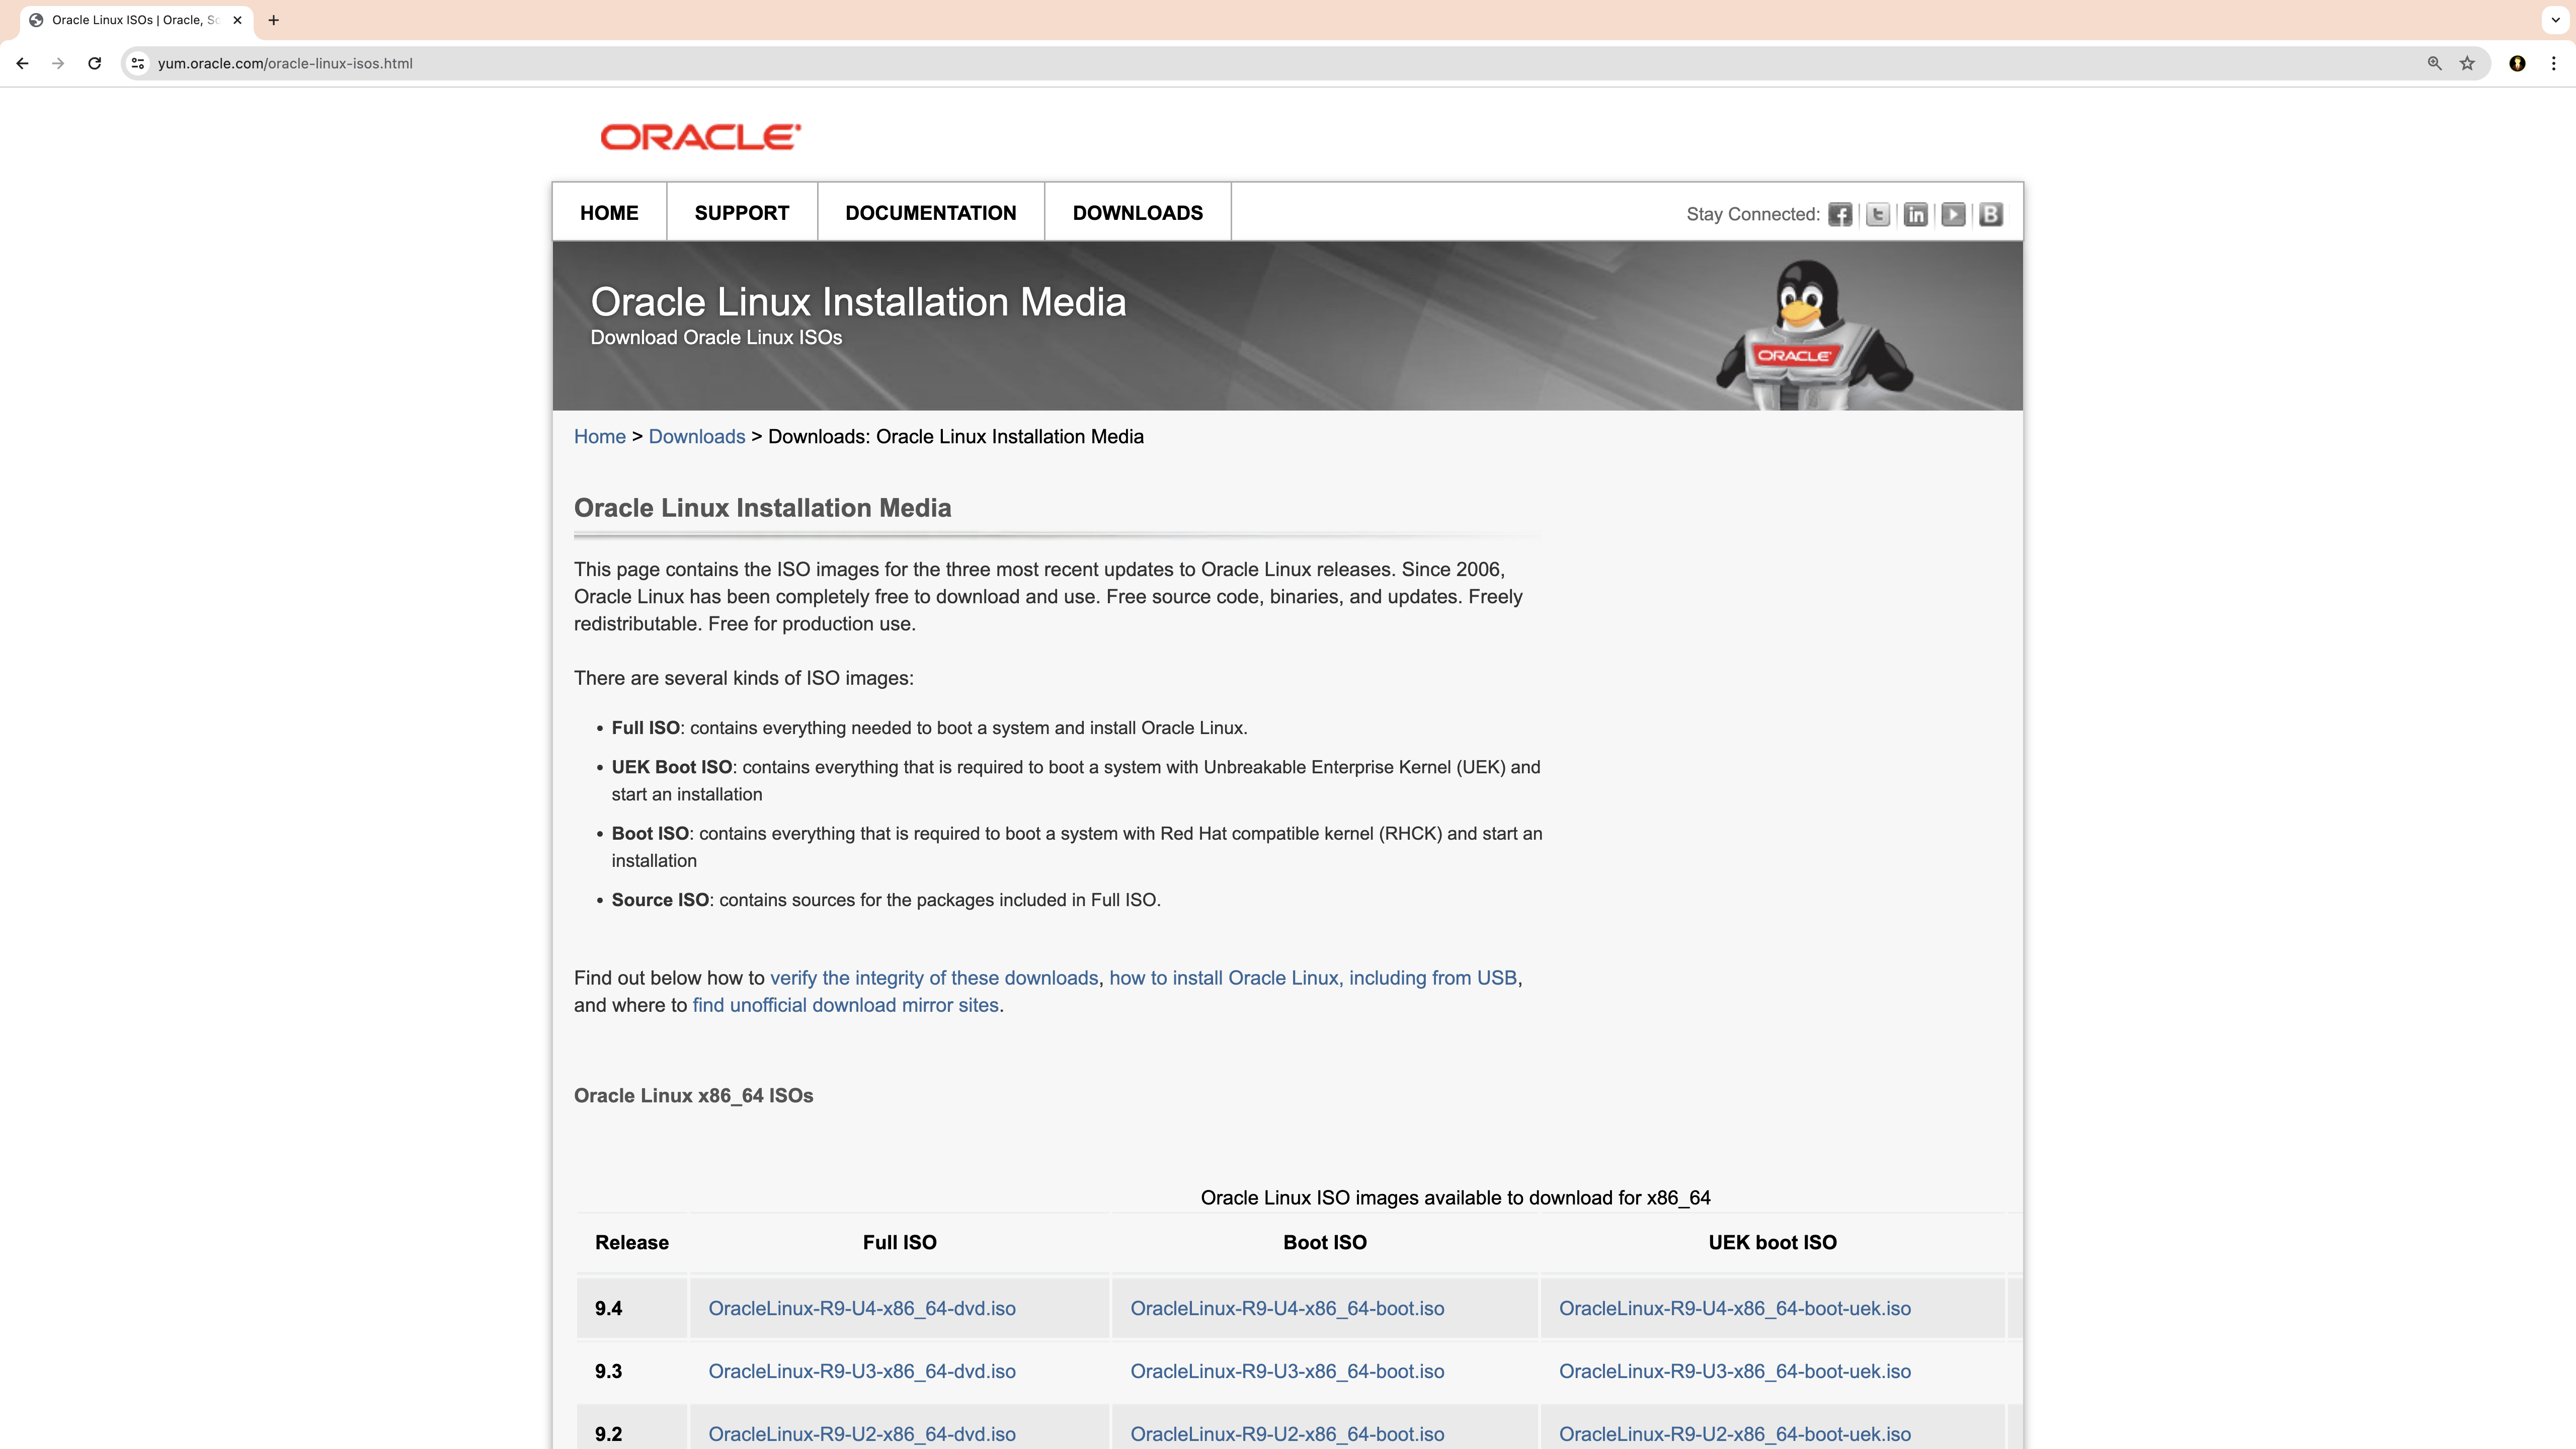
Exhibit 23: Oracle Website – Open the Oracle Linux Media List
Select the release ISO installation media to be used during the OS installation [➜ Link reference #14, Oracle Linux x86-64 ISO Release List].
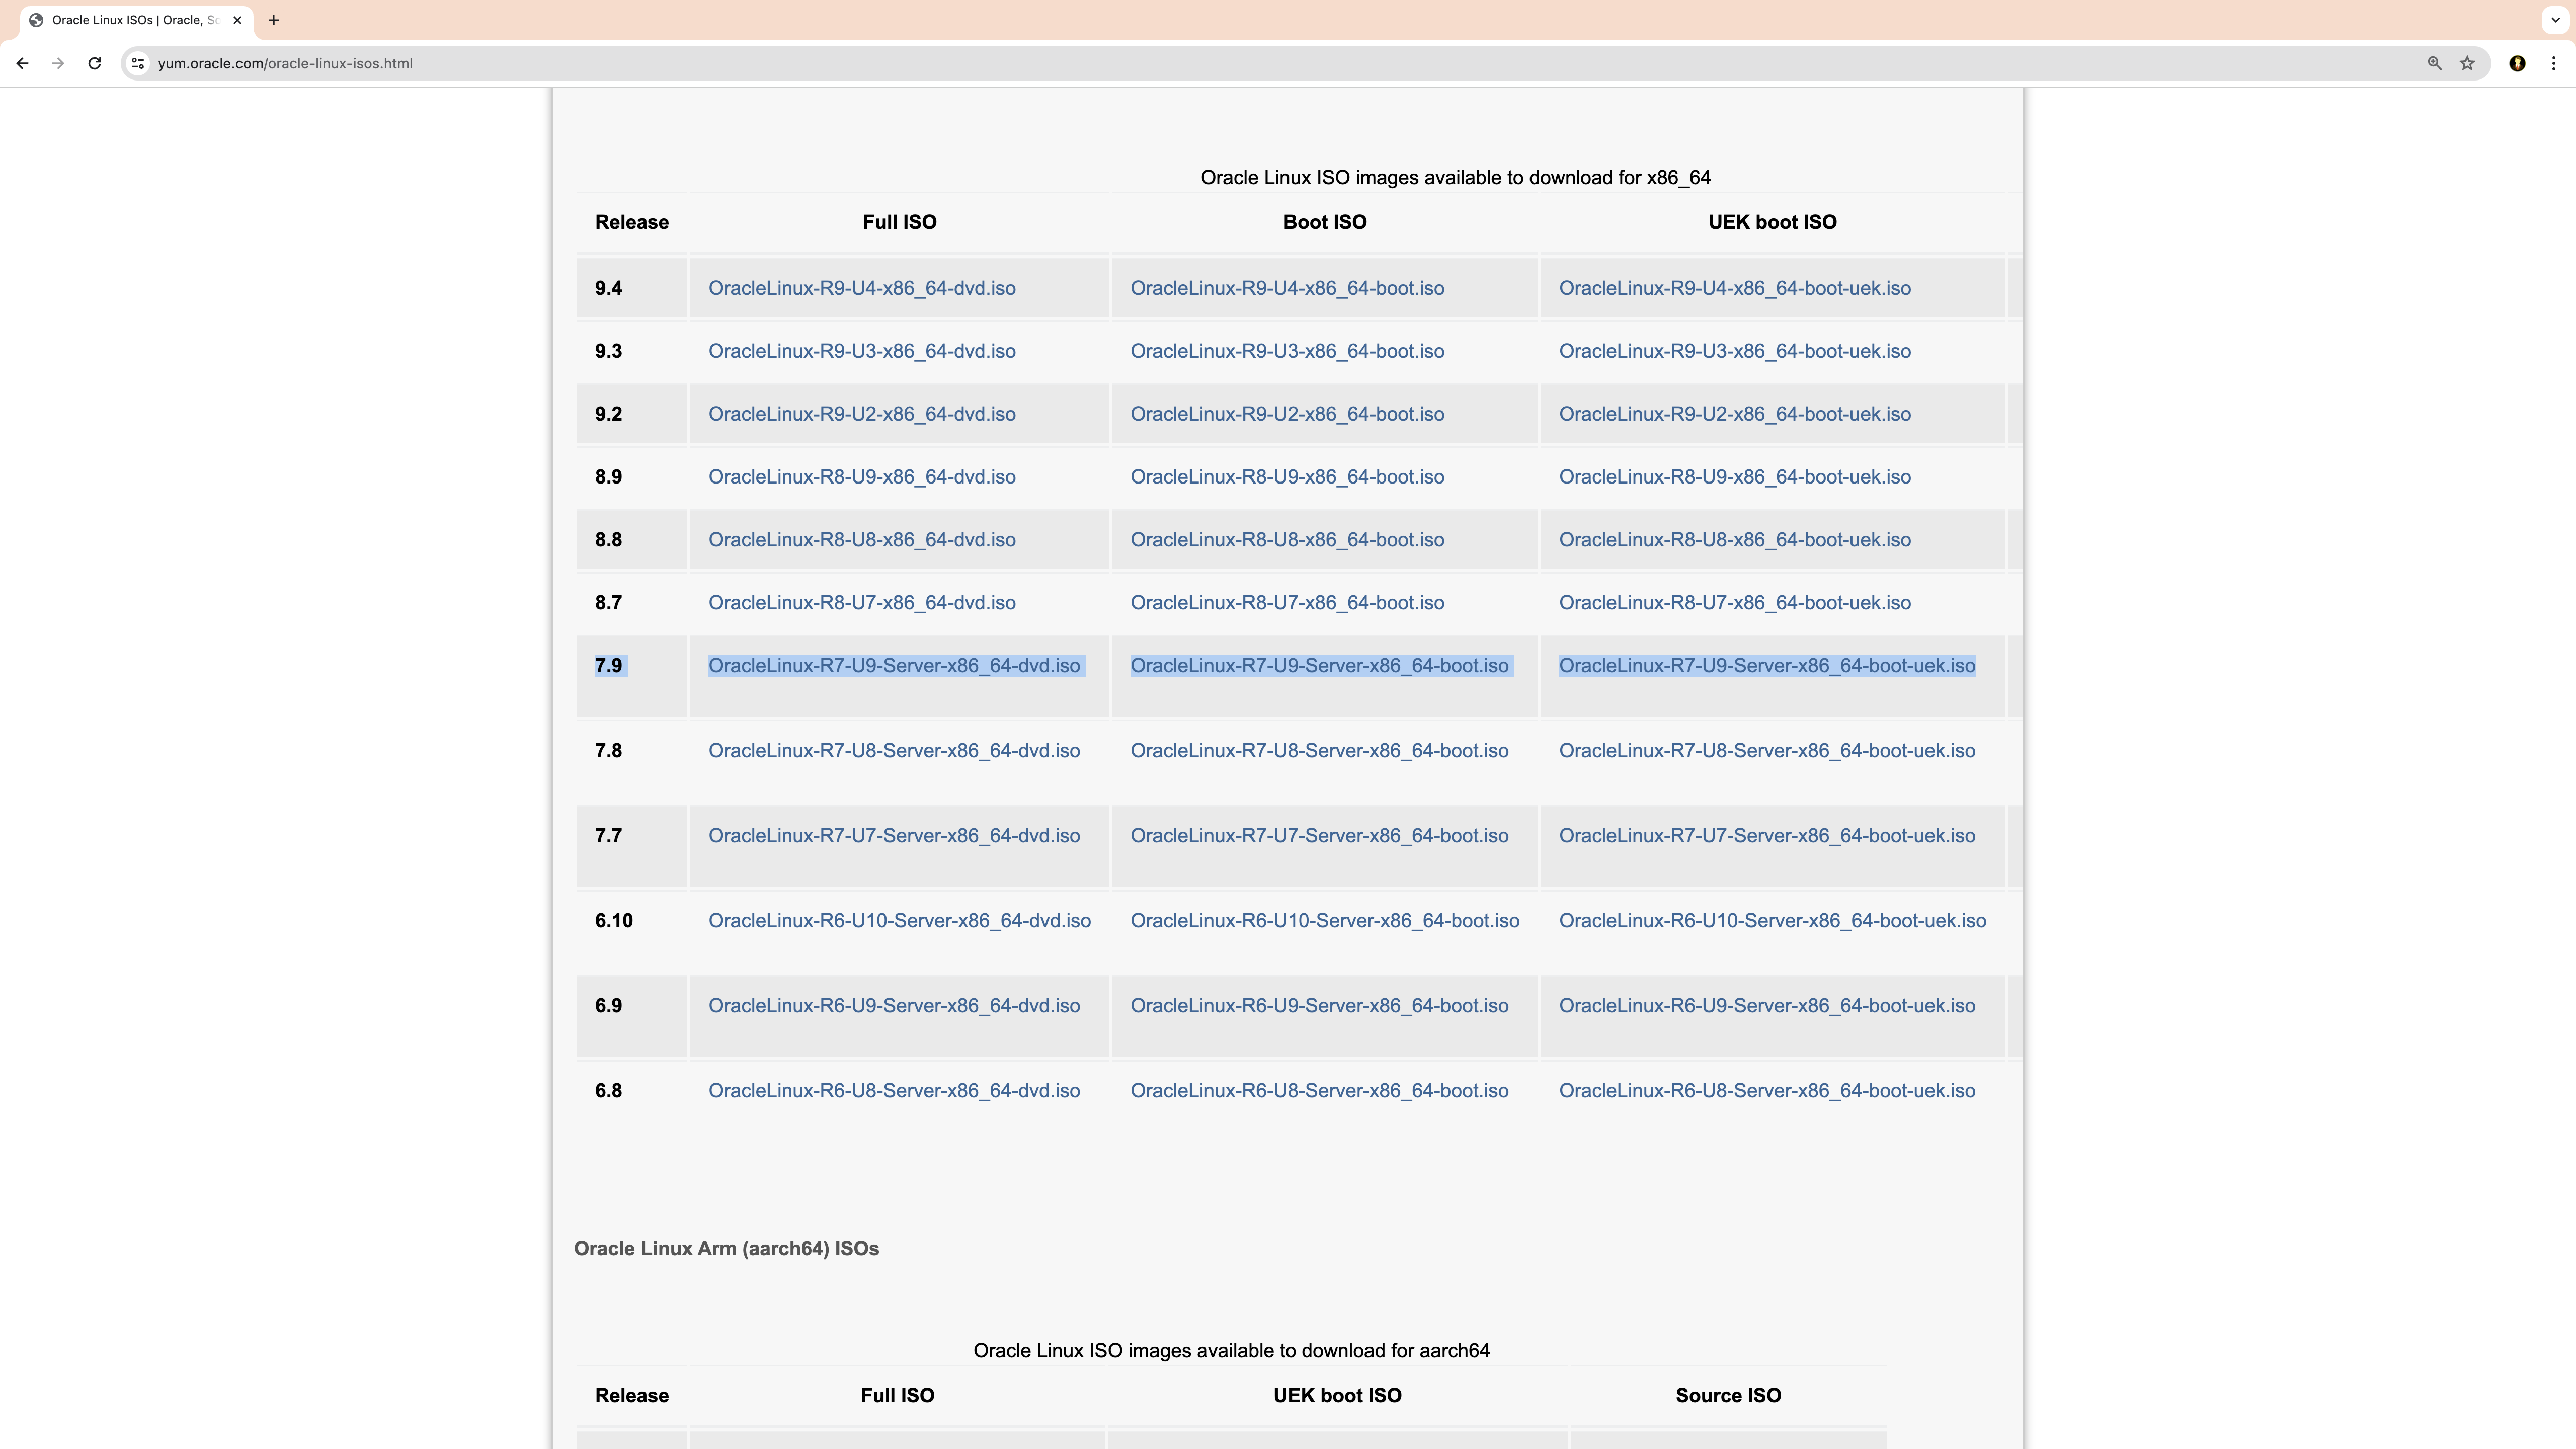
Exhibit 24: Oracle Website – Select Oracle Linux 7.9 Installation Media
Confirm that the Oracle Linux 7.9 ISO (OracleLinux-R7-U9-Server-x86_64-dvd.iso) was downloaded to the intended folder. Before using the ISO, calculate its SHA-256 checksum and compare it with the official value published by Oracle:
For instance, at the time of publication, the checksum is:
28d2928ded40baddcd11884b9a6a611429df12897784923c346057ec5cdd1012
The checksums must match. If they differ, do not use the ISO; download it again from the official vendor website.
Section Outcome
The ISO is ready for the next step once its checksum has been checked. Section 2.3 creates the VM and attaches this file as the installation media.
2.3. Set Up the Virtual Machine
Create the VM using the software and ISO prepared above. The reference build uses 2 vCPUs, 4 GB of RAM, and a 50 GB virtual disk. This section also sets the network mode and boot order.
The steps in this section are:
Step 1 – Define Guest Host Configuration
Step 2 – Launch VirtualBox Manager
Step 3 – Create a New Virtual Machine
Step 4 – Configure Network Settings
Step 5 – Verify Boot Settings
Additional settings, such as USB and display configuration, may be configured if required, but they are optional for the reference environment.
Additional information about virtual machine configuration in Oracle VirtualBox is available on the Oracle website [➜ Link reference #15, VirtualBox Basic Concepts and VM Configuration].
Note: The reference links are listed in the Link References file in folder 05_External_Links (refer to the downloadable publication package, chapter 7).
Step 1 – Define Guest Host Configuration
Create a new guest VM with the following parameters:
|
Name
|
ODBTestEnv
|
|
VM Folder
|
Use the preferred location or retain the default folder.
|
|
vCPU
|
2
|
|
RAM
|
4 GB
|
|
Virtual disk
|
50 GB
|
|
ISO Image
|
Oracle Linux 7.9 (previously downloaded)
|
Exhibit 25: Virtual Machine – Define Configuration Parameters
Step 2 – Launch VirtualBox Manager
Launch the VirtualBox application.
The section Creating a Virtual Machine of the Oracle VirtualBox User Guide describes the workflow and configuration steps for creating a new VM.
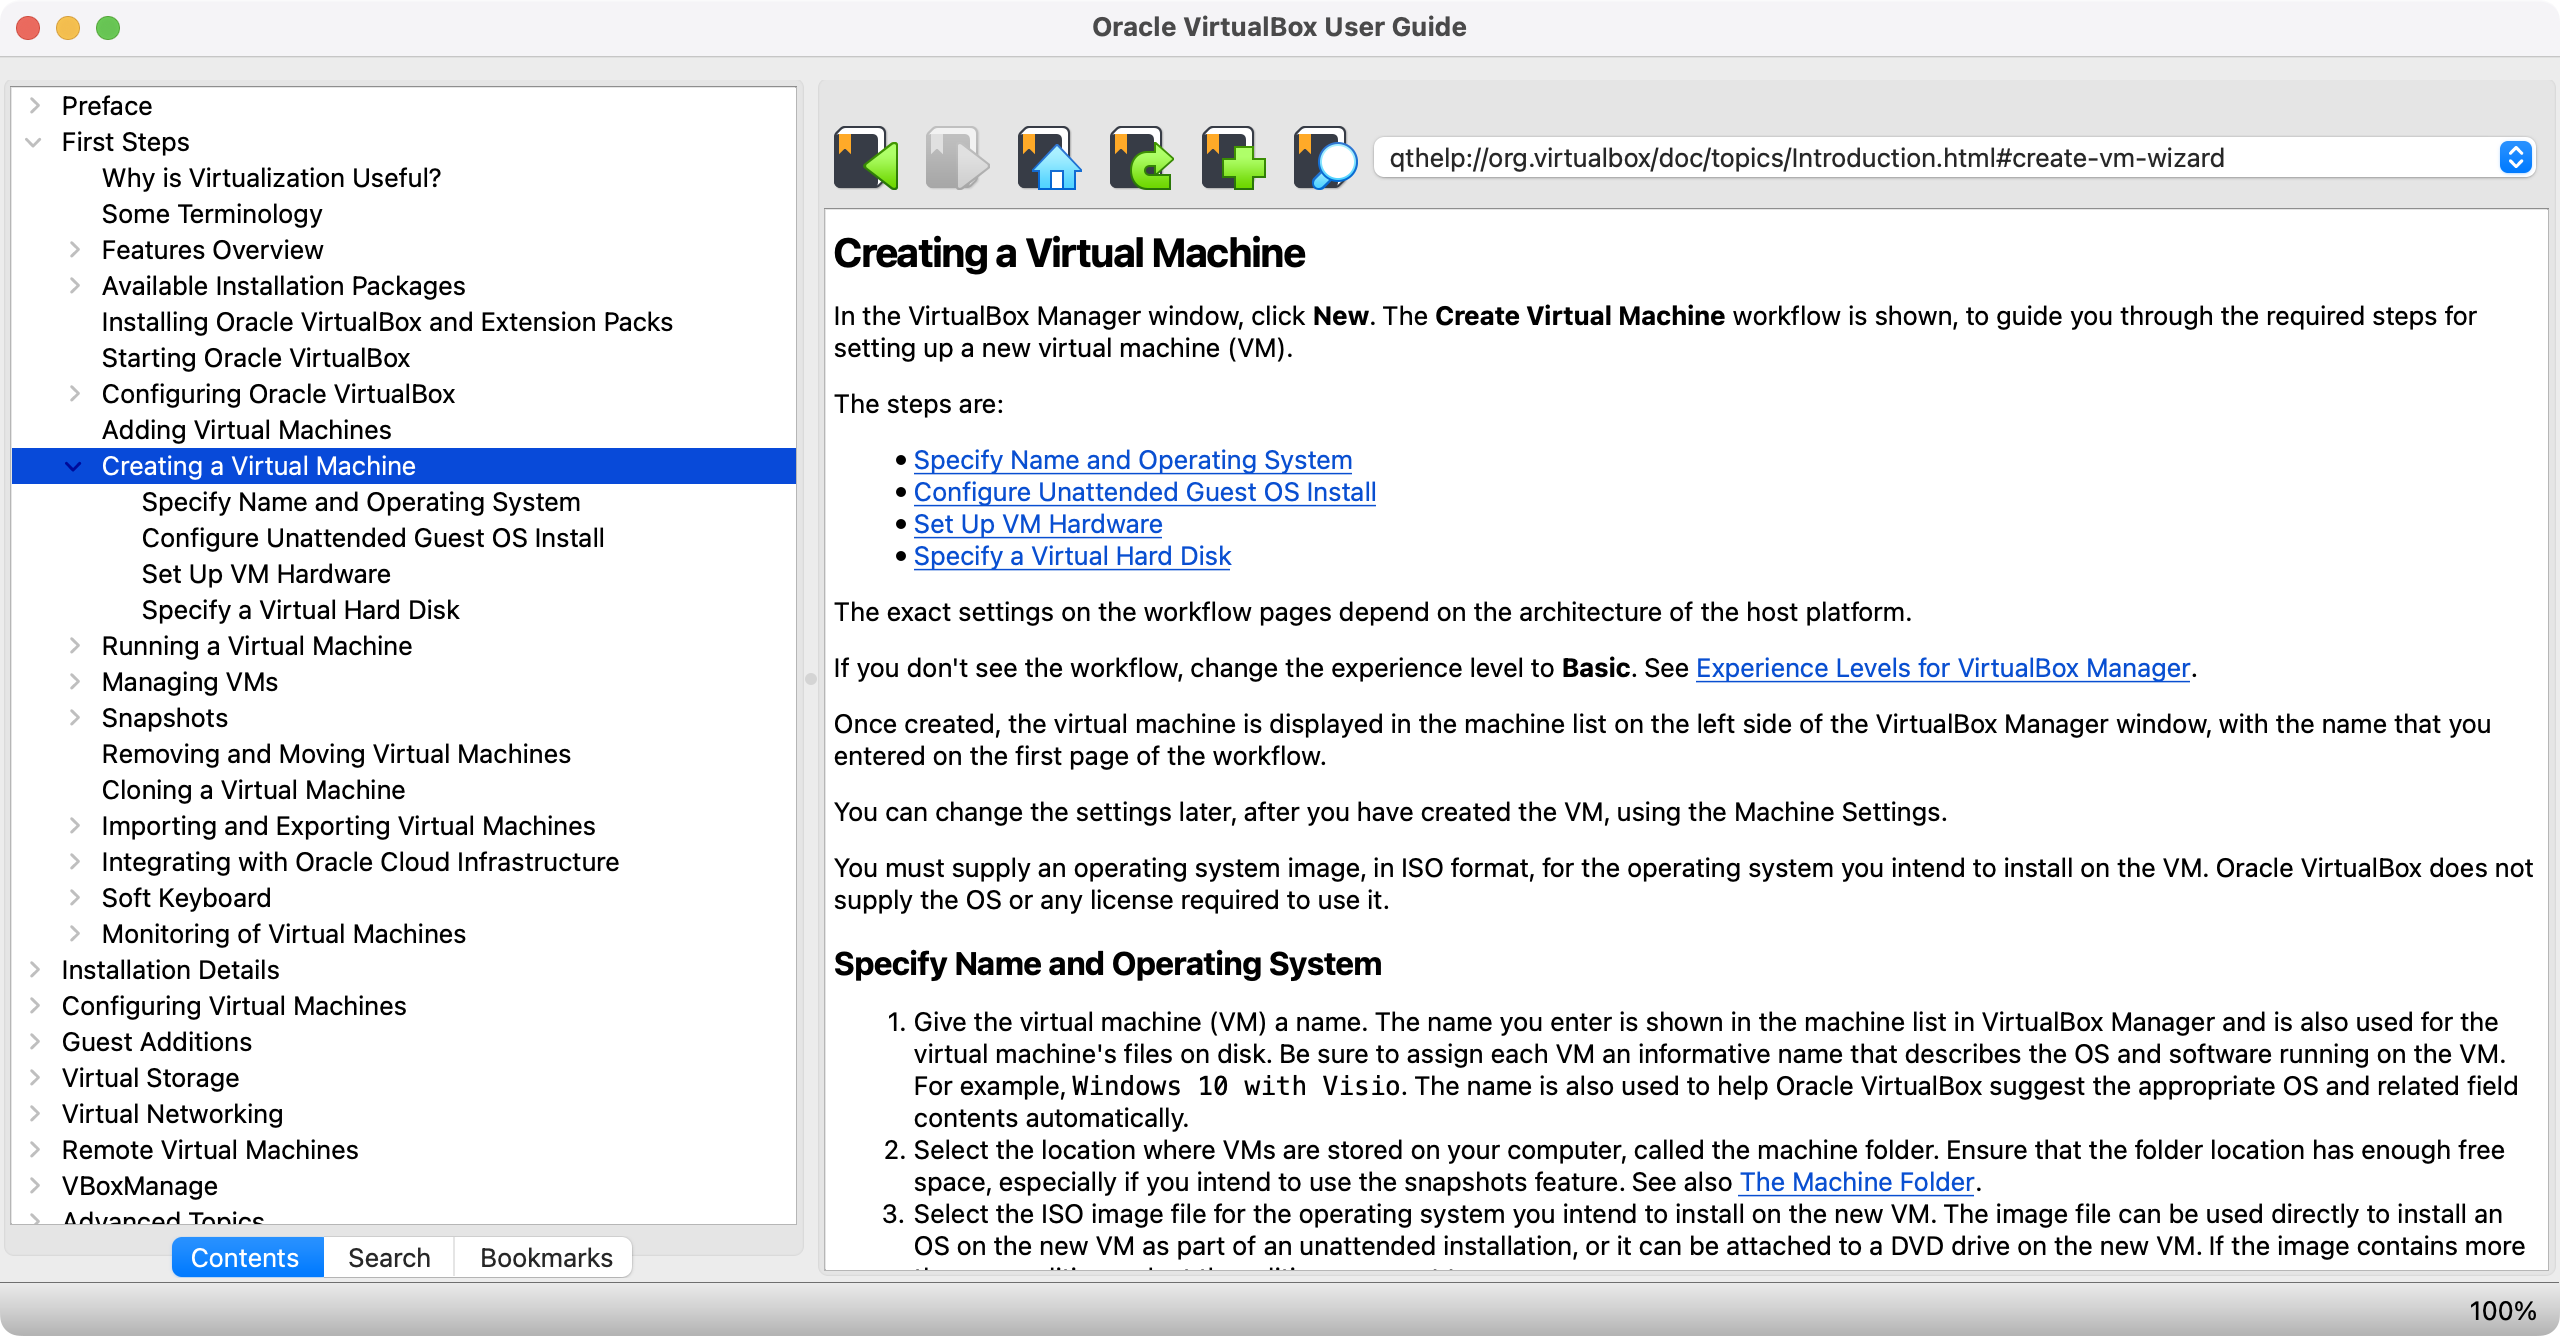
Exhibit 26: VirtualBox User Guide – Review the VM Creation Procedure
Step 3 – Create a New Virtual Machine
Enter a name and select a folder for the virtual machine. Mount the Oracle Linux ISO to the virtual CD/DVD drive and enable Skip Unattended Installation to proceed manually through the OS setup. VirtualBox’s Unattended Installation automates this process using predefined inputs, but manual setup is recommended here.
Note: Screenshots may differ slightly from the actual interface.
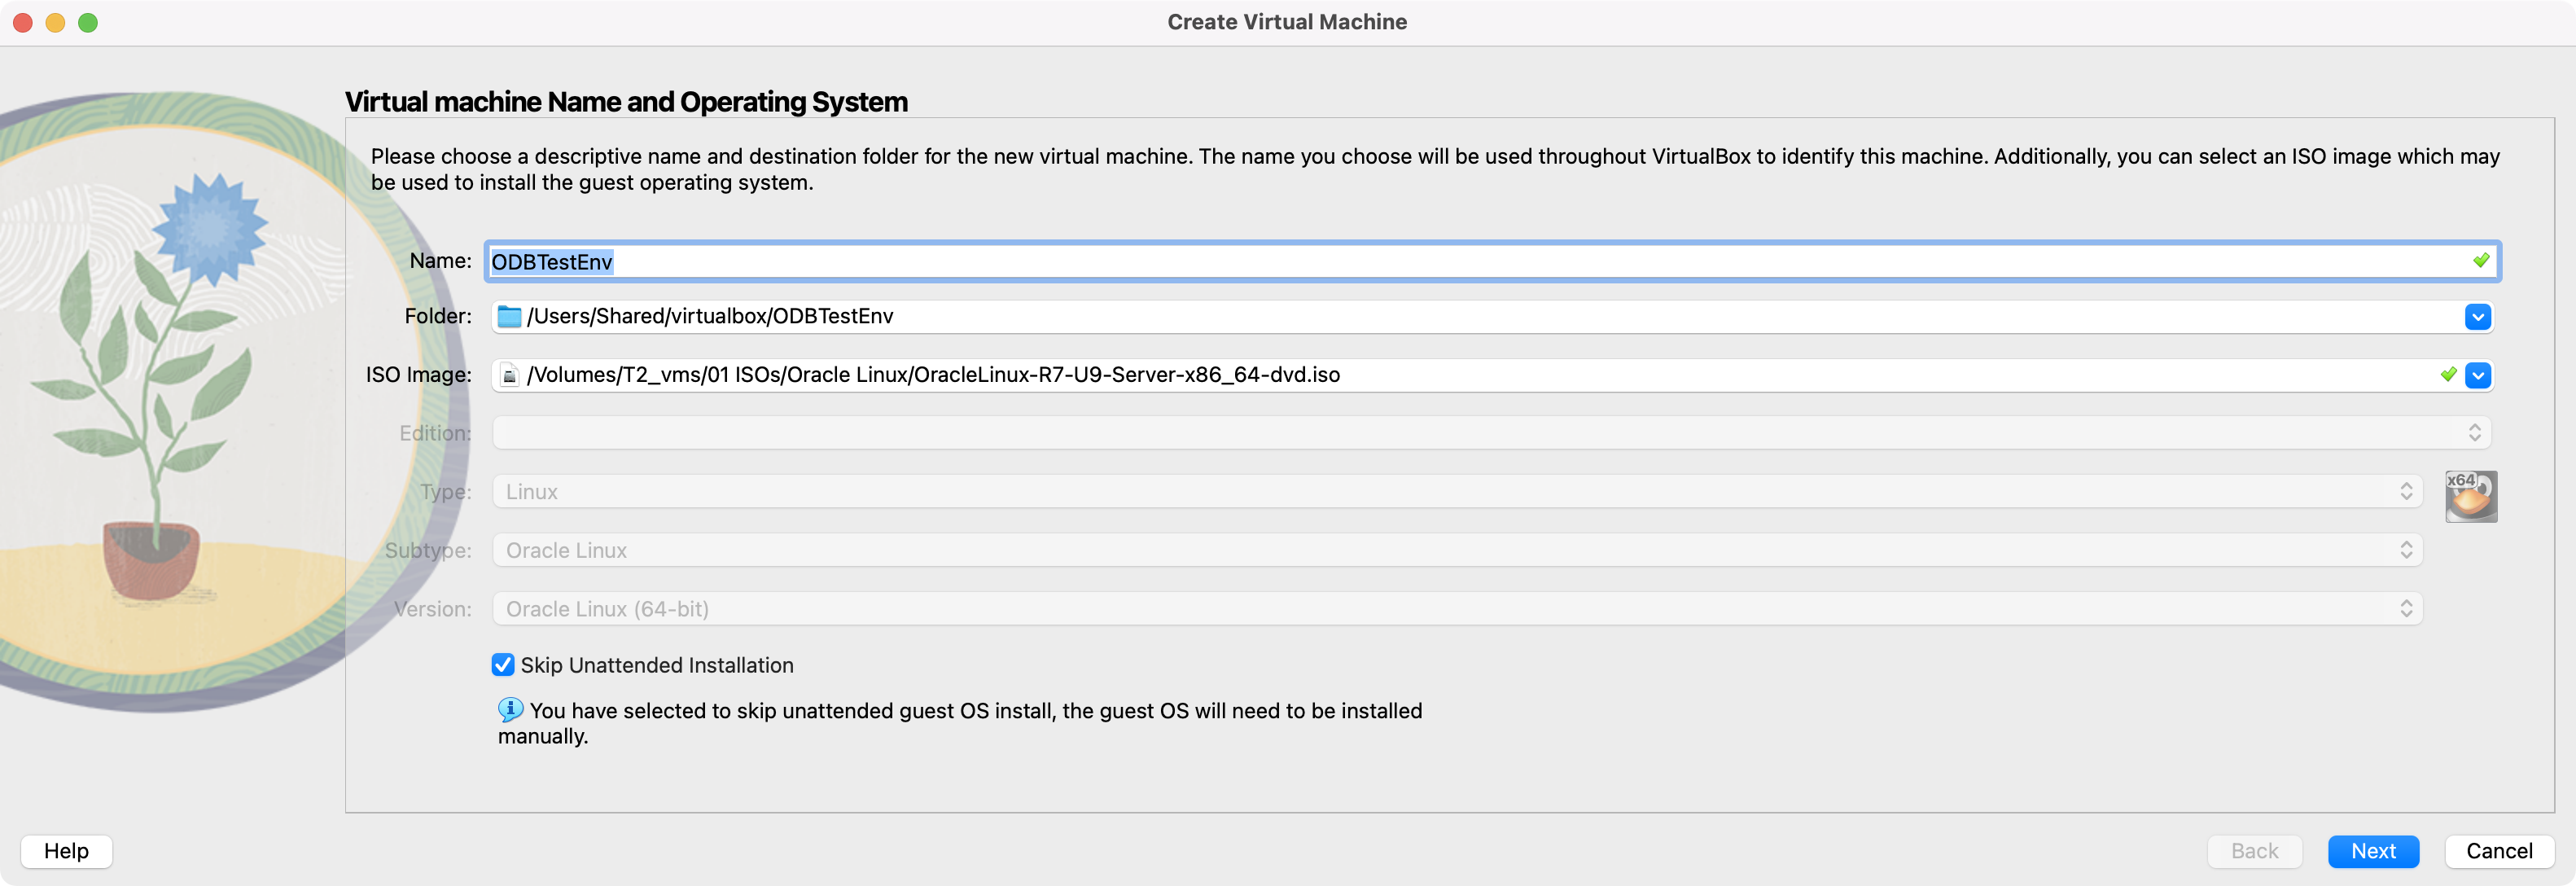
Exhibit 27: Virtual Machine – Name the VM and Select the Operating System
Allocate the RAM and CPU resources specified previously. For the reference sandbox, assign 4 GB (4,096 MB) of memory and two virtual processors (small VM running on a workstation). Ensure that sufficient resources remain available for the host operating system.
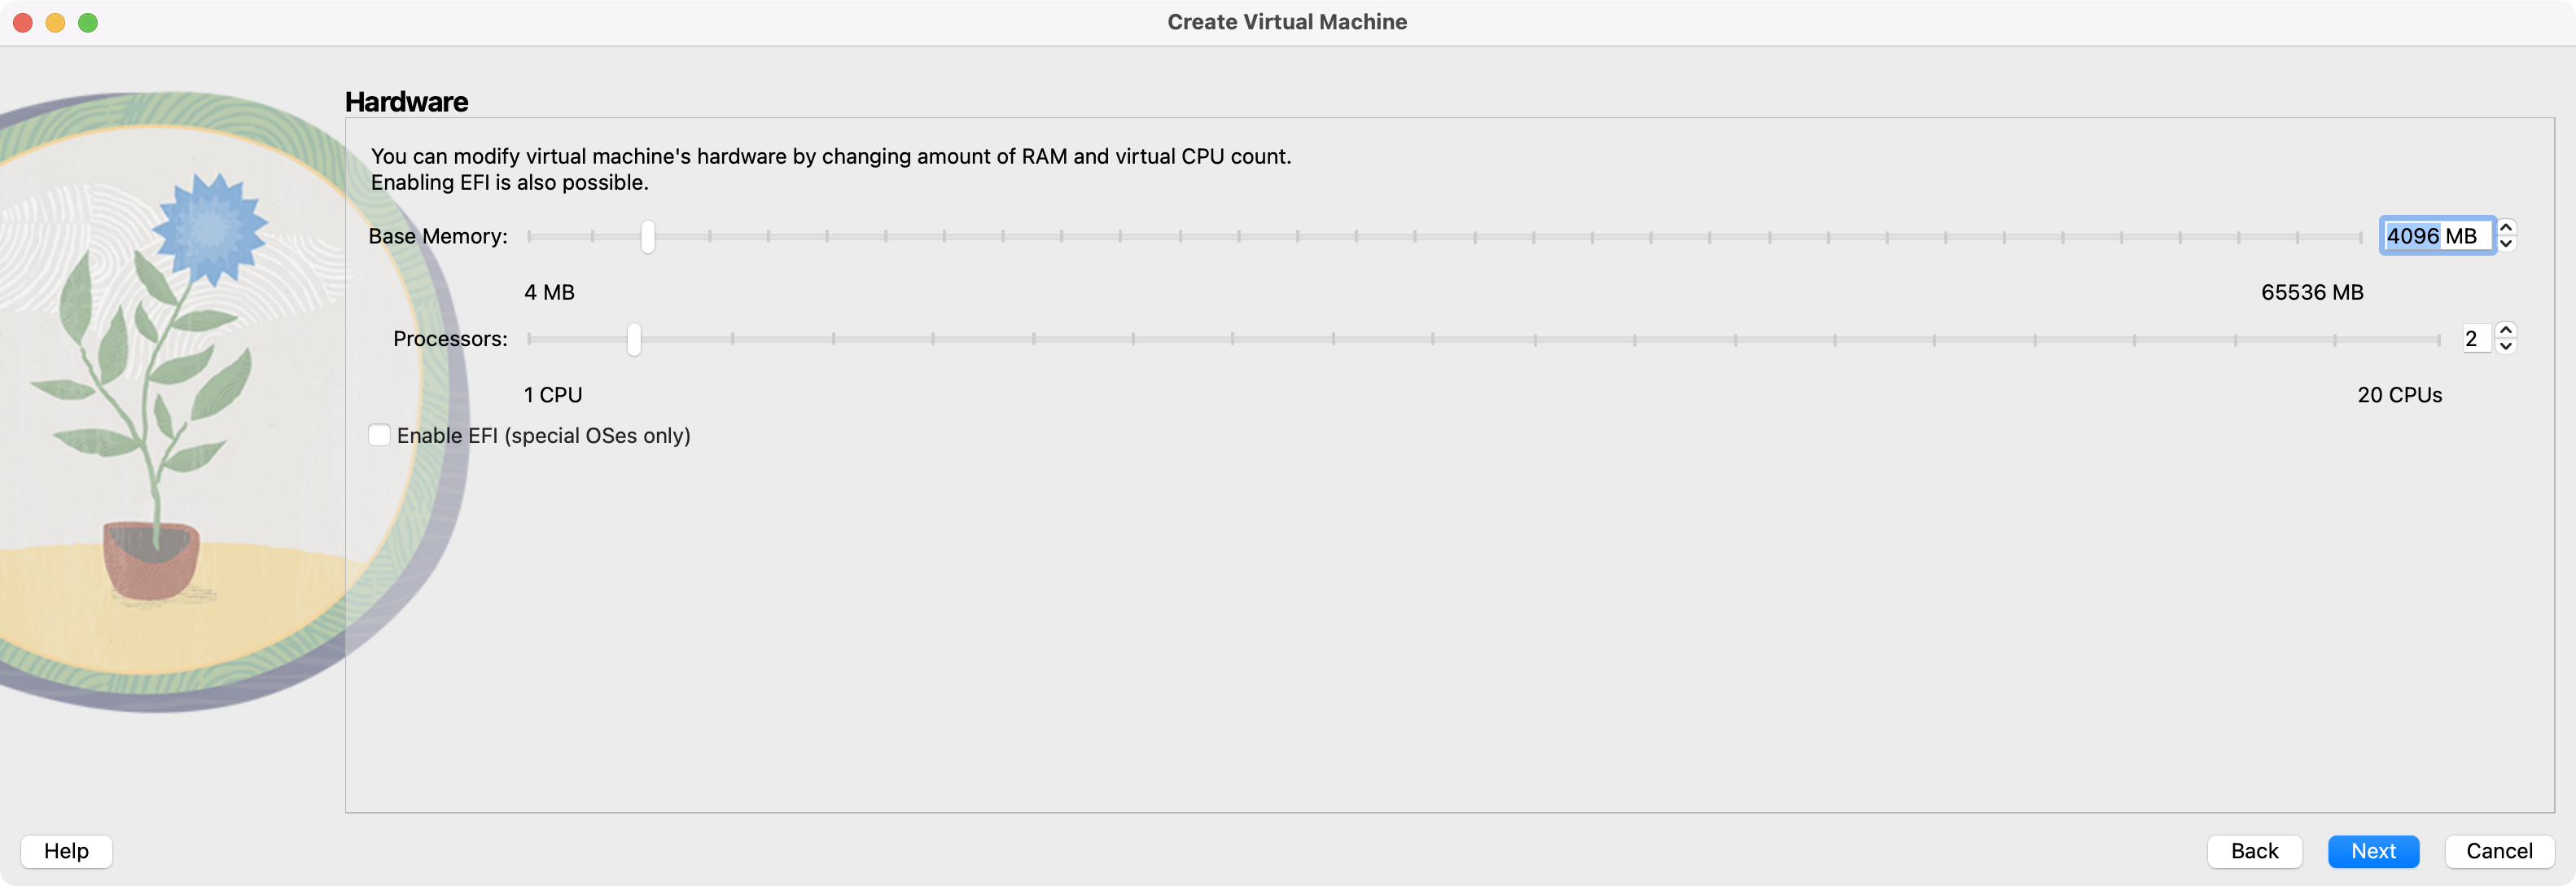
Exhibit 28: Virtual Machine – Allocate RAM and CPU
Allocate the required virtual-disk space. The reference configuration uses a 50 GB virtual disk for the Oracle Linux operating system, Oracle Database software, and database files. Ensure that sufficient free storage is available on the host before proceeding.
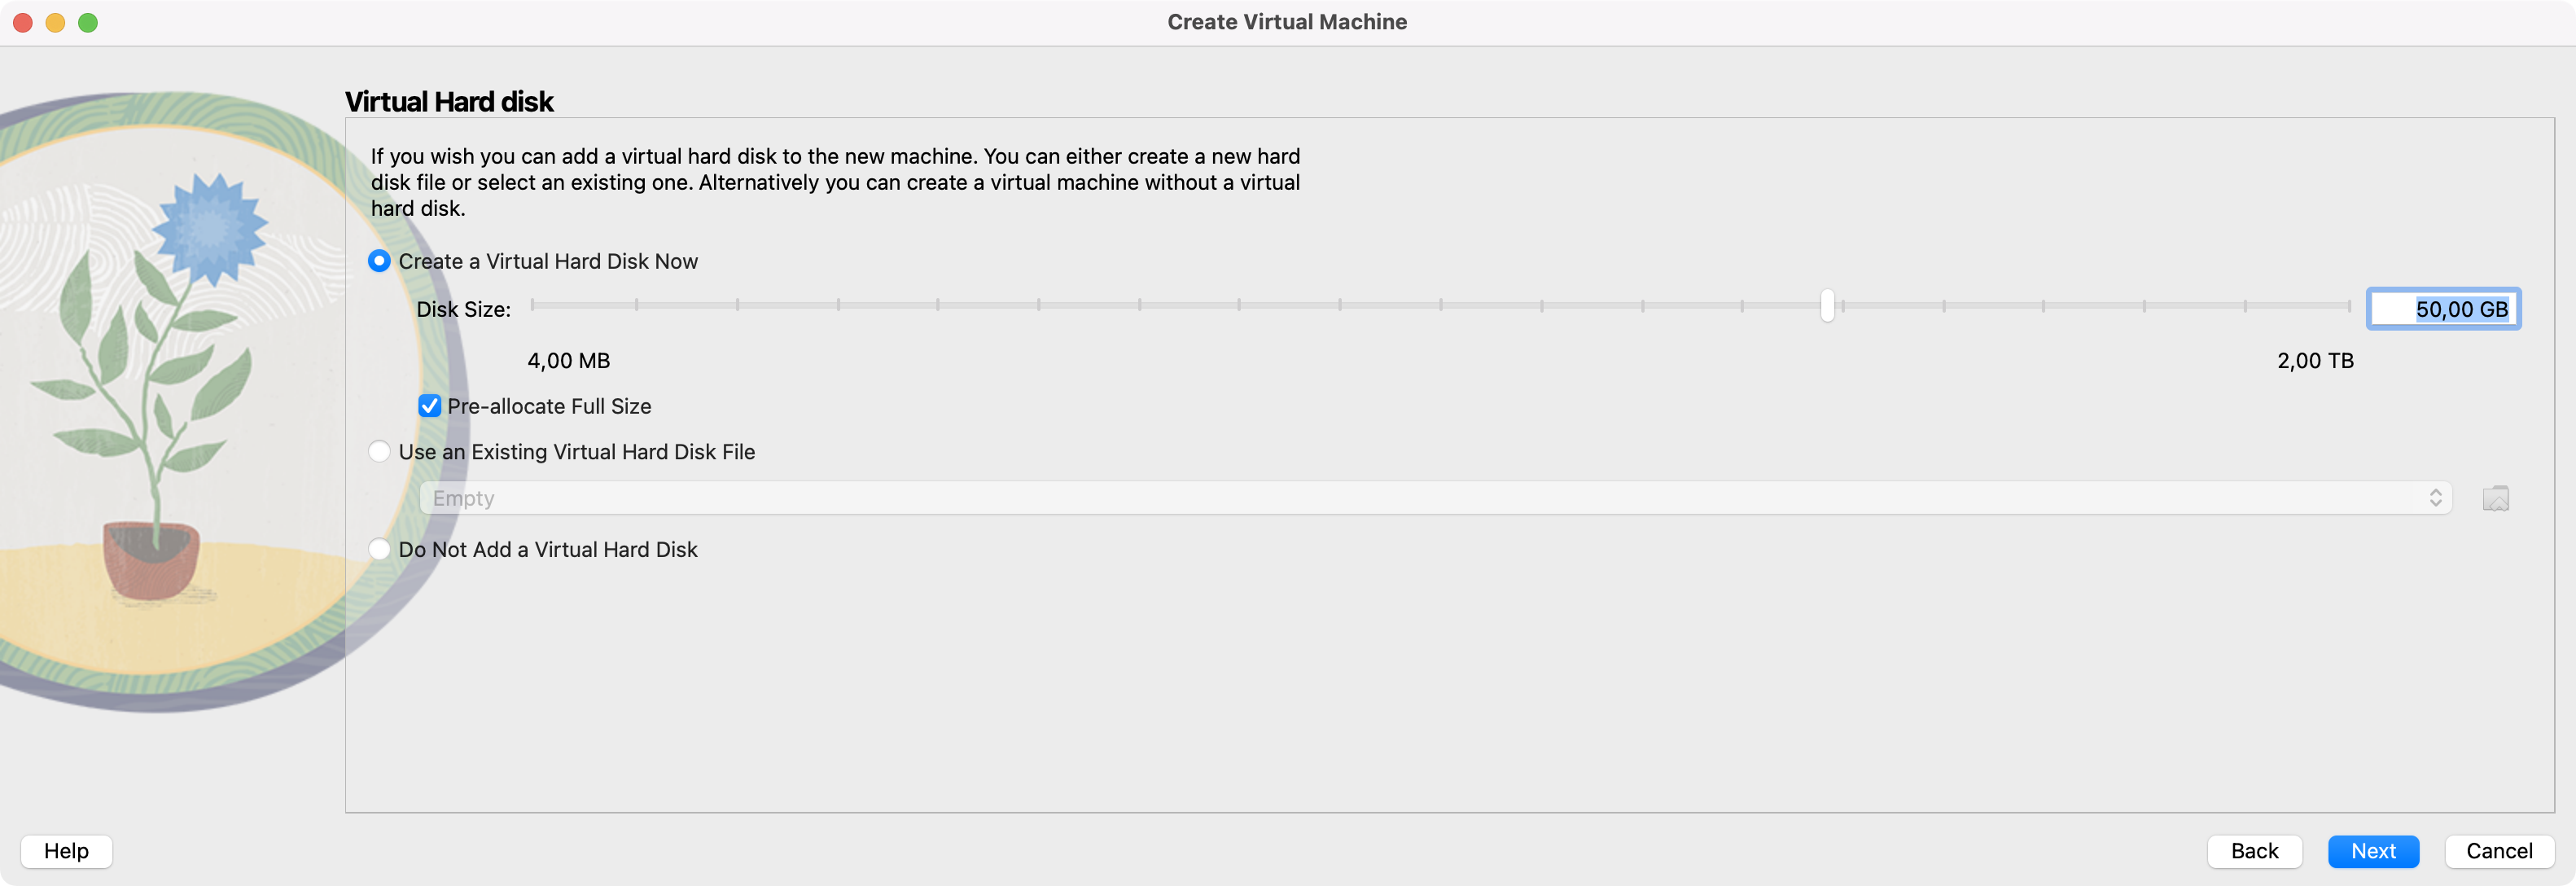
Exhibit 29: Virtual Machine – Configure the Virtual Disk
Pre-allocating disk space is recommended to provide more predictable disk performance and avoid file expansion during use. This option allocates the full 50 GB on the host when the virtual disk is created, rather than allowing the disk file to grow as data is written.
Before installation, a summary is shown.
The virtual disk will contain the Oracle Linux operating system, Oracle Database software, and the database files created during subsequent exercises. The selected capacity should therefore accommodate both the initial installation and the expected workload of the reference sandbox.
Before proceeding, verify that the host has sufficient free storage for the virtual disk and any additional files generated during use, including snapshots and installation media. If future exercises require more storage, the virtual disk capacity may need to be increased using the appropriate VirtualBox and operating system procedures.
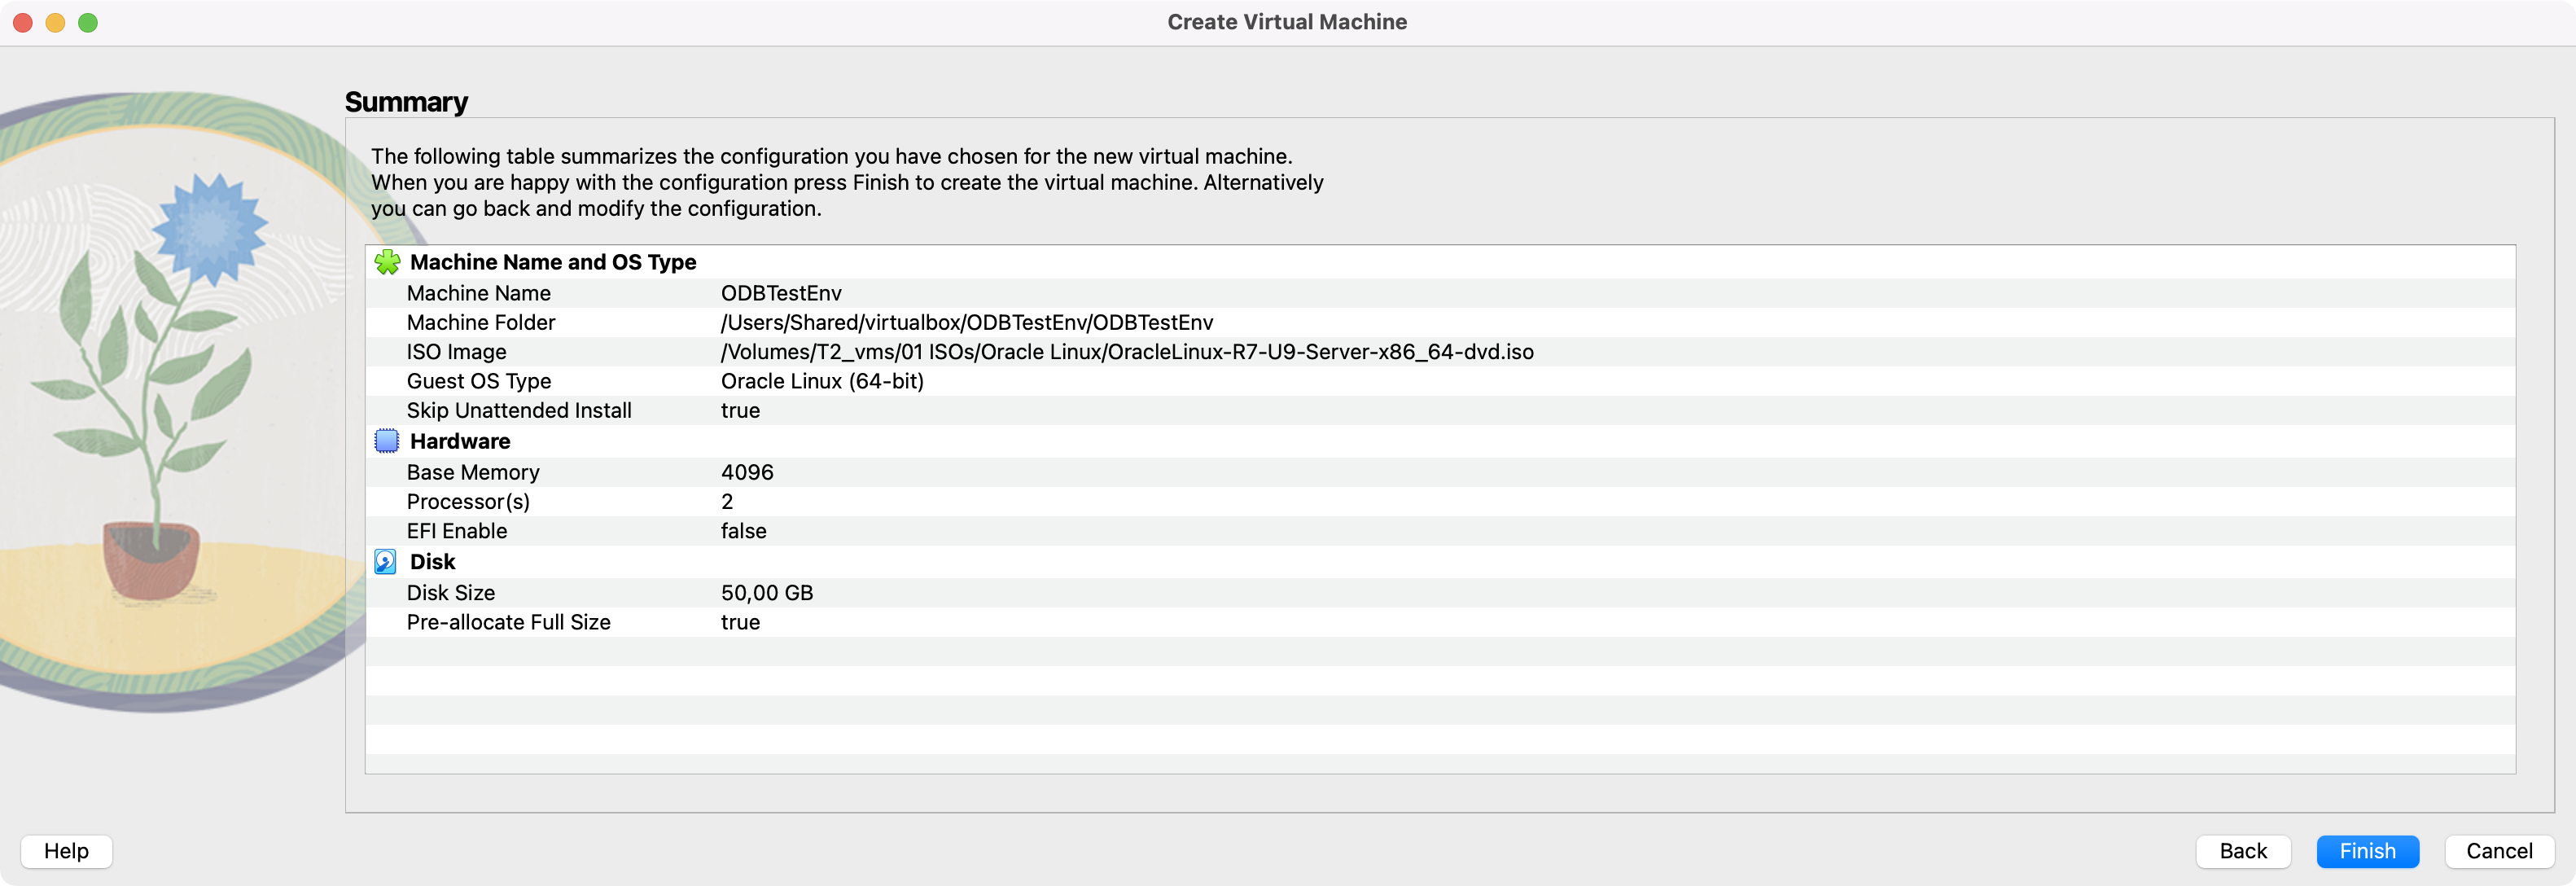
Exhibit 30: Virtual Machine – Review the Configuration
Review the configuration summary and confirm that the virtual machine has the correct name, Oracle Linux installation ISO, 4 GB of RAM, two virtual processors, and a 50 GB virtual disk.
Verify that unattended installation is disabled, as the operating system will be installed manually in the following steps.
Select Finish to create the virtual machine.
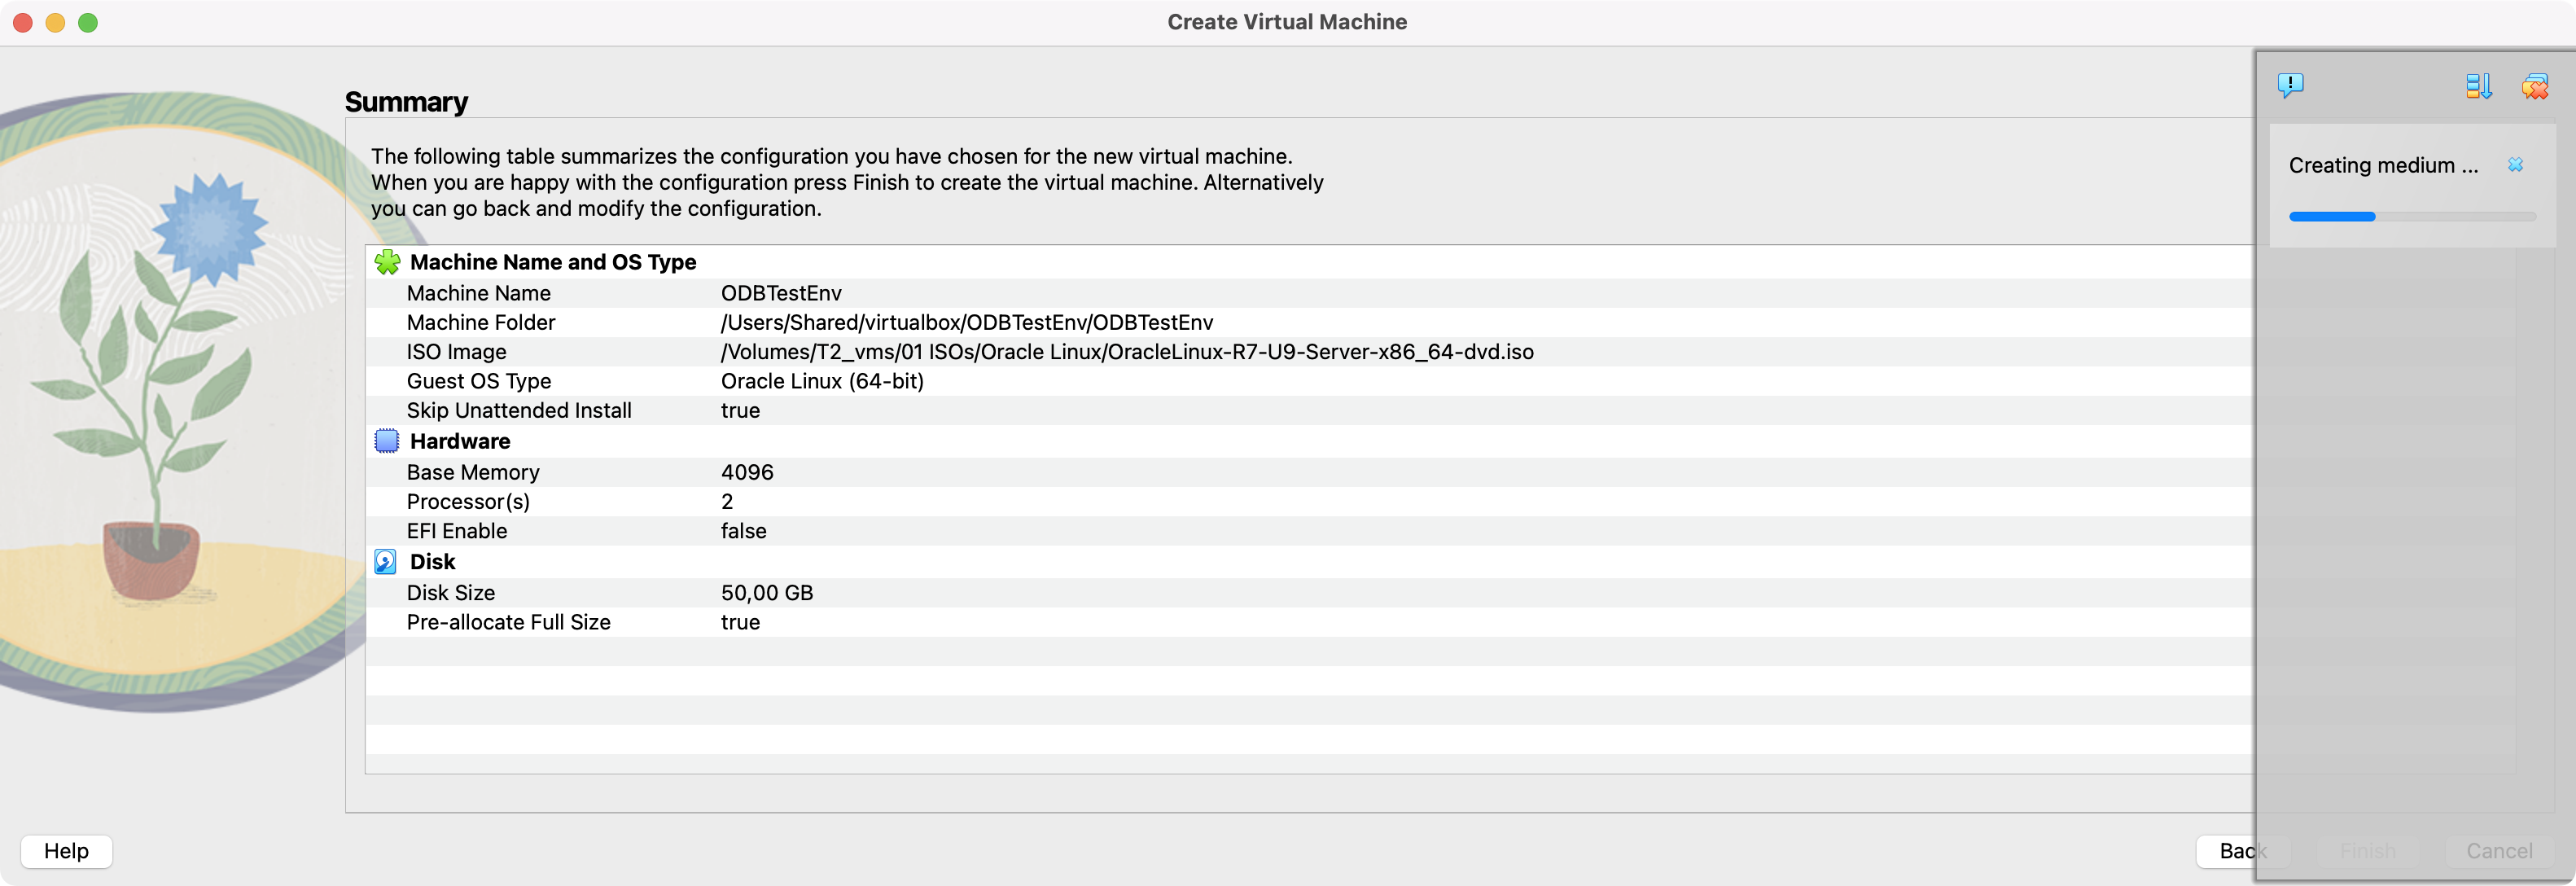
Exhibit 31: Virtual Machine – Create the Virtual Machine
The guest VM is now ready to be started on VirtualBox.
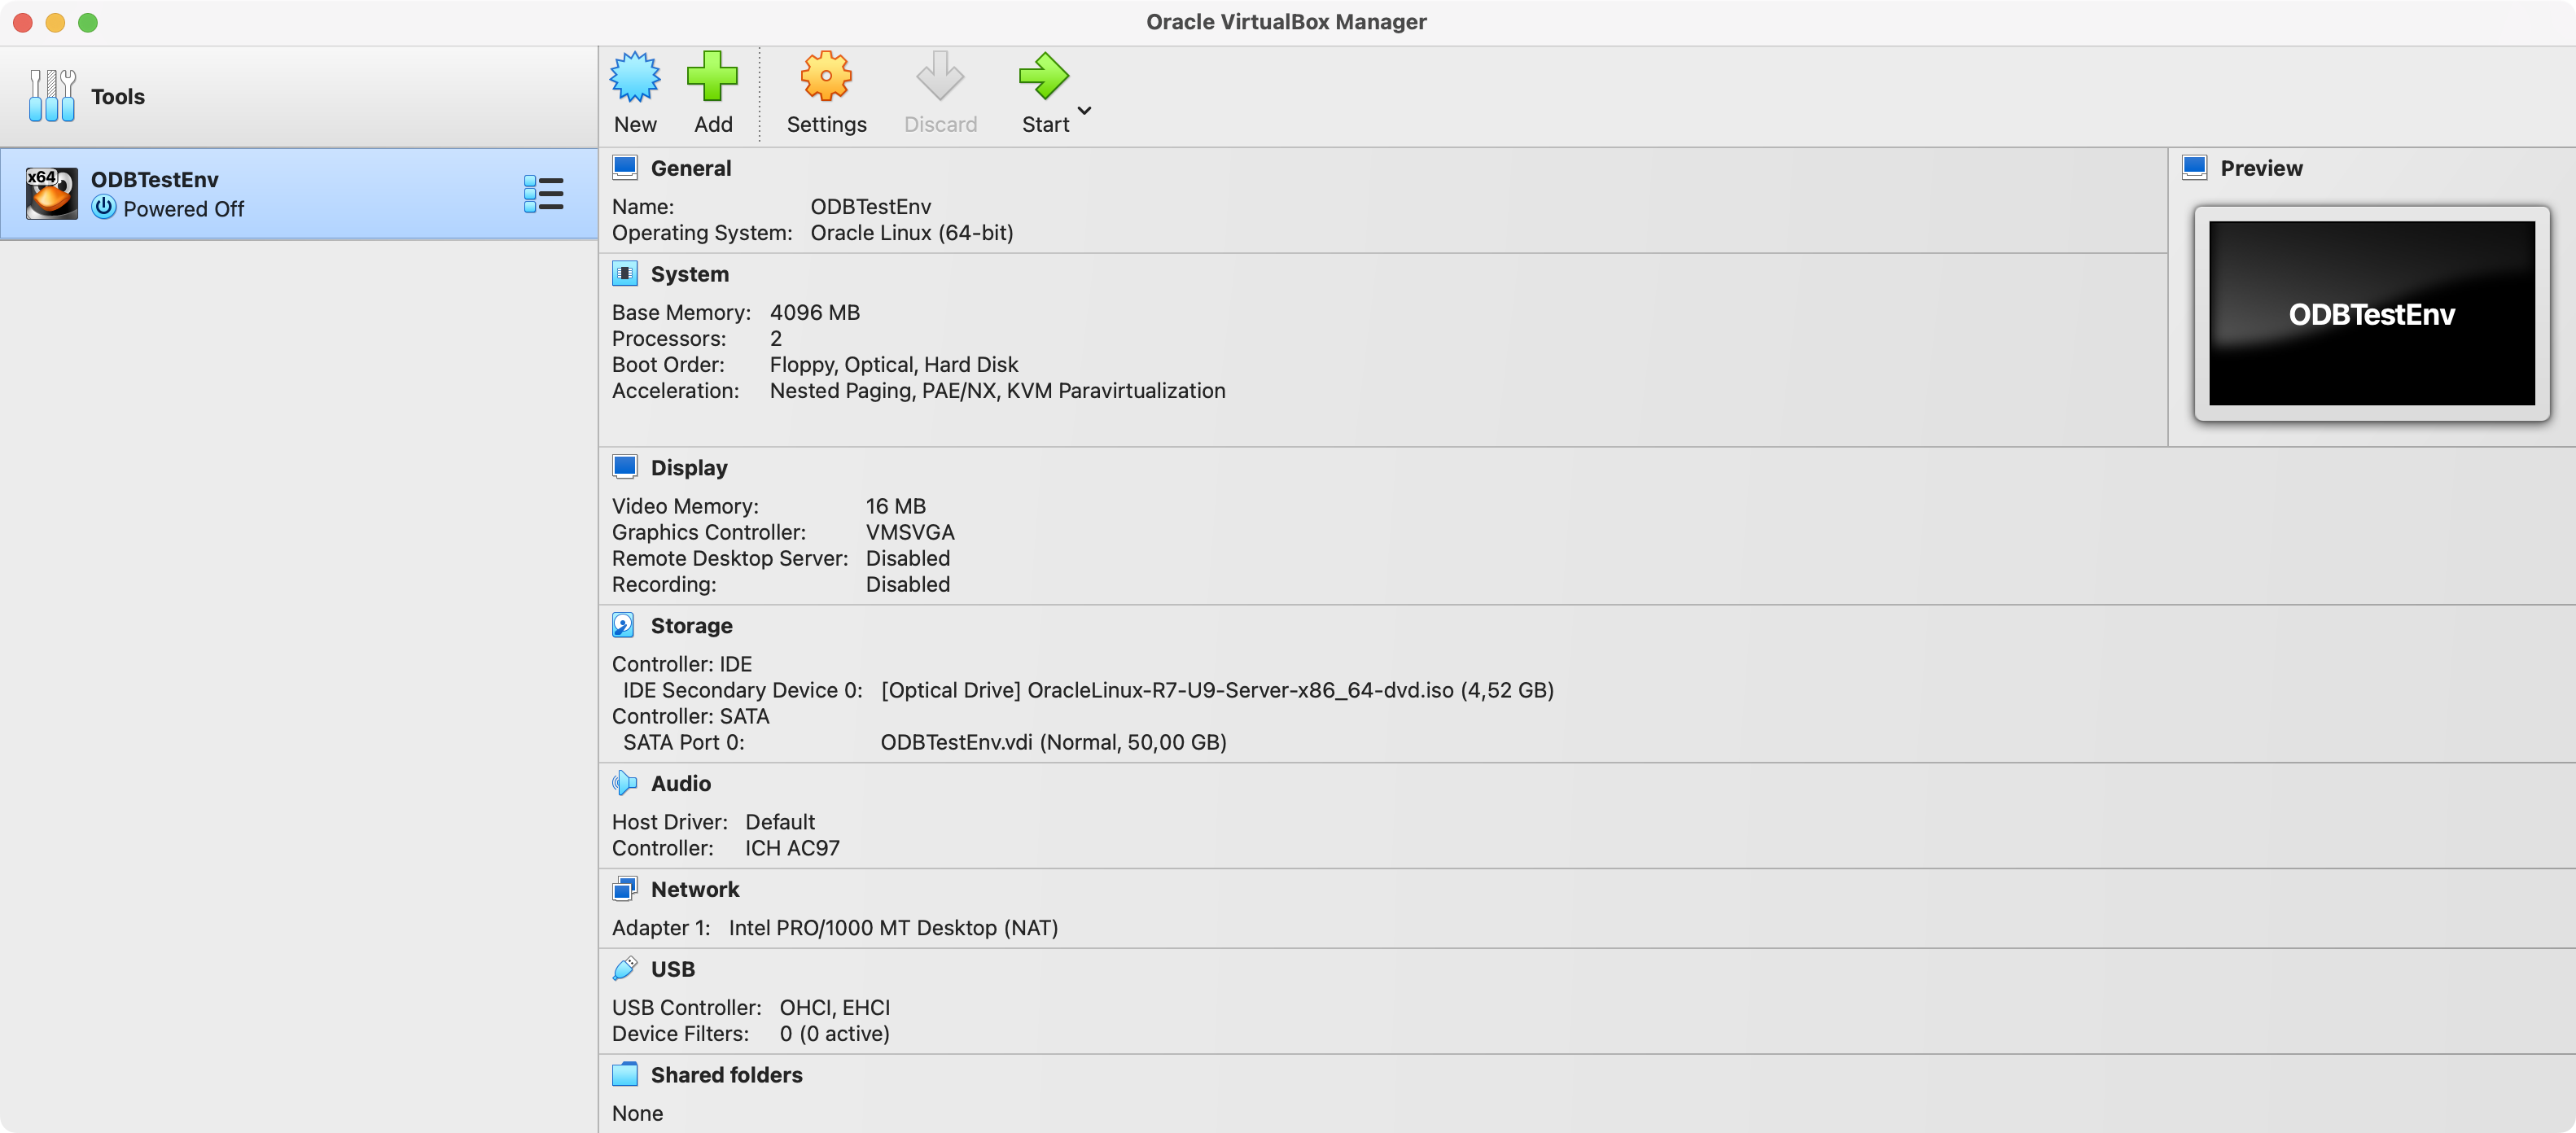
Exhibit 32: VirtualBox Manager – Verify the Virtual Machine Configuration
A new VM has been created.
Step 4 – Configure Network Settings
VirtualBox by default creates the virtual machine with NAT networking. Use NAT when outbound access is sufficient.
The next exhibit shows Bridged Adapter mode for a case that requires LAN access. Use it only when that access is necessary and authorized. For SSH from the host, configure NAT port forwarding or an approved alternative.
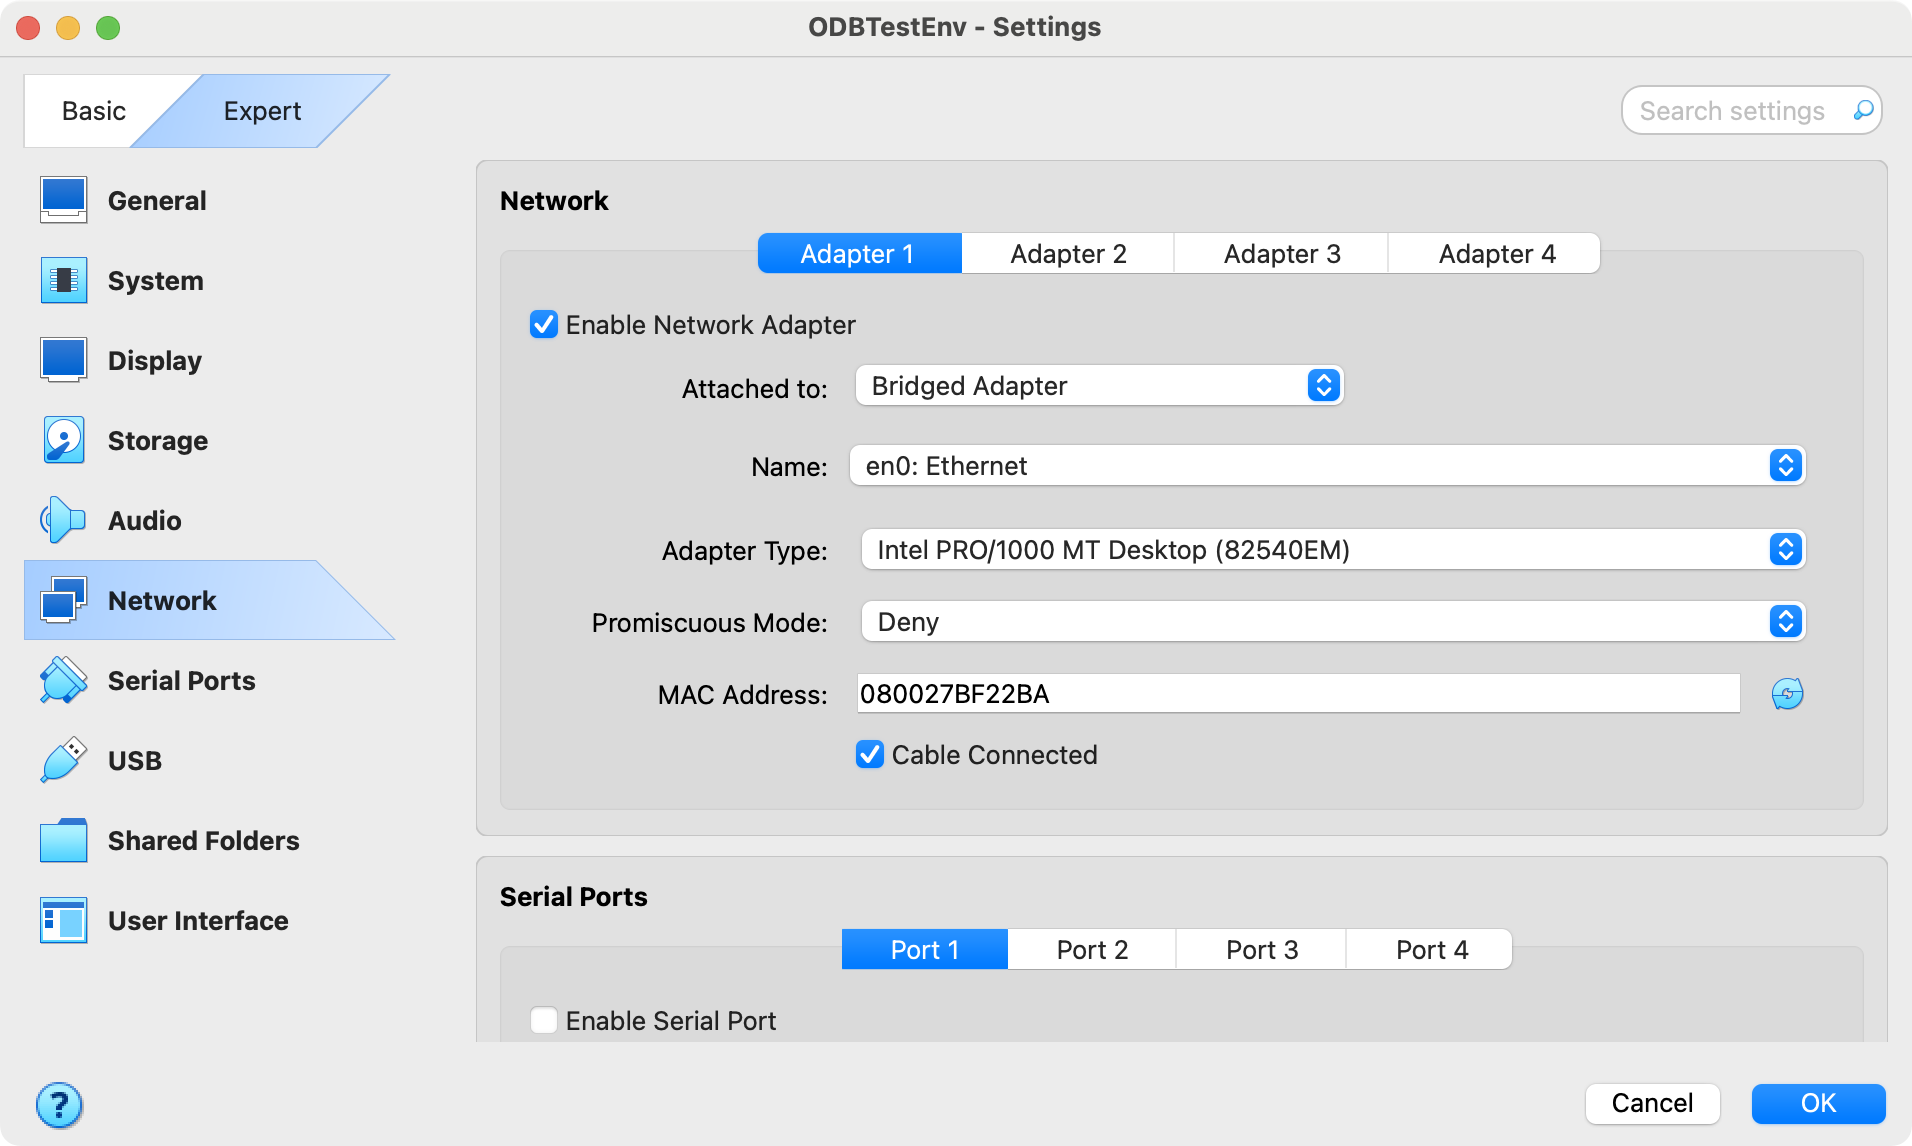
Exhibit 33: Virtual Machine Settings – Configure the Network
Select OK to apply the changes.
Step 5 – Verify Boot Settings
Verify the VM configuration and confirm that the boot ISO is the Oracle Linux image downloaded earlier.
In the VM settings, go to Settings > Storage.
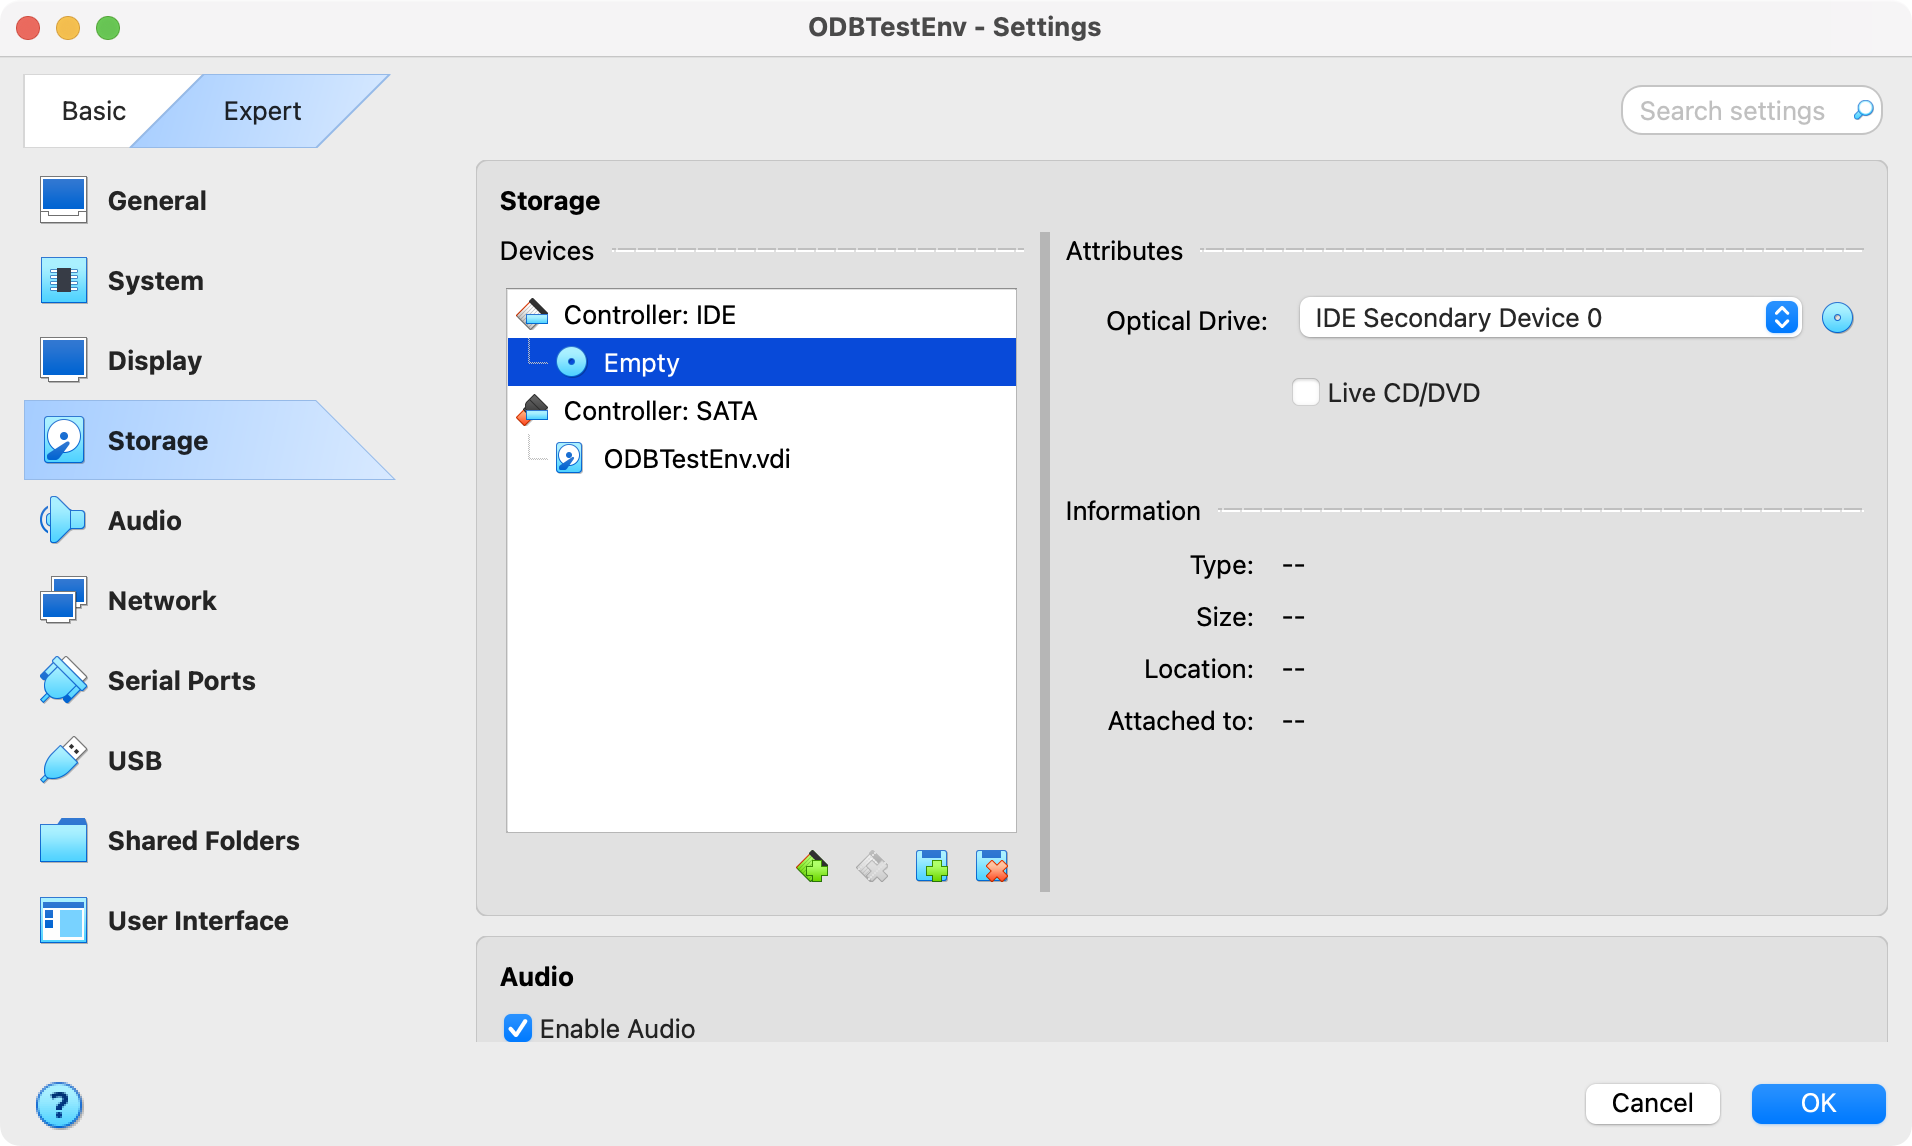
Exhibit 34: Virtual Machine Settings – Open Storage Settings
If the IDE controller is absent, add one with the (+) icon.
Select the blue disk on the right to choose the correct ISO file before starting the virtual machine.
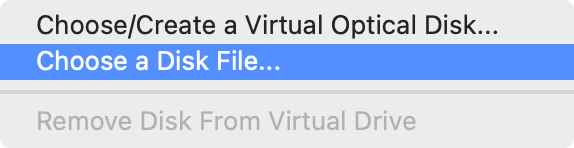
Exhibit 35: Virtual Machine Settings – Select the Oracle Linux ISO
Click Choose a Disk File in order to select the ISO file from the host file system. Navigate to the position of the ISO file to select it.
Confirm that the selected Oracle Linux ISO file appears under the IDE controller before proceeding.
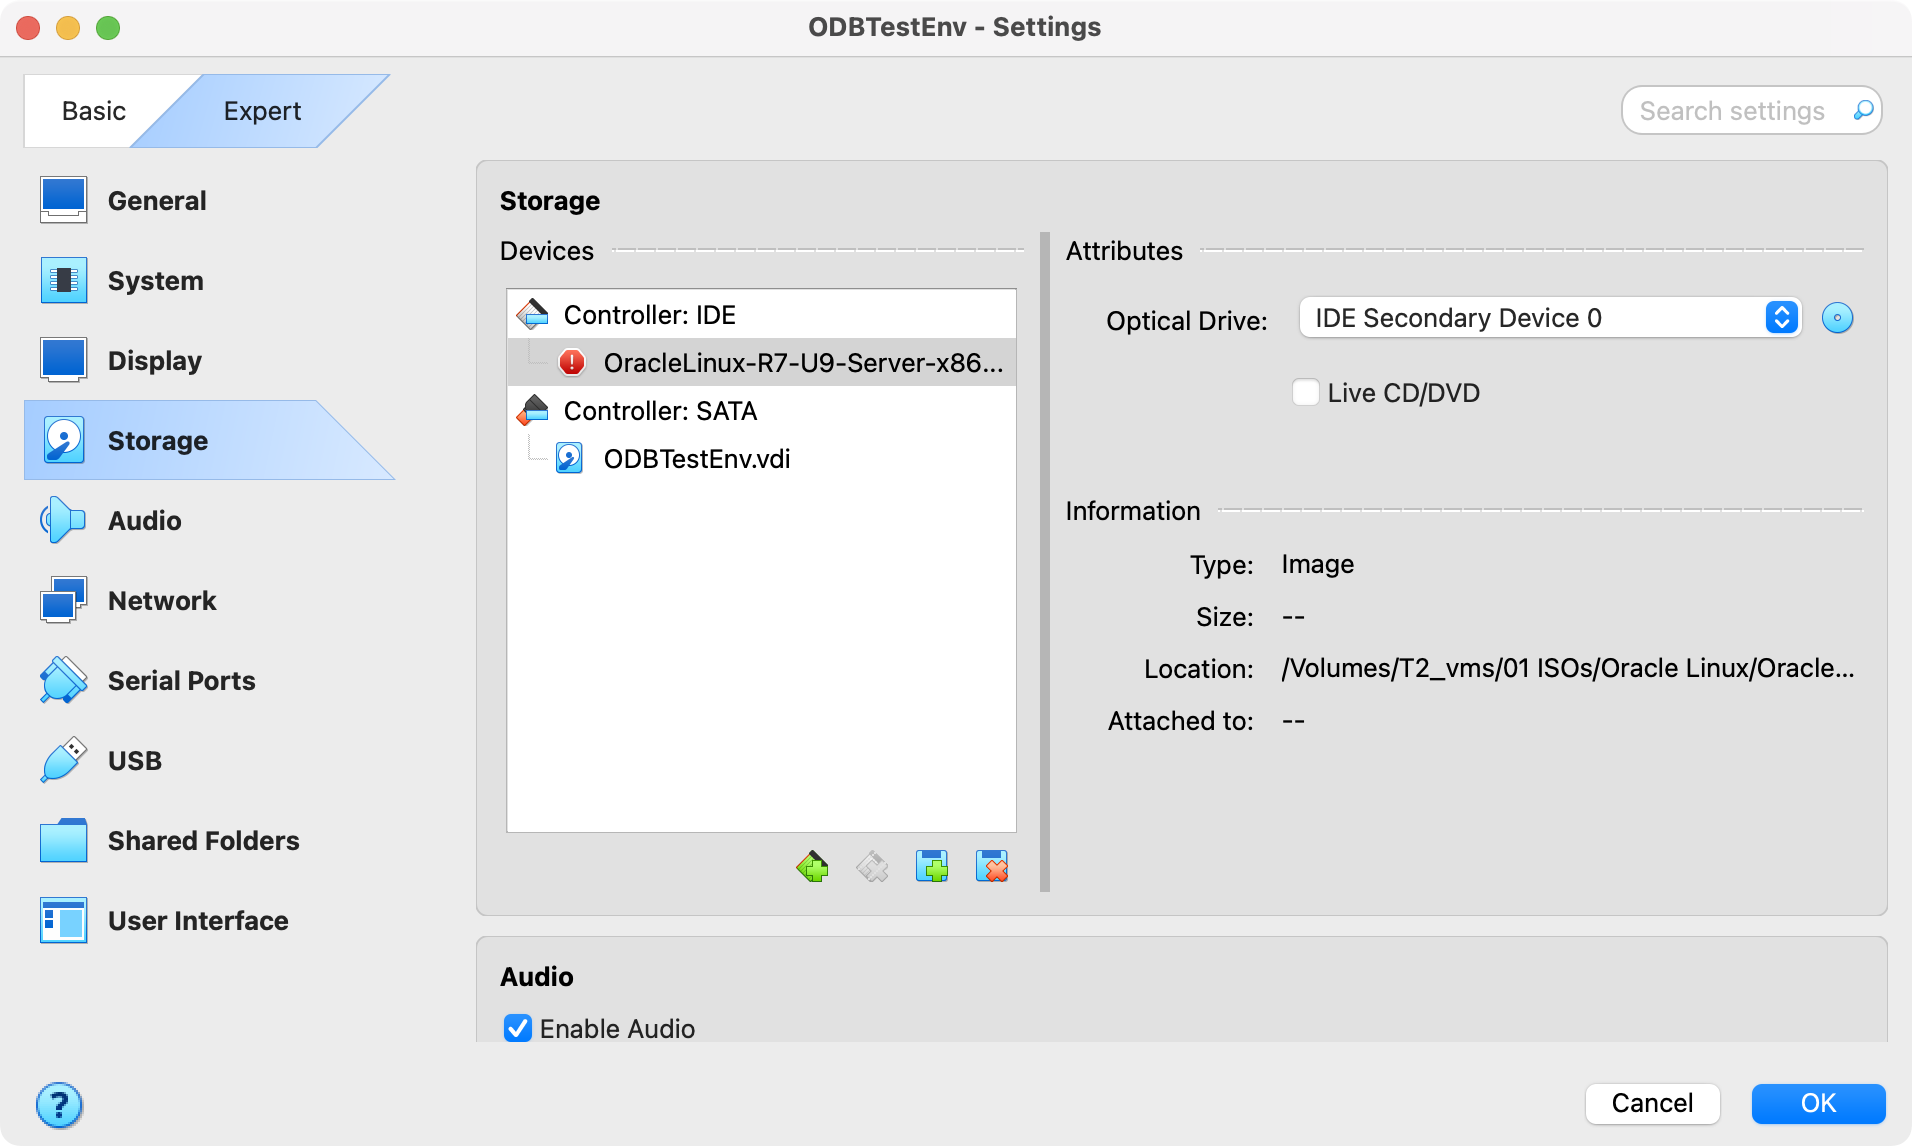
Exhibit 36: Virtual Machine Settings – Attach the Oracle Linux ISO
Verify the boot order to ensure that the virtual machine starts from the Oracle Linux installation ISO. In the VirtualBox System settings, open the Motherboard tab and place Optical before Hard Disk in the boot sequence. The optical drive attached to the IDE controller must contain the Oracle Linux installation ISO.
This configuration allows the Oracle Linux installer to start when the virtual machine is powered on. After installation, the virtual hard disk will be used to boot the installed operating system.
The selected boot order is shown in the next exhibit.
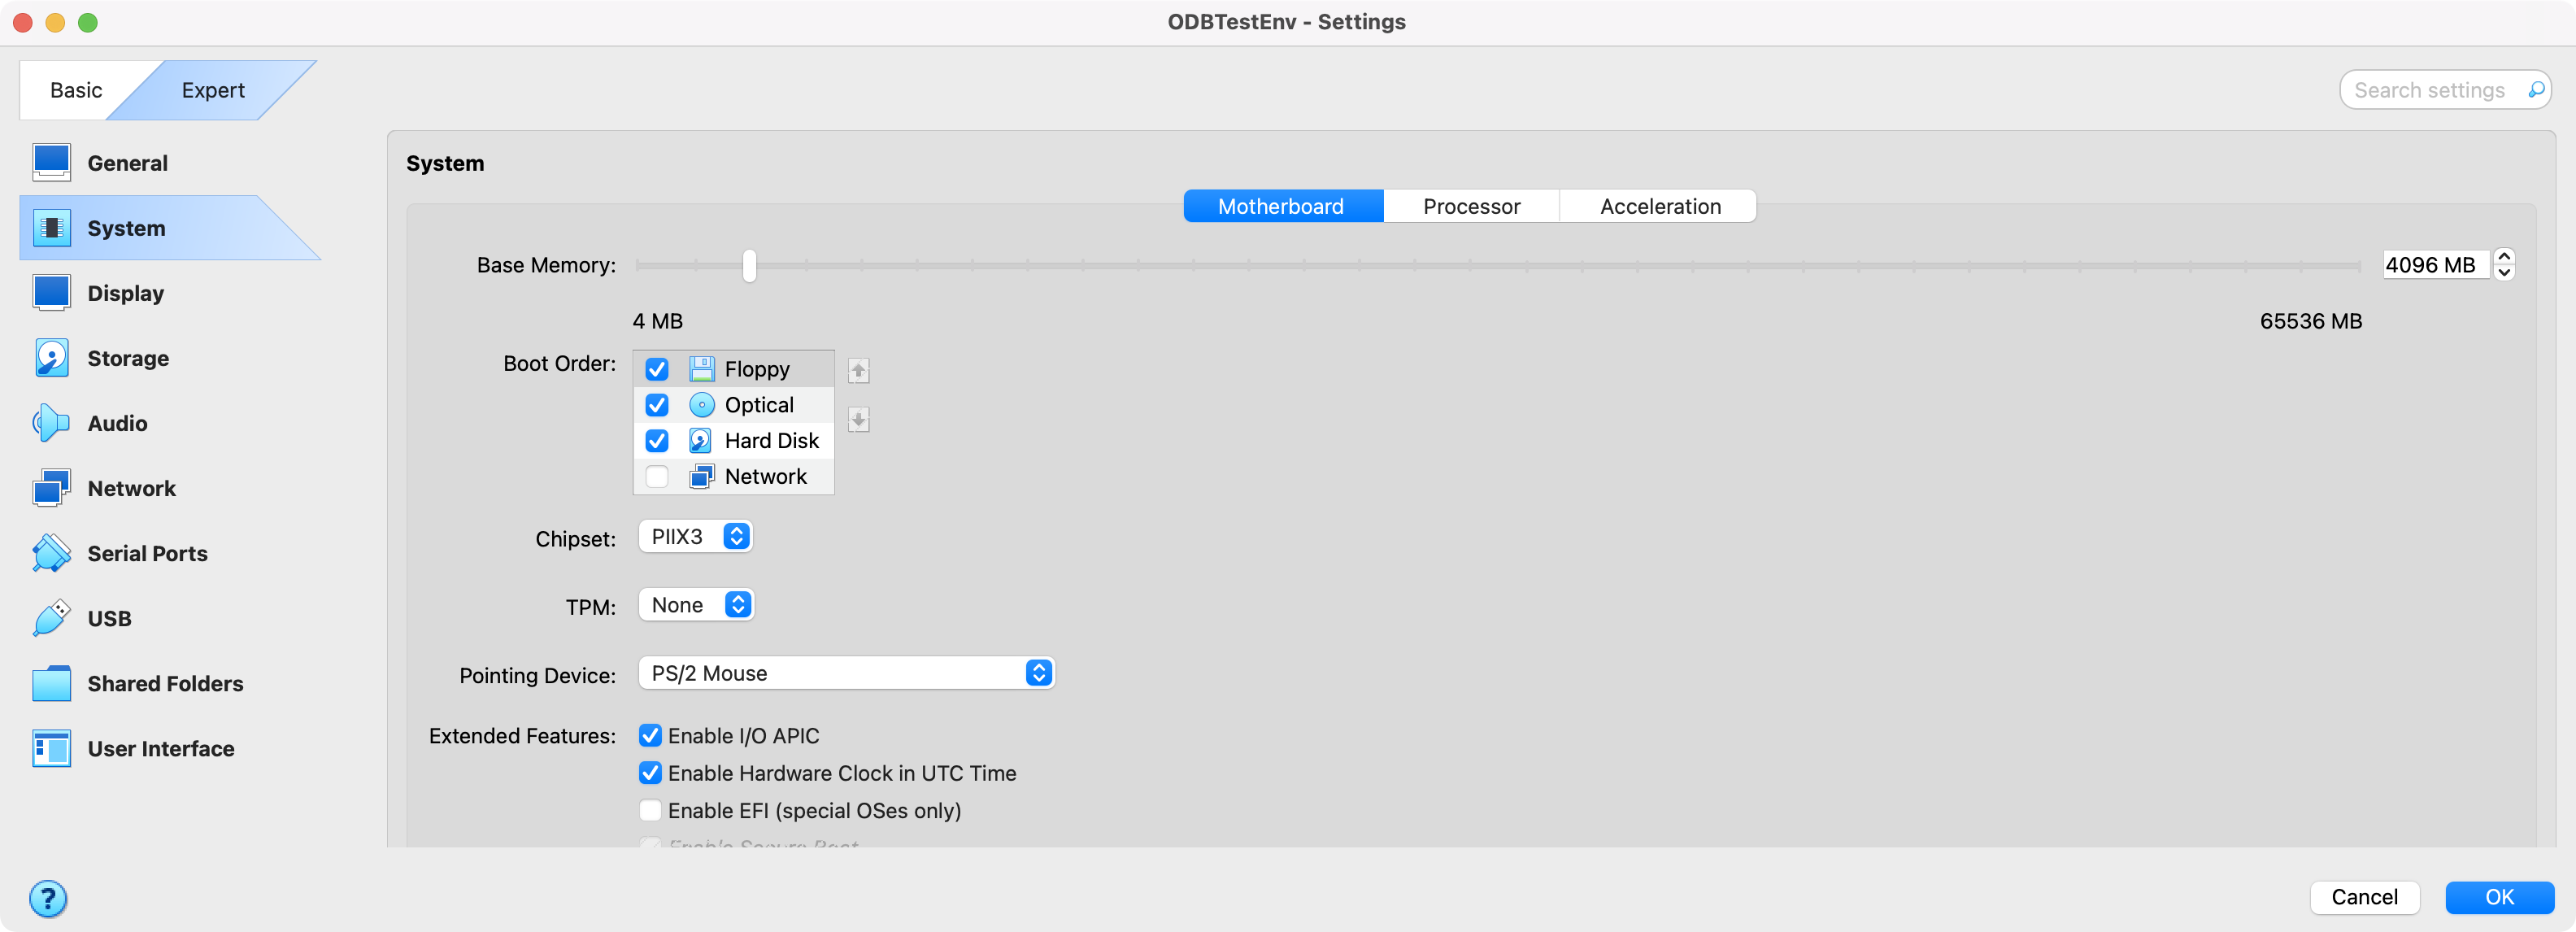
Exhibit 37: Virtual Machine Settings – Set the Boot Order
Chapter Outcome
The VM now has 2 vCPUs, 4 GB of RAM, a 50 GB virtual disk, and the selected network settings. The Oracle Linux ISO is attached and first in the boot order. Chapter 3 starts the VM and installs the operating system.
3. Install and Configure Oracle Linux
This chapter installs Oracle Linux 7.9 in the VM created in Chapter 2. It covers disk and network settings, account creation, the first login, and a basic system check. Chapter 4 then prepares Linux for the database installation.
The steps in this chapter are:
Step 1 – Configure the Oracle Linux Installation
Step 2 – Complete the Oracle Linux Installation
Step 3 – Configure and Verify Oracle Linux
3.1. Configure the Oracle Linux Installation
This section starts the reference virtual machine from the Oracle Linux 7.9 installation ISO. It selects the installer language, disk layout, software configuration, and network settings before installation begins.
For additional information on installing the guest operating system, consult the Oracle Linux 7 Installation Guide [➜ Link reference #16, Oracle Linux 7 Installation Guide].
Note: The reference links are listed in the Link References file in folder 05_External_Links (refer to the downloadable publication package, chapter 7).
In the VirtualBox Manager application, power on the VM by selecting the Start icon.
Before starting the VM, confirm that the Oracle Linux 7.9 installation ISO is attached to the virtual optical drive and that the boot order is configured as described in Chapter 2.
When the VM starts, VirtualBox initializes the virtual hardware and loads the installation media. The following steps guide the Oracle Linux installation, from the initial boot menu to the operating system configuration.
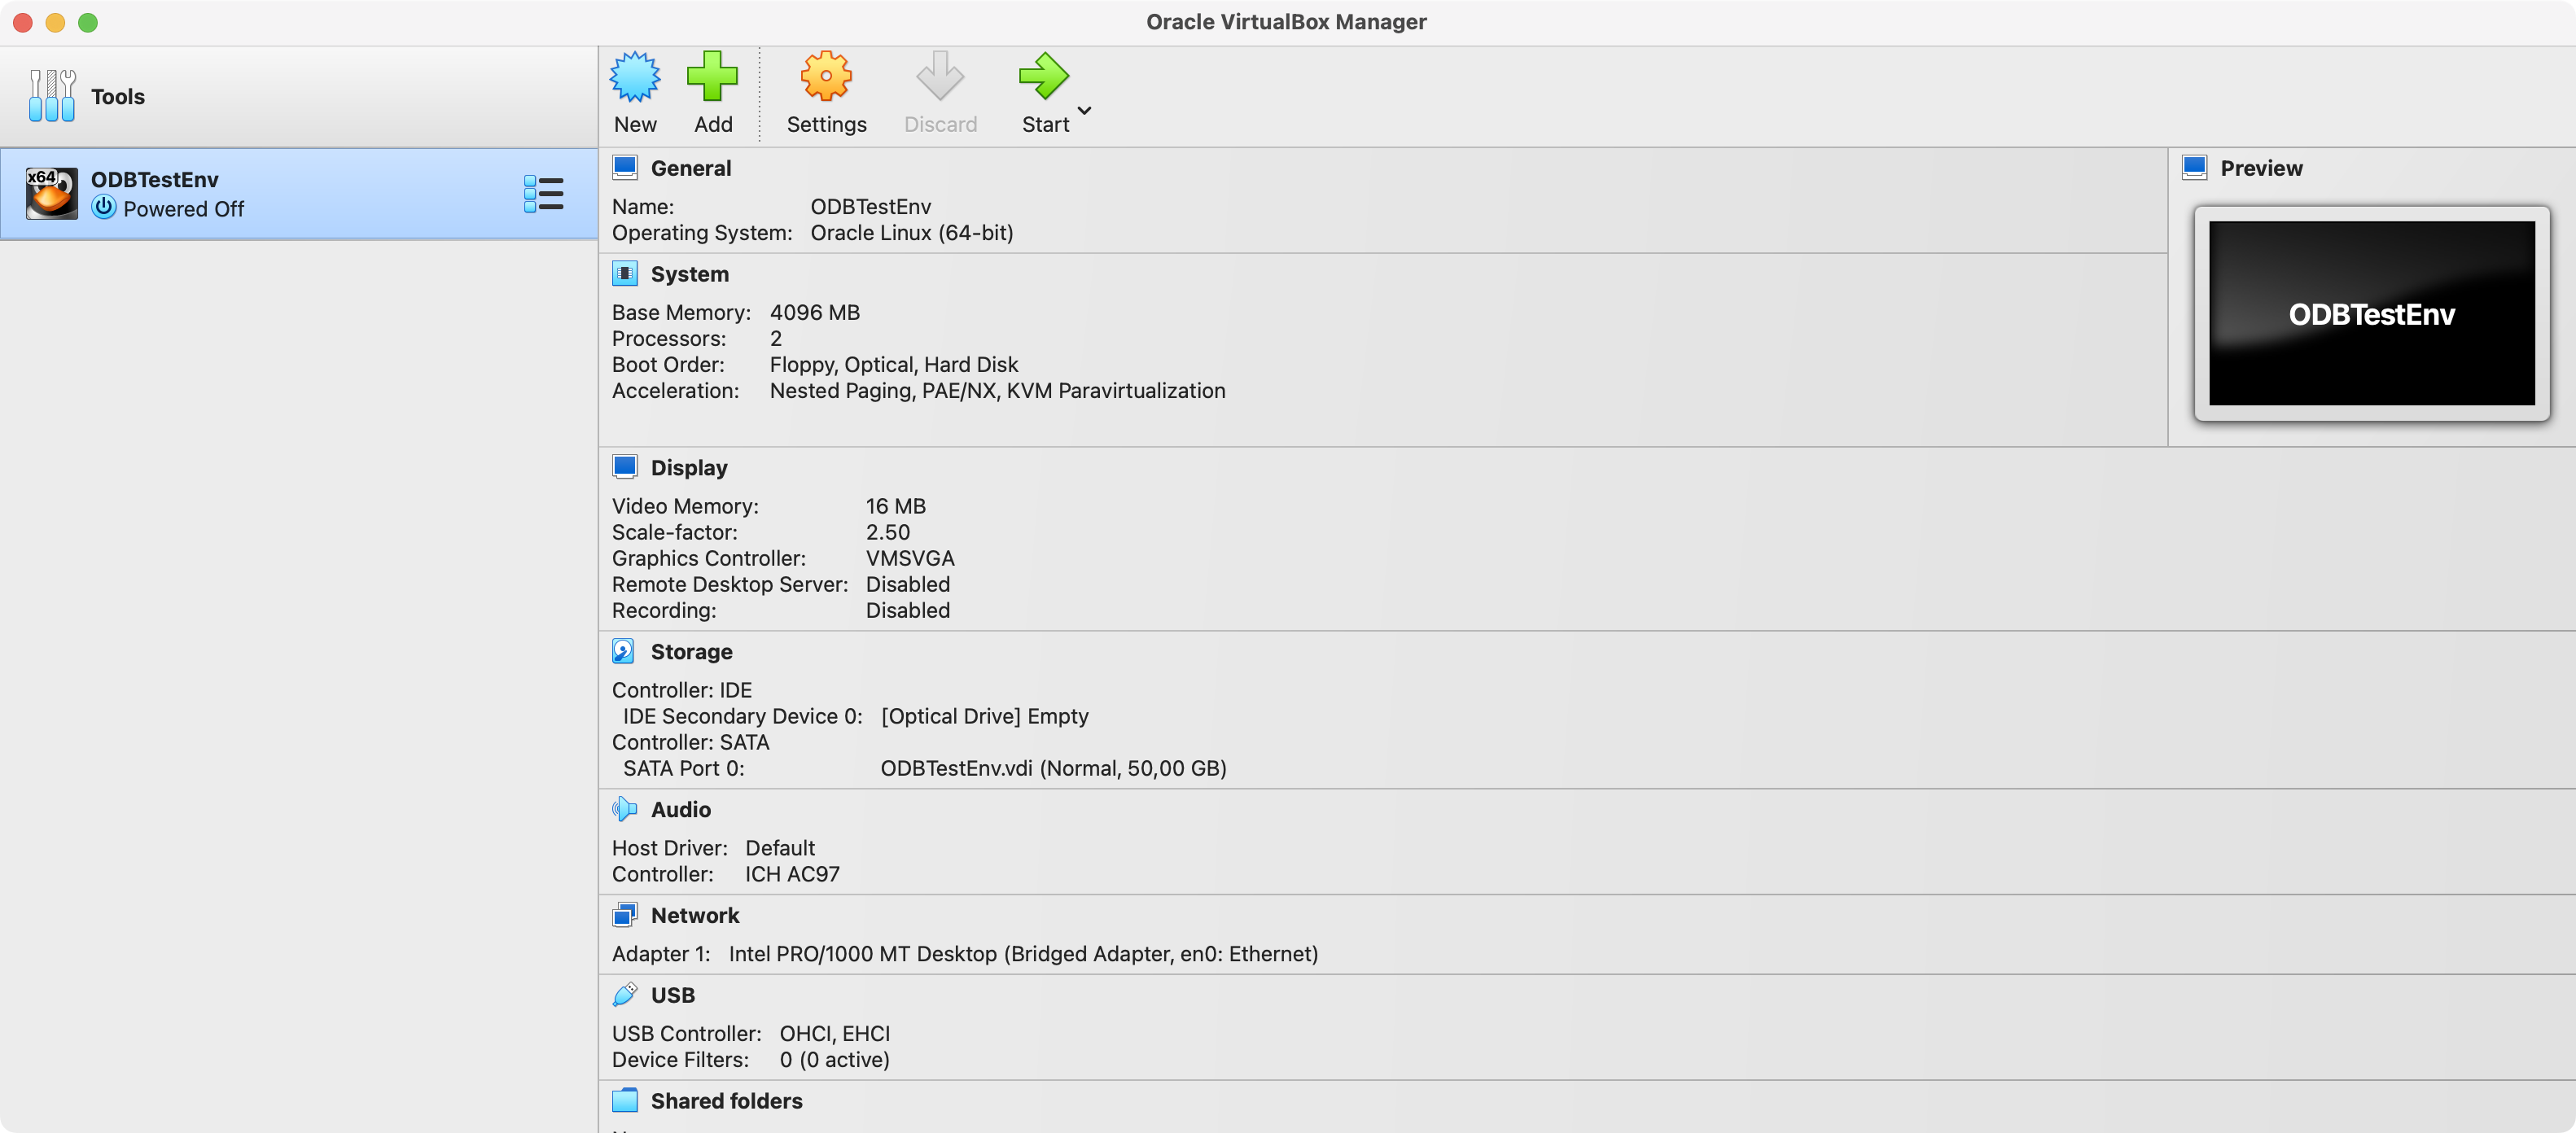
Exhibit 38: VirtualBox Manager – Start the Virtual Machine
Wait for the splash screen to be shown.
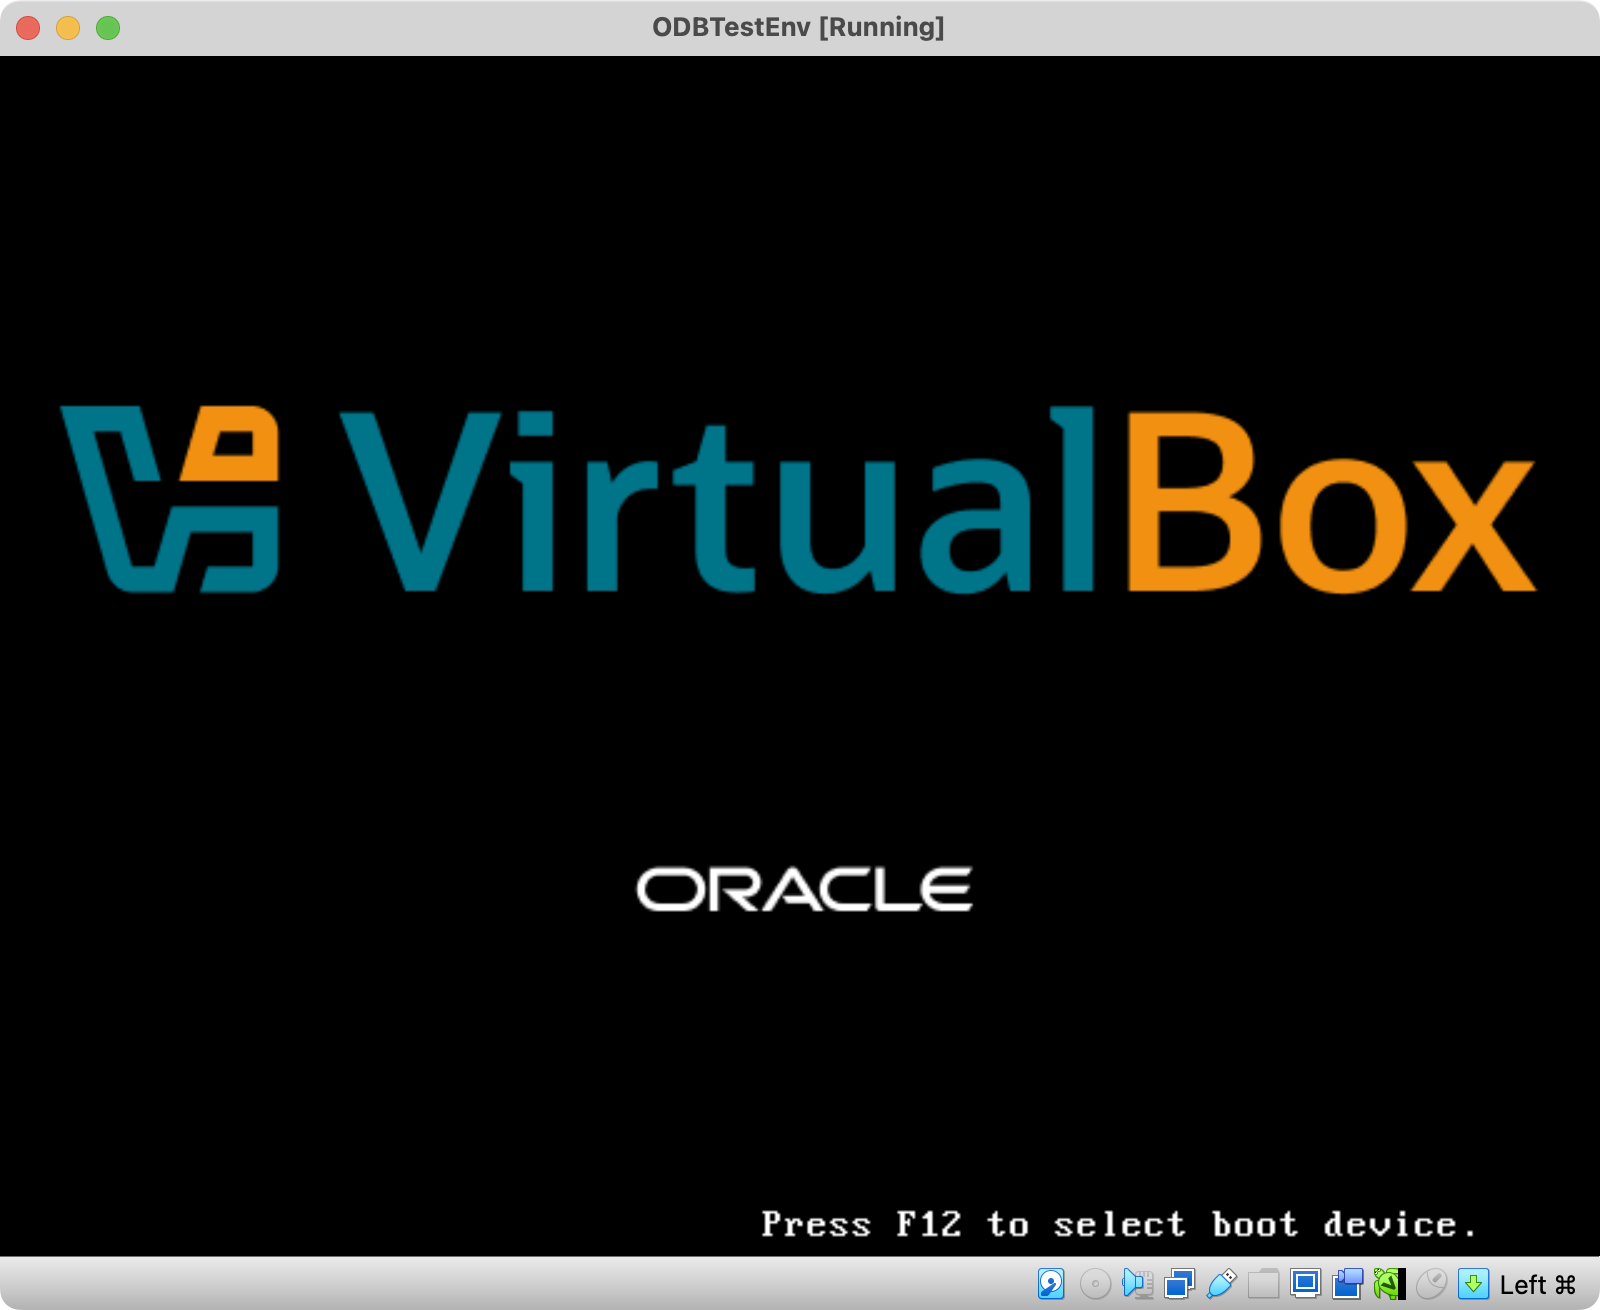
Exhibit 39: Virtual Machine Startup – Boot from the Oracle Linux ISO
By default, the VM boots from the previously mounted ISO and starts with the Oracle Linux installer. The VirtualBox splash screen appears briefly while the virtual hardware initializes. If the installer does not start, verify the ISO attachment and boot order.
Step 1 – Configure the Oracle Linux Installation
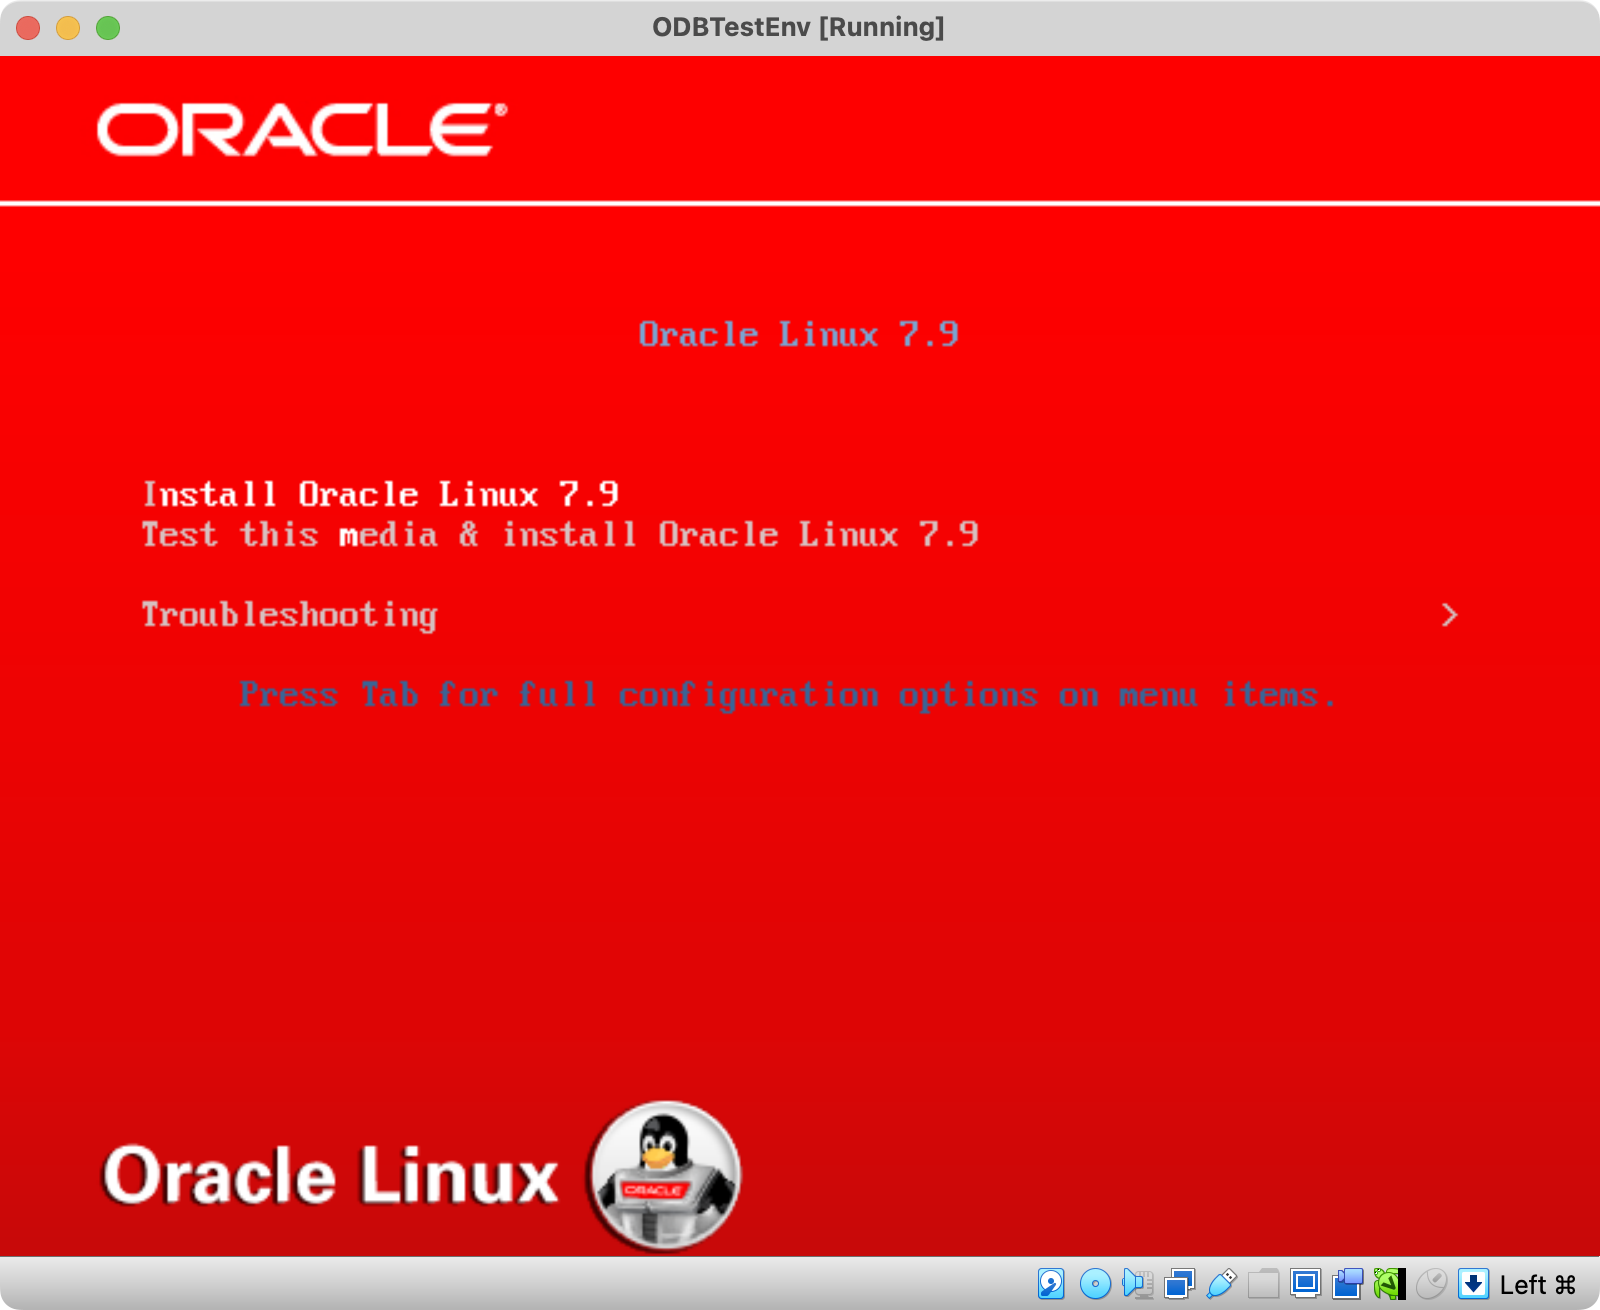
Exhibit 40: Oracle Linux Installation – Select the Installation Option
Select Test this media & install Oracle Linux 7.9 to verify the installation media before starting the installer.
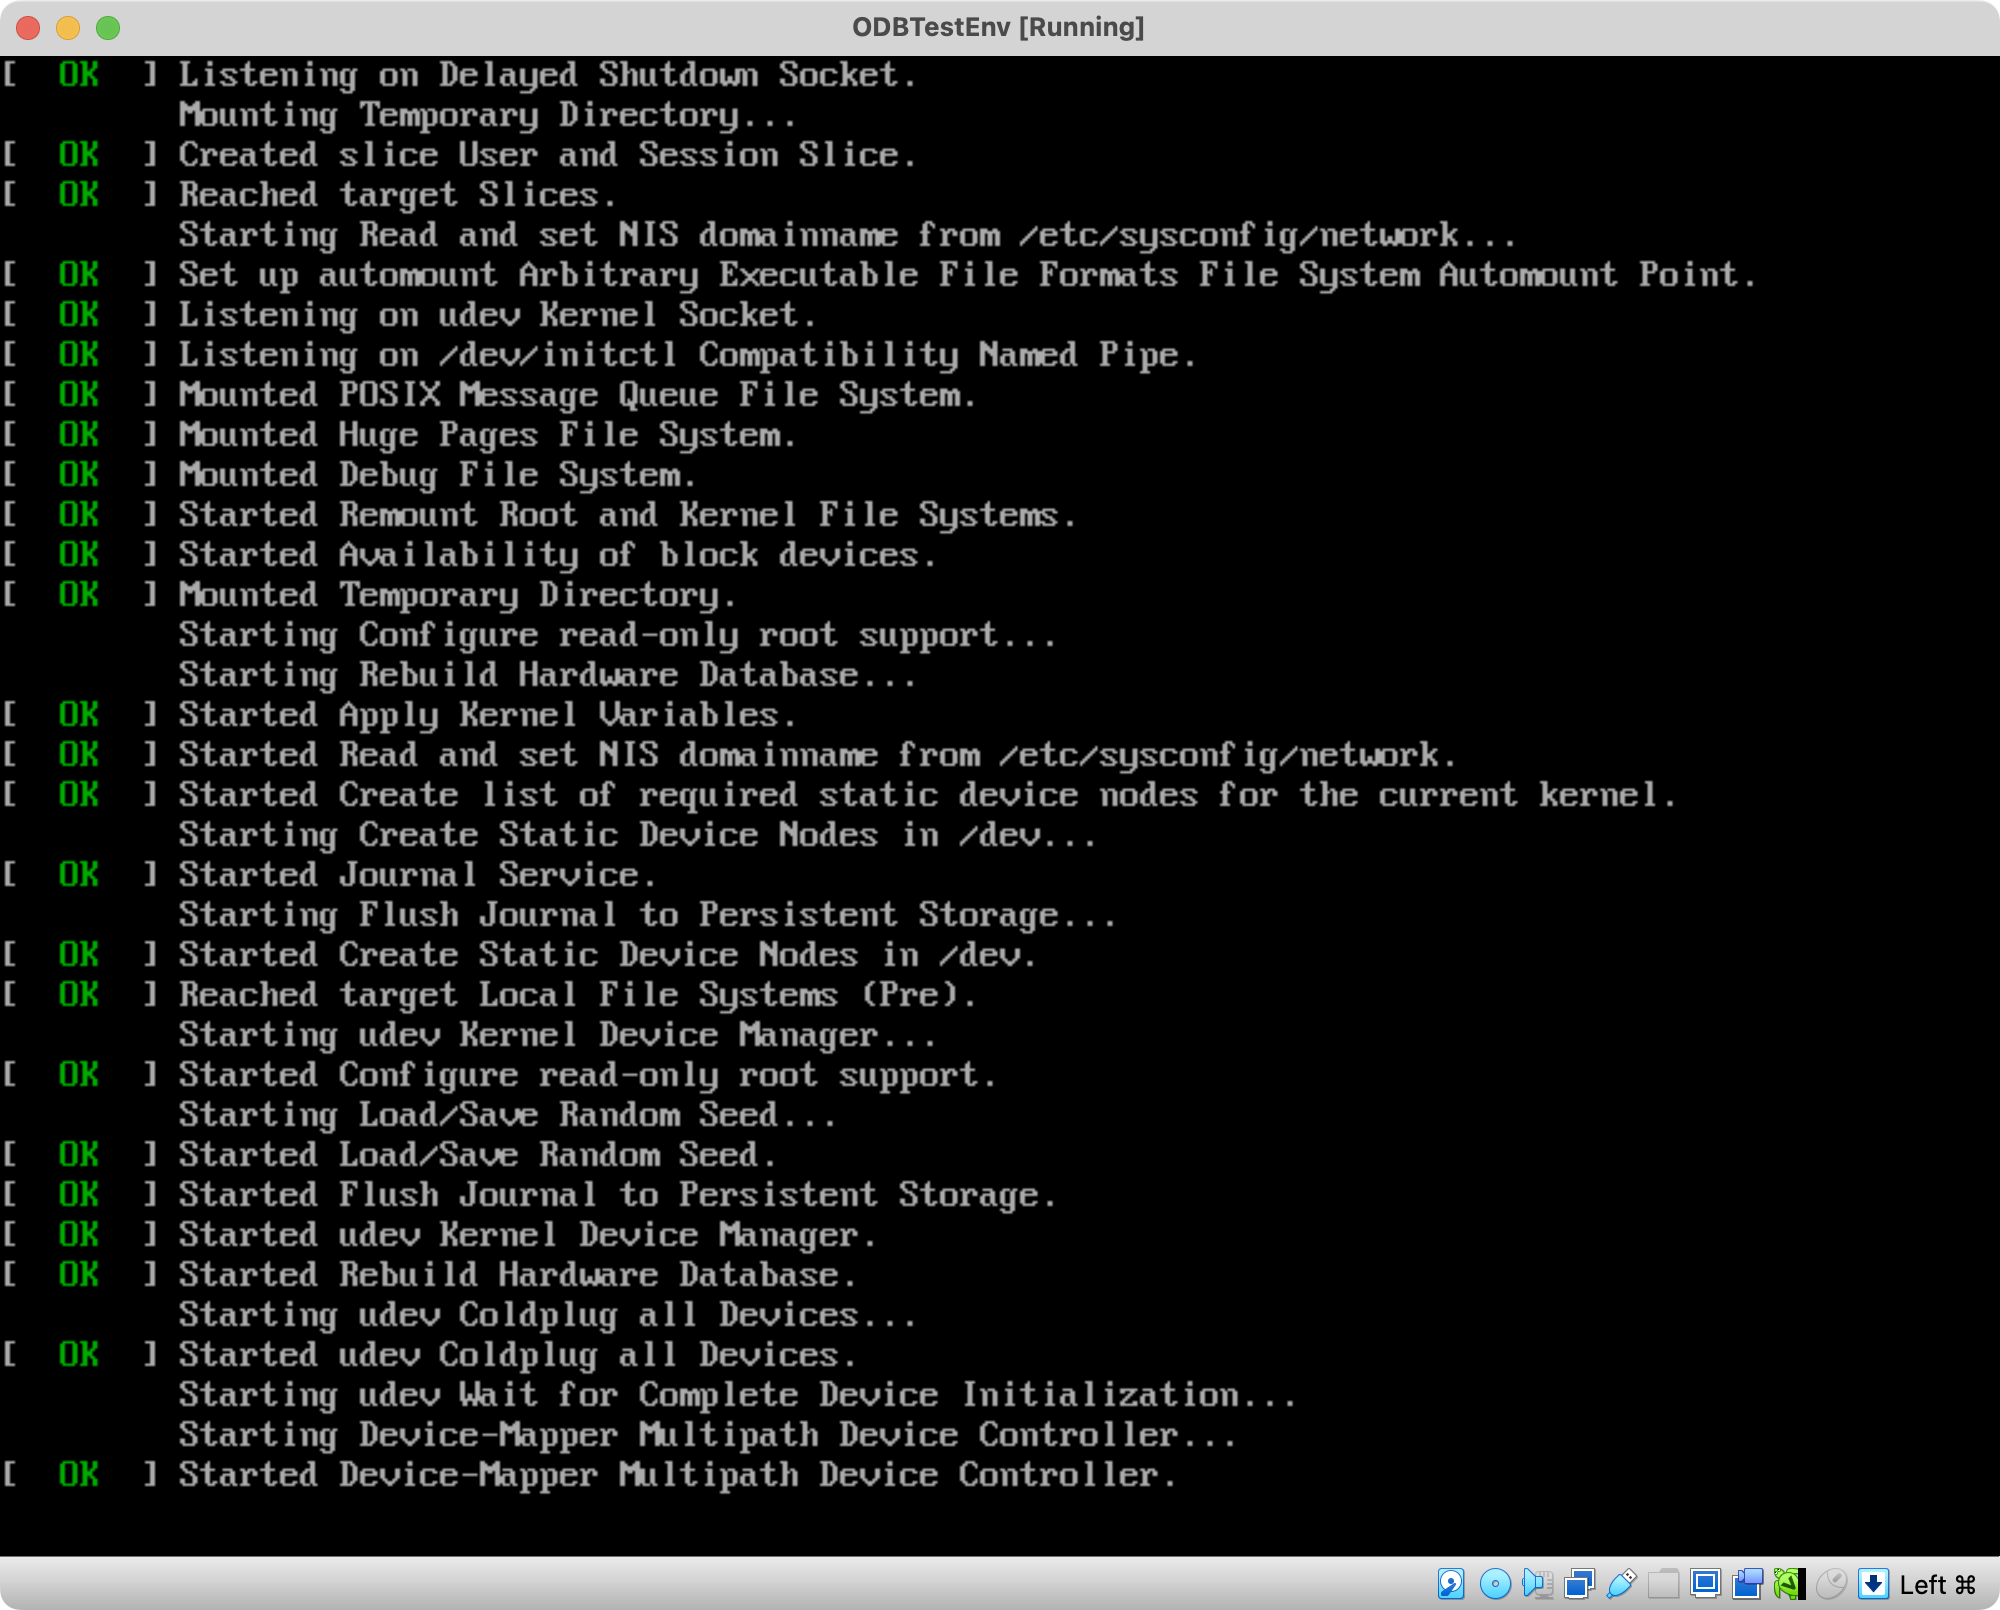
Exhibit 41: Oracle Linux Installation – Run the Installation Media Check
Select a language. English is selected in this guide.
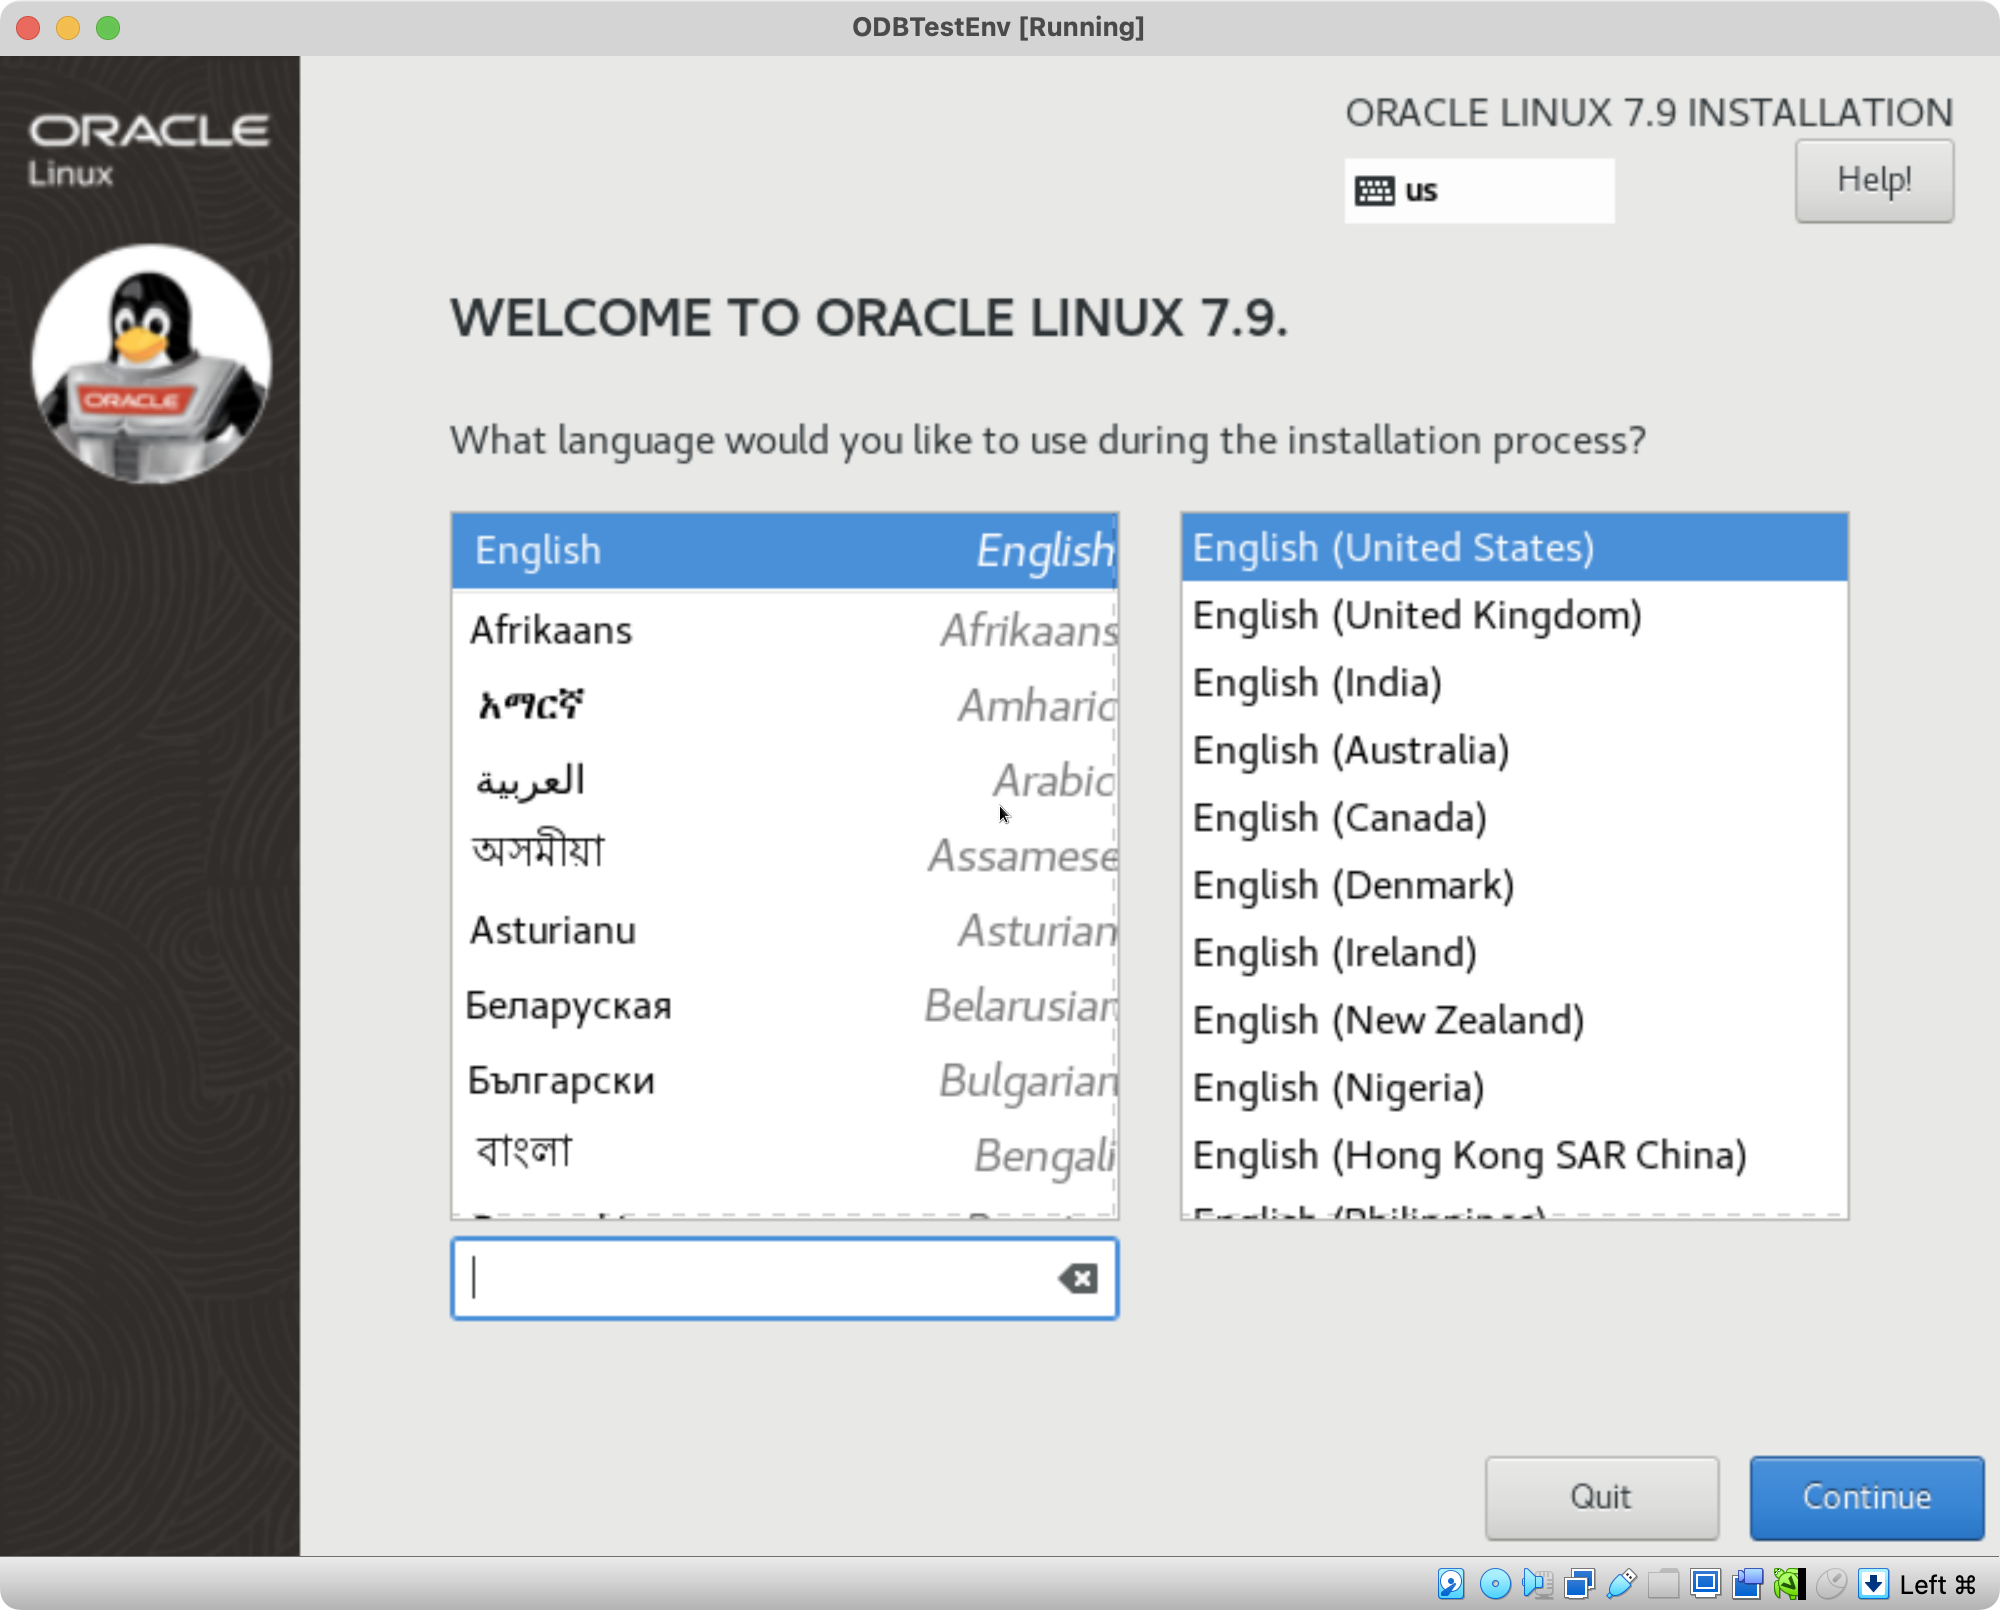
Exhibit 42: Oracle Linux Installation – Select the Language
Select the 50 GB virtual disk, retain Automatically configure partitioning, and select Done.
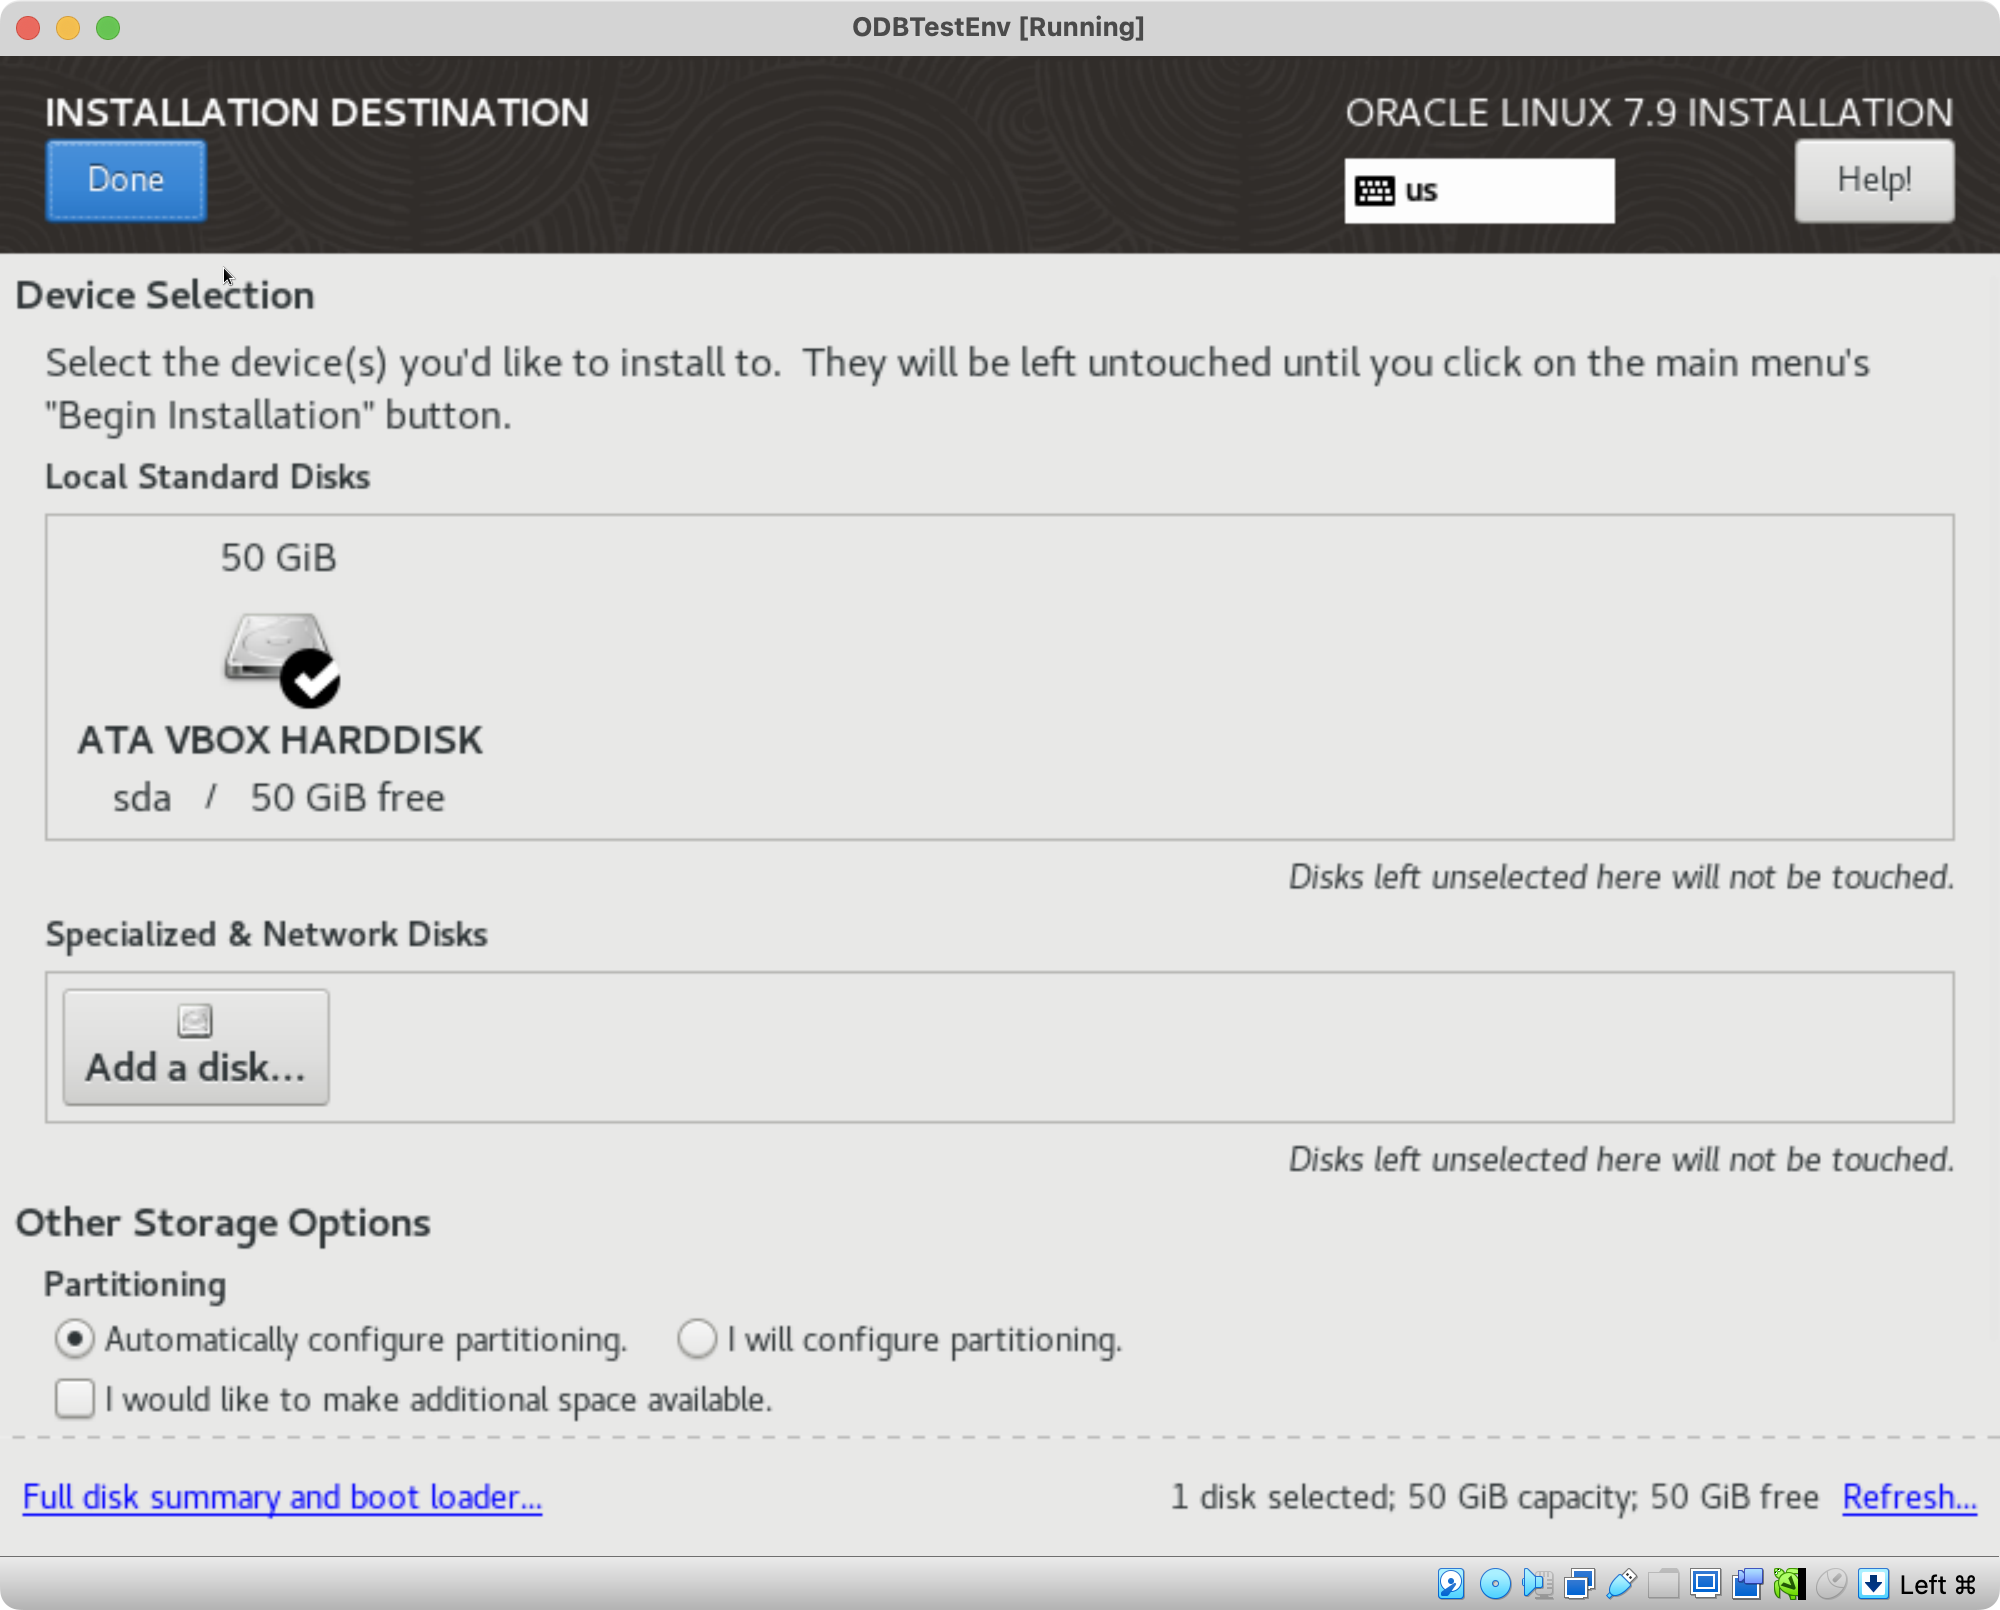
Exhibit 43: Oracle Linux Installation – Select the Disk and Partitioning
Select Server with GUI to get a graphical desktop (select Minimal Install: no graphical interface). Select the System Administration Tools add-on to provide additional system administration utilities.
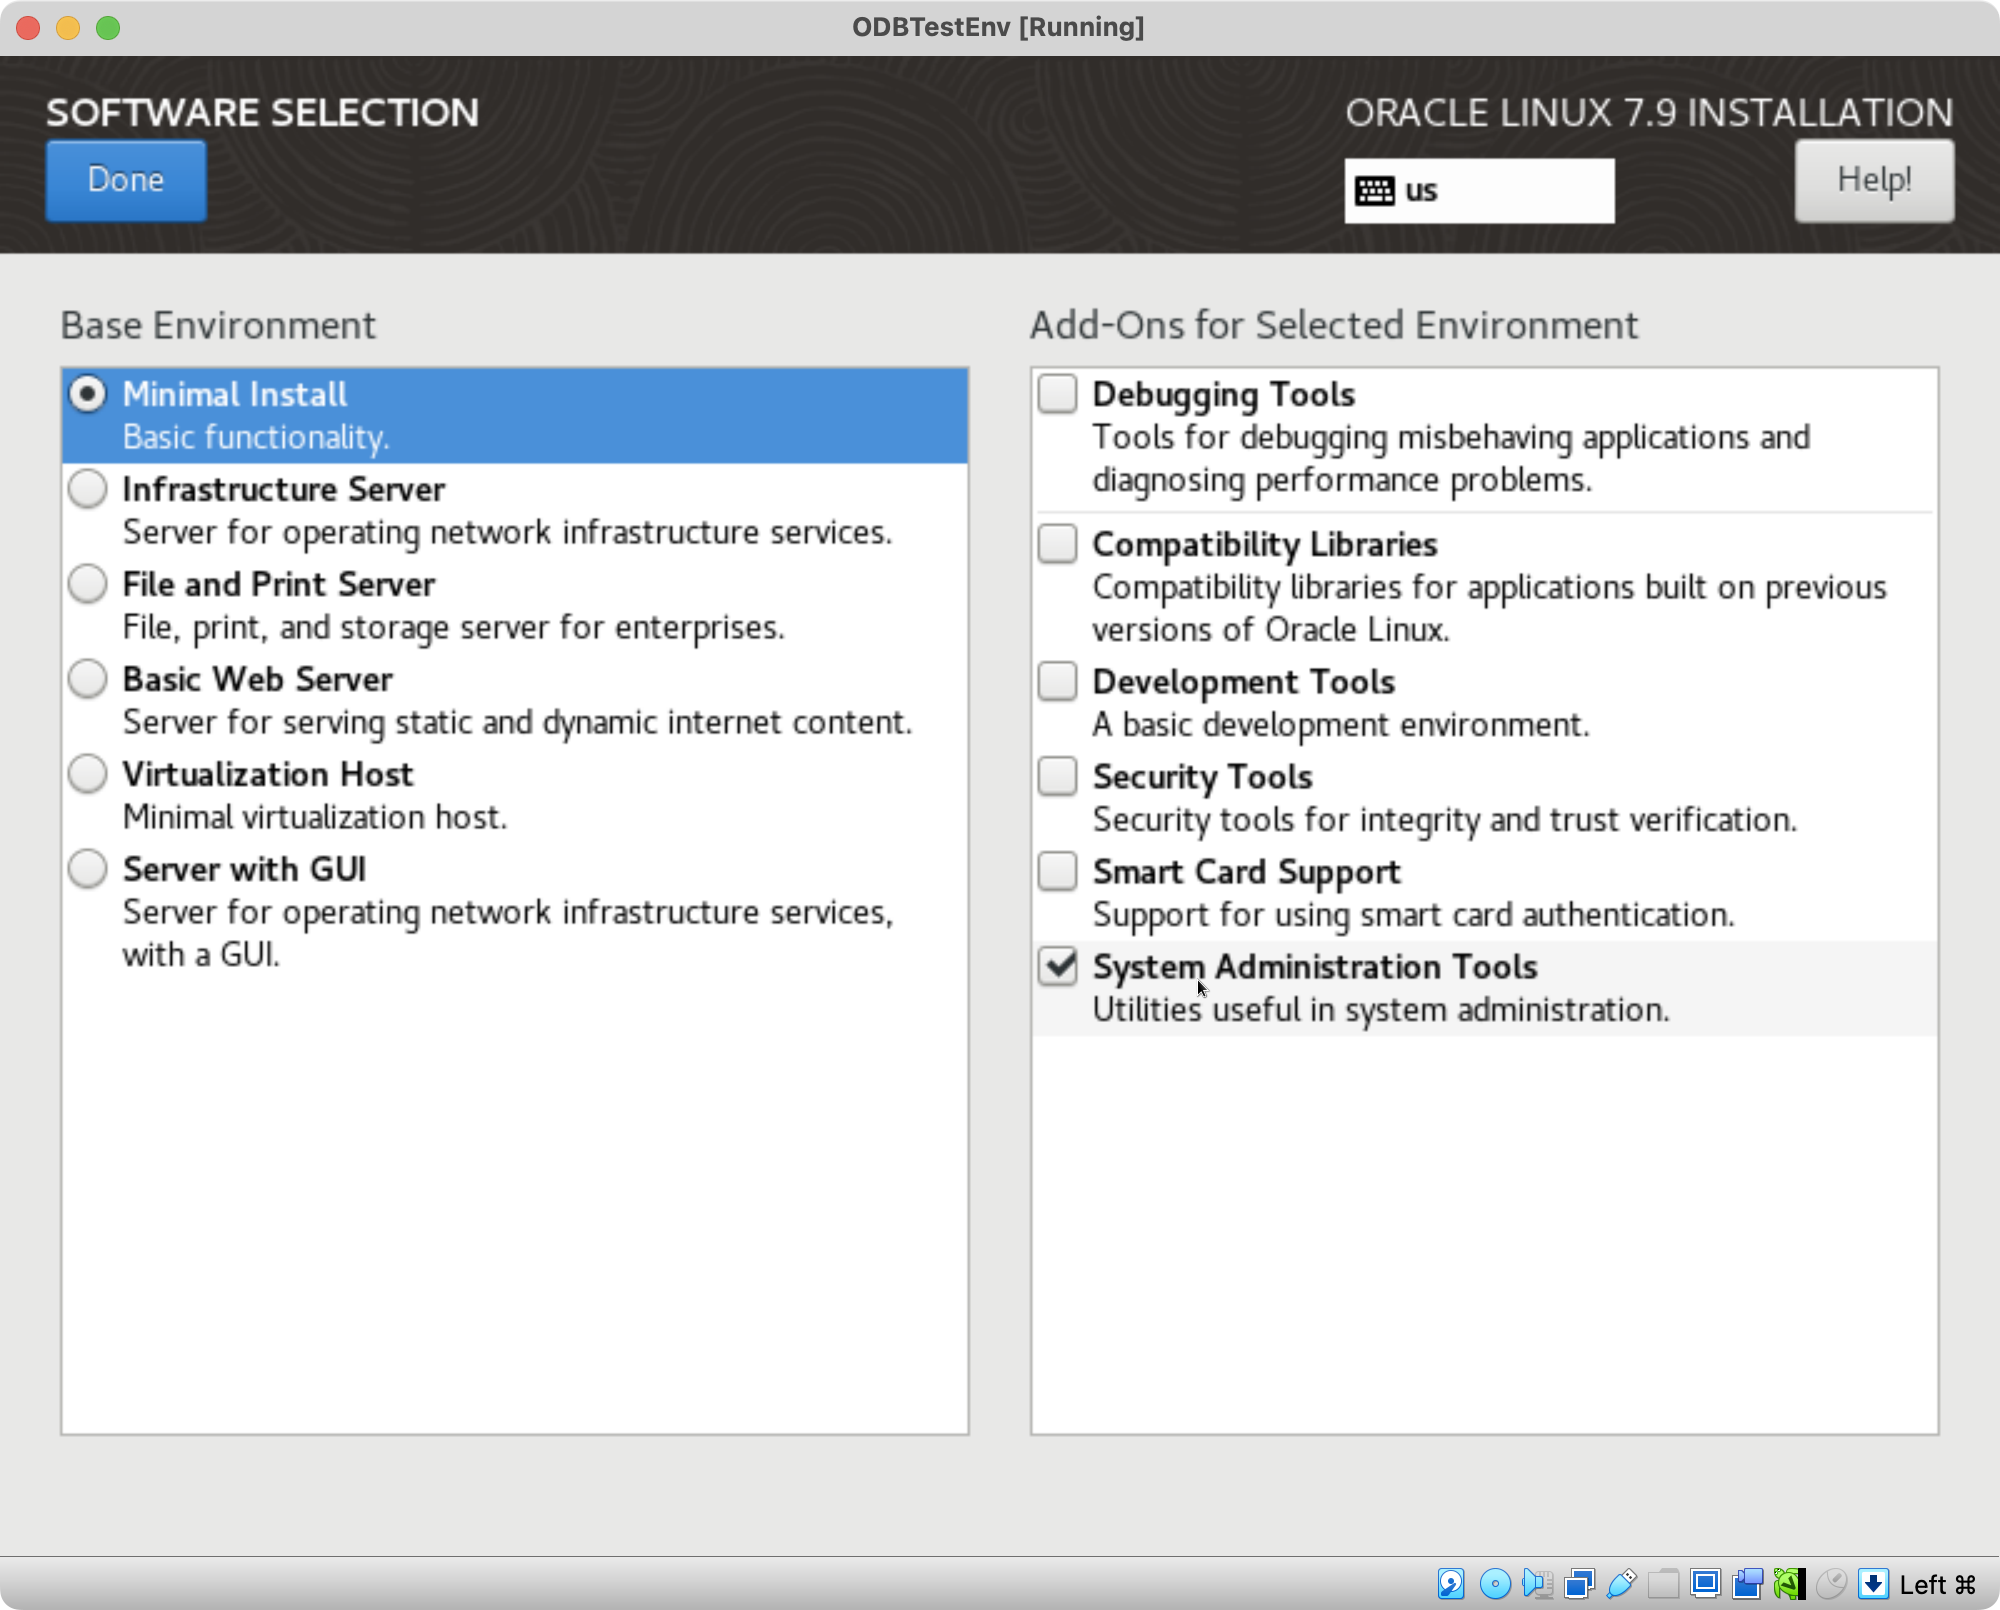
Exhibit 44: Oracle Linux Installation – Select the Software Configuration
Enable networking if the VM needs package updates or approved SSH access.
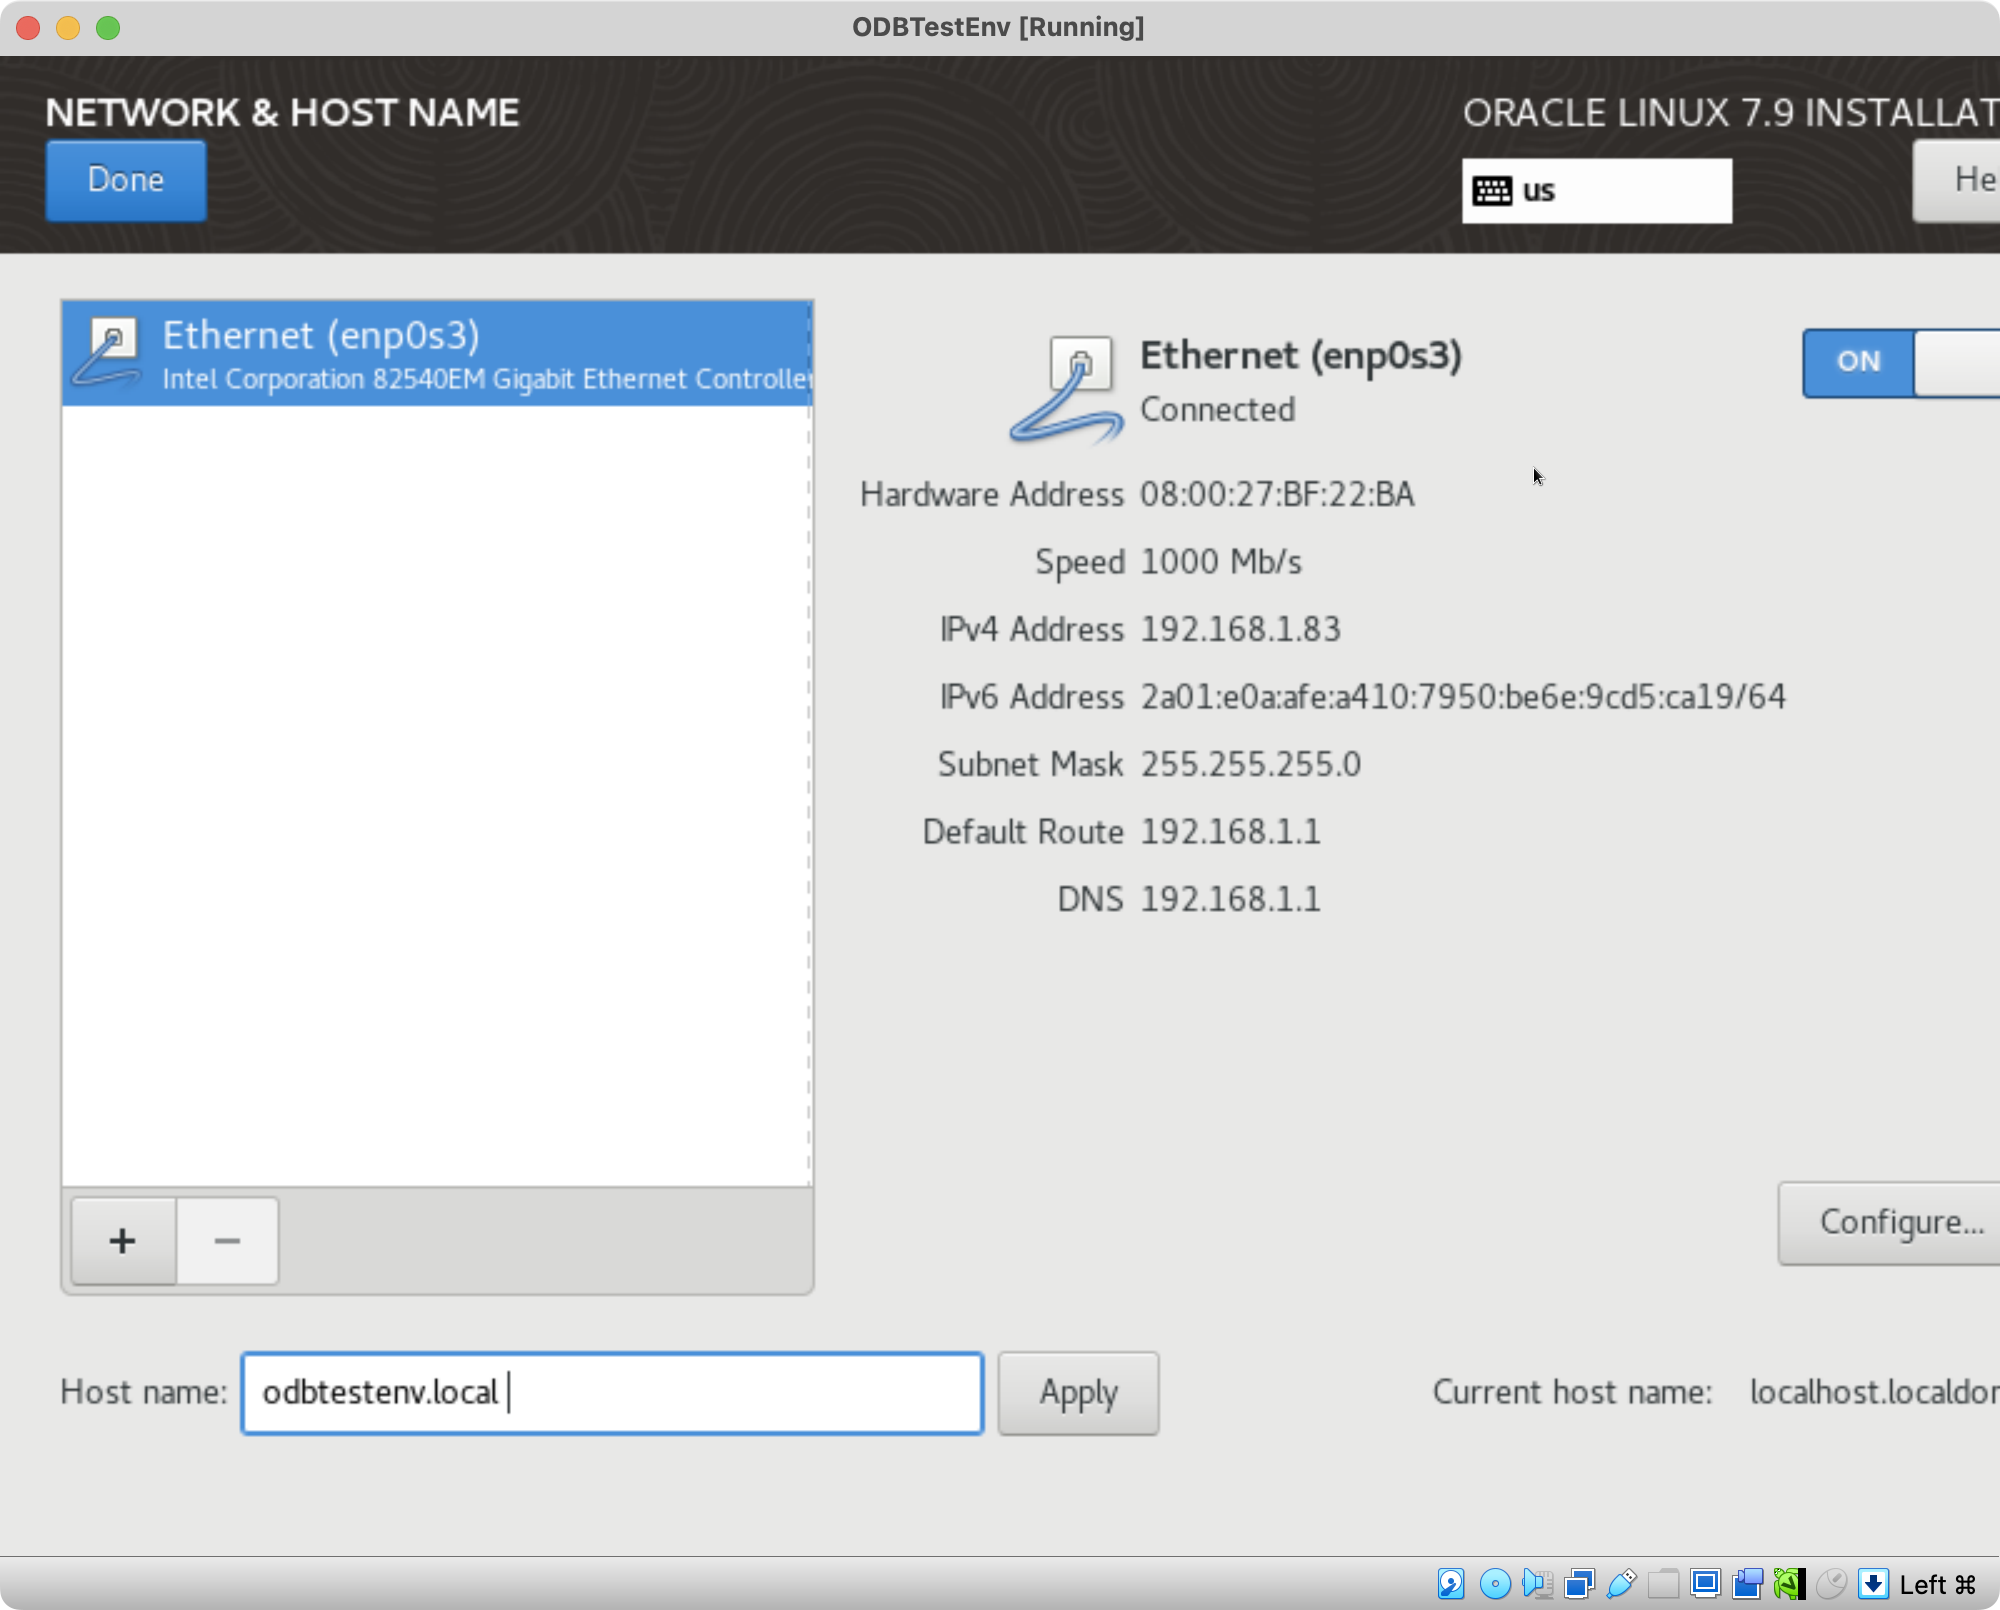
Exhibit 45: Oracle Linux Installation – Configure Network and Hostname
3.2. Complete the Oracle Linux Installation
This section completes the Oracle Linux installation using the choices made in Section 3.1. It starts the installation, sets the root password, creates a user account, and reboots the VM when installation has finished.
Step 2 – Complete the Oracle Linux Installation
The installation summary is shown.
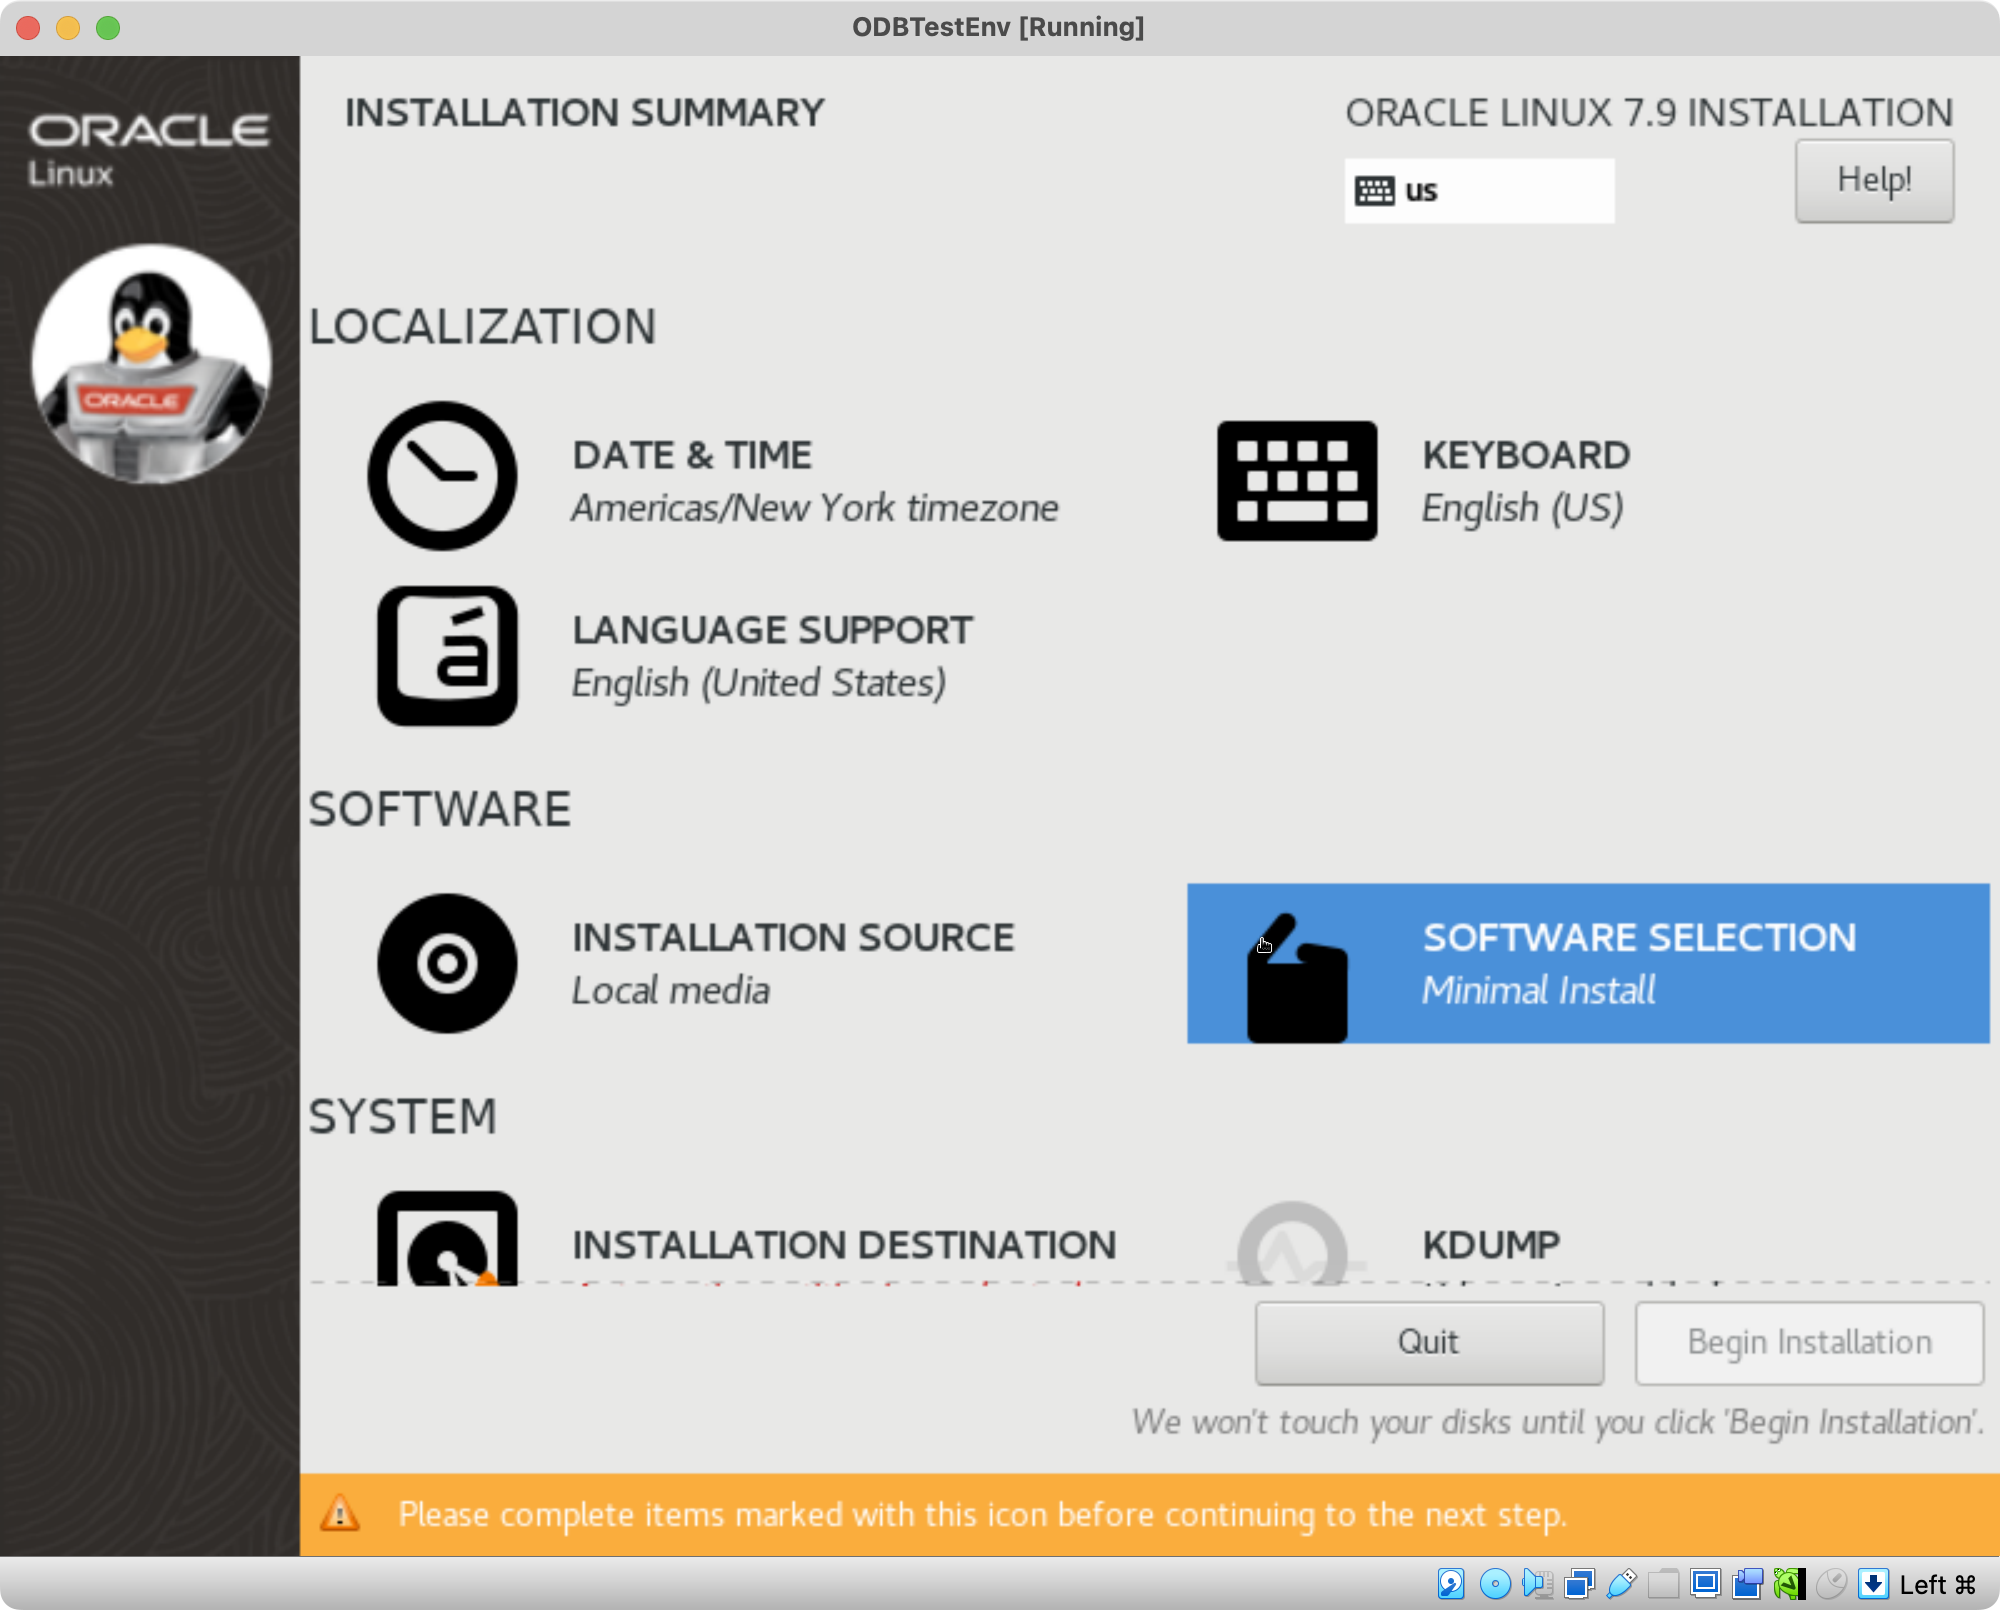
Exhibit 46: Oracle Linux Installation – Review the Installation Summary
Selecting Begin Installation initiates the copying of system files and the configuration of default user settings. Set a root password.
Selecting Begin Installation starts the installation of Oracle Linux 7.9 on the virtual machine. The installer copies the required system files to the virtual disk, installs the selected software packages, and configures the operating system according to the settings defined previously. Installation progress is displayed while these operations are performed.
During this process, the installer allows the remaining user settings to be completed. A root password must be defined to secure the administrative account, and a separate user account should be created for routine system access. Both settings can be configured while the installation continues.
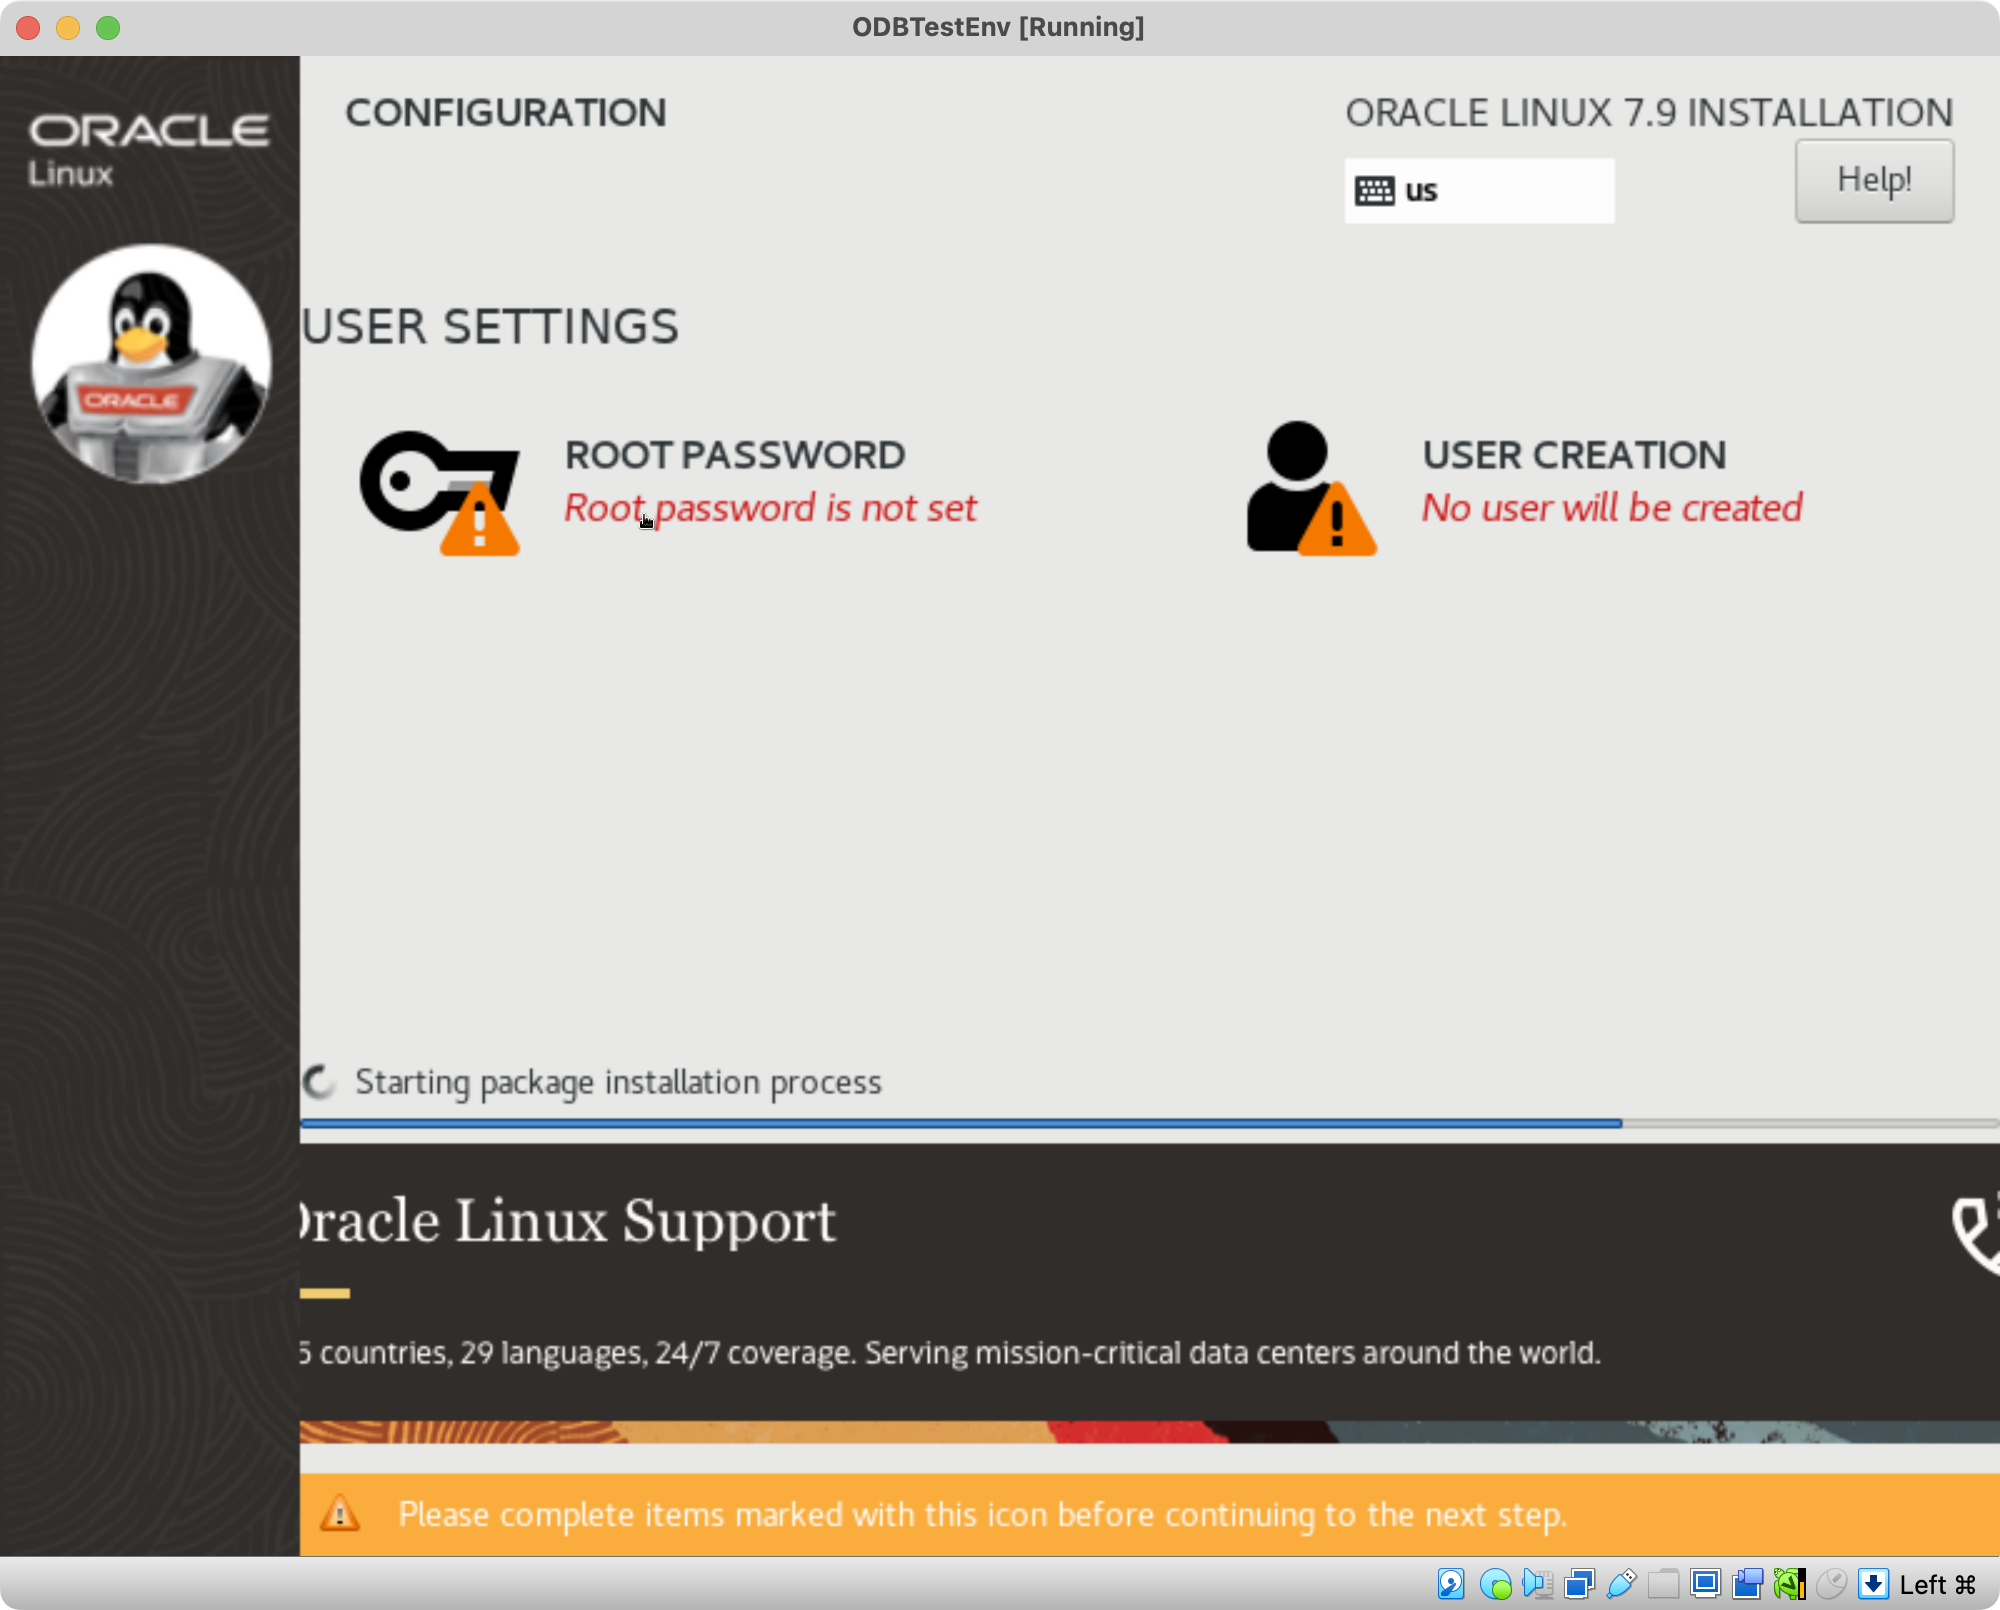
Exhibit 47: Oracle Linux Installation – Set the Root Password and Create a User
Configure the required user settings. Select Root Password to define the password for the root account (administrative access to Oracle Linux). Enter a strong password, confirm it in the second field, and select Done to save the configuration. Store this password securely: it will be required for system administration tasks.
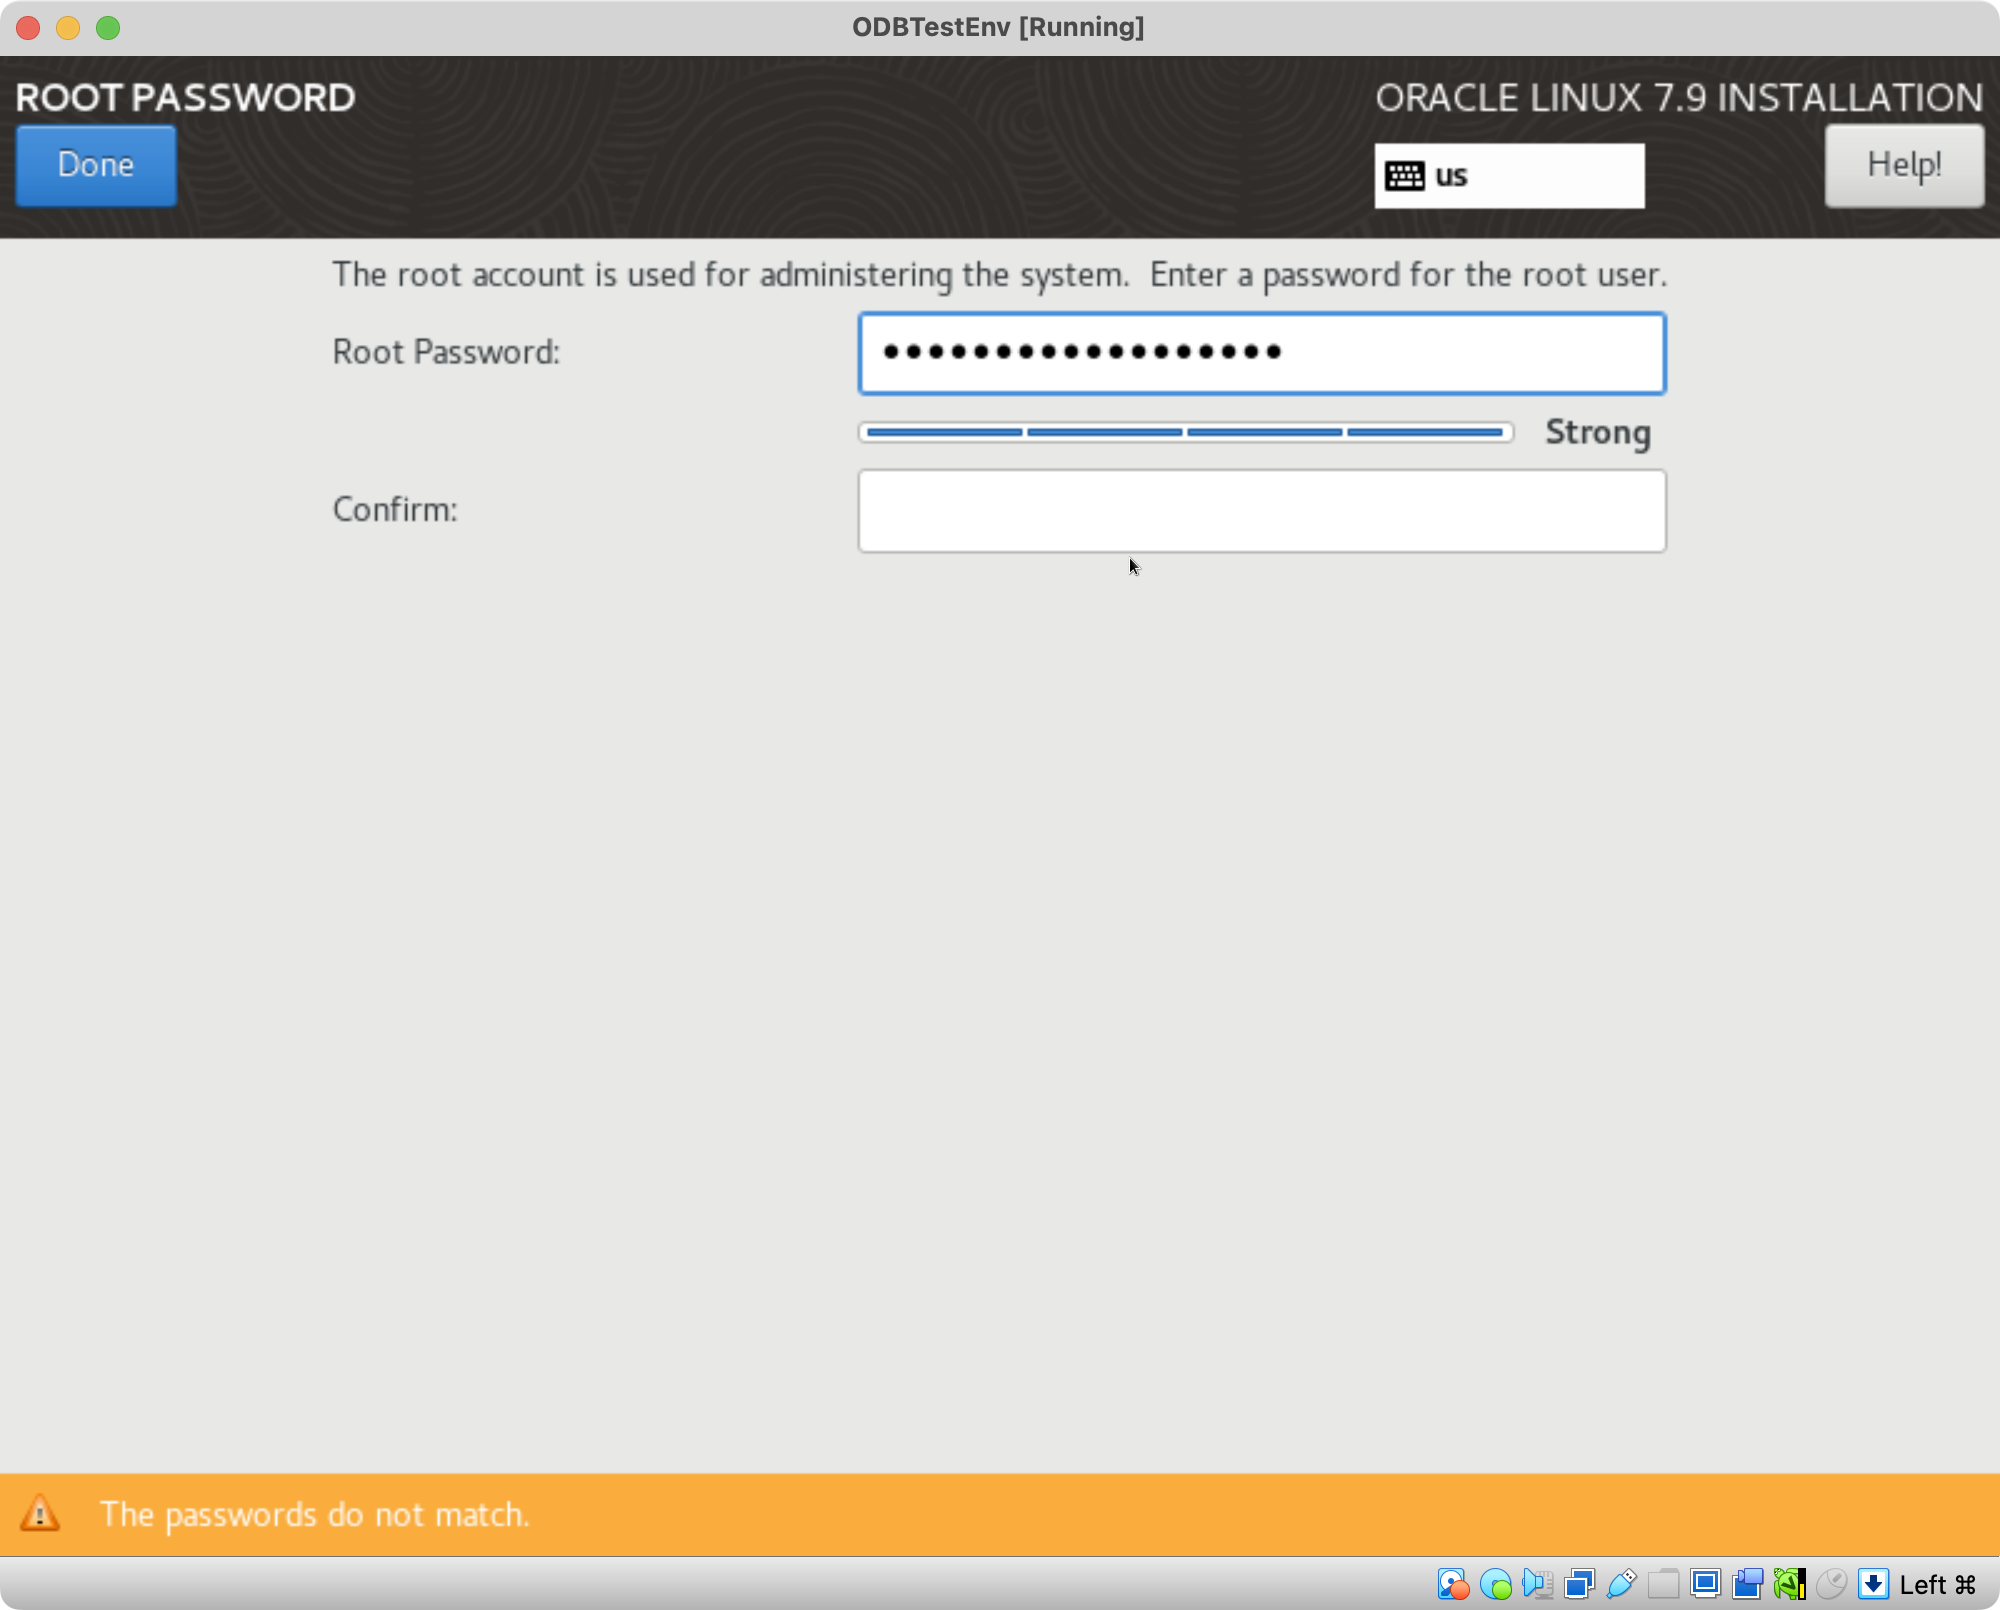
Exhibit 48: Oracle Linux Installation – Set the Root Password
Create a user account.
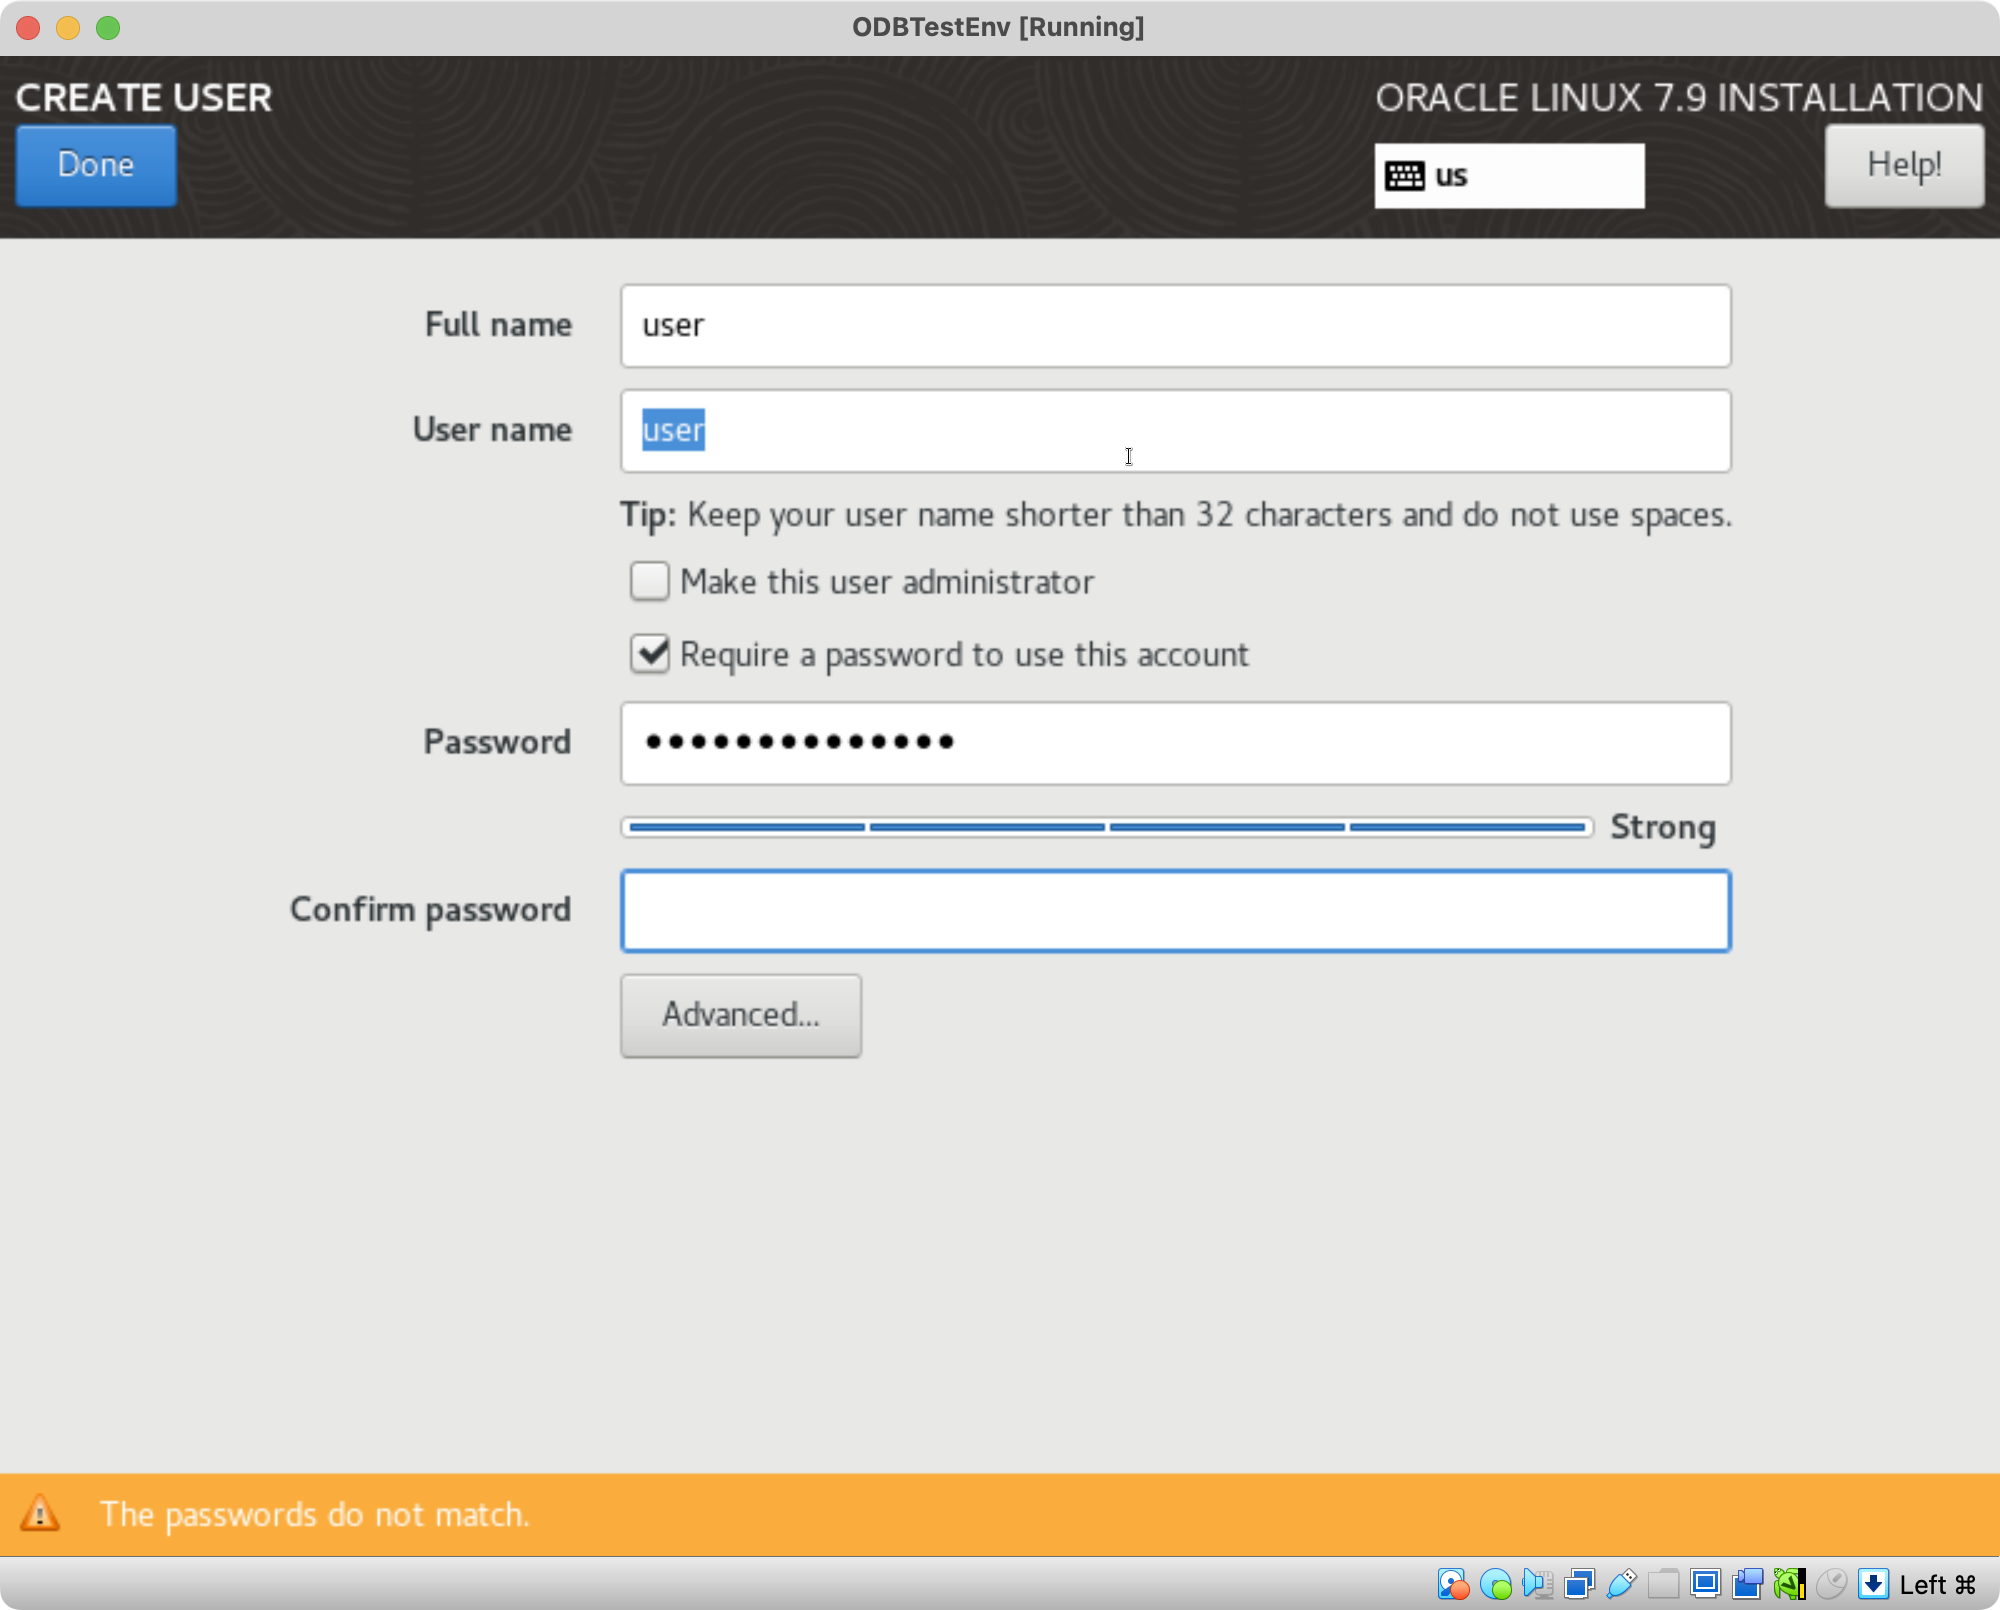
Exhibit 49: Oracle Linux Installation – Create the User Account
Select Advanced to review or configure the advanced settings for the user account.
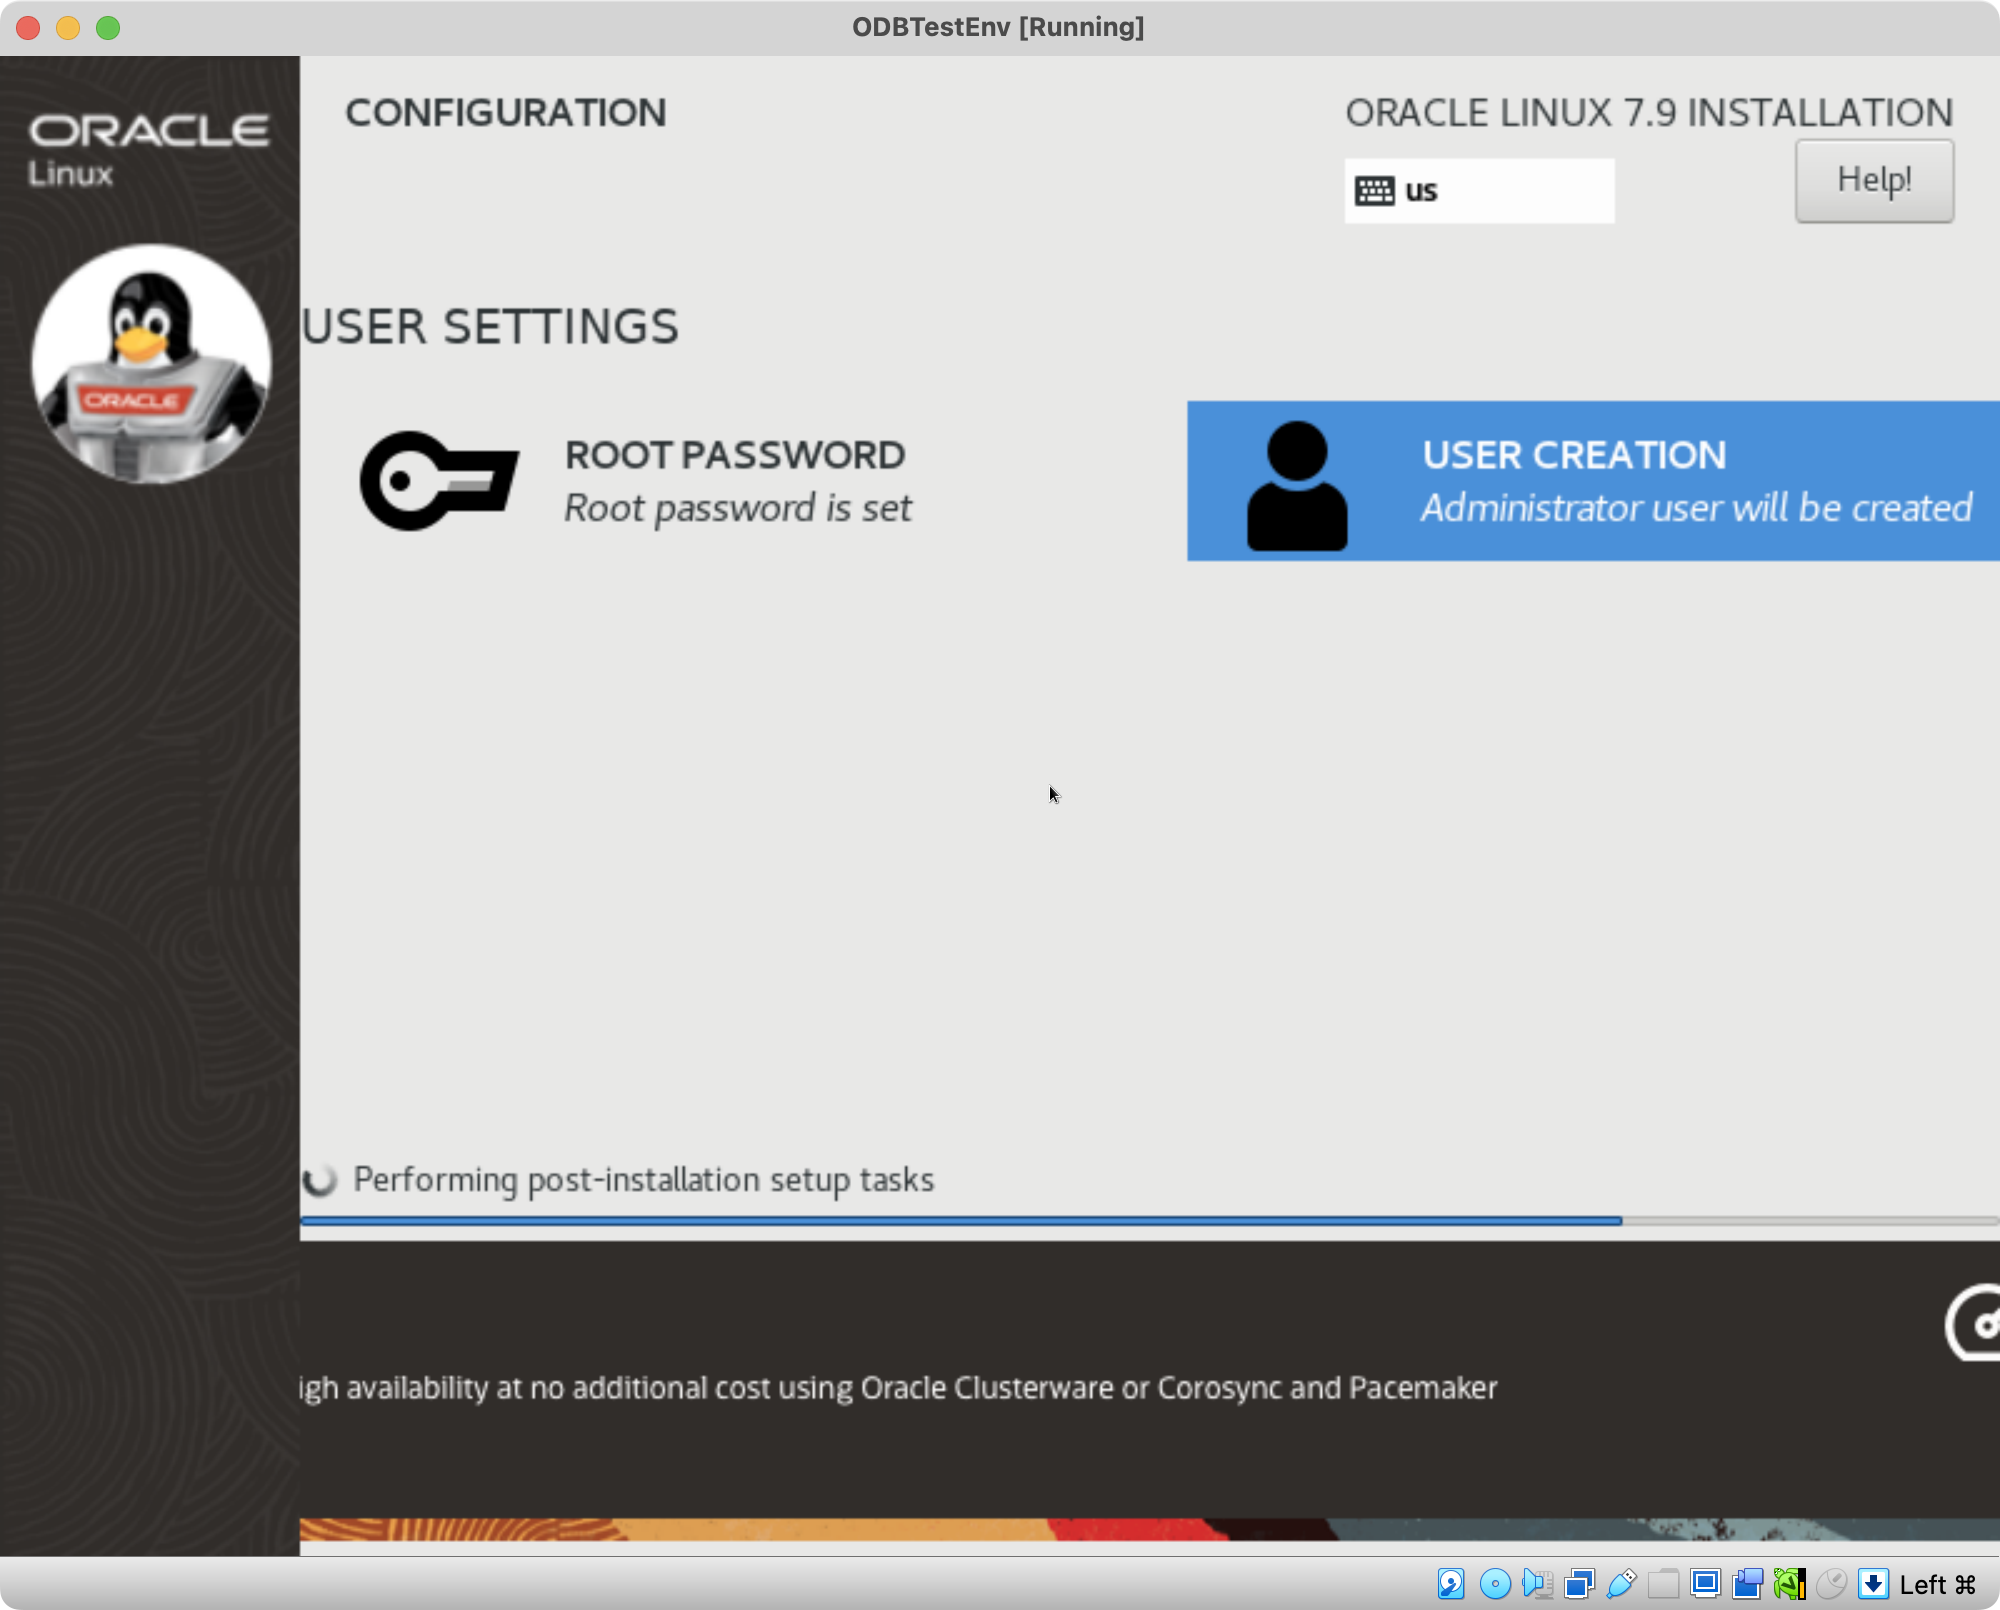
Exhibit 50: Oracle Linux Installation – Configure Advanced User Settings
Review the home directory, user and group IDs, and group memberships as required, then select Save Changes to return to the user account configuration screen.
After the root password and user account have been configured, allow the installation process to complete.
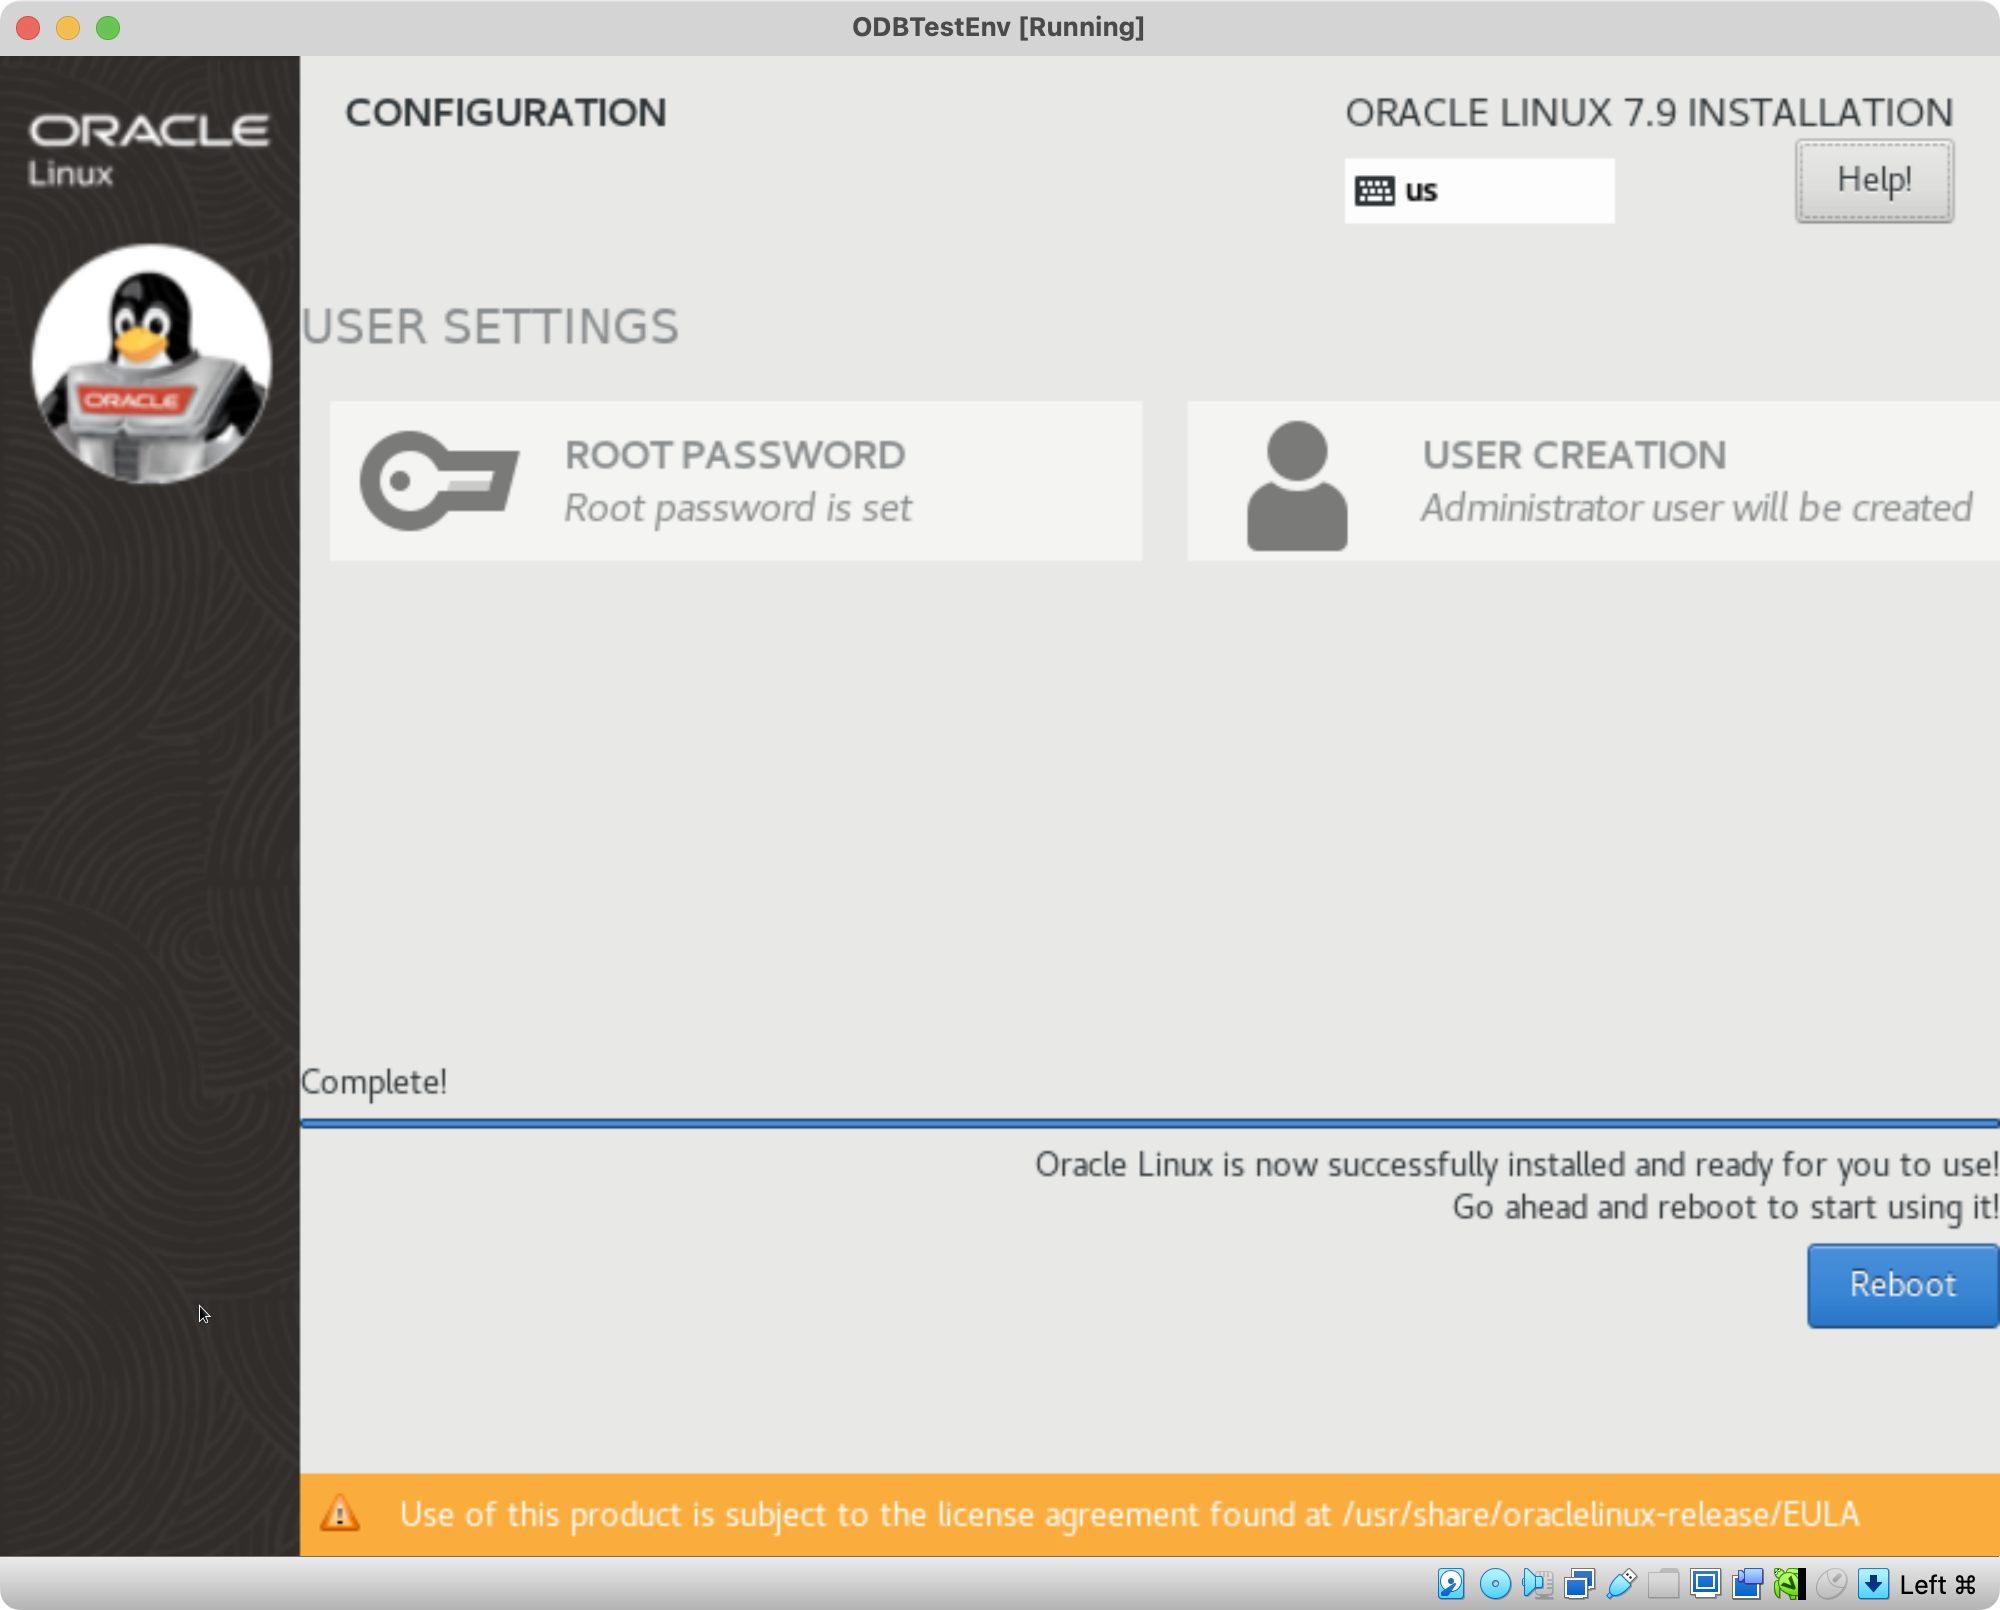
Exhibit 51: Oracle Linux Installation – Complete the Installation
Setup is now complete, and the VM can be rebooted.
3.3. Configure and Verify Oracle Linux
This section starts the installed Oracle Linux system, selects a suitable kernel, completes initial setup, and checks the operating-system environment. The resulting guest must be ready for the database prerequisites in Chapter 4.
Step 3 – Configure and Verify Oracle Linux
At boot, select a kernel certified for the chosen Oracle Database 19c Release Update. The screenshots use the Red Hat Compatible Kernel (RHCK). A certified Unbreakable Enterprise Kernel (UEK) may be used instead.
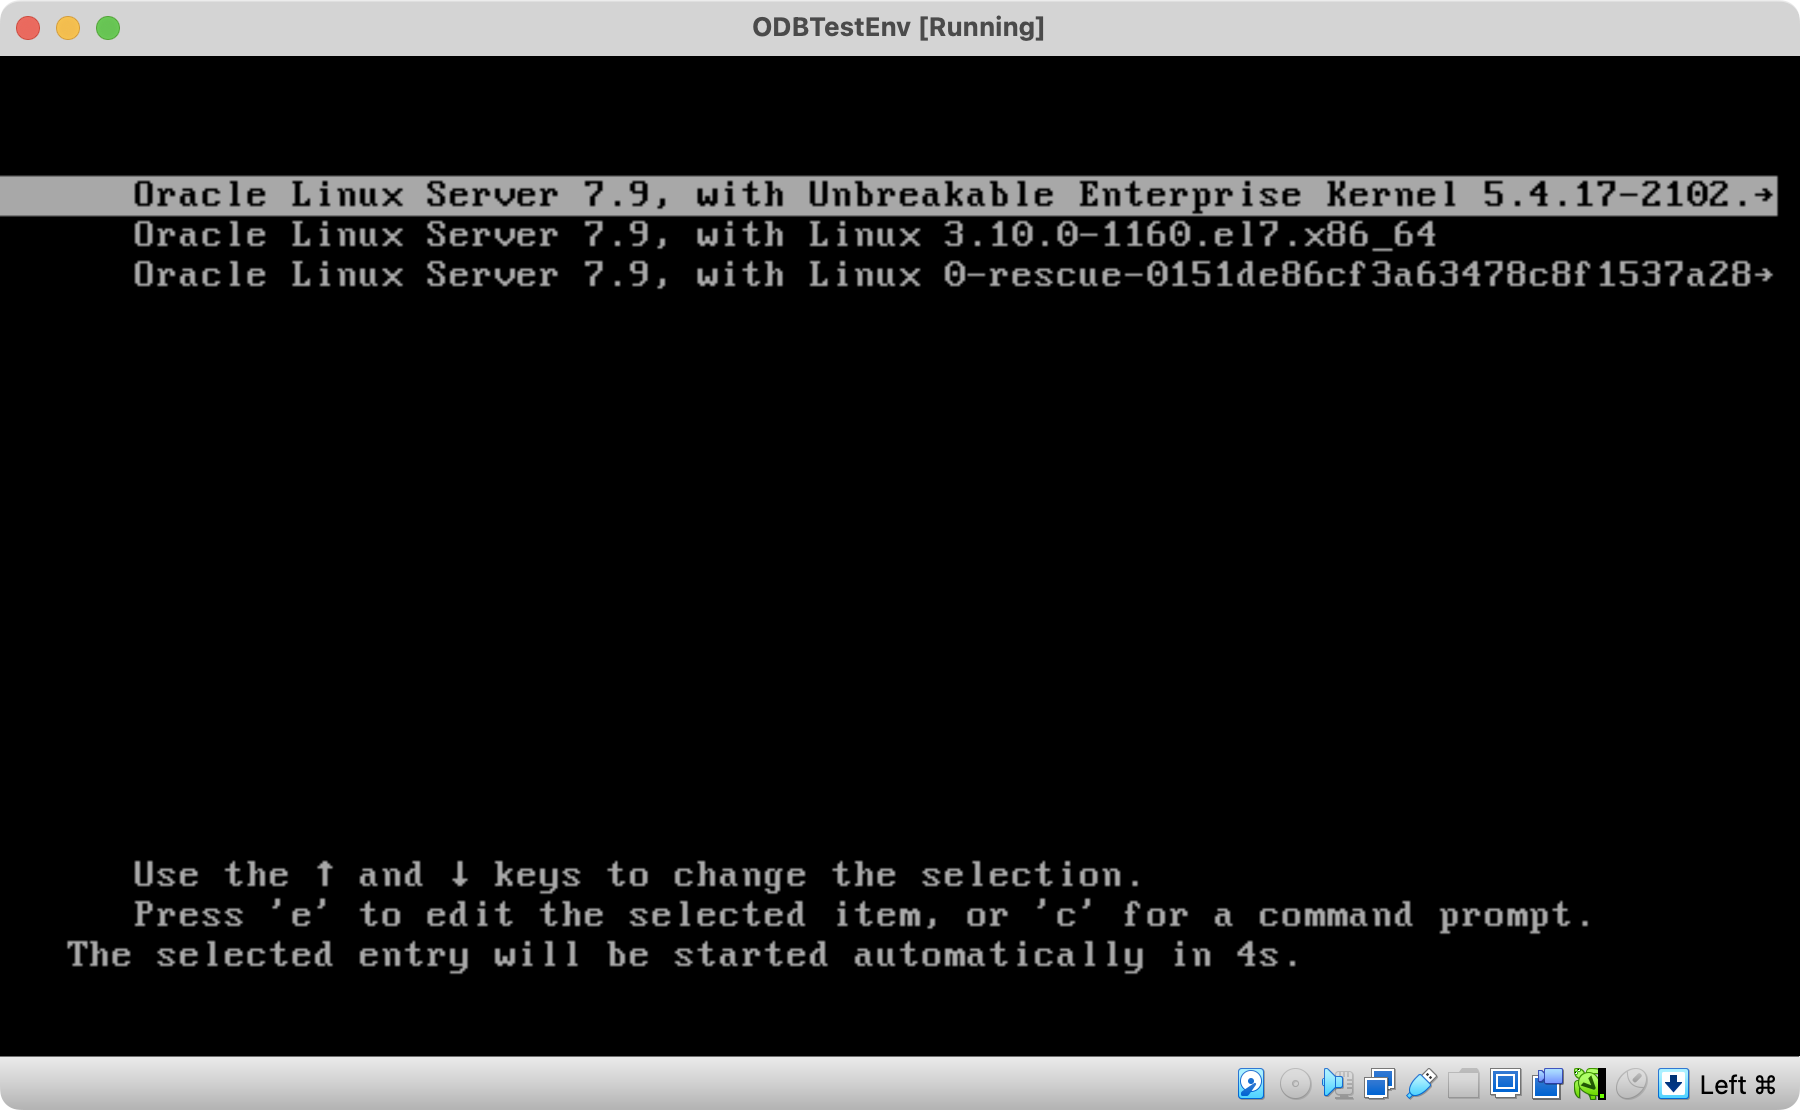
Exhibit 52: Oracle Linux Installation – Select the Boot Kernel
Log in with the user account created during the installation process.
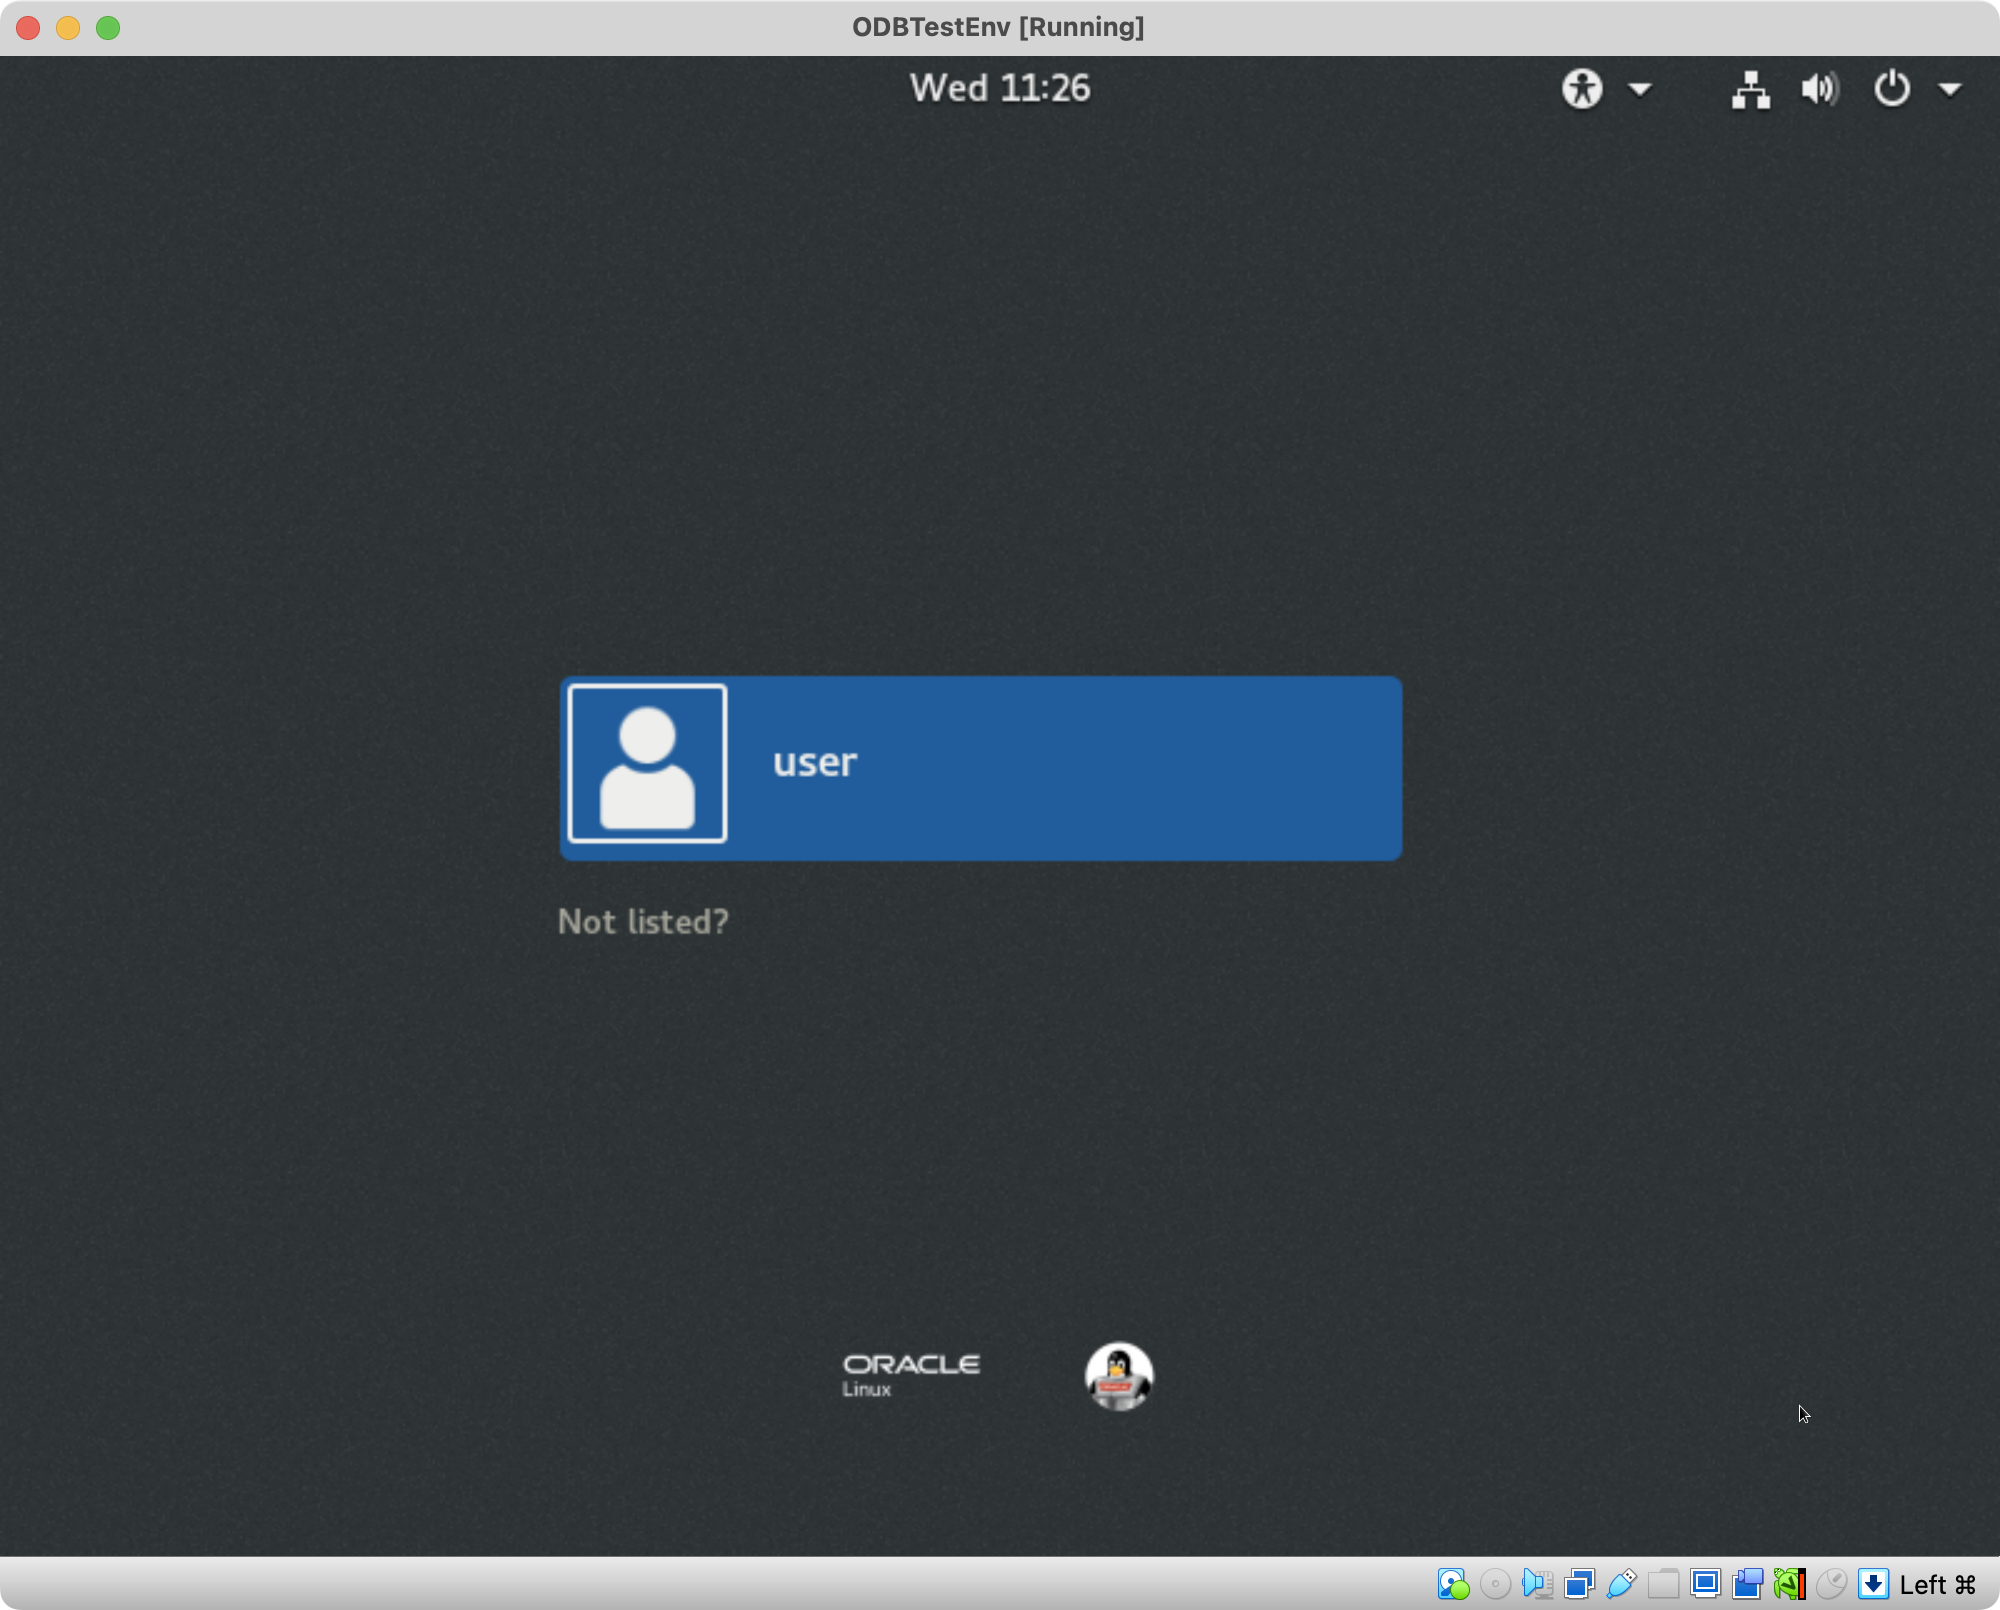
Exhibit 53: Oracle Linux Installation – First Login to Oracle Linux
At the first login, Oracle Linux Initial Setup is displayed. Review the remaining configuration items and the license agreement.
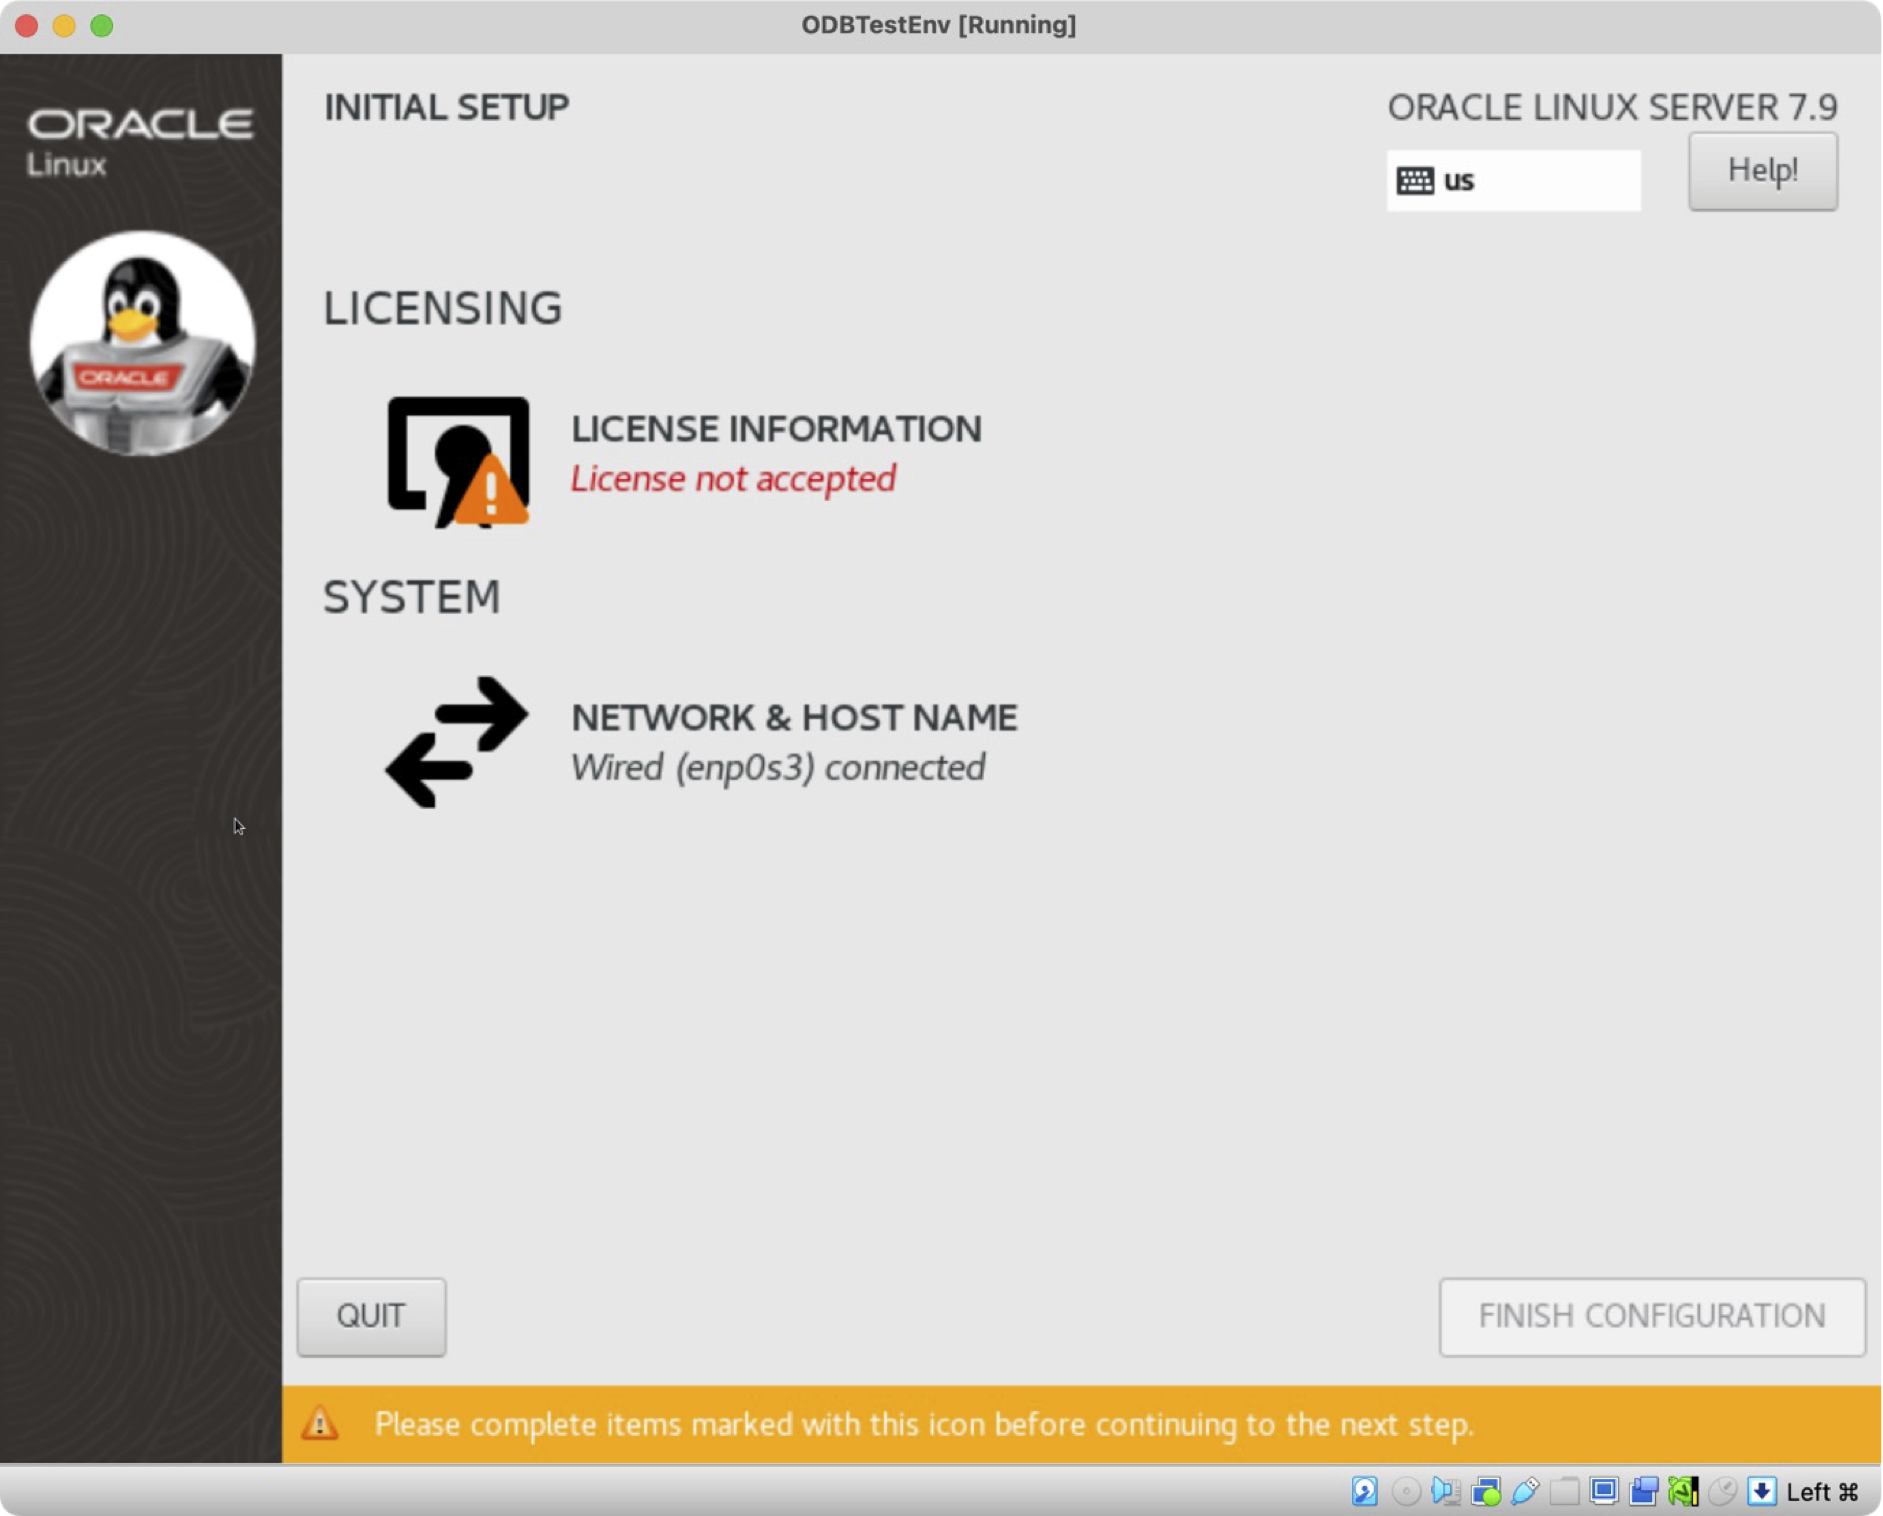
Exhibit 54: Oracle Linux Initial Setup – Review the Configuration
Select License Information and review the Oracle Linux license agreement. Accept the terms only if authorized to do so on behalf of the organization.
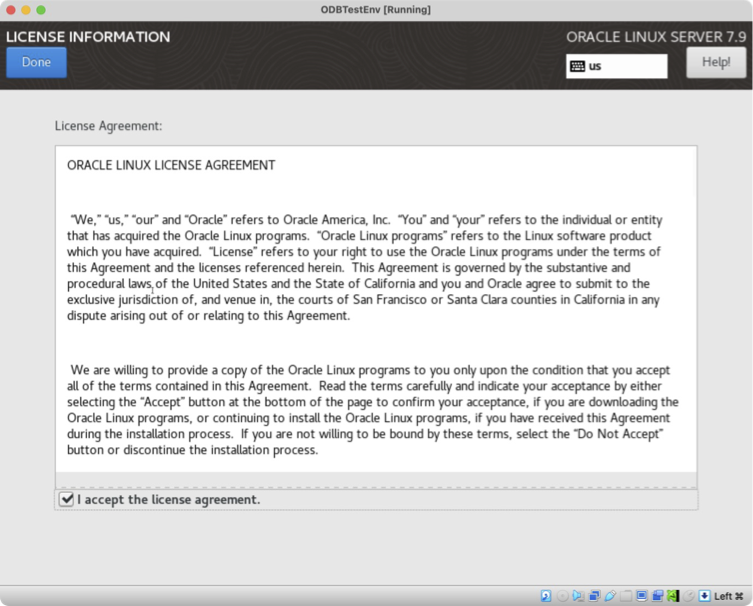
Exhibit 55: Oracle Linux Initial Setup – Accept the License Agreement
Return to the Initial Setup screen and select Finish Configuration.
Exhibit 56: Oracle Linux Initial Setup – Return to the Login Screen
System Check
Enter the username defined during the configuration process.
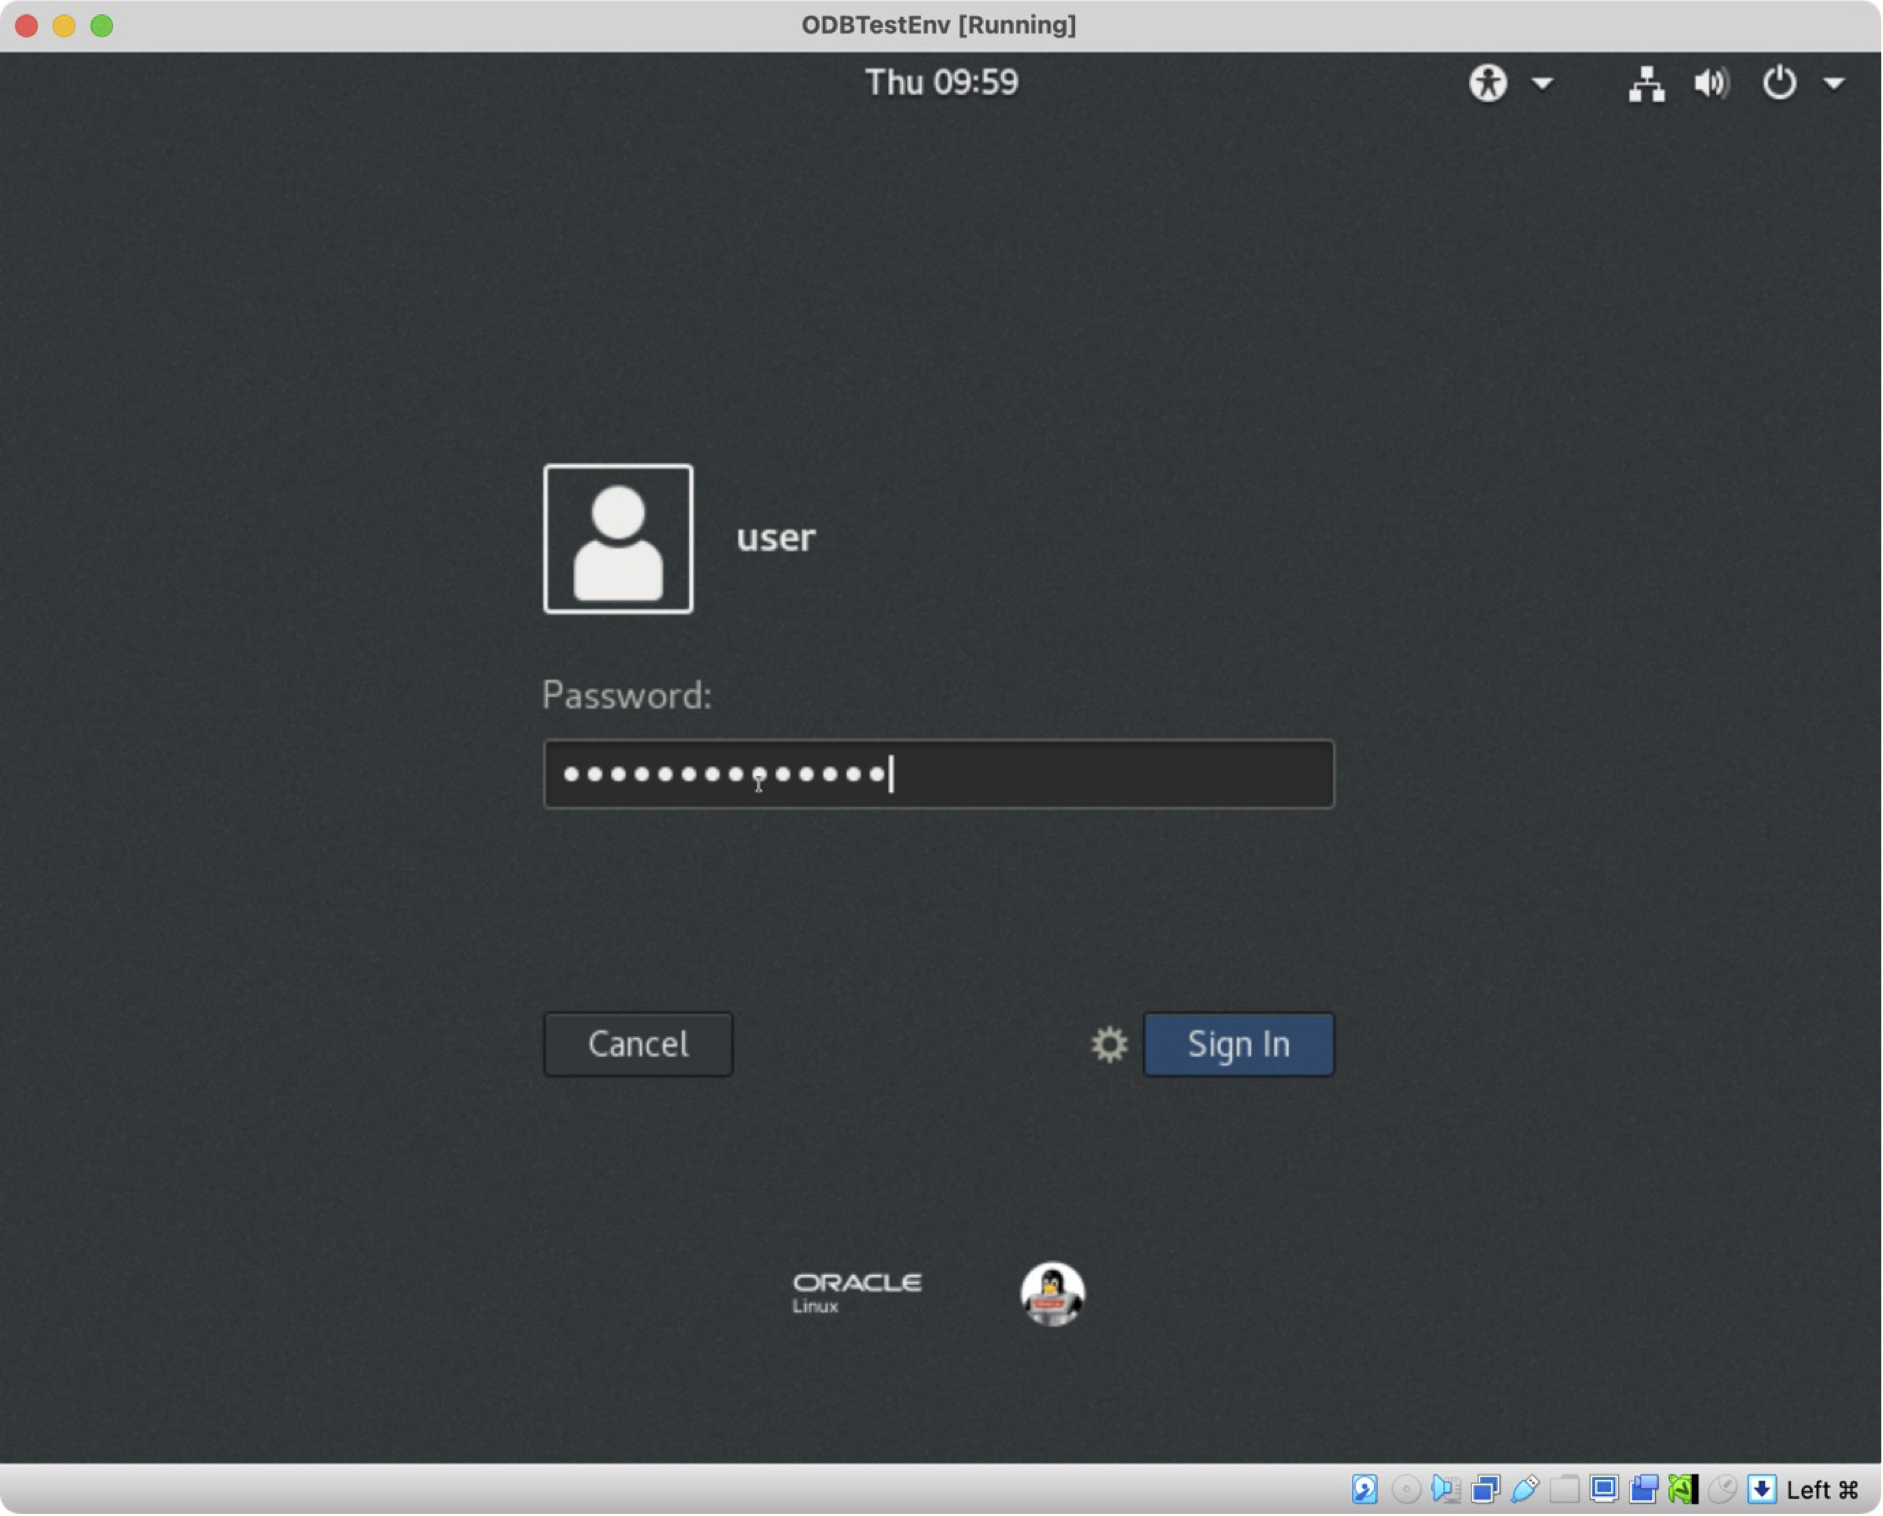
Exhibit 57: Oracle Linux Desktop – Login
The system displays GNOME configuration prompts for the admin user. Once configuration is complete, the system is ready for use. GNOME Help is then displayed.
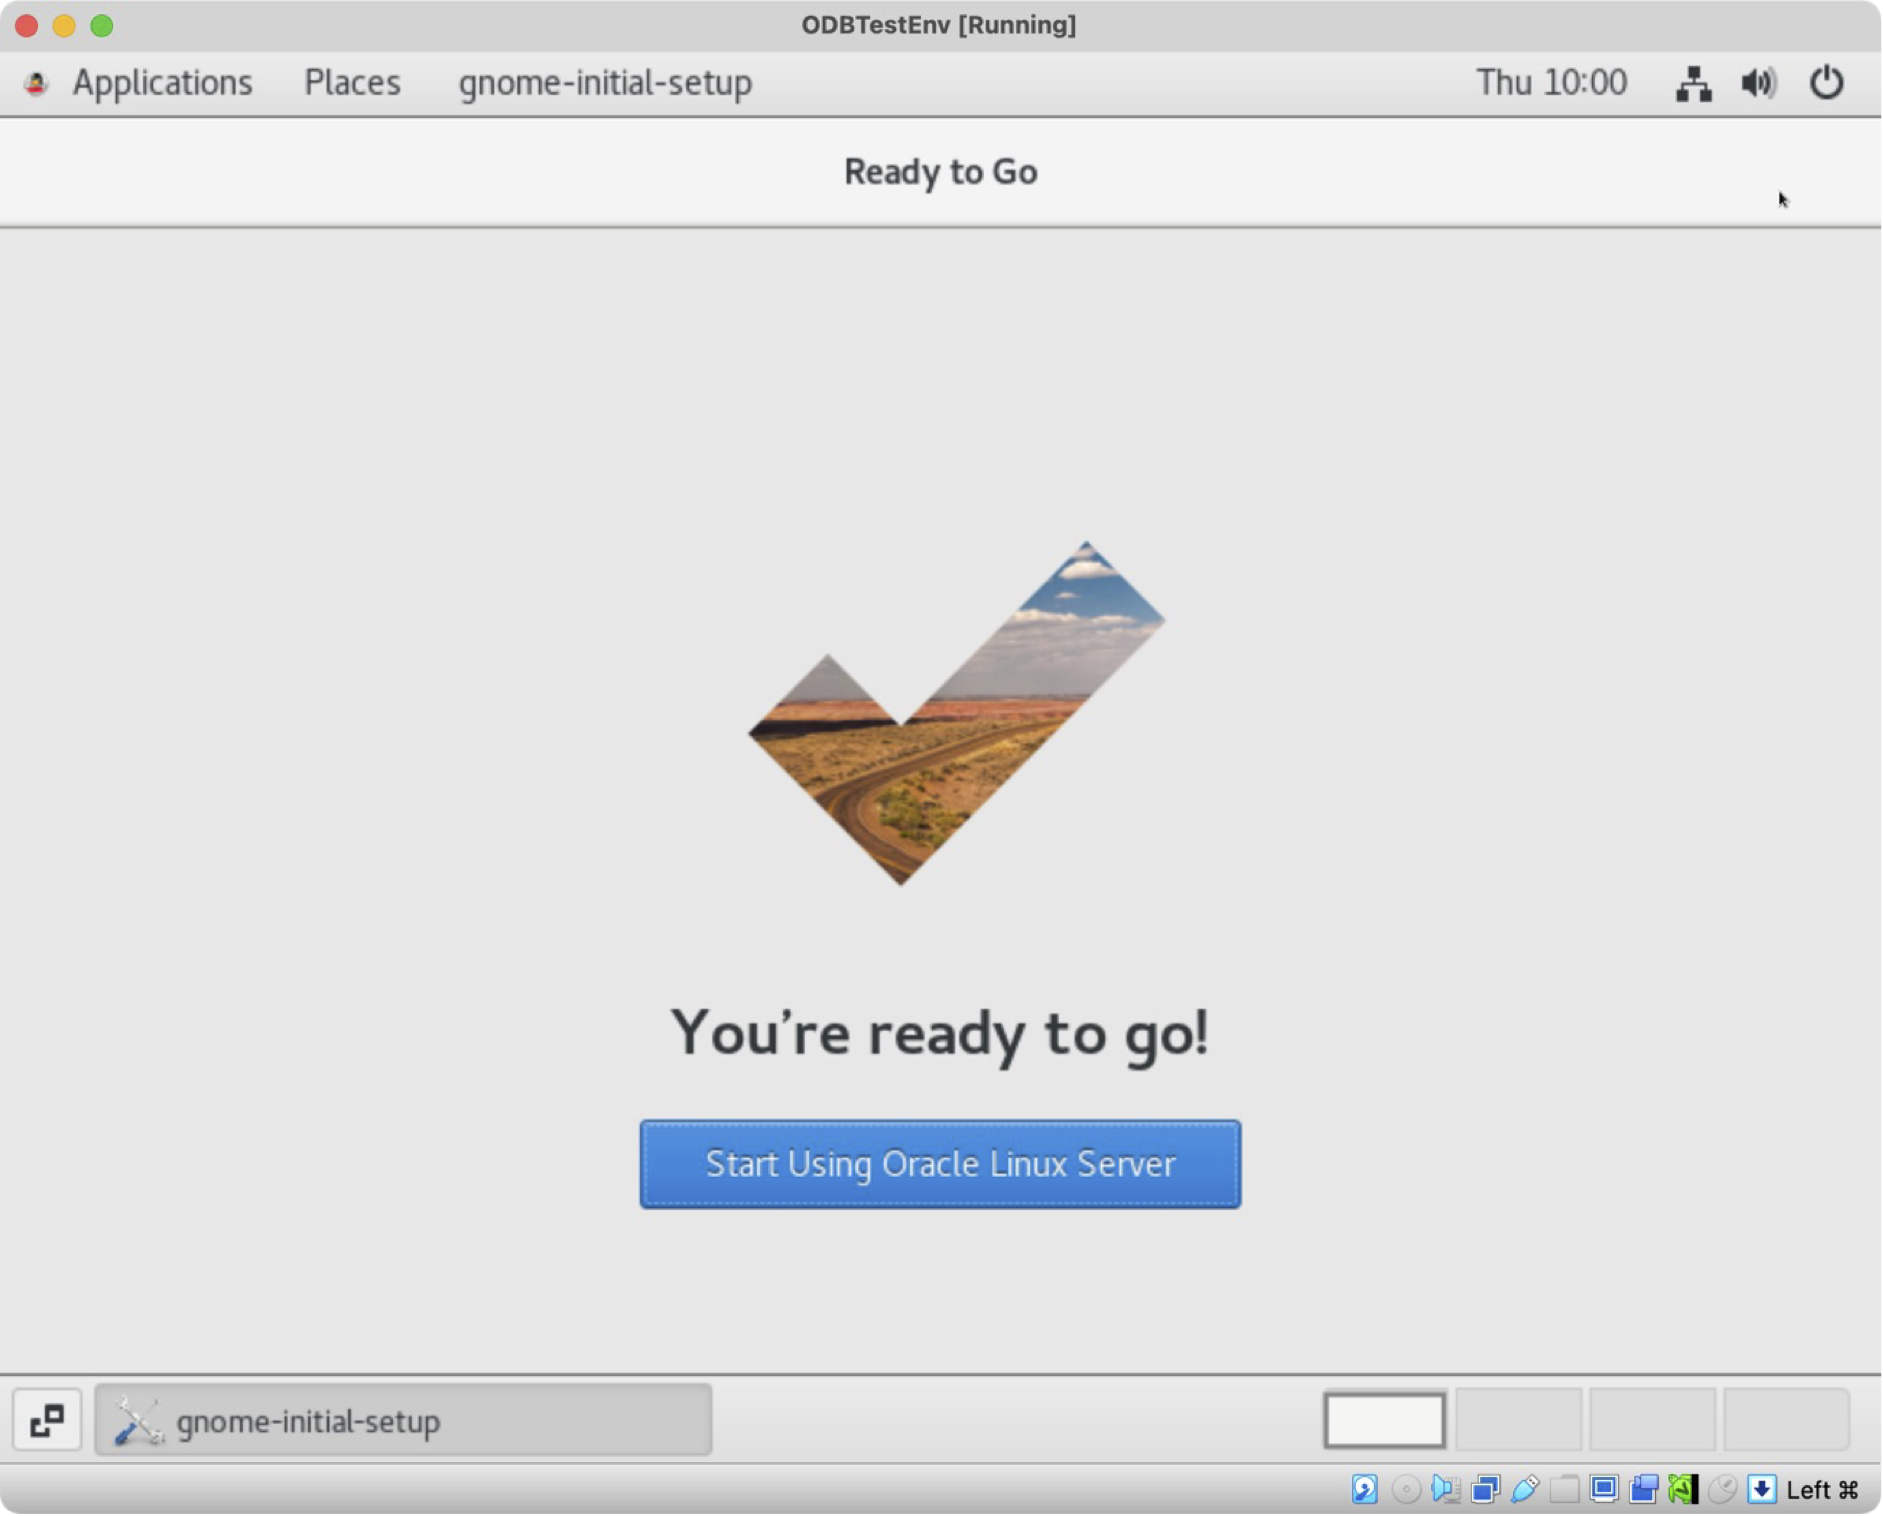
Exhibit 58: Oracle Linux Desktop – Complete GNOME Initial Setup
The Getting Started page is displayed in GNOME Help.
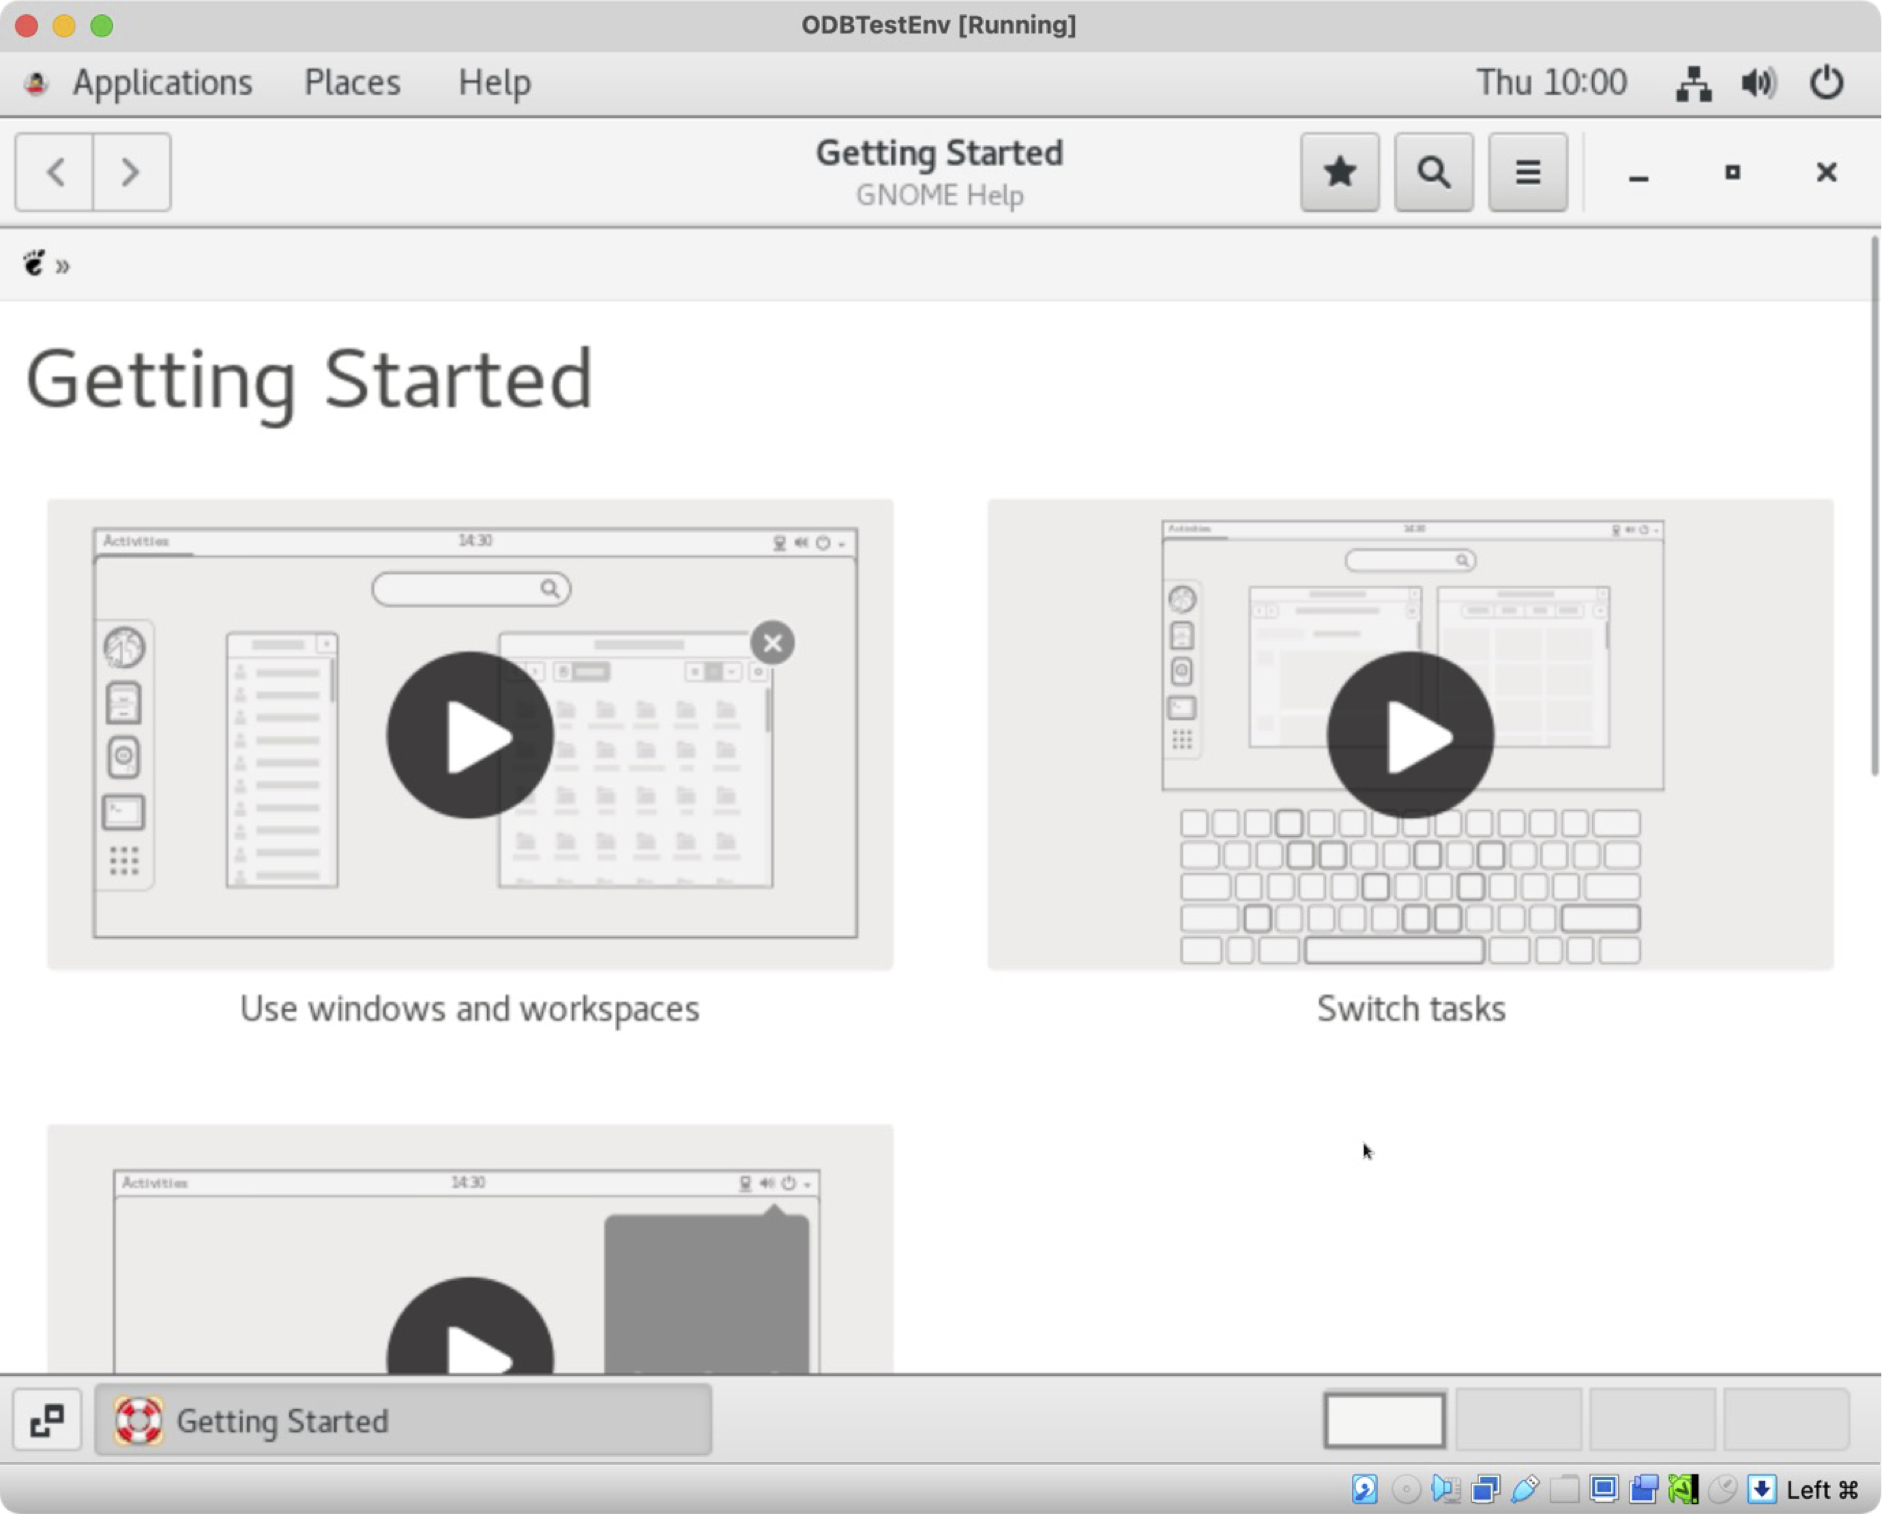
Exhibit 59: Oracle Linux Desktop – Open Getting Started
A terminal can be opened to check the current user and system information with the commands whoami (currently logged-in user) and uname or uname -a (system information).
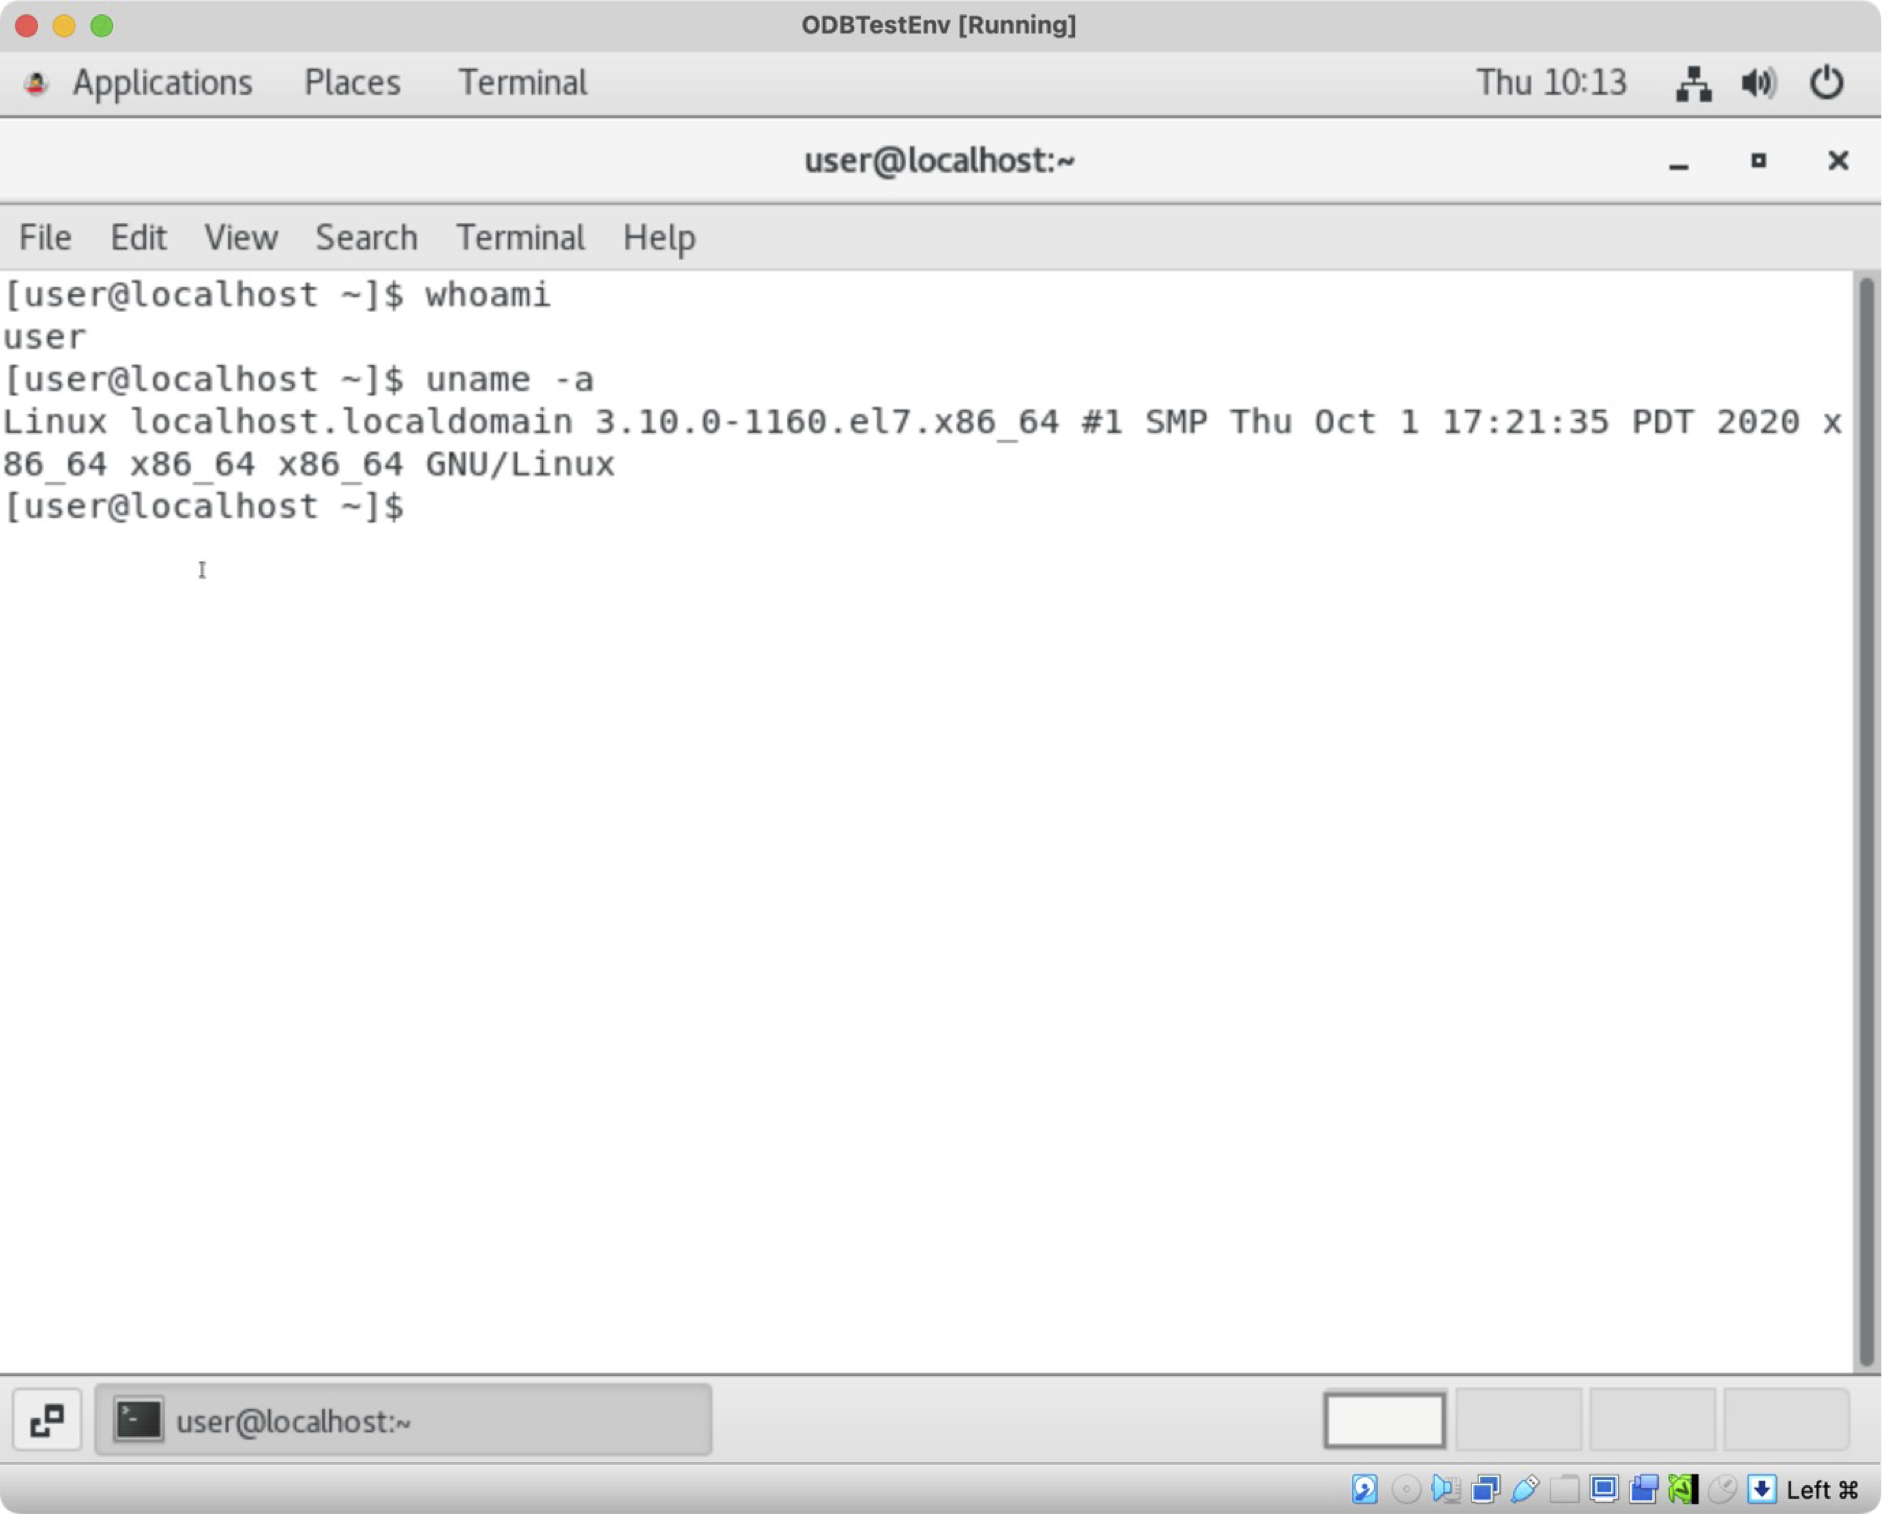
Exhibit 60: Oracle Linux Desktop – Open a GNOME Terminal
Chapter Outcome
Oracle Linux 7.9 is installed, and the configured account can log in. The system check identifies the running kernel. In the reference build, the VM used approximately 5.75 GB at this point. Take a snapshot before applying the database prerequisites in Chapter 4.
4. Deploy Oracle Database 19c
The Linux VM from Chapter 3 is ready for database preparation.
This chapter installs the prerequisites, copies the Oracle Database 19c media to the VM, and runs the installer. It creates one CDB and one PDB using the configuration chosen in Chapter 1.
Furthermore, it configures access via SSH access which may help for subsequent administrative tasks.
4.1. Prepare the Oracle Database Deployment
First, prepare the Linux guest for the database installer. Check the prerequisites, install the preinstallation package, configure the oracle account and SSH access, and copy the database archive to the VM. Section 4.2 then installs the database software.
The steps in this section are:
Step 1 – Download the Installation Media
Step 2 – Check Database Prerequisites
Step 3 – Perform Preinstallation Tasks
Step 4 – Configure SSH Access for the Oracle User
Step 5 – Set the Oracle User Password
Step 6 – Copy the Database Media to the VM
Step 1 – Download the Installation Media
This deployment uses Oracle Database Enterprise Edition 19c for Linux x86-64, a stable Oracle release. The 19.3 base image must be updated to an appropriate, currently supported Release Update before the environment is used as a reliable reference.
Start at the official Oracle website [➜ Link reference #17, Oracle official Website] and open Oracle Database Technologies [➜ Link reference #18, Oracle Database Technologies]. Download the installation media from the Oracle Database Software Downloads page [➜ Link reference #19, Oracle Database Software Downloads].
Note: The reference links are listed in the Link References file in folder 05_External_Links (refer to the downloadable publication package, chapter 7).
Note: Downloading an Oracle Database image requires an Oracle Technology Network (OTN) or an Oracle Cloud Infrastructure (OCI) account.
Open the Oracle products page [➜ Link reference #20, Oracle Products].
Select the Oracle Software menu. Use the official Oracle download pages to obtain the installation media. Ensure that the selected database release and platform match the reference configuration defined previously.
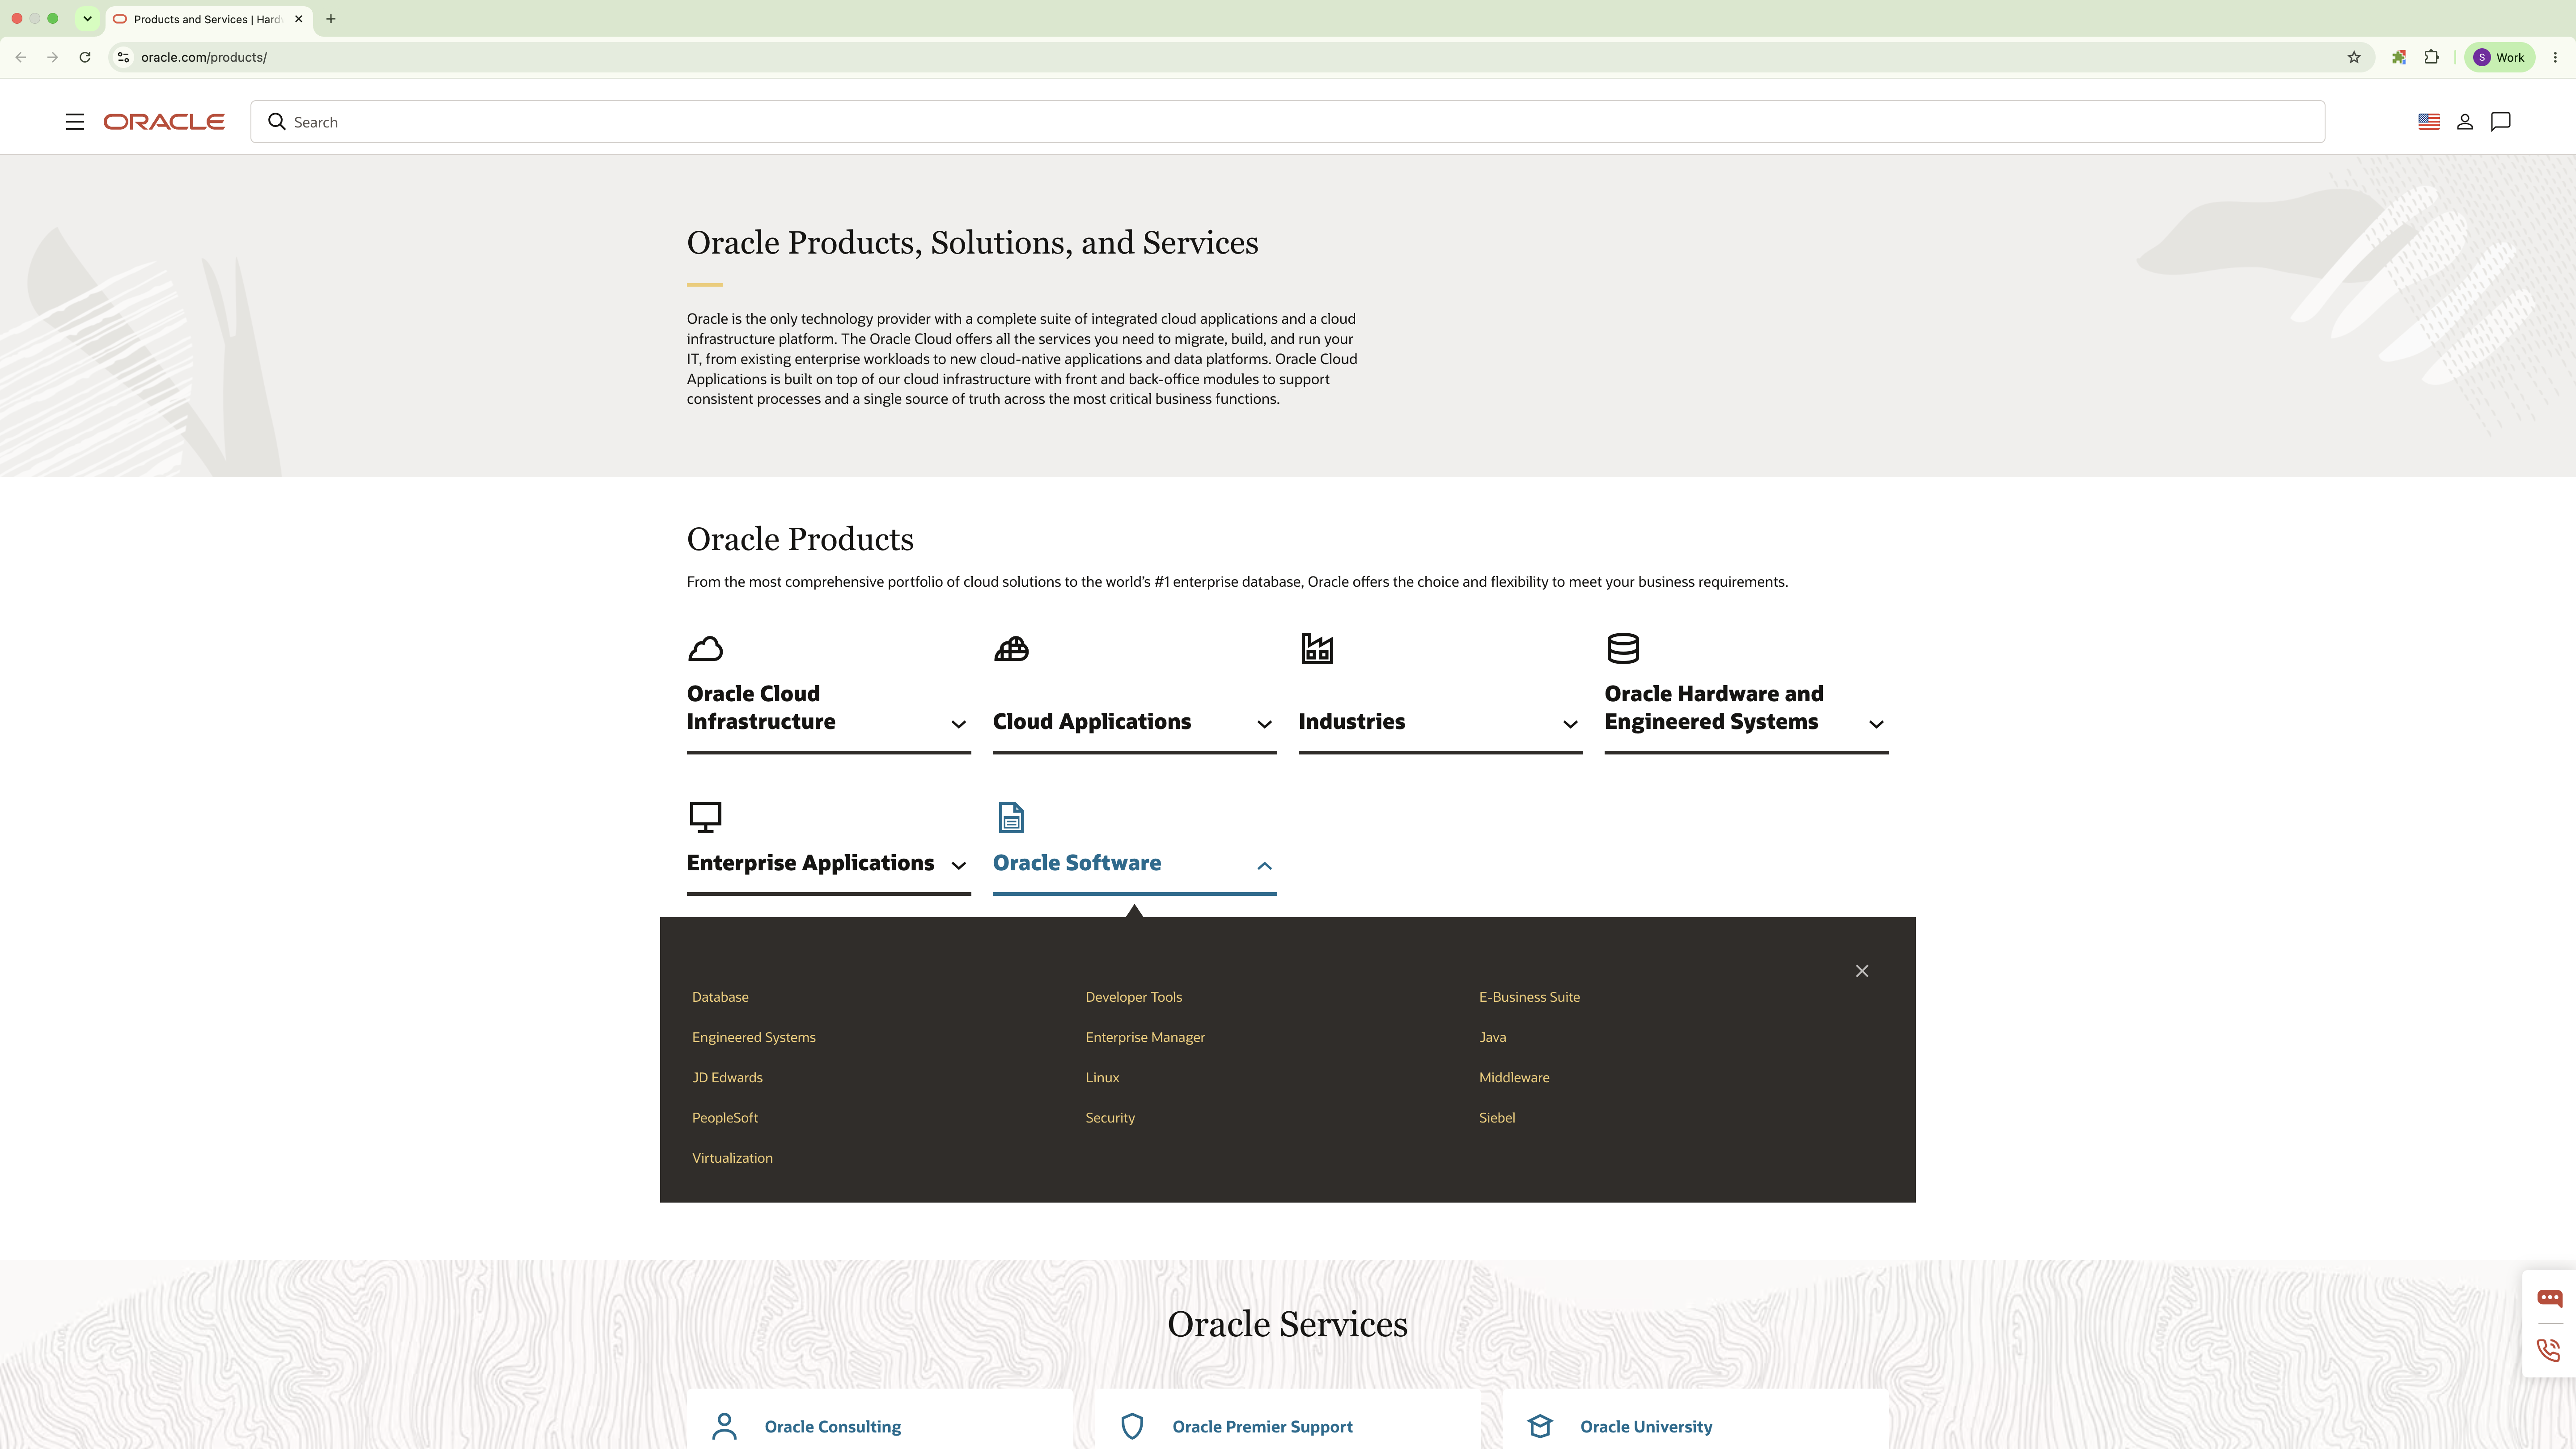
Exhibit 61: Oracle Website – Open Products, Solutions, and Services
Select the Database link to open the Oracle Database software download page. The Oracle Database Software Downloads page provides access to the available database releases, installation packages, and related documentation. The website layout may vary as Oracle updates its download pages.
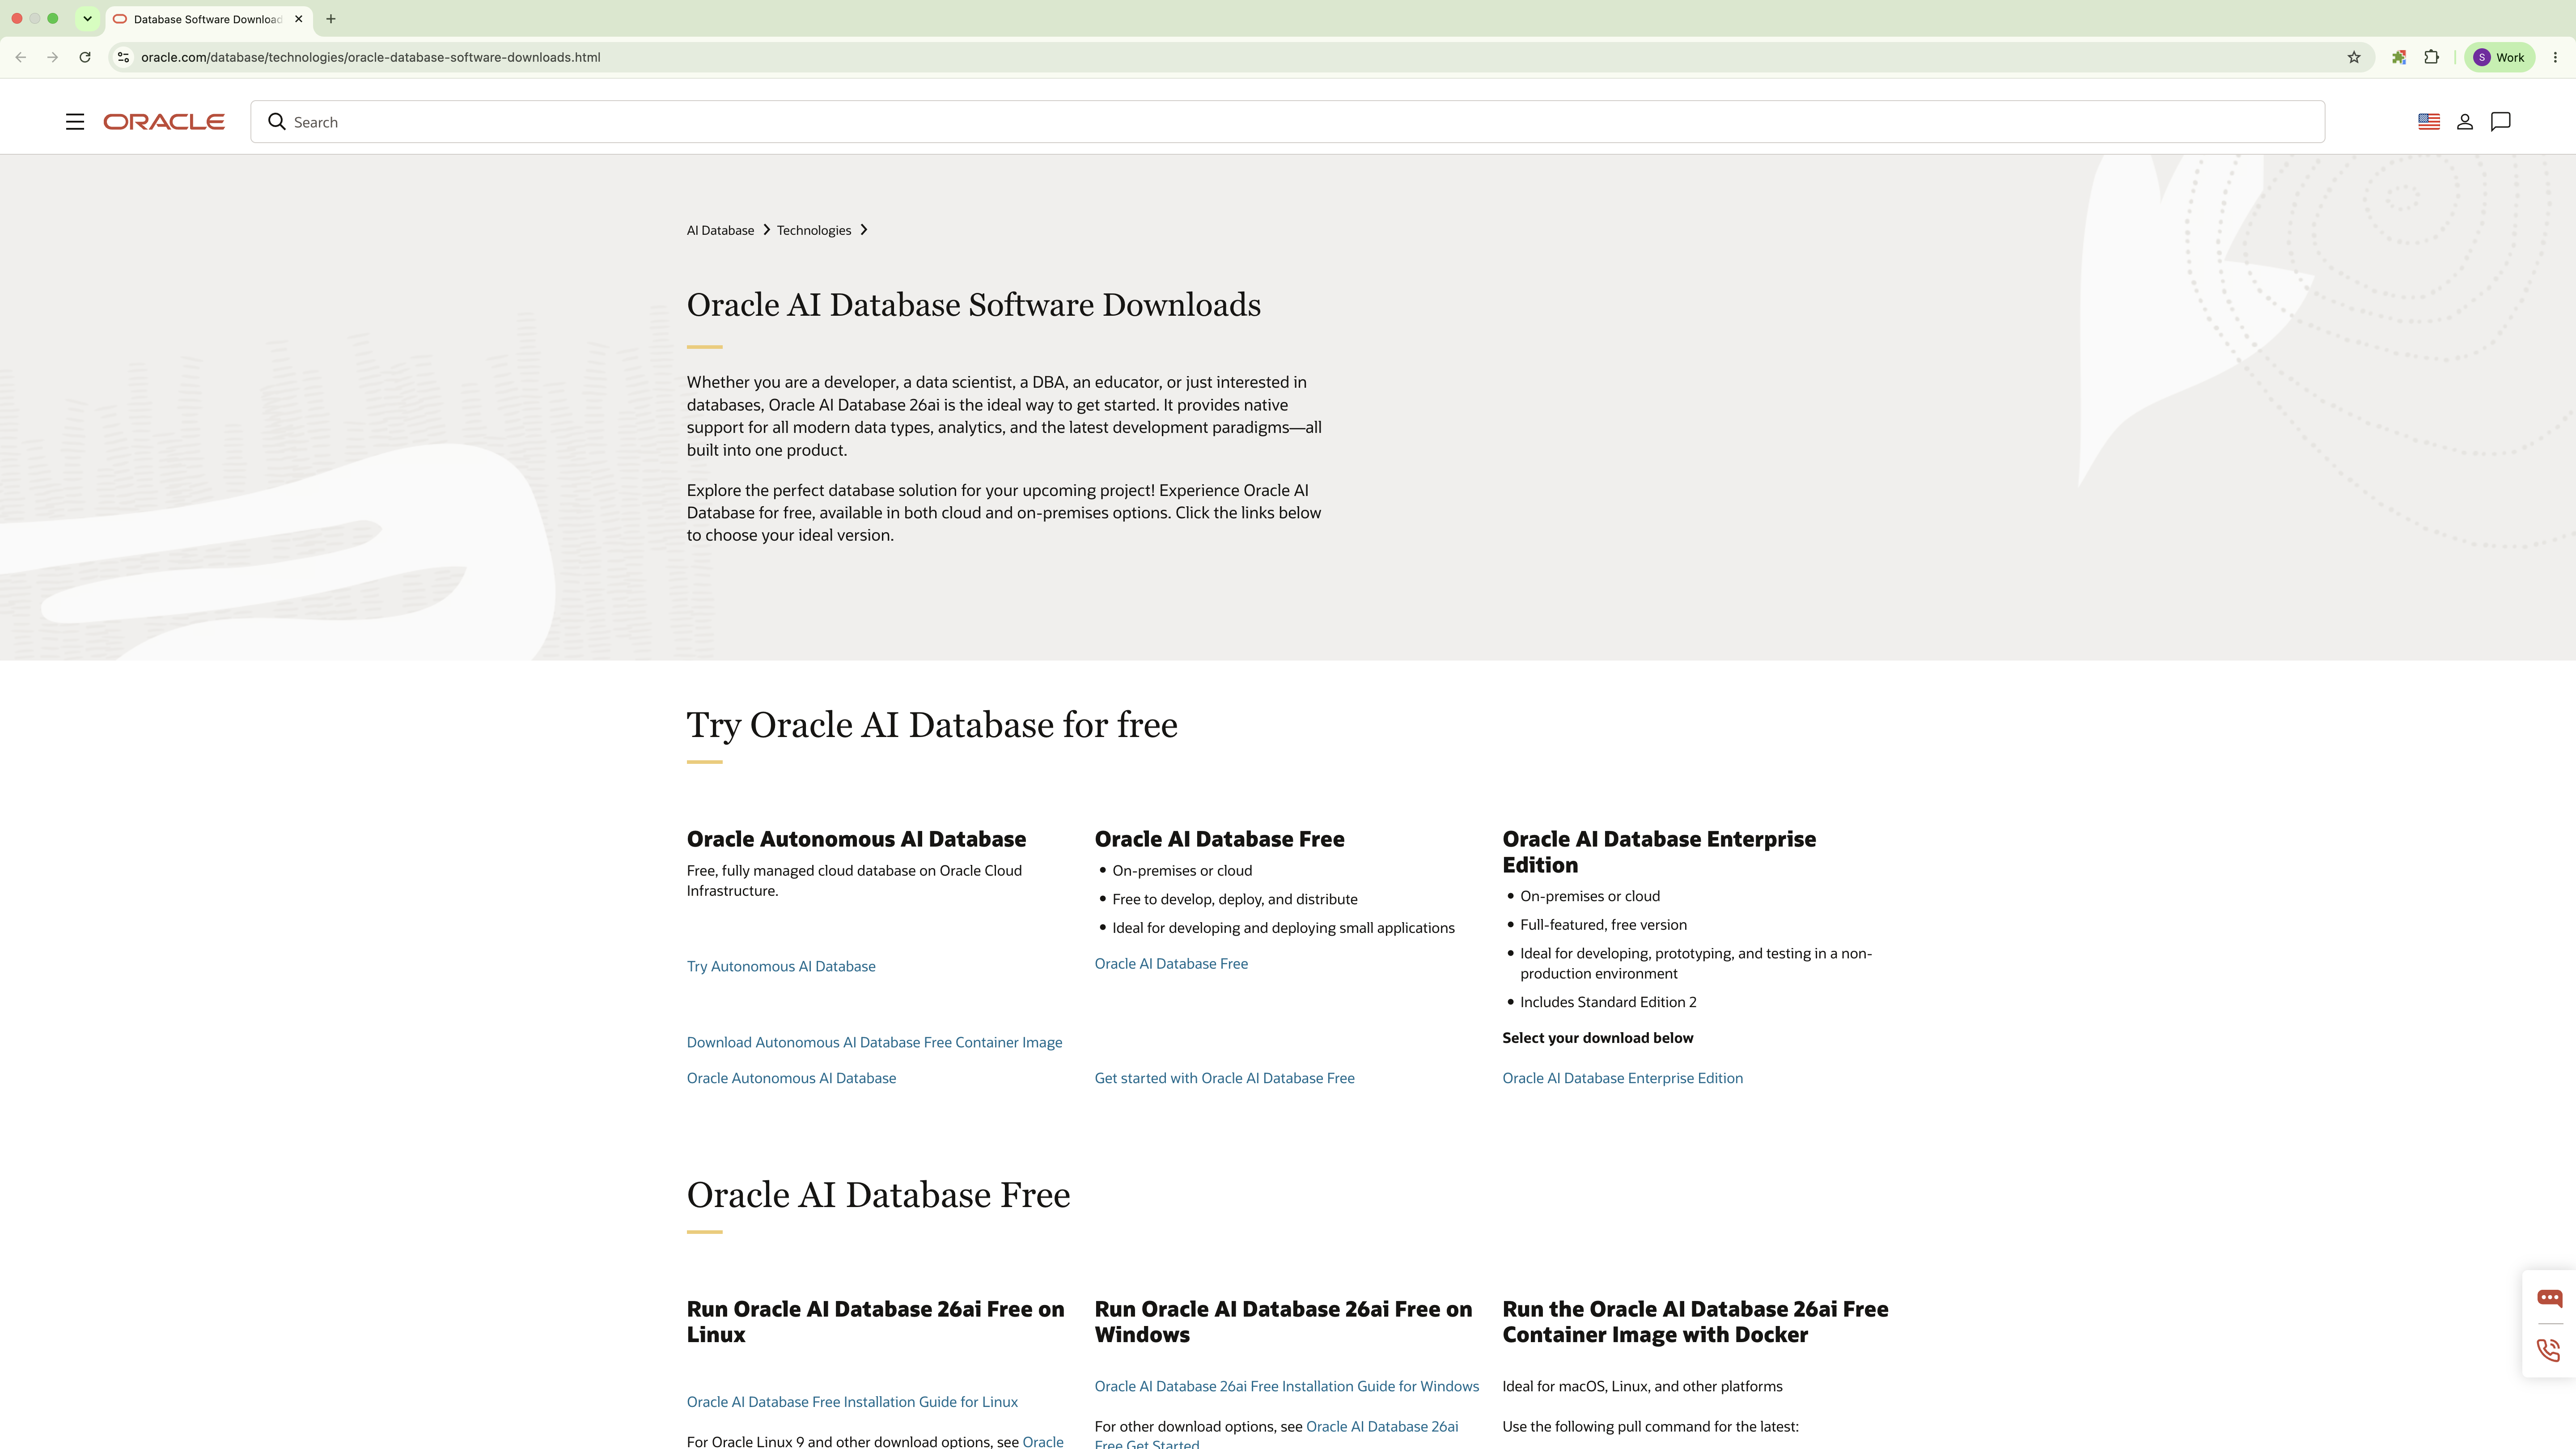
Exhibit 62: Oracle Website – Open the Database Software Download Page
Scroll down to the Oracle Database section to find the available Oracle Database versions and platforms.
Select Oracle Database 19c for Linux x86-64. Ensure that the selected download matches the Oracle Linux x86-64 guest operating system used in the reference sandbox. Alternatively, select any other Oracle Database download suitable for the environment to be deployed. The database package must be compatible with the guest environment, regardless of the host workstation’s operating system.
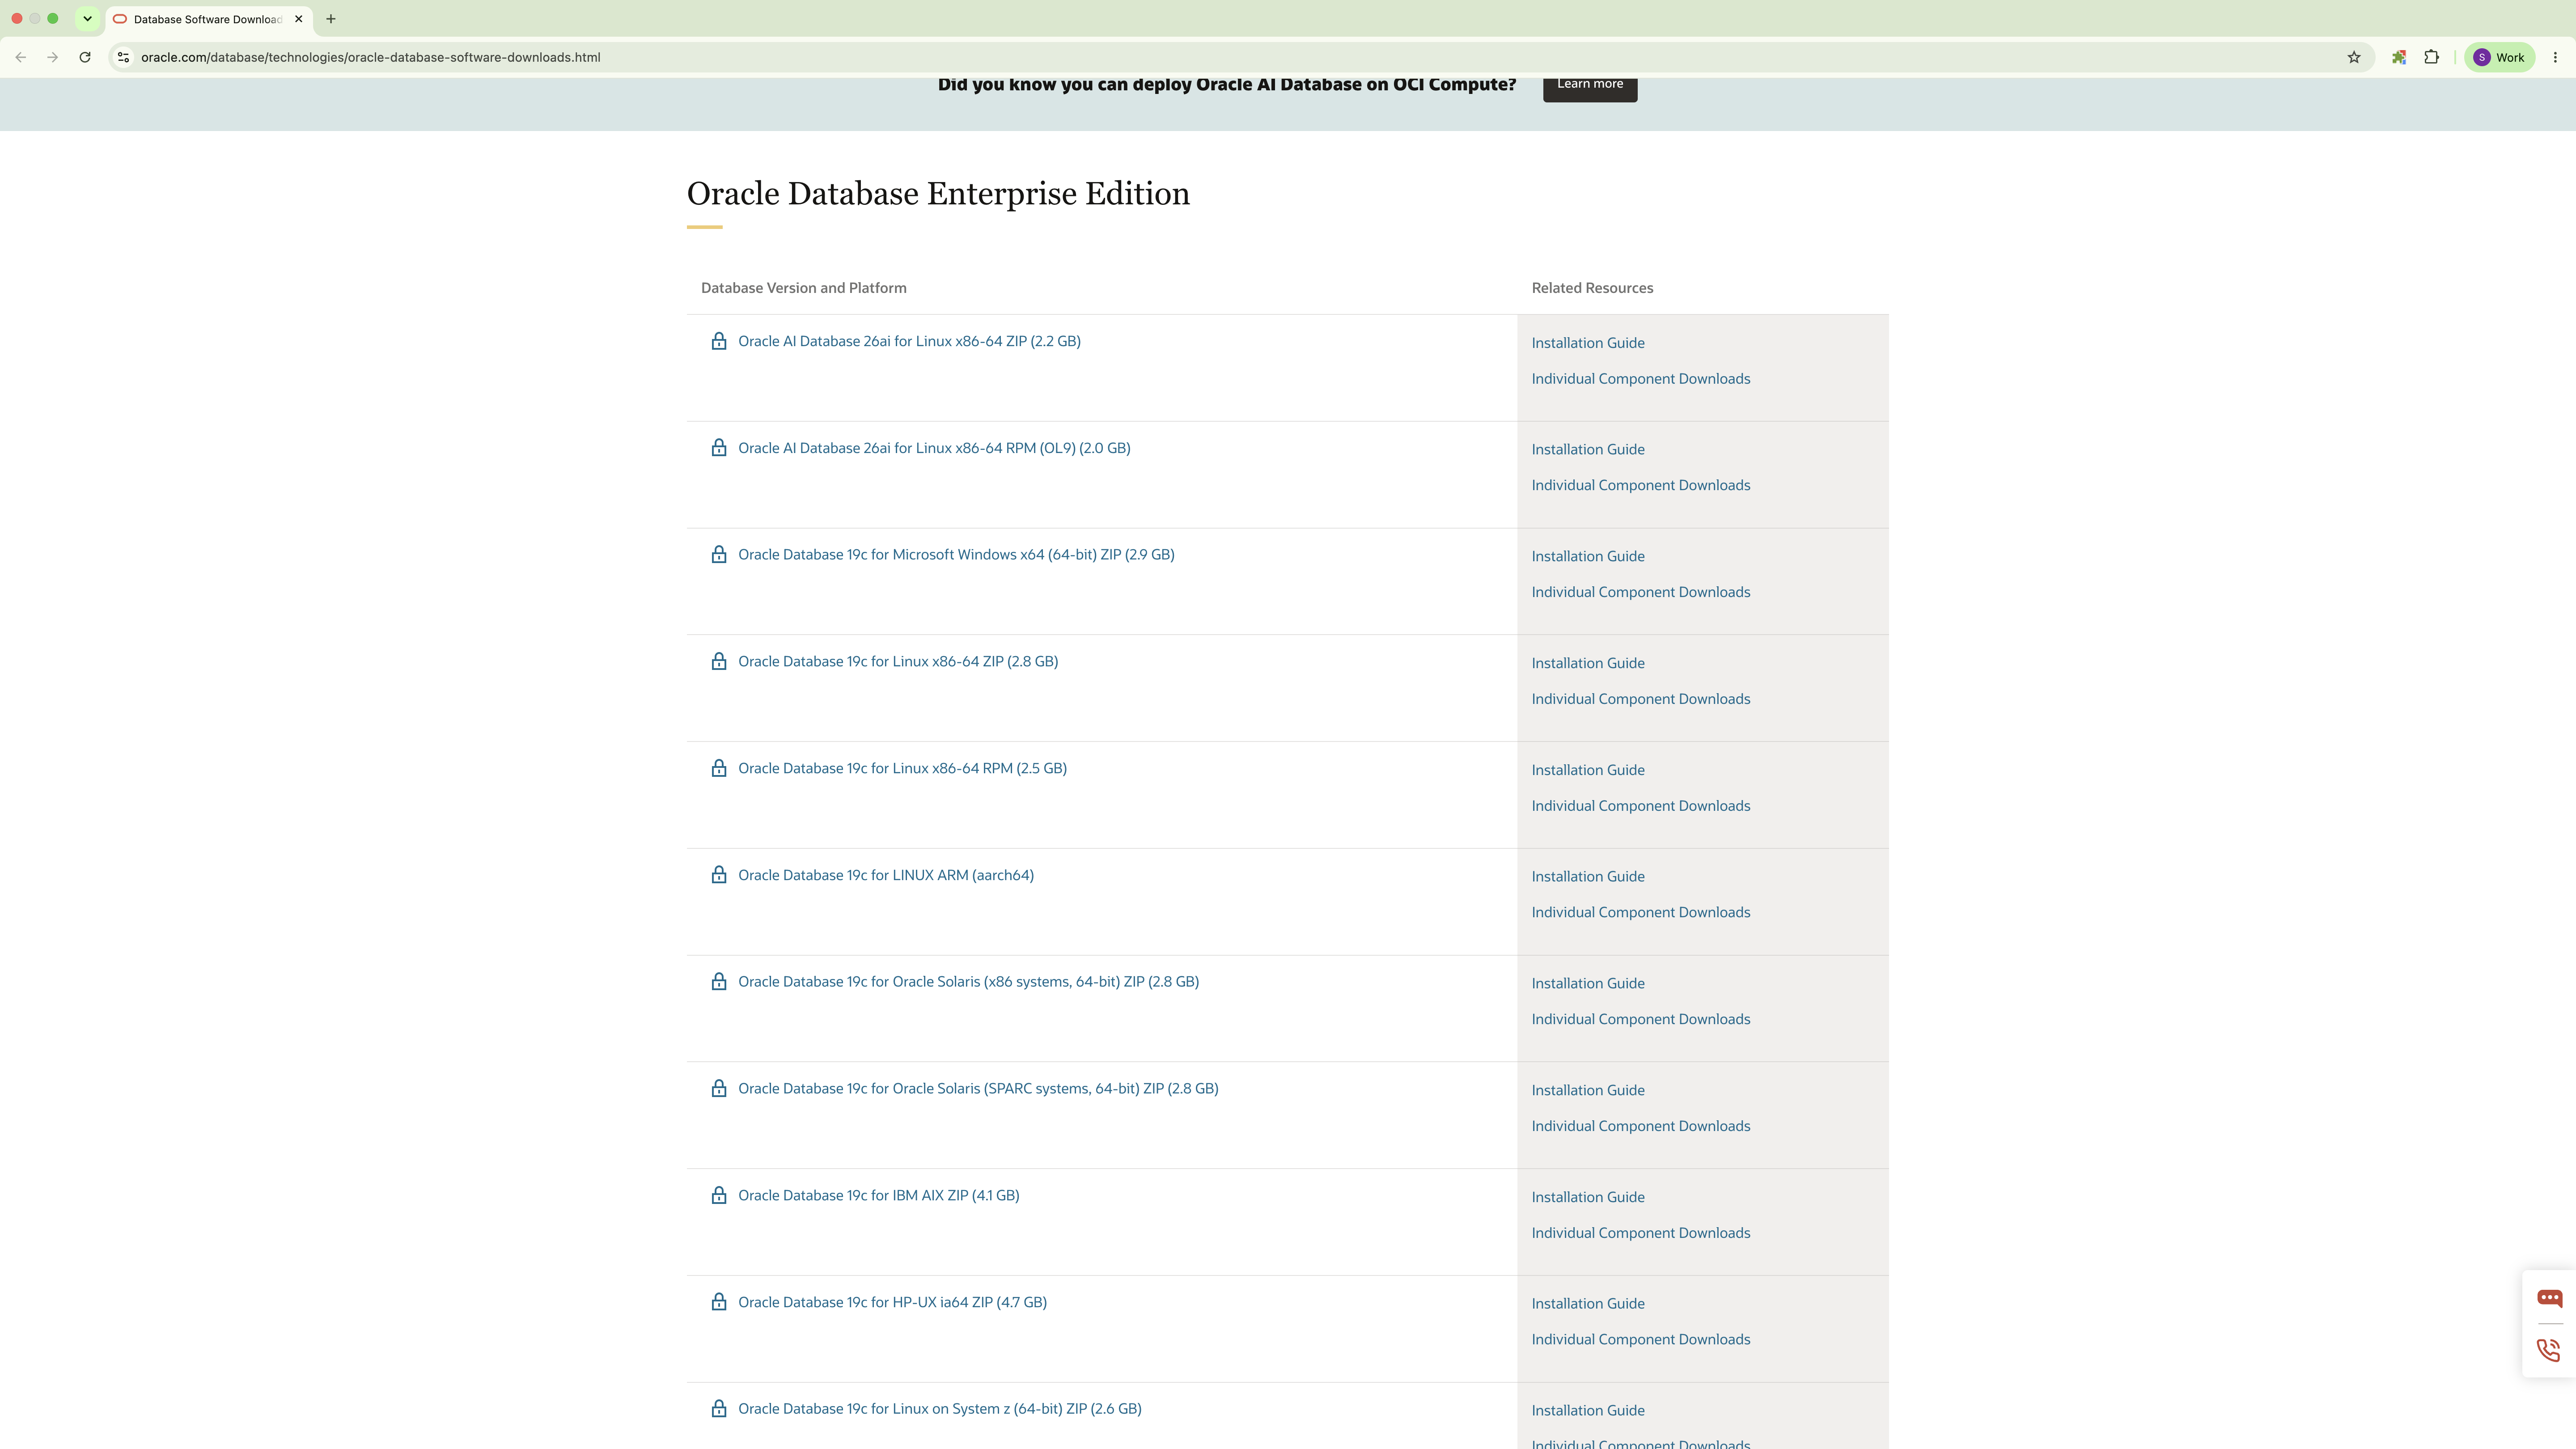
Exhibit 63: Oracle Website – Select Oracle Database 19c for Linux x86-64
Oracle Database installation files are available in ZIP or RPM format, with additional components available separately. For the ZIP-based installation described in this guide, the database version is 19c. The database edition – Standard Edition 2 (SE2) or Enterprise Edition (EE) – is selected during installation.
The selected edition affects Oracle Database licensing requirements. Review the applicable Oracle licensing terms and ensure compliance before deploying or using the database, including in non-production environments.
For the reference sandbox, select the Oracle Database 19c Linux x86-64 ZIP installation archive. Save the downloaded file on the host workstation and retain the original archive for future use. The following steps prepare the installation media and transfer it to the Oracle Linux virtual machine.
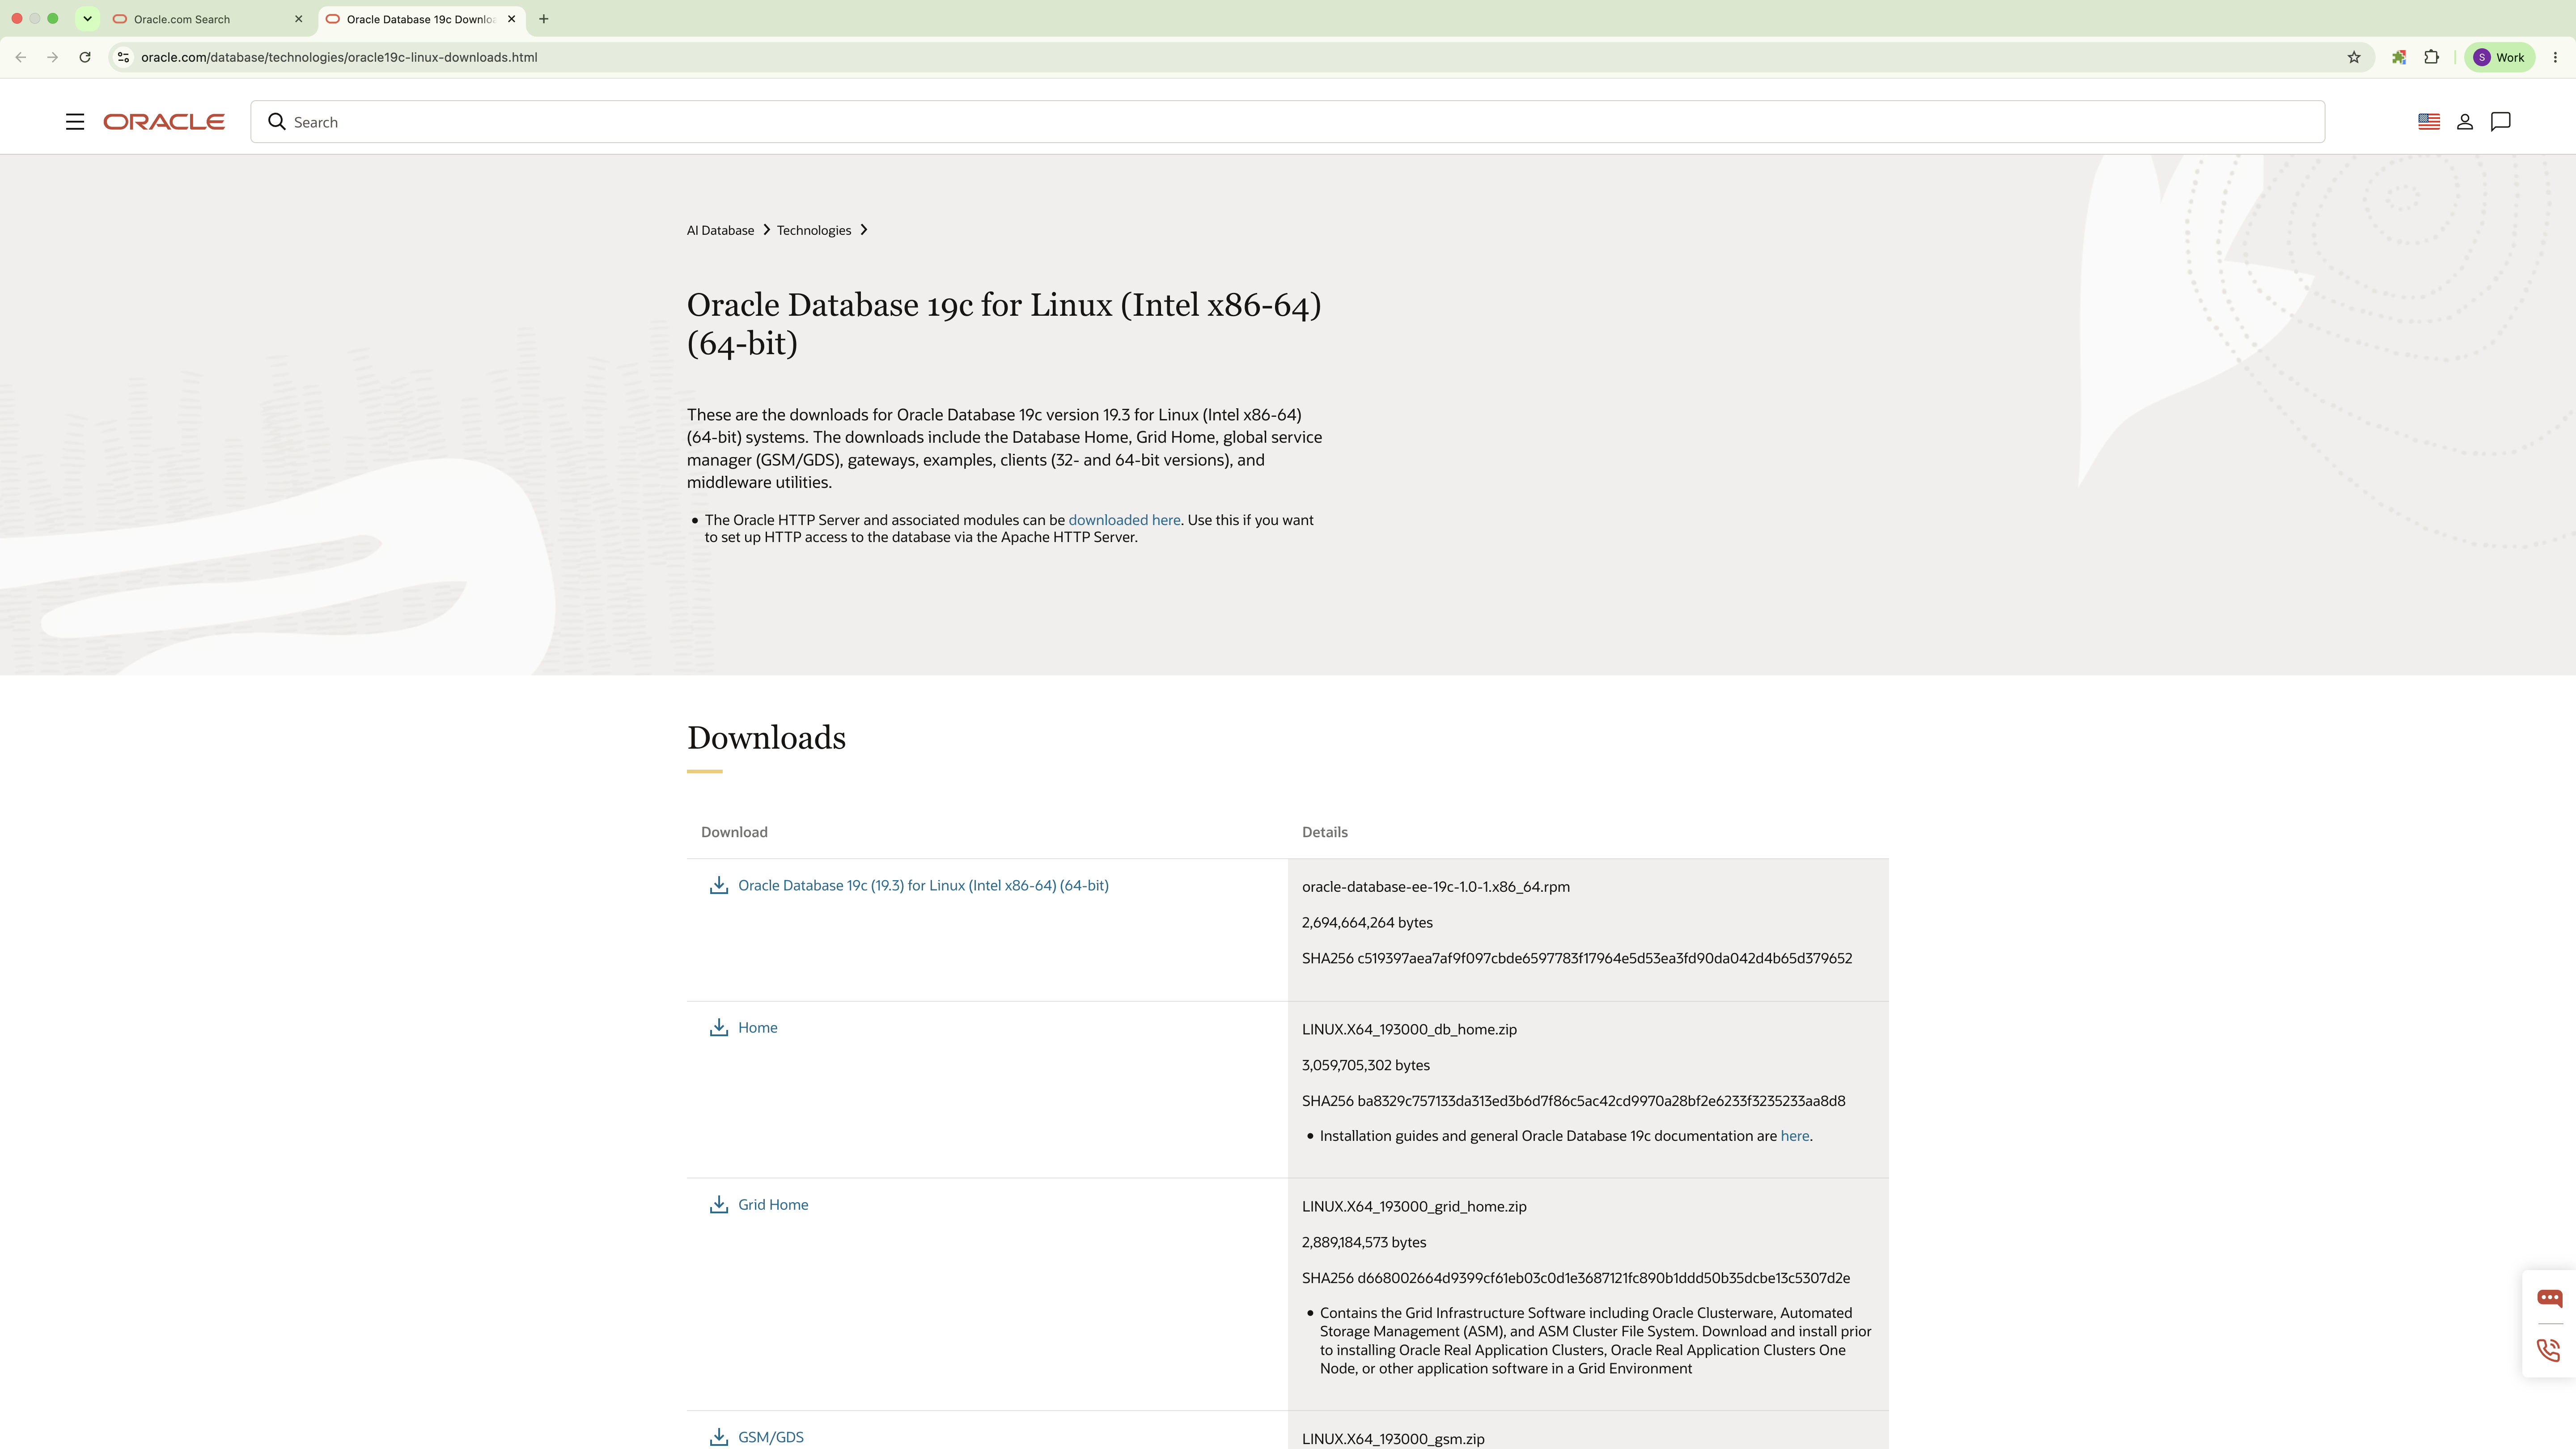
Exhibit 64: Oracle Website – Download Oracle Database 19c Media
Select the Oracle Database 19c ZIP file for Linux x86-64. When the download window appears, review the Oracle License Agreement and, if the terms are accepted on behalf of the organization, select I reviewed and accept the Oracle License Agreement, then select Download LINUX.X64_193000_db_home.zip. An Oracle account is required to proceed with the download.
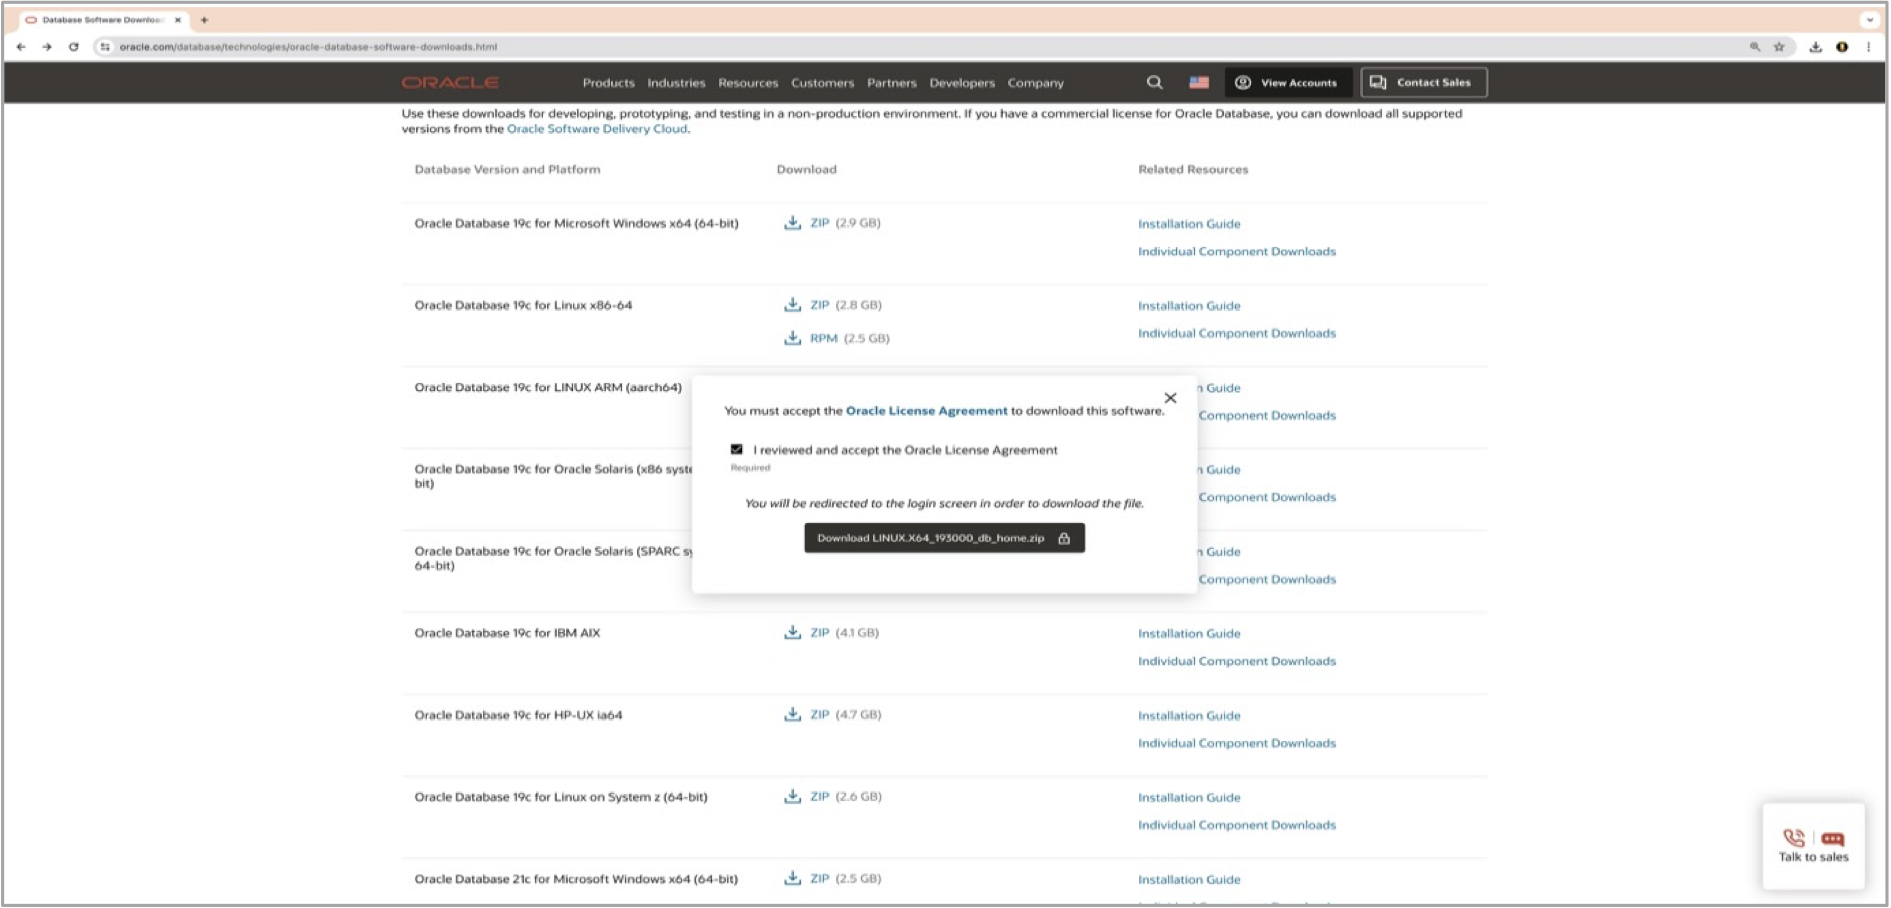
Exhibit 65: Oracle Website – Accept the Oracle License Agreement
Step 2 – Check Database Prerequisites
The Oracle Database 19c Installation Guide for Linux [➜ Link reference #21, Oracle Database 19c Installation Guide for Linux] describes the prerequisites and installation procedure. Check the requirements for the selected release before continuing.
Note: The reference links are listed in the Link References file in folder 05_External_Links (refer to the downloadable publication package, chapter 7).
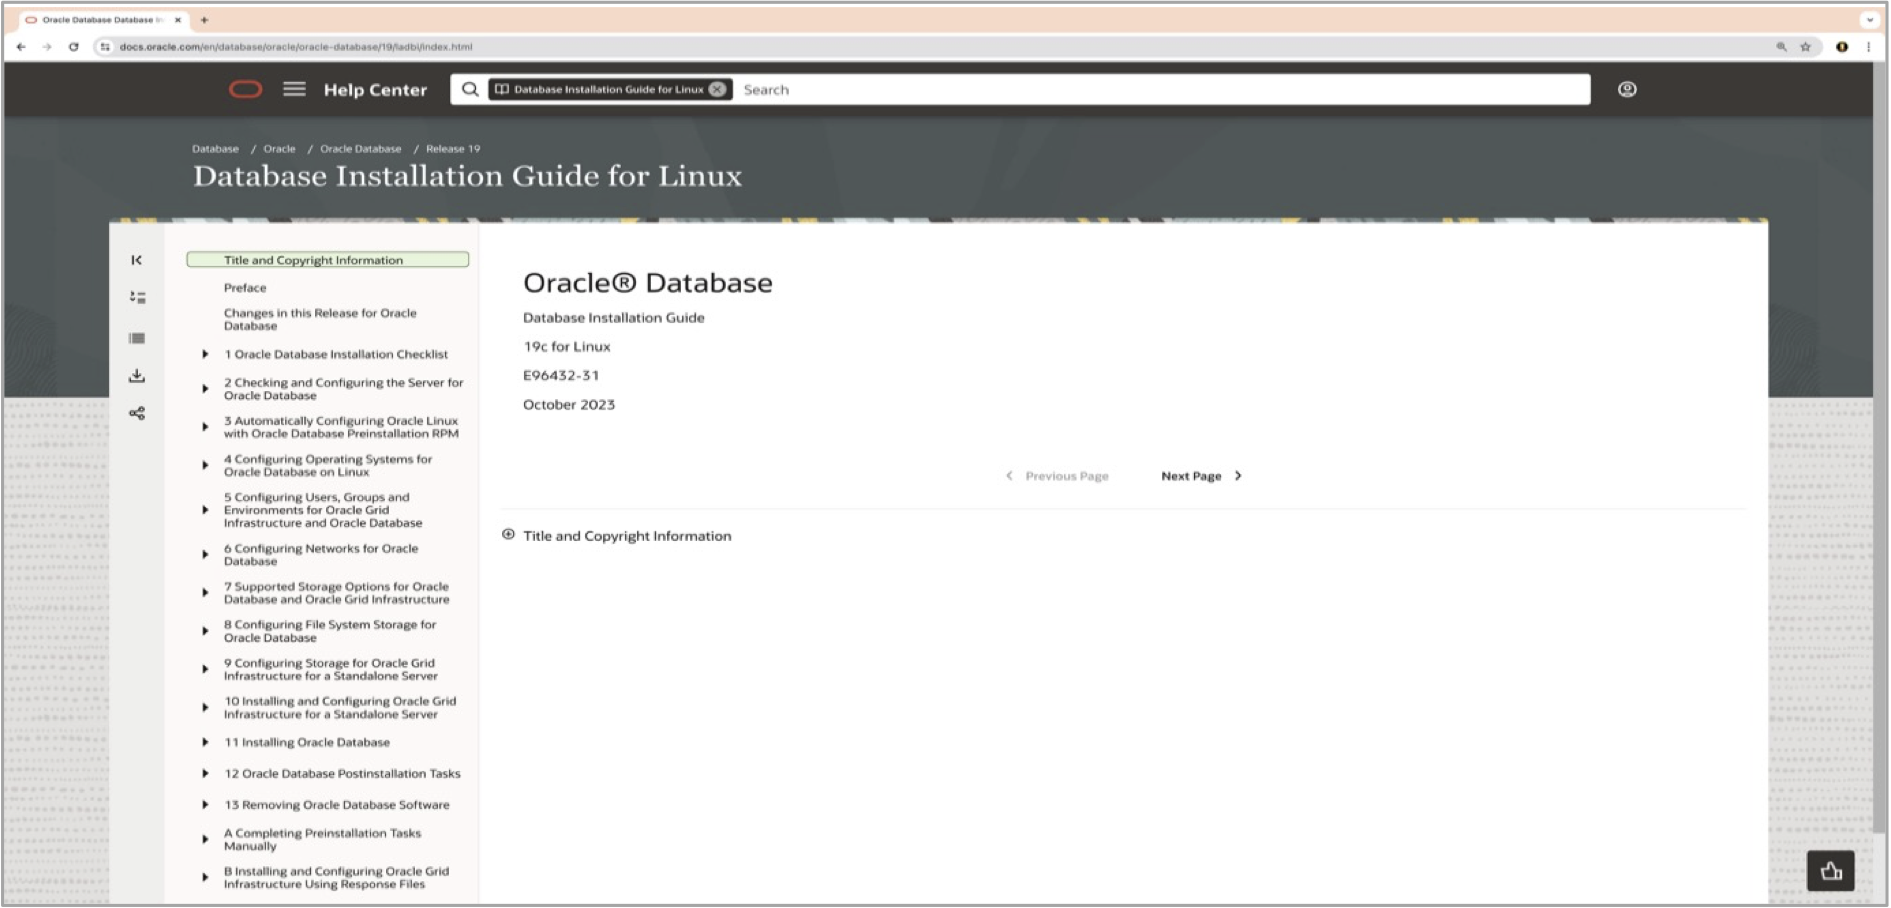
Exhibit 66: Oracle Website – Open the Database Installation Guide for Linux
Check the following prerequisites before installing the database. The minimum RAM requirement below is distinct from the 4 GB allocated to the reference VM:
-
2 GB RAM (minimum requirement)
-
Network connectivity
-
Oracle Linux 7.x with a supported Linux x86-64 kernel (download instructions are provided above)
-
OpenSSH installation
-
Storage space for Oracle software (Linux x86-64): at least 7.2 GB for Oracle Database Enterprise Edition
-
At least 1 GB of available temporary disk space in /tmp for installation operations
-
Sufficient swap space (4 GB for the reference VM with 4 GB of RAM)
-
Access to the Oracle Linux software repositories required to install prerequisite packages
The VirtualBox reference VM uses 2 vCPUs, 4 GB of RAM, and a 50 GB virtual disk. Verify capacity against the selected database components and keep Oracle Linux and Oracle Database at supported update levels.
Step 3 – Perform Preinstallation Tasks
Refer to the Oracle Yum support page [➜ Link reference #22, Oracle Database 19c Oracle Linux Preinstallation via Yum].
Run the following yum command:
# yum install oracle-database-preinstall-19c
Install the Oracle Database prerequisites and create the oracle operating-system user and groups.
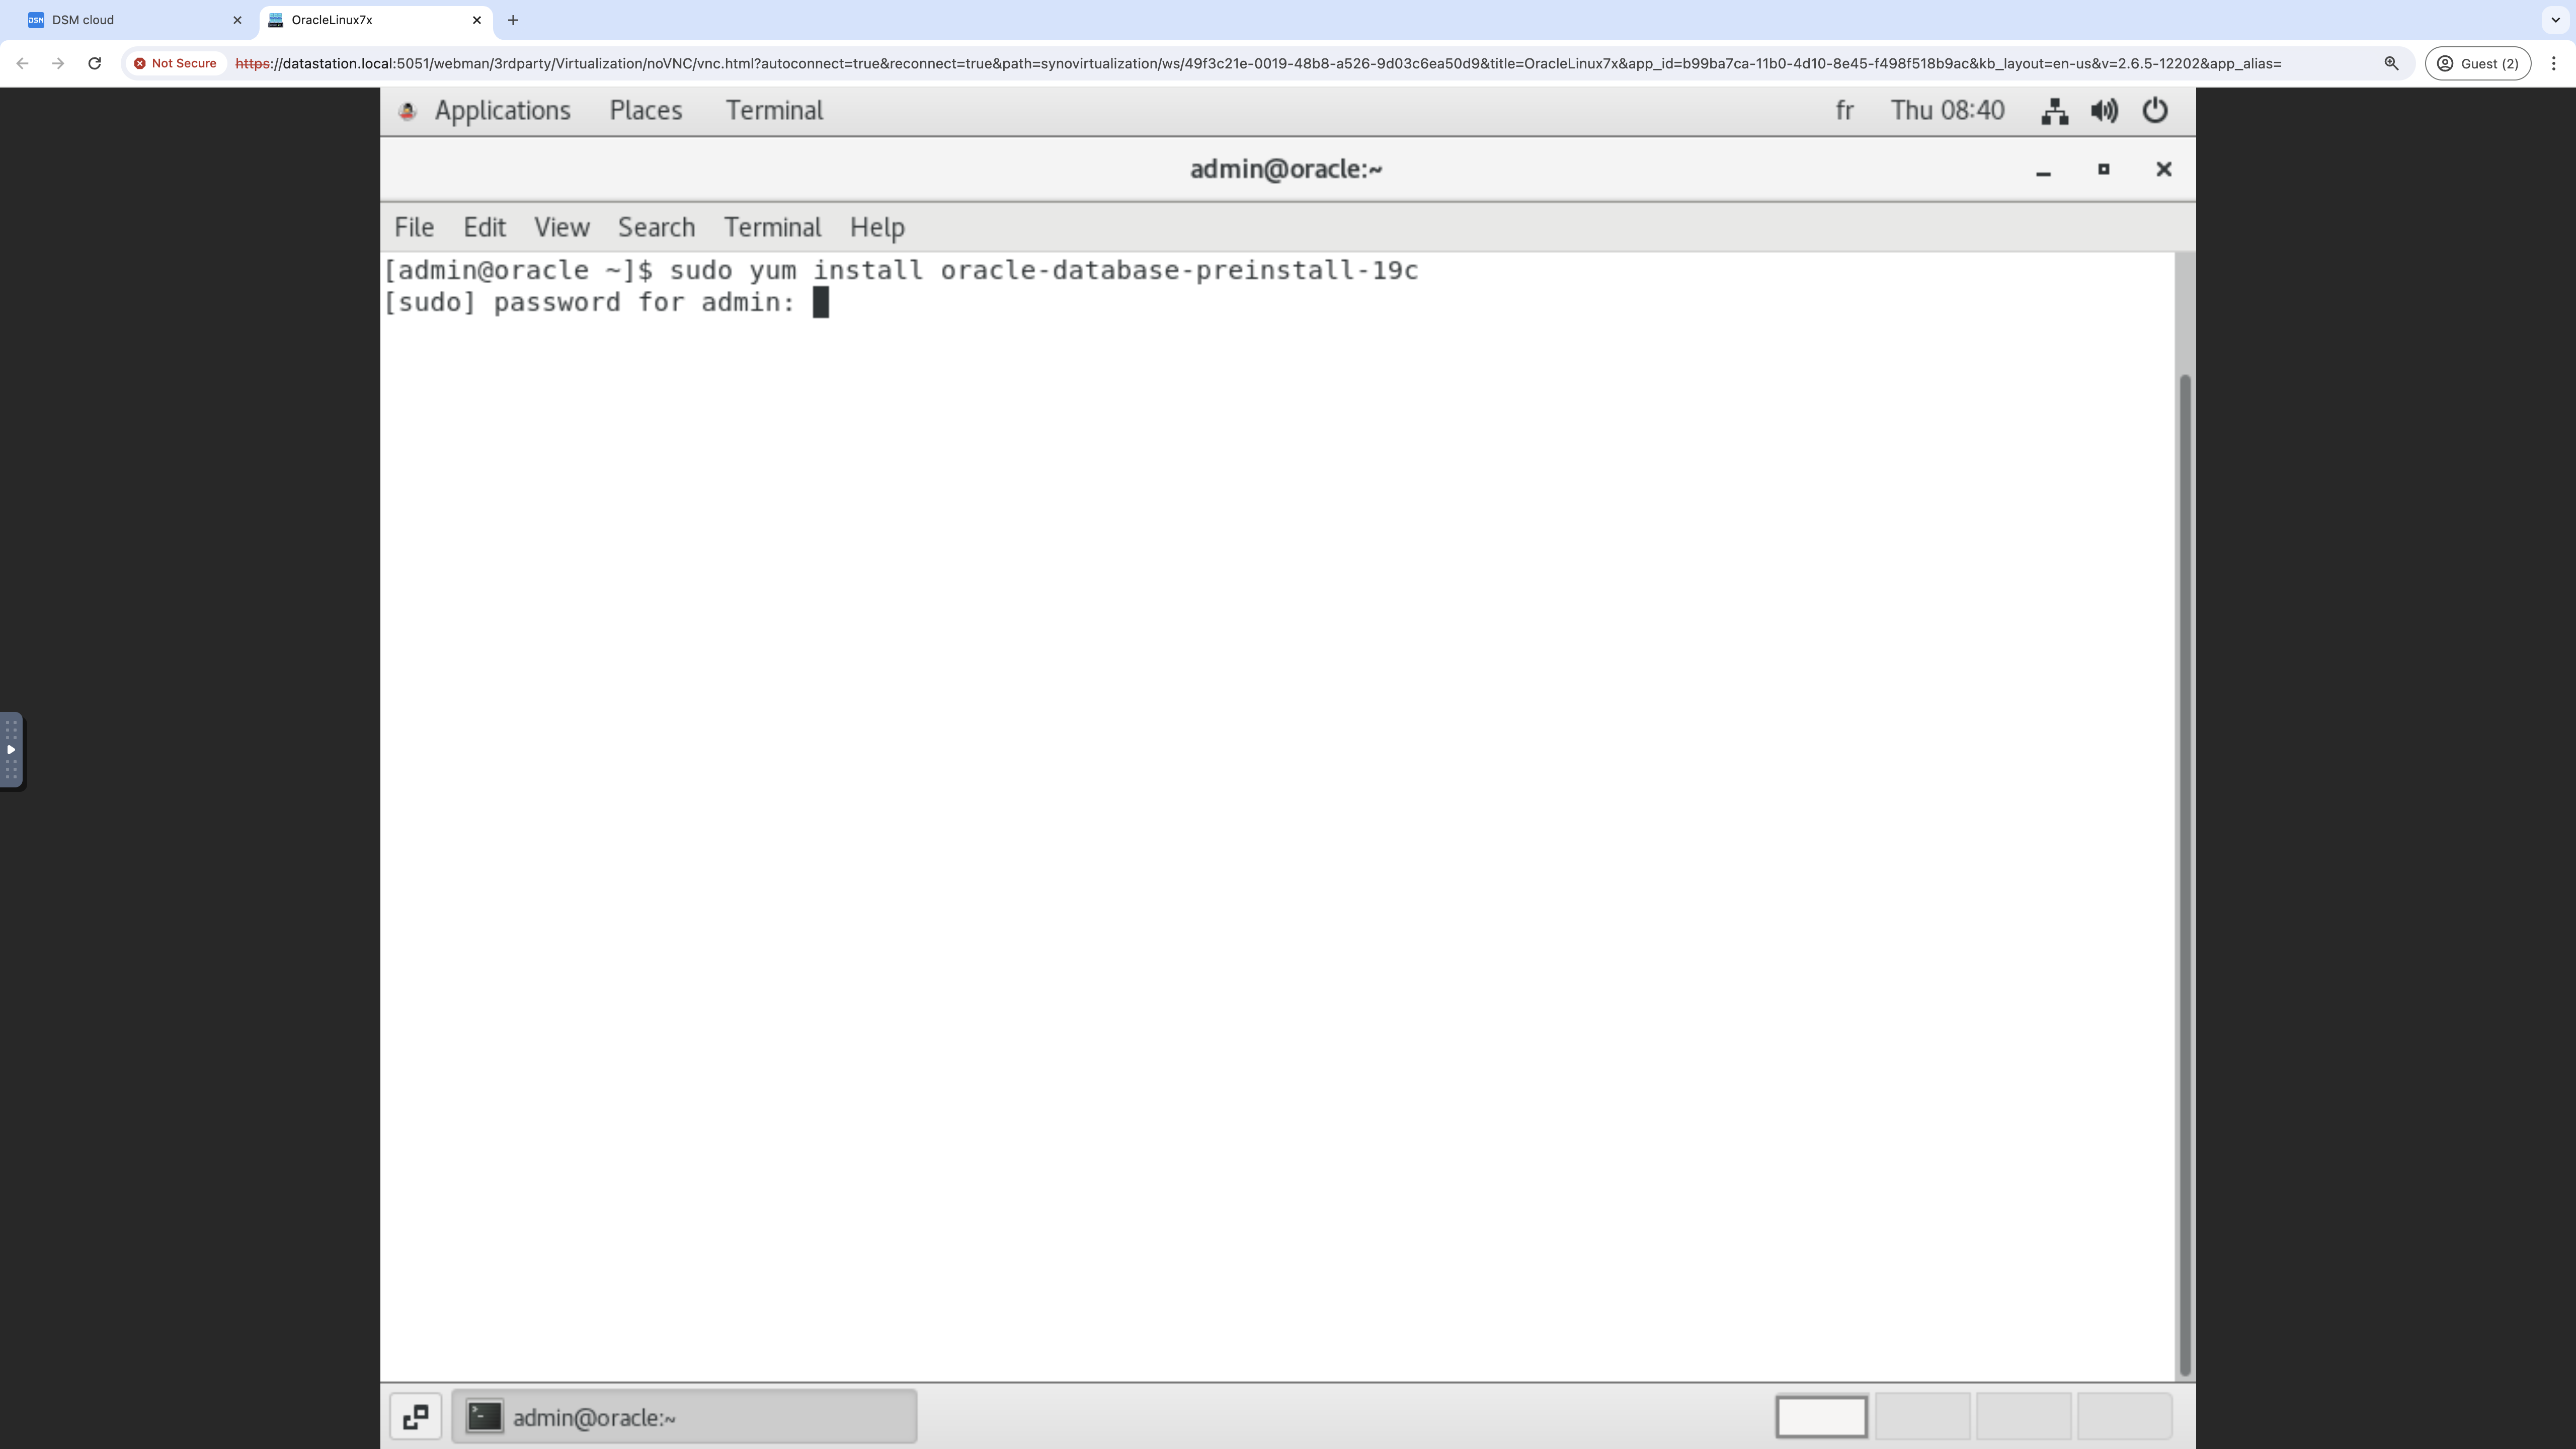
Exhibit 67: Oracle Database Preinstallation – Run the Yum Command
Review and accept the dependency changes. The oracle-database-preinstall-19c package installs the required dependencies, configures operating system settings, and creates the oracle user and associated groups.
Review the dependency changes proposed by yum, and if agreed upon, then confirm the installation, and allow the process to be completed.
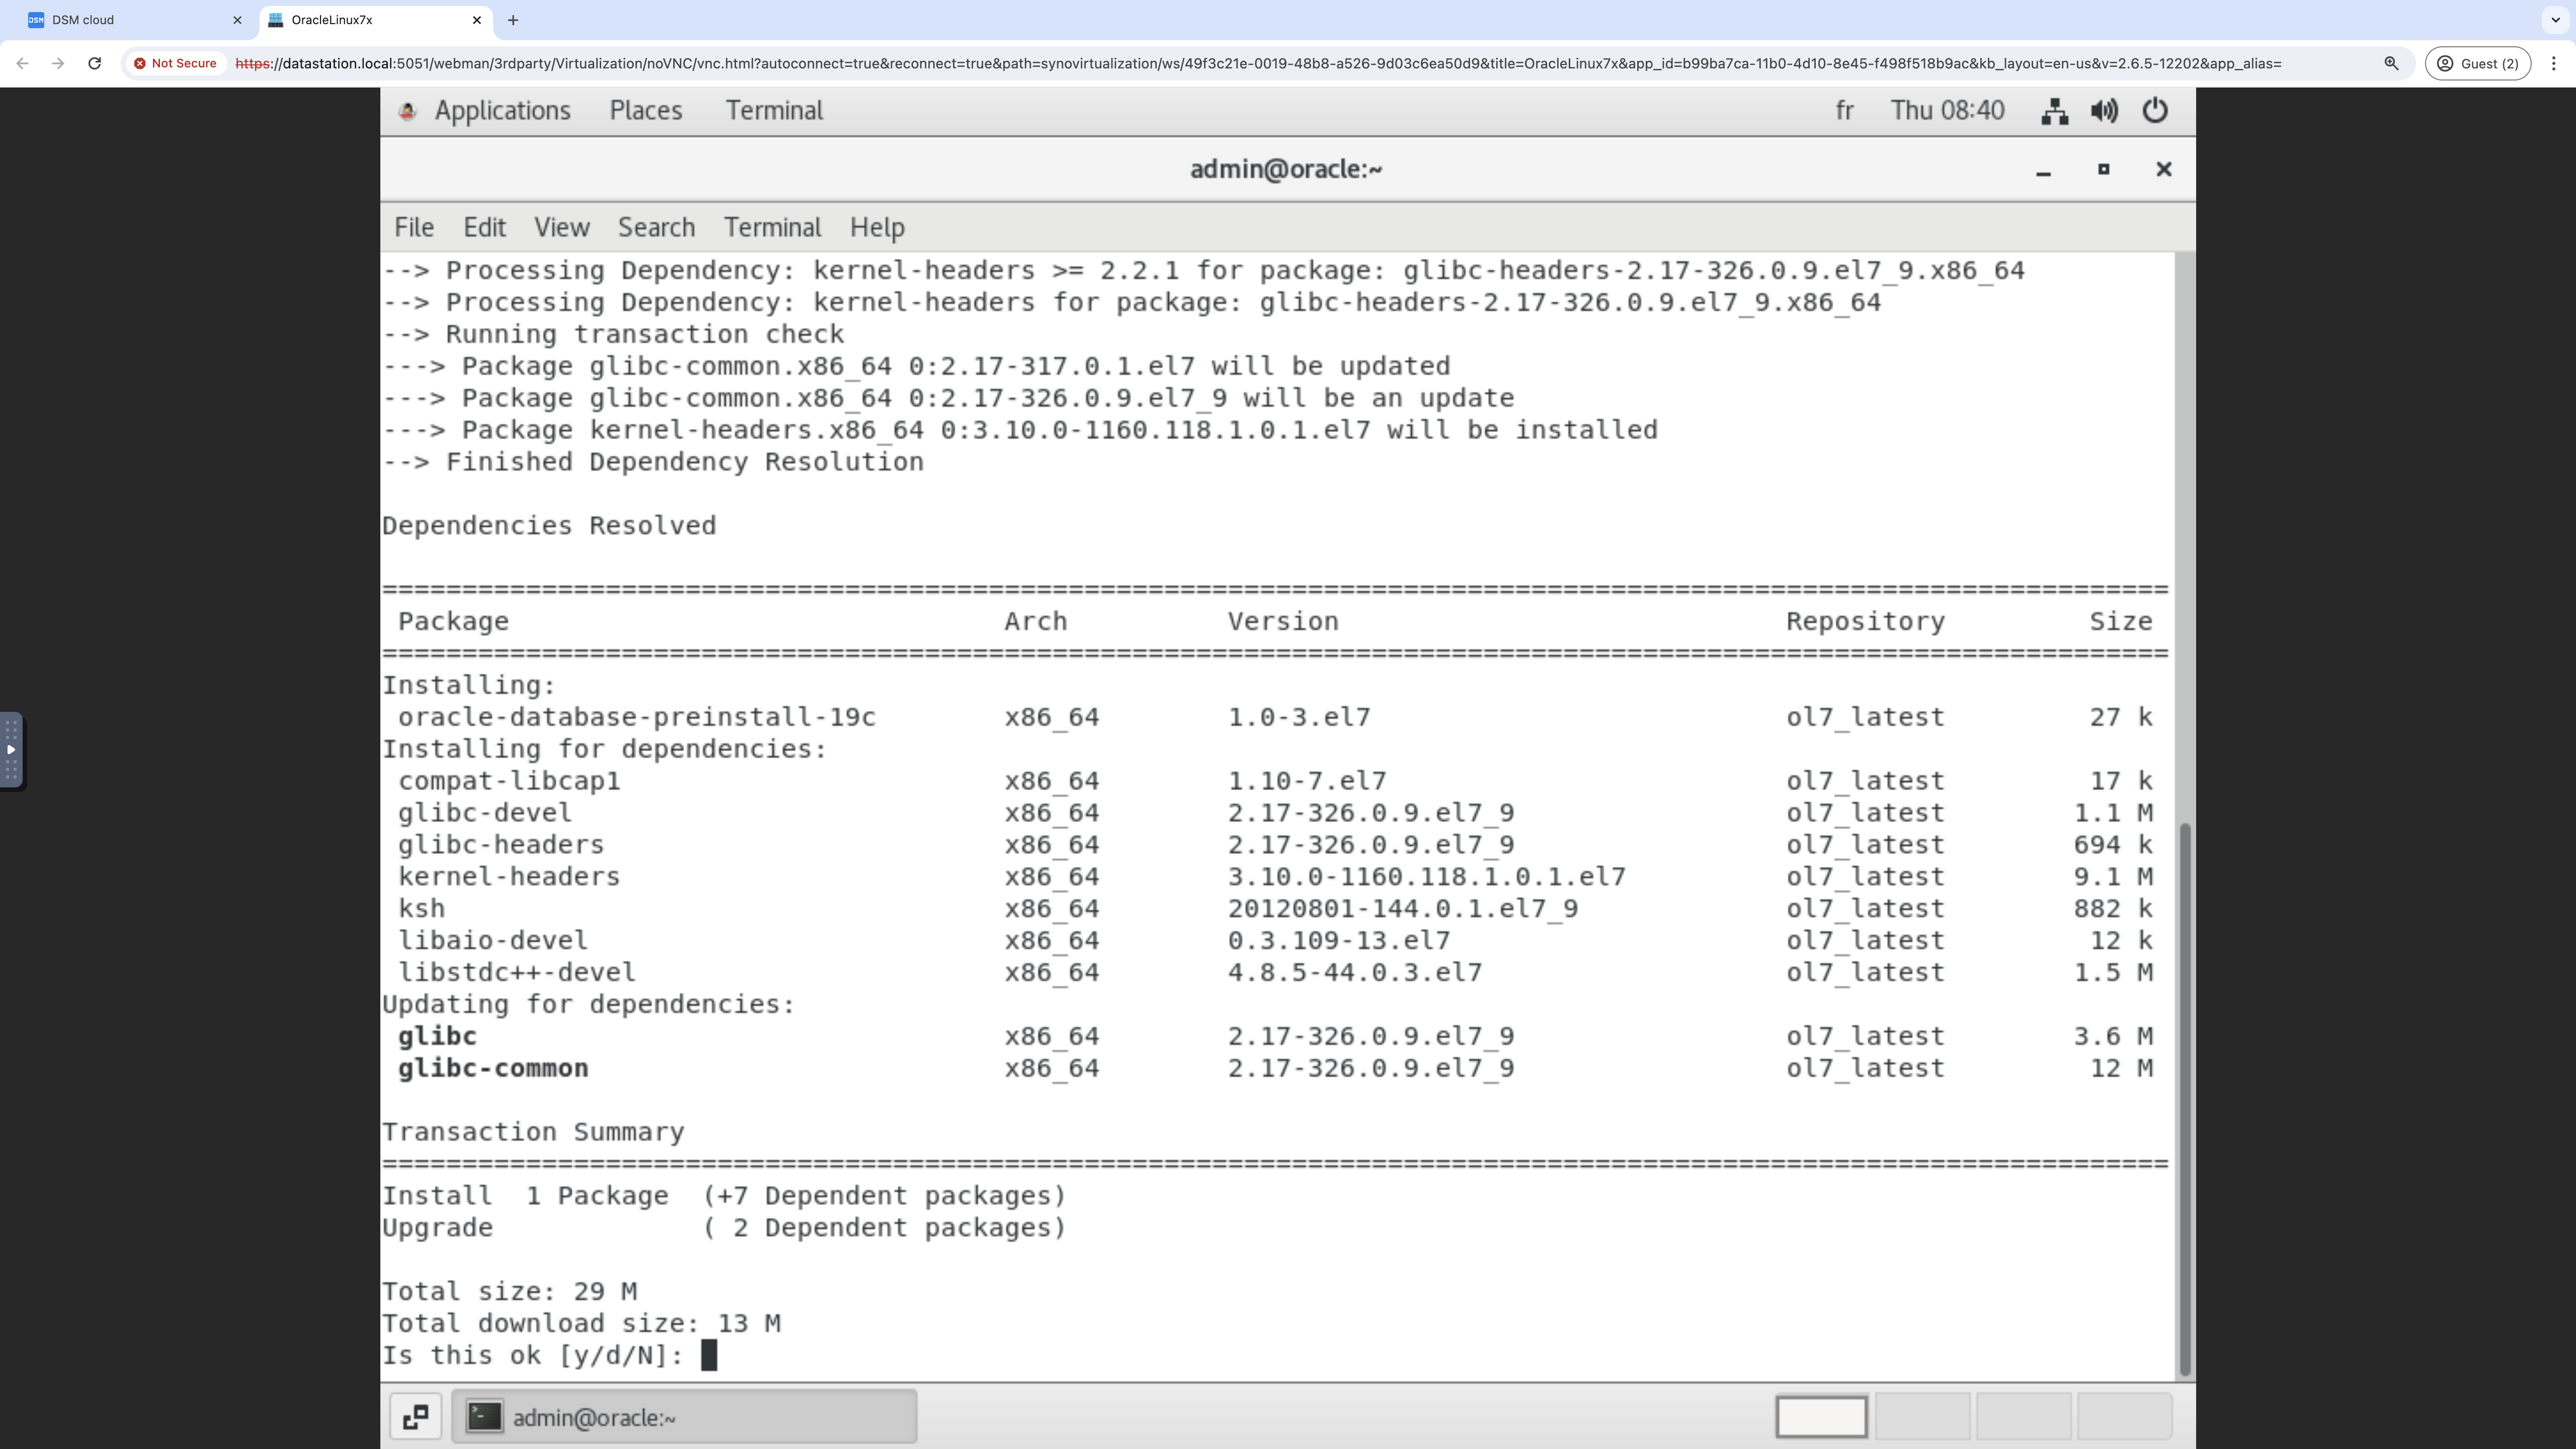
Exhibit 68: Oracle Database Preinstallation – Check Package Dependencies
Confirm the installation.
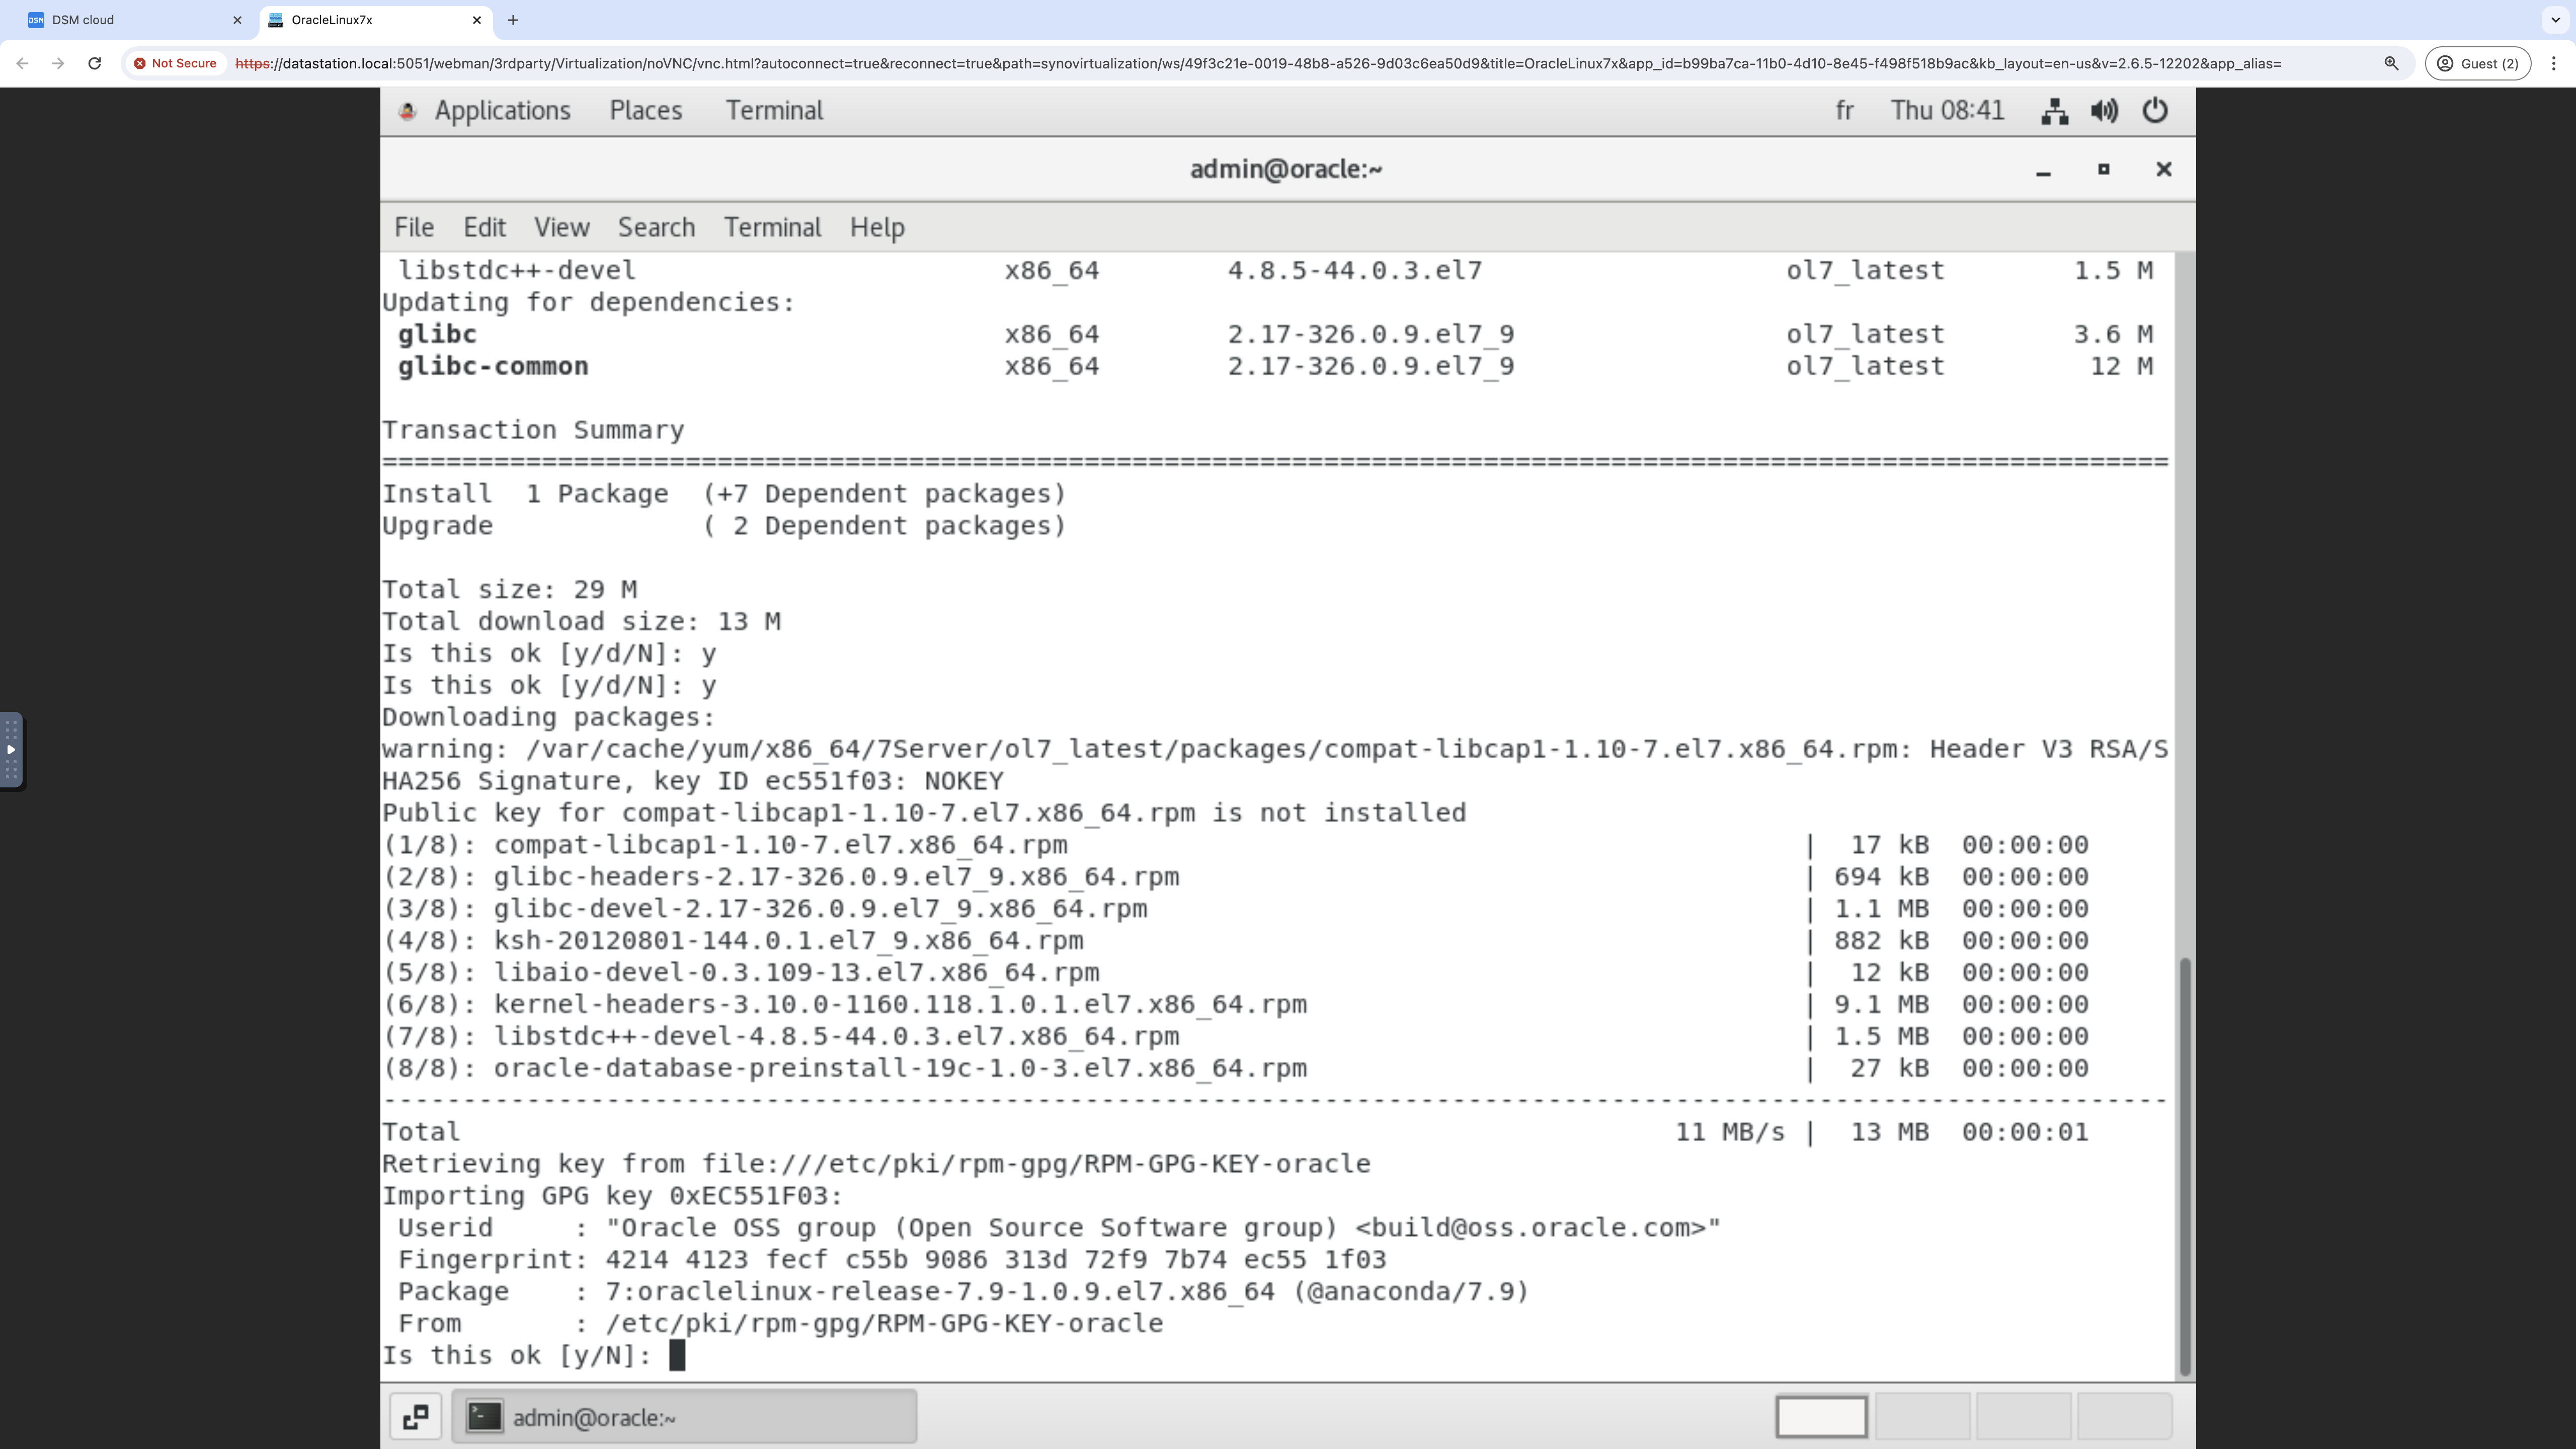
Exhibit 69: Oracle Database Preinstallation – Confirm Package Installation
Dependence is installed, and the Oracle preinstallation tasks are executed.
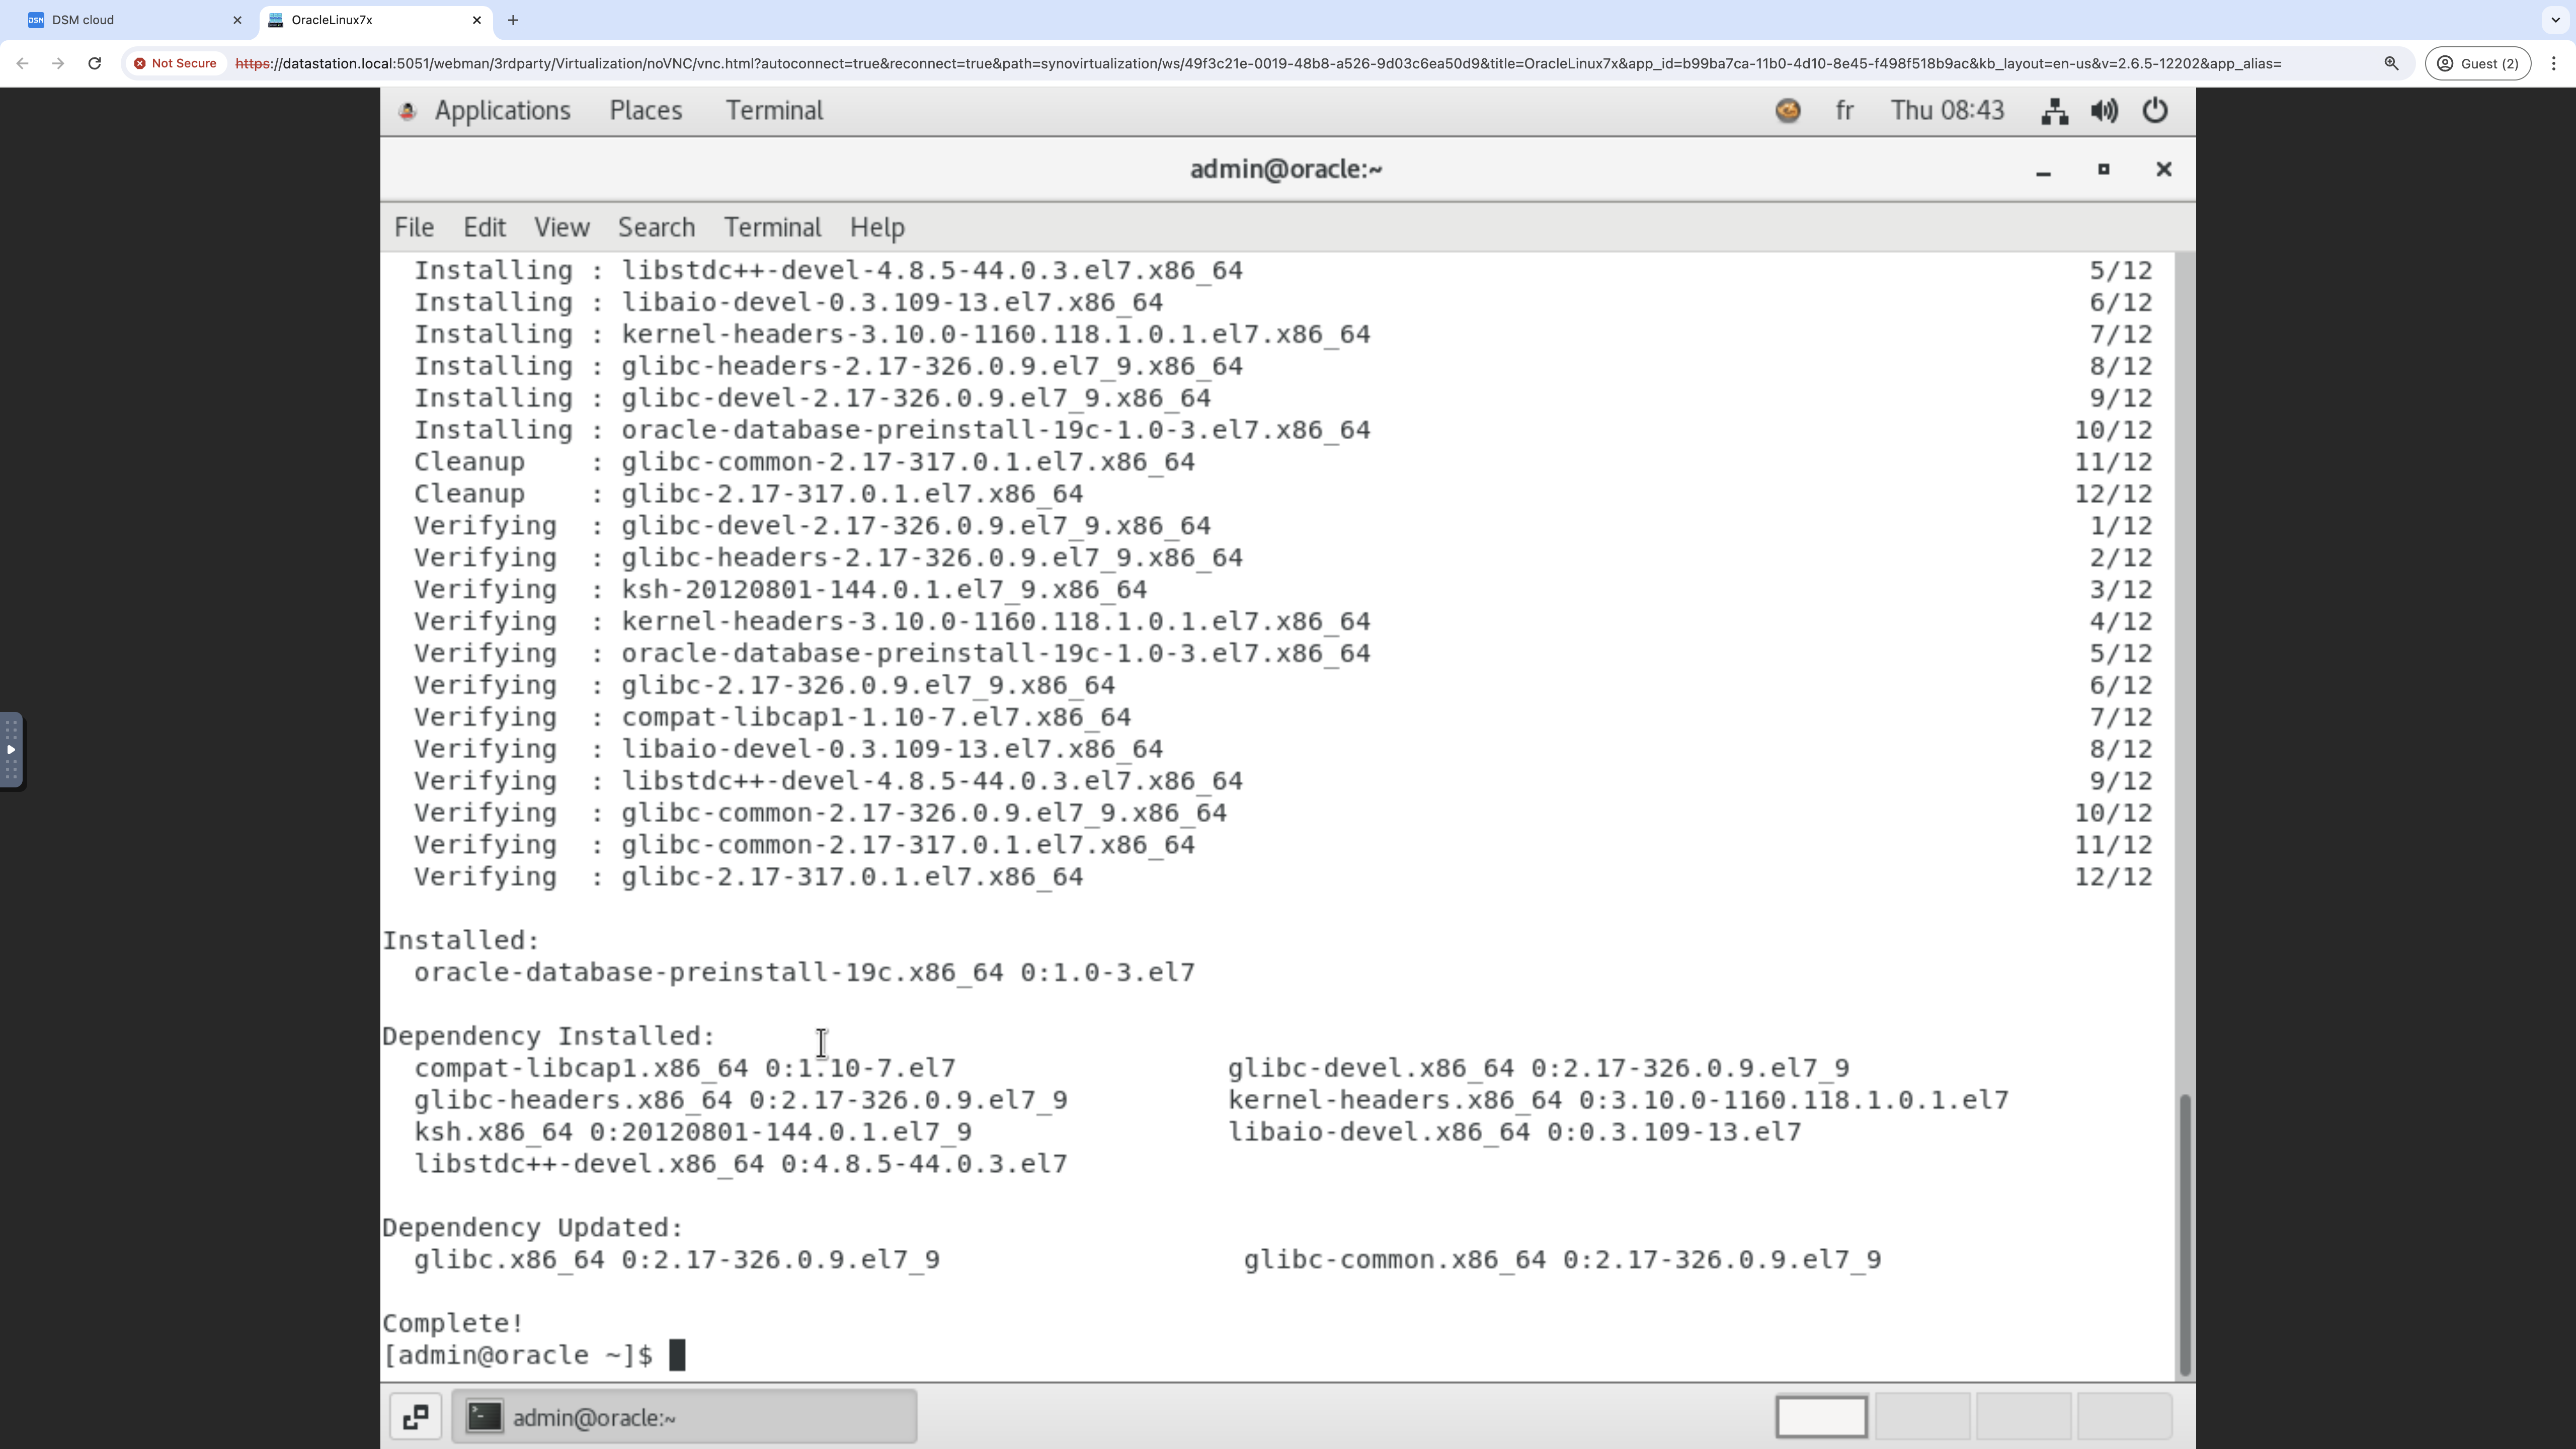
Exhibit 70: Oracle Database Preinstallation – Complete Package Installation
Oracle-related groups are created.
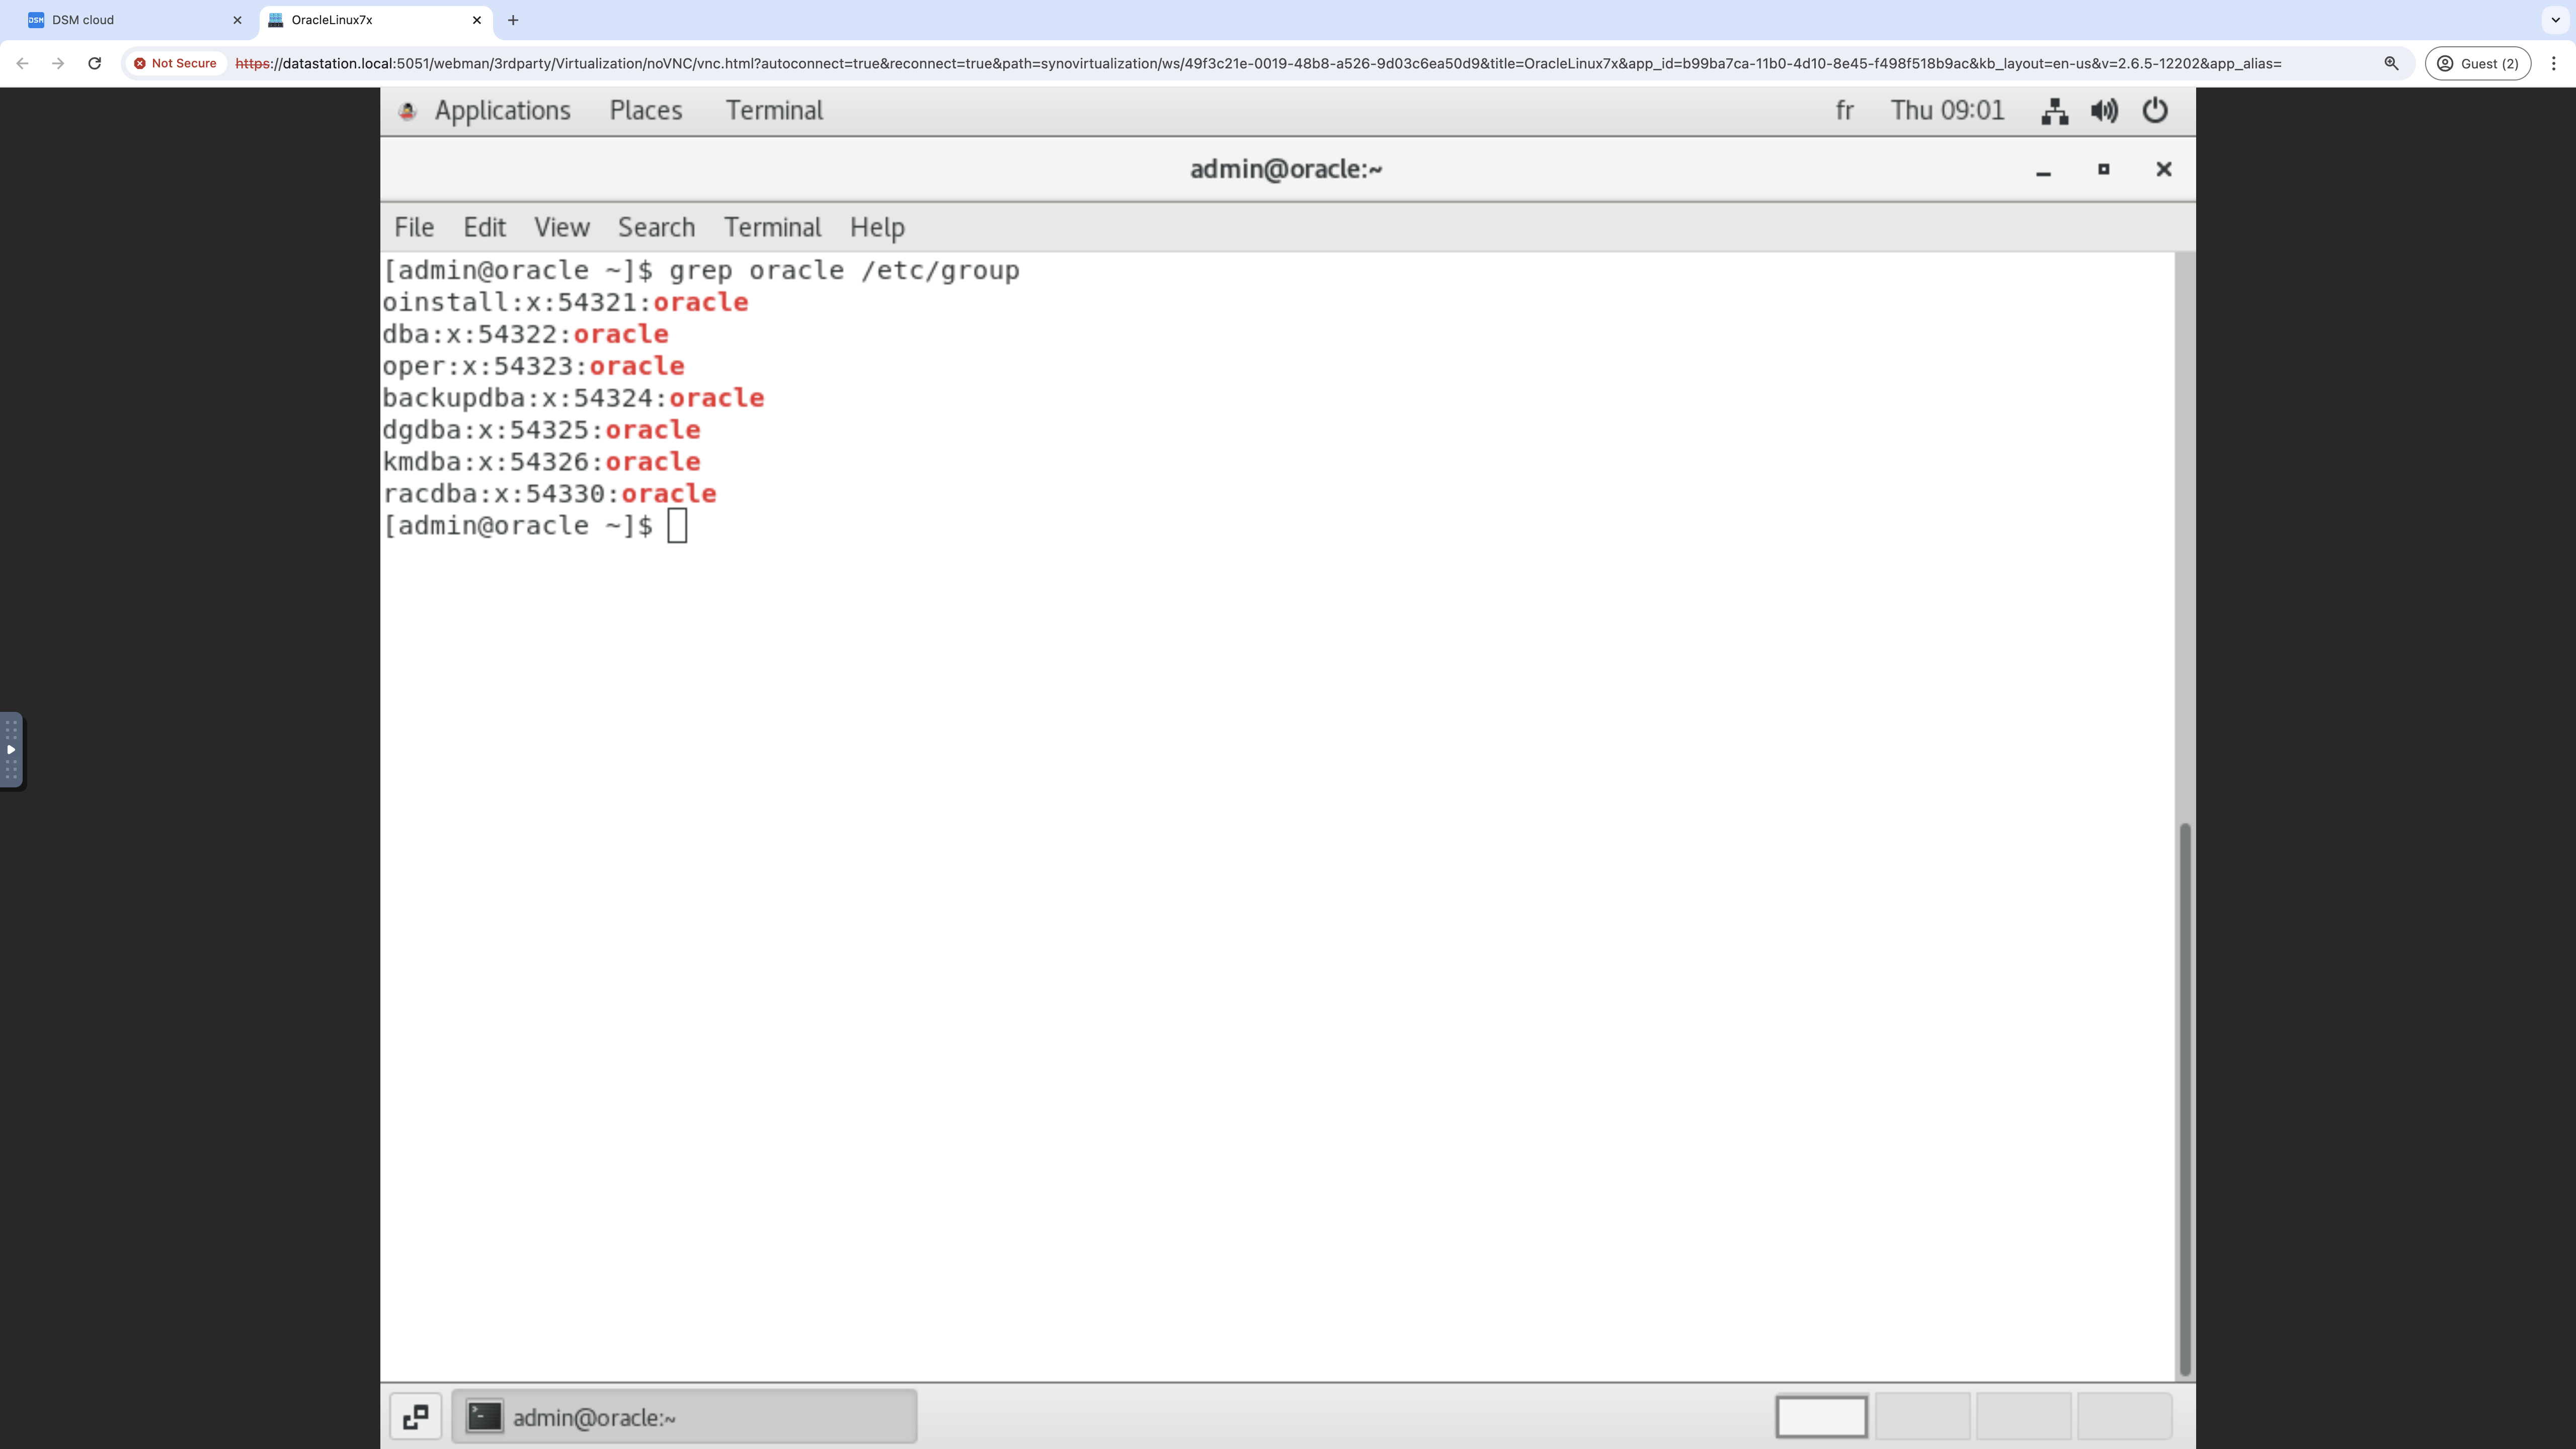
Exhibit 71: Oracle Database Preinstallation Check – Verify the Oracle Groups
The oracle user is created.
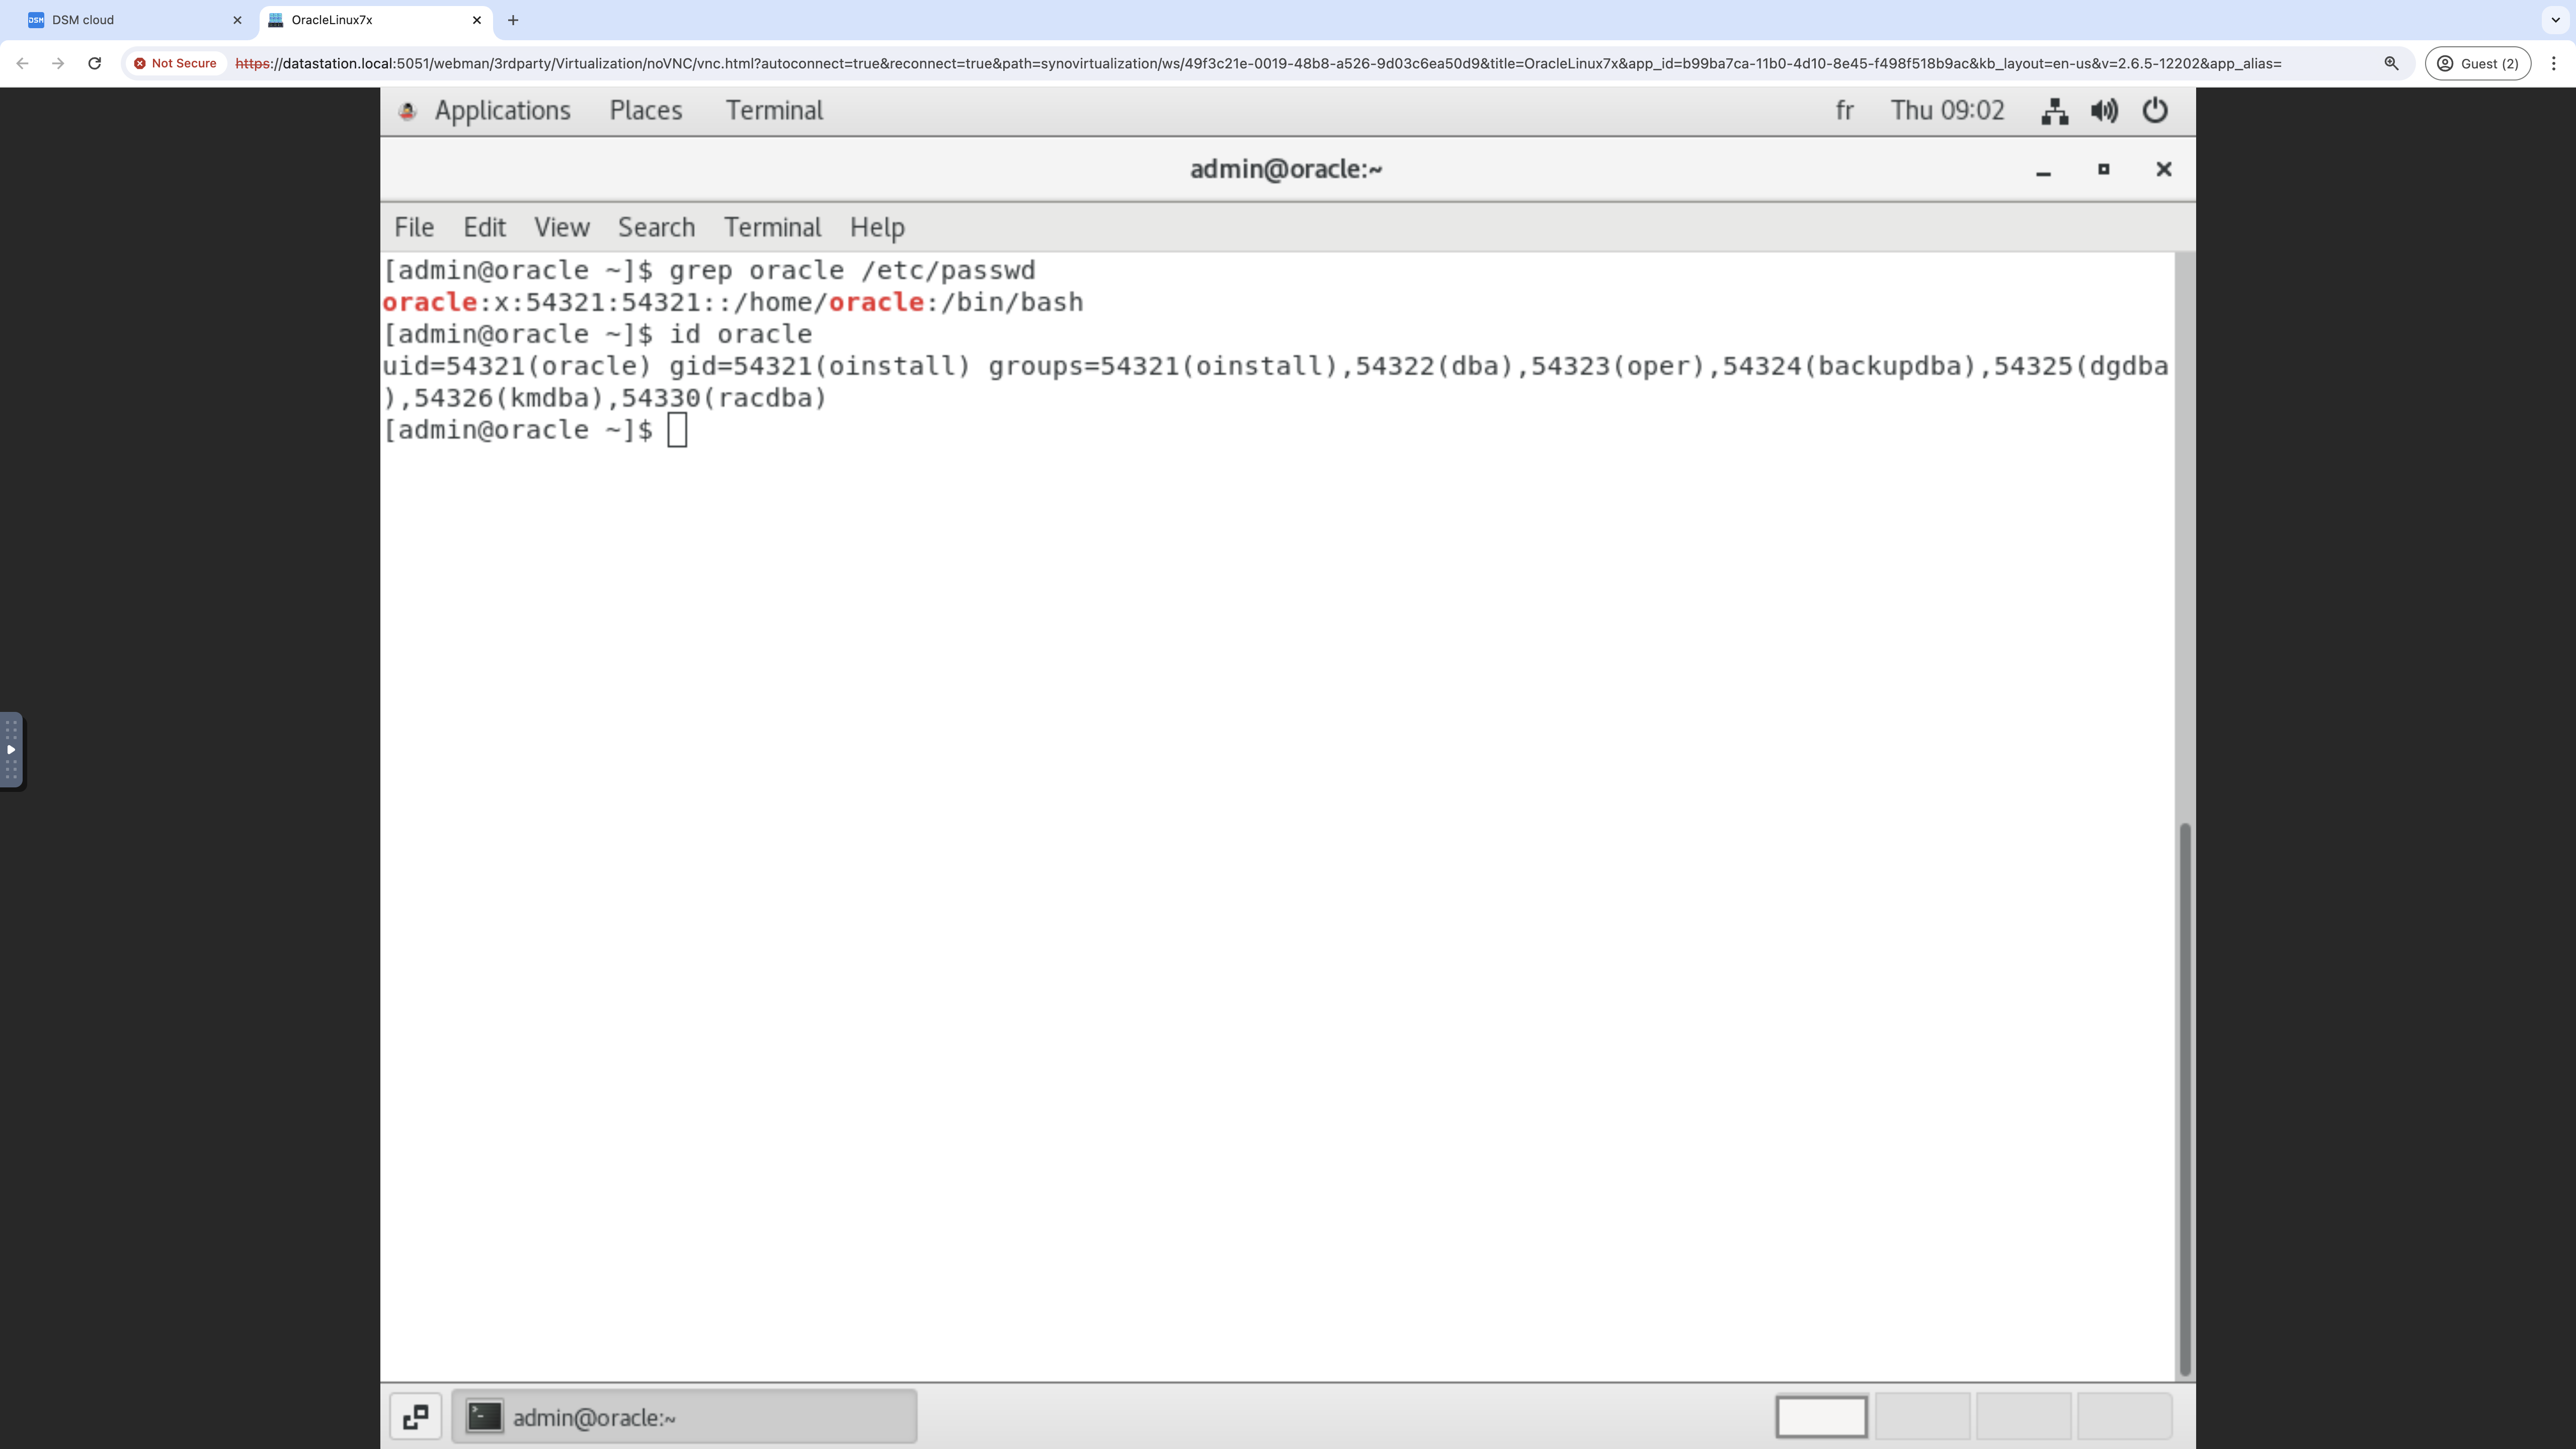
Exhibit 72: Oracle Database Preinstallation Check – Verify the Oracle User
Step 4 – Configure SSH Access for the Oracle User
SSH access by itself does not require wheel-group membership. Ensure that the SSH service is enabled, then set a strong password or configure key-based authentication for the oracle account.
# sudo systemctl enable --now sshd
If wheel-group membership is required for administrative tasks, run the following command from the admin account:
# sudo usermod -aG wheel oracle
The wheel group provides administrative privileges through sudo when permitted by the system configuration. This membership is optional and is not required for SSH access. Grant it only if the oracle user needs to perform administrative tasks.
Verify that the SSH service is running and that the VM network configuration permits connections from the host workstation.
The following configures the oracle account password and transfers the database installation media to the VM.
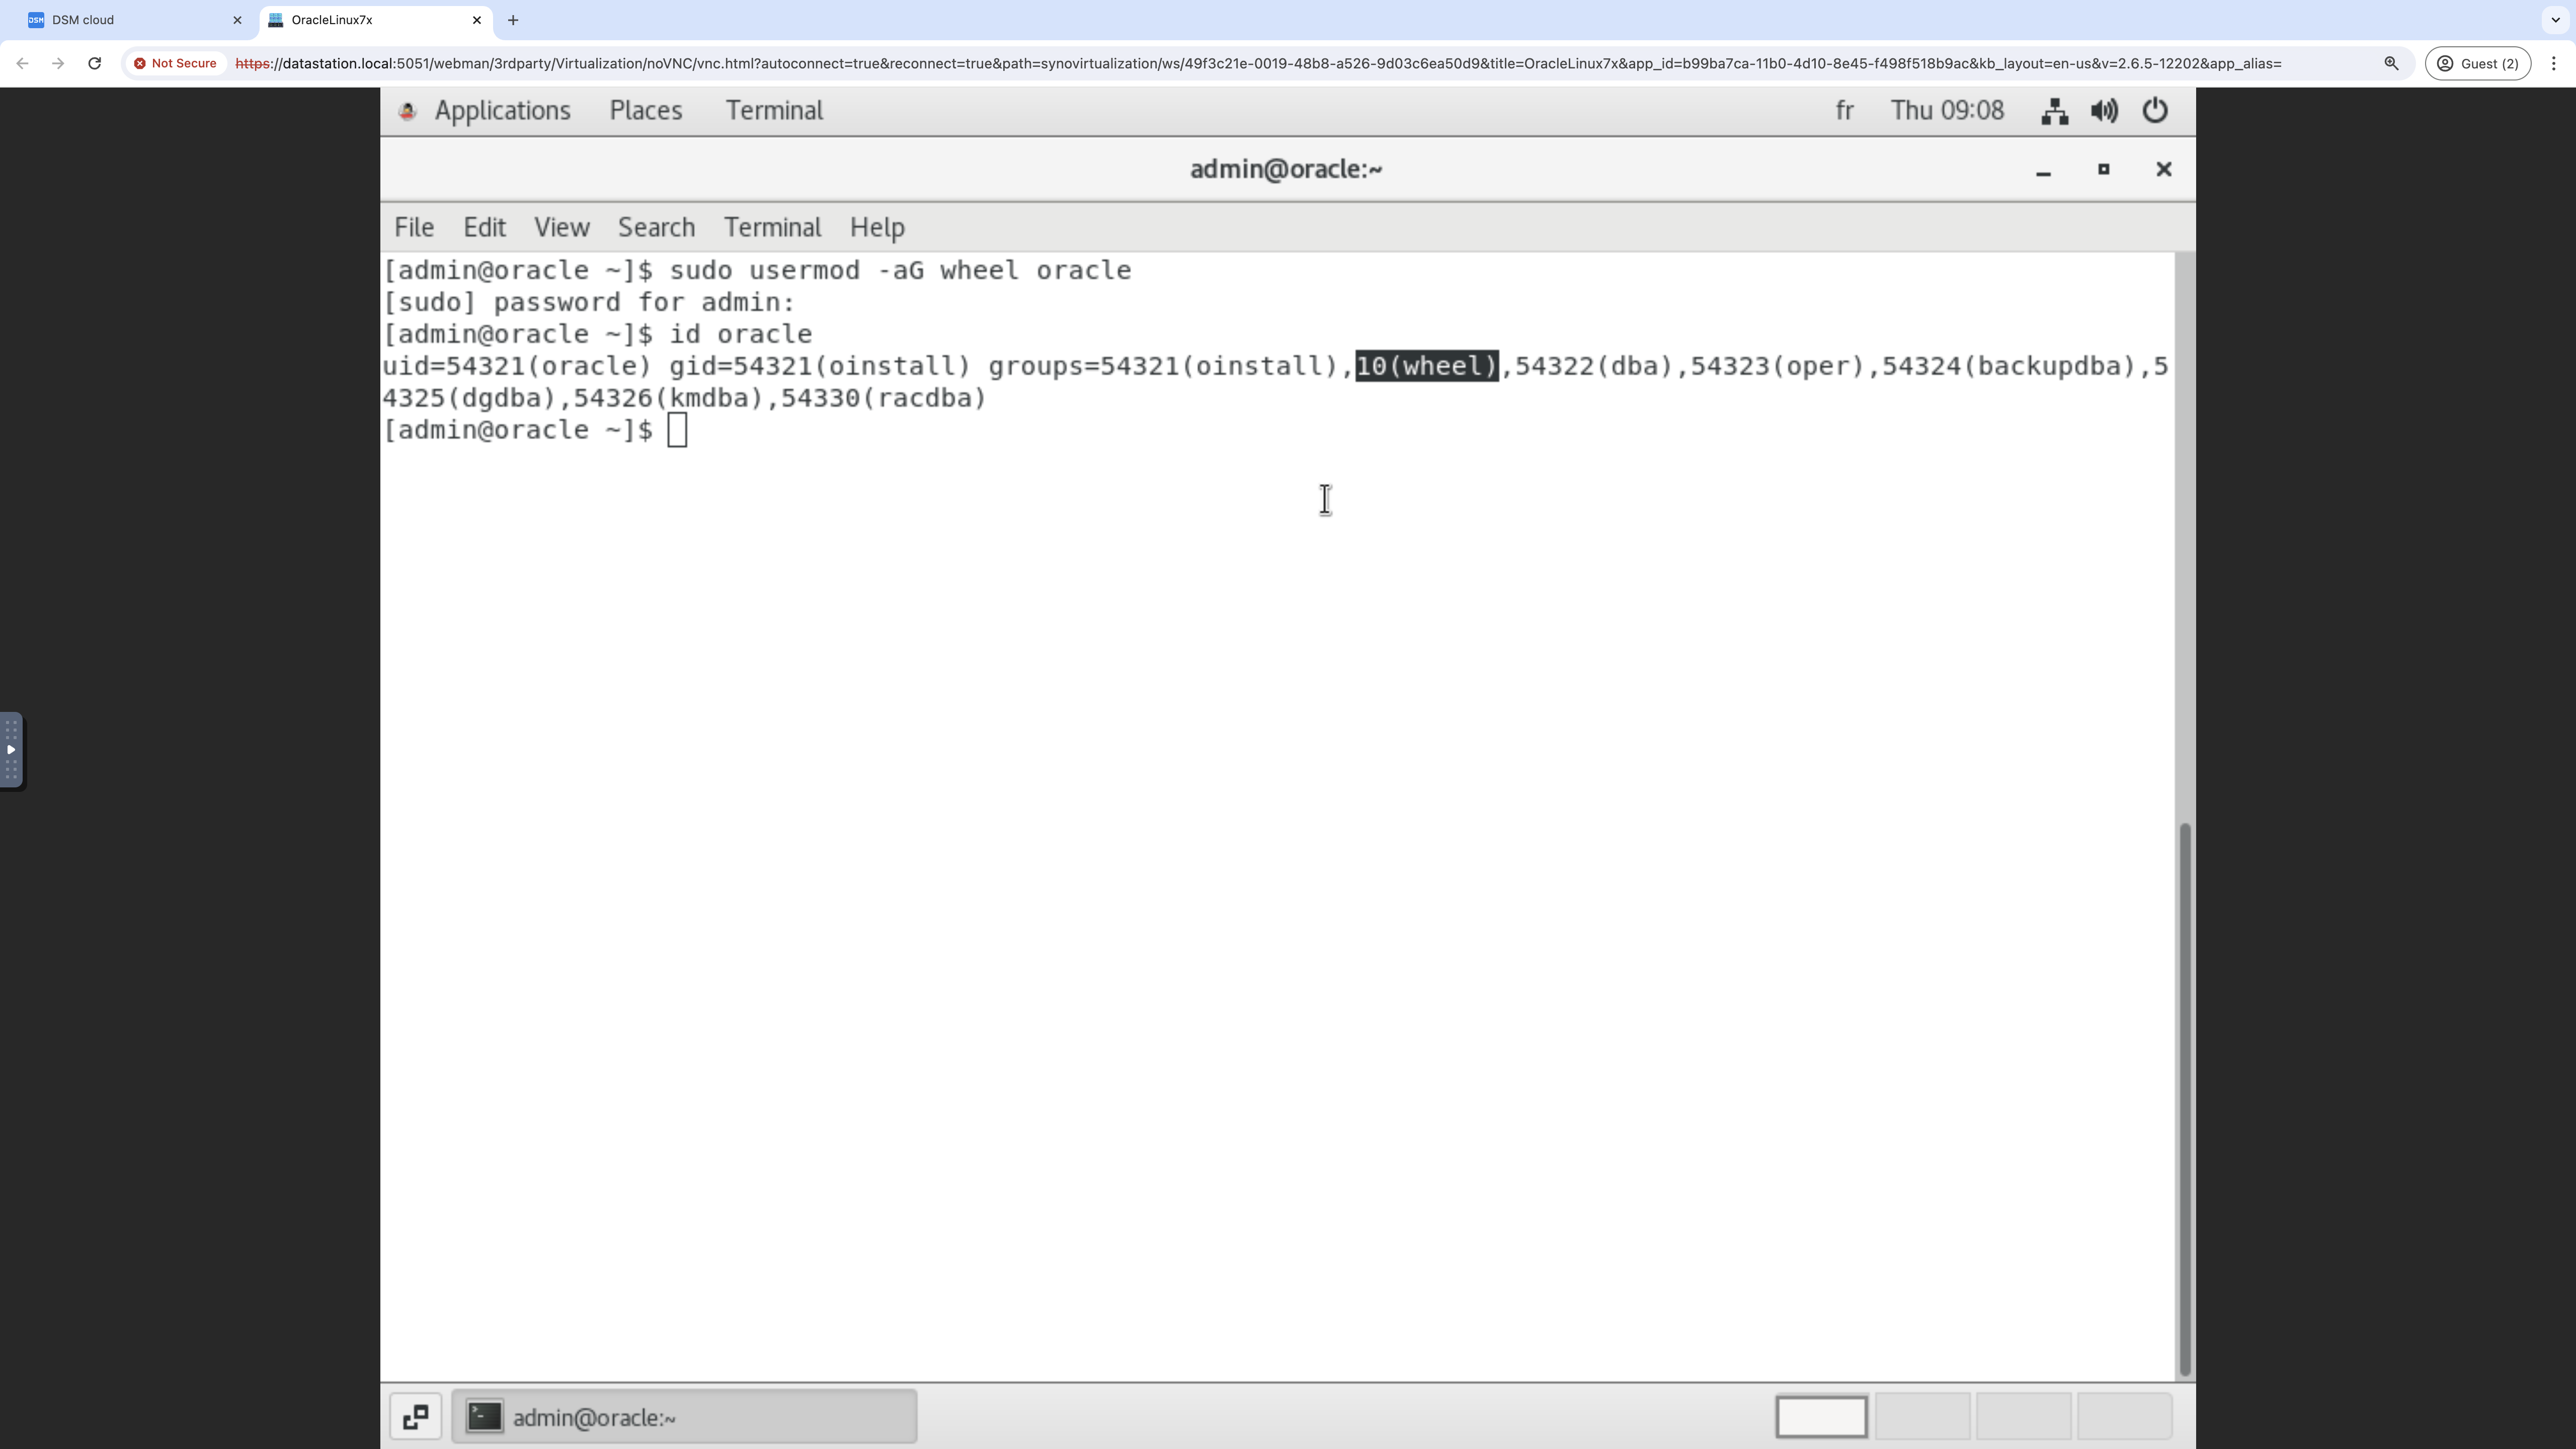
Exhibit 73: Oracle User Configuration – Add the Oracle User to the Wheel Group
Step 5 – Set the Oracle User Password
Set the password for the oracle user account.
sudo passwd oracle
With SSH access configured, copy the archive using scp. The reference VM used approximately 6.7 GB at this stage. A snapshot can be taken before copying and extracting the database media.
Step 6 – Copy Binaries to the VM
Download the db_home archive and copy it to the VM by using the scp command:
# scp LINUX.X64_193000_db_home.zip oracle@192.168.1.213:~/
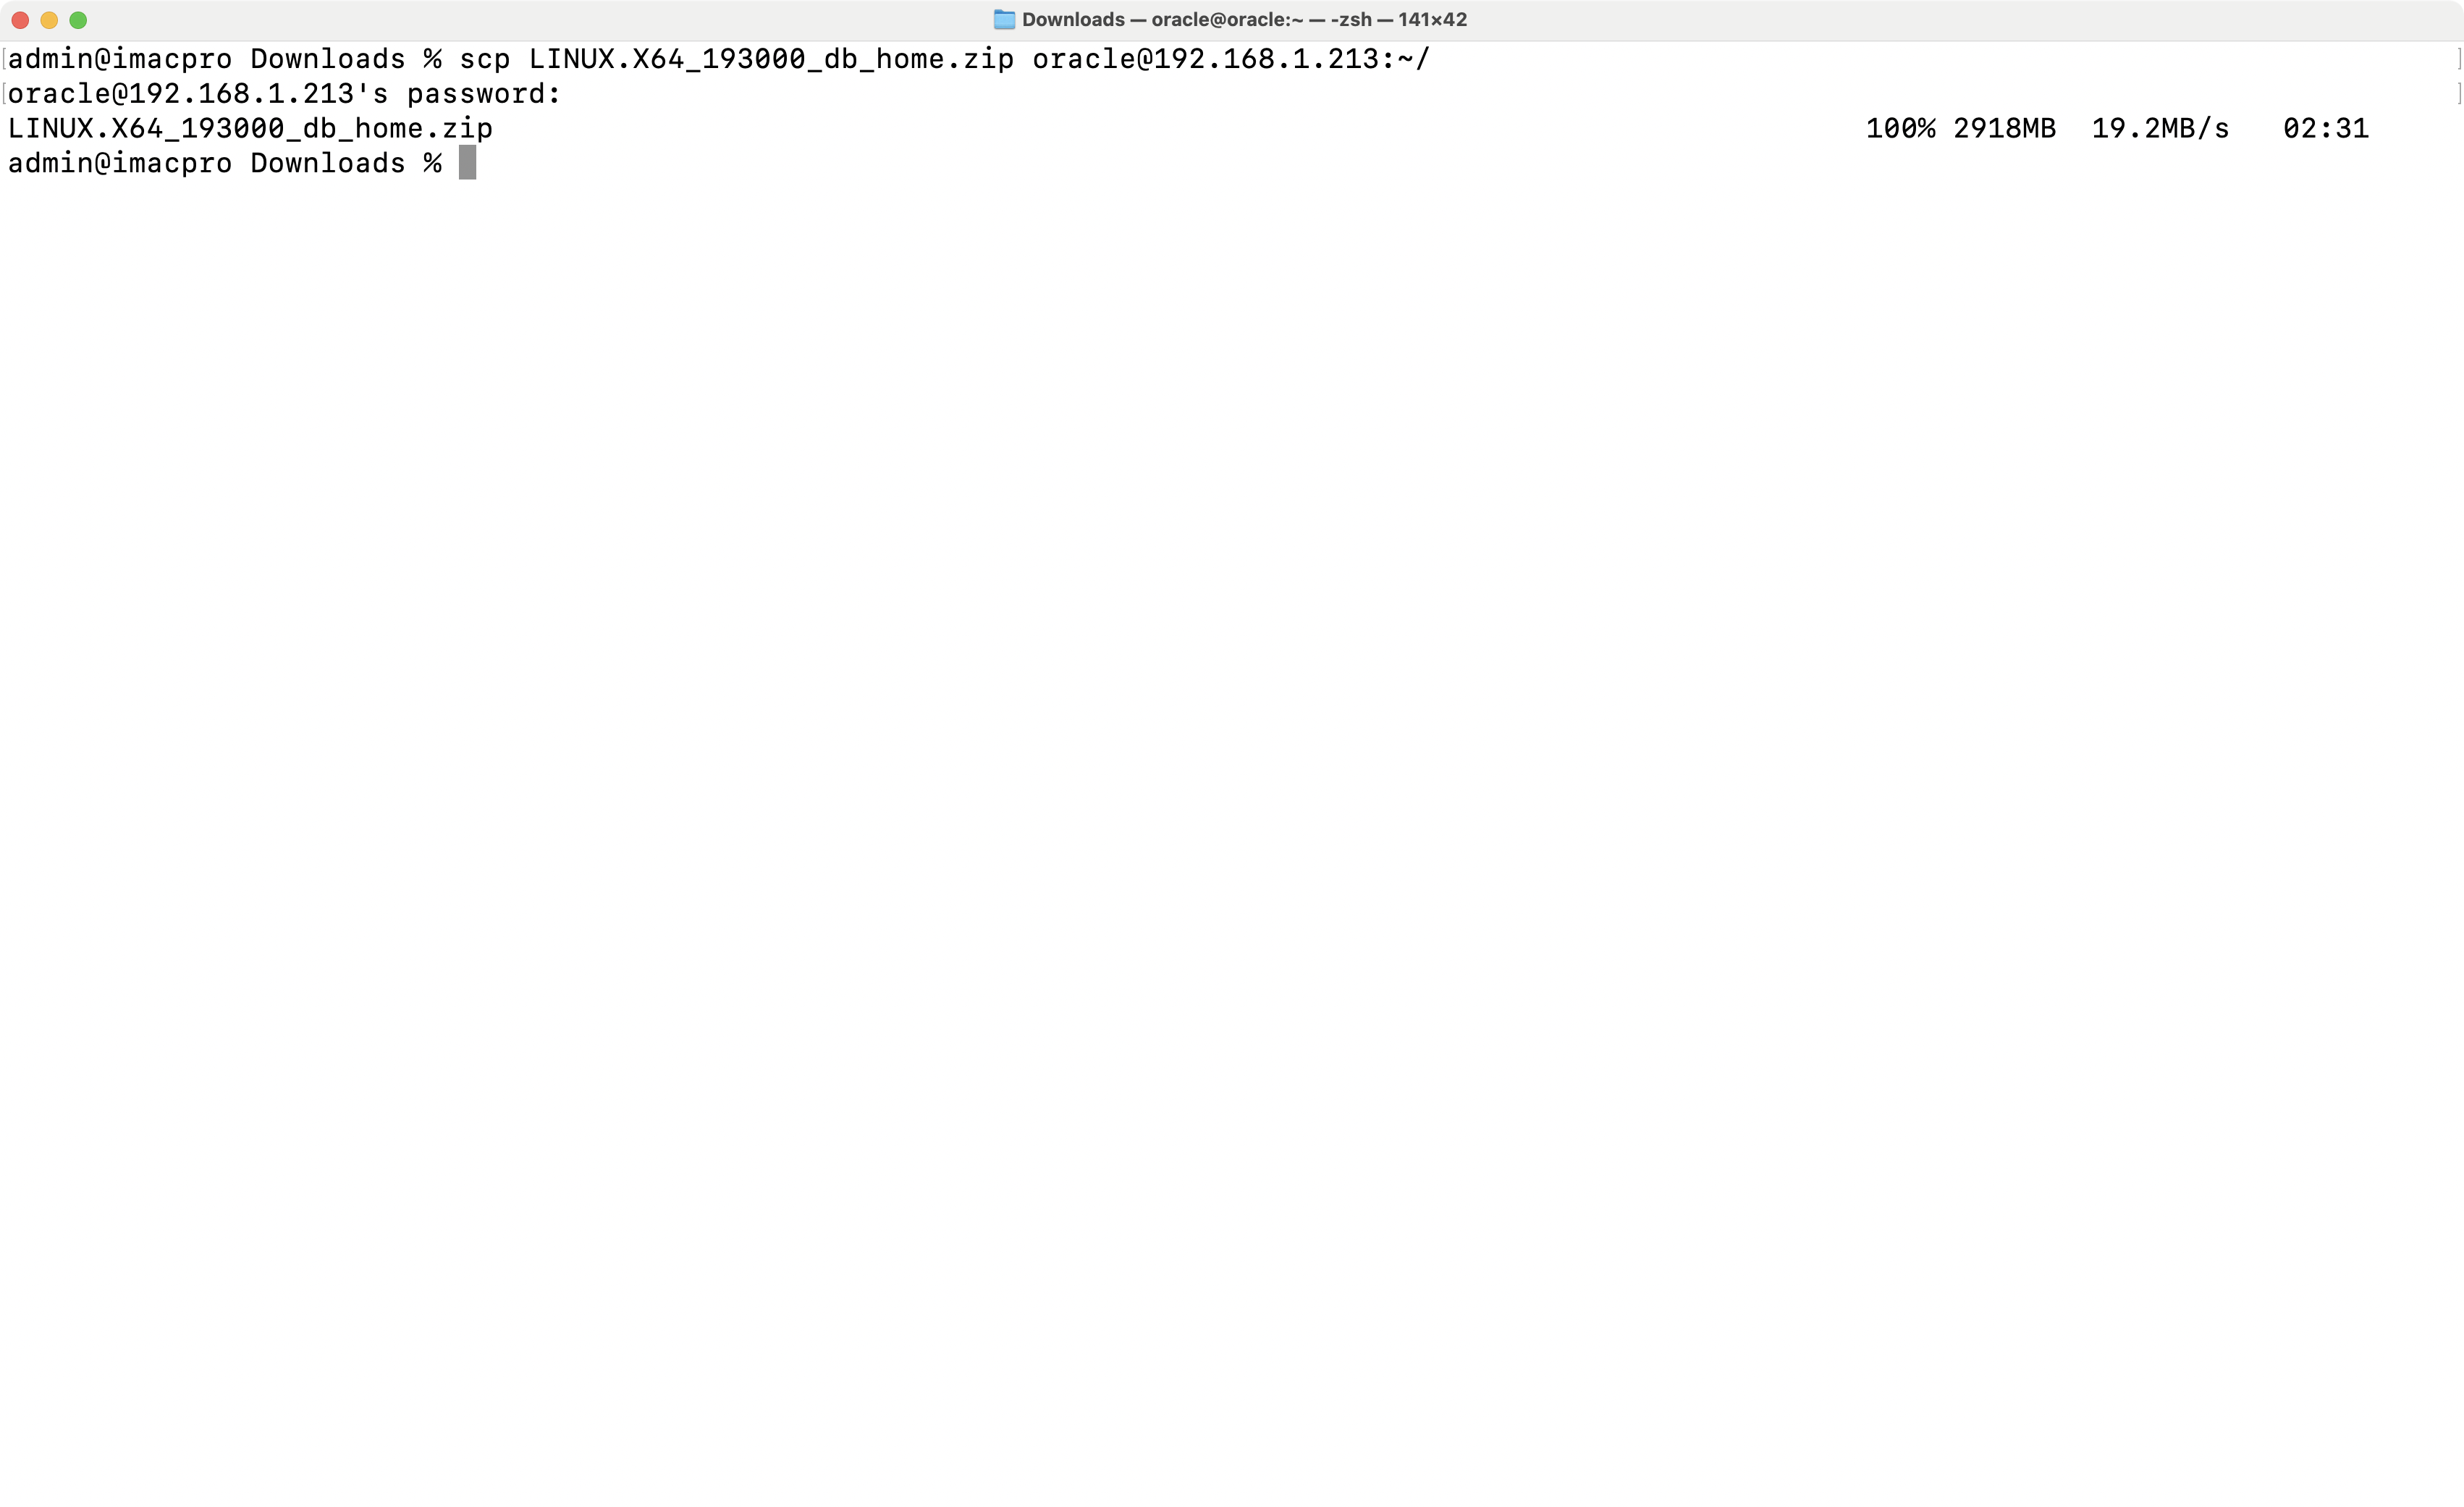
Exhibit 74: Oracle Database Media – Copy the Media to the VM
The archive is now available on the VM.
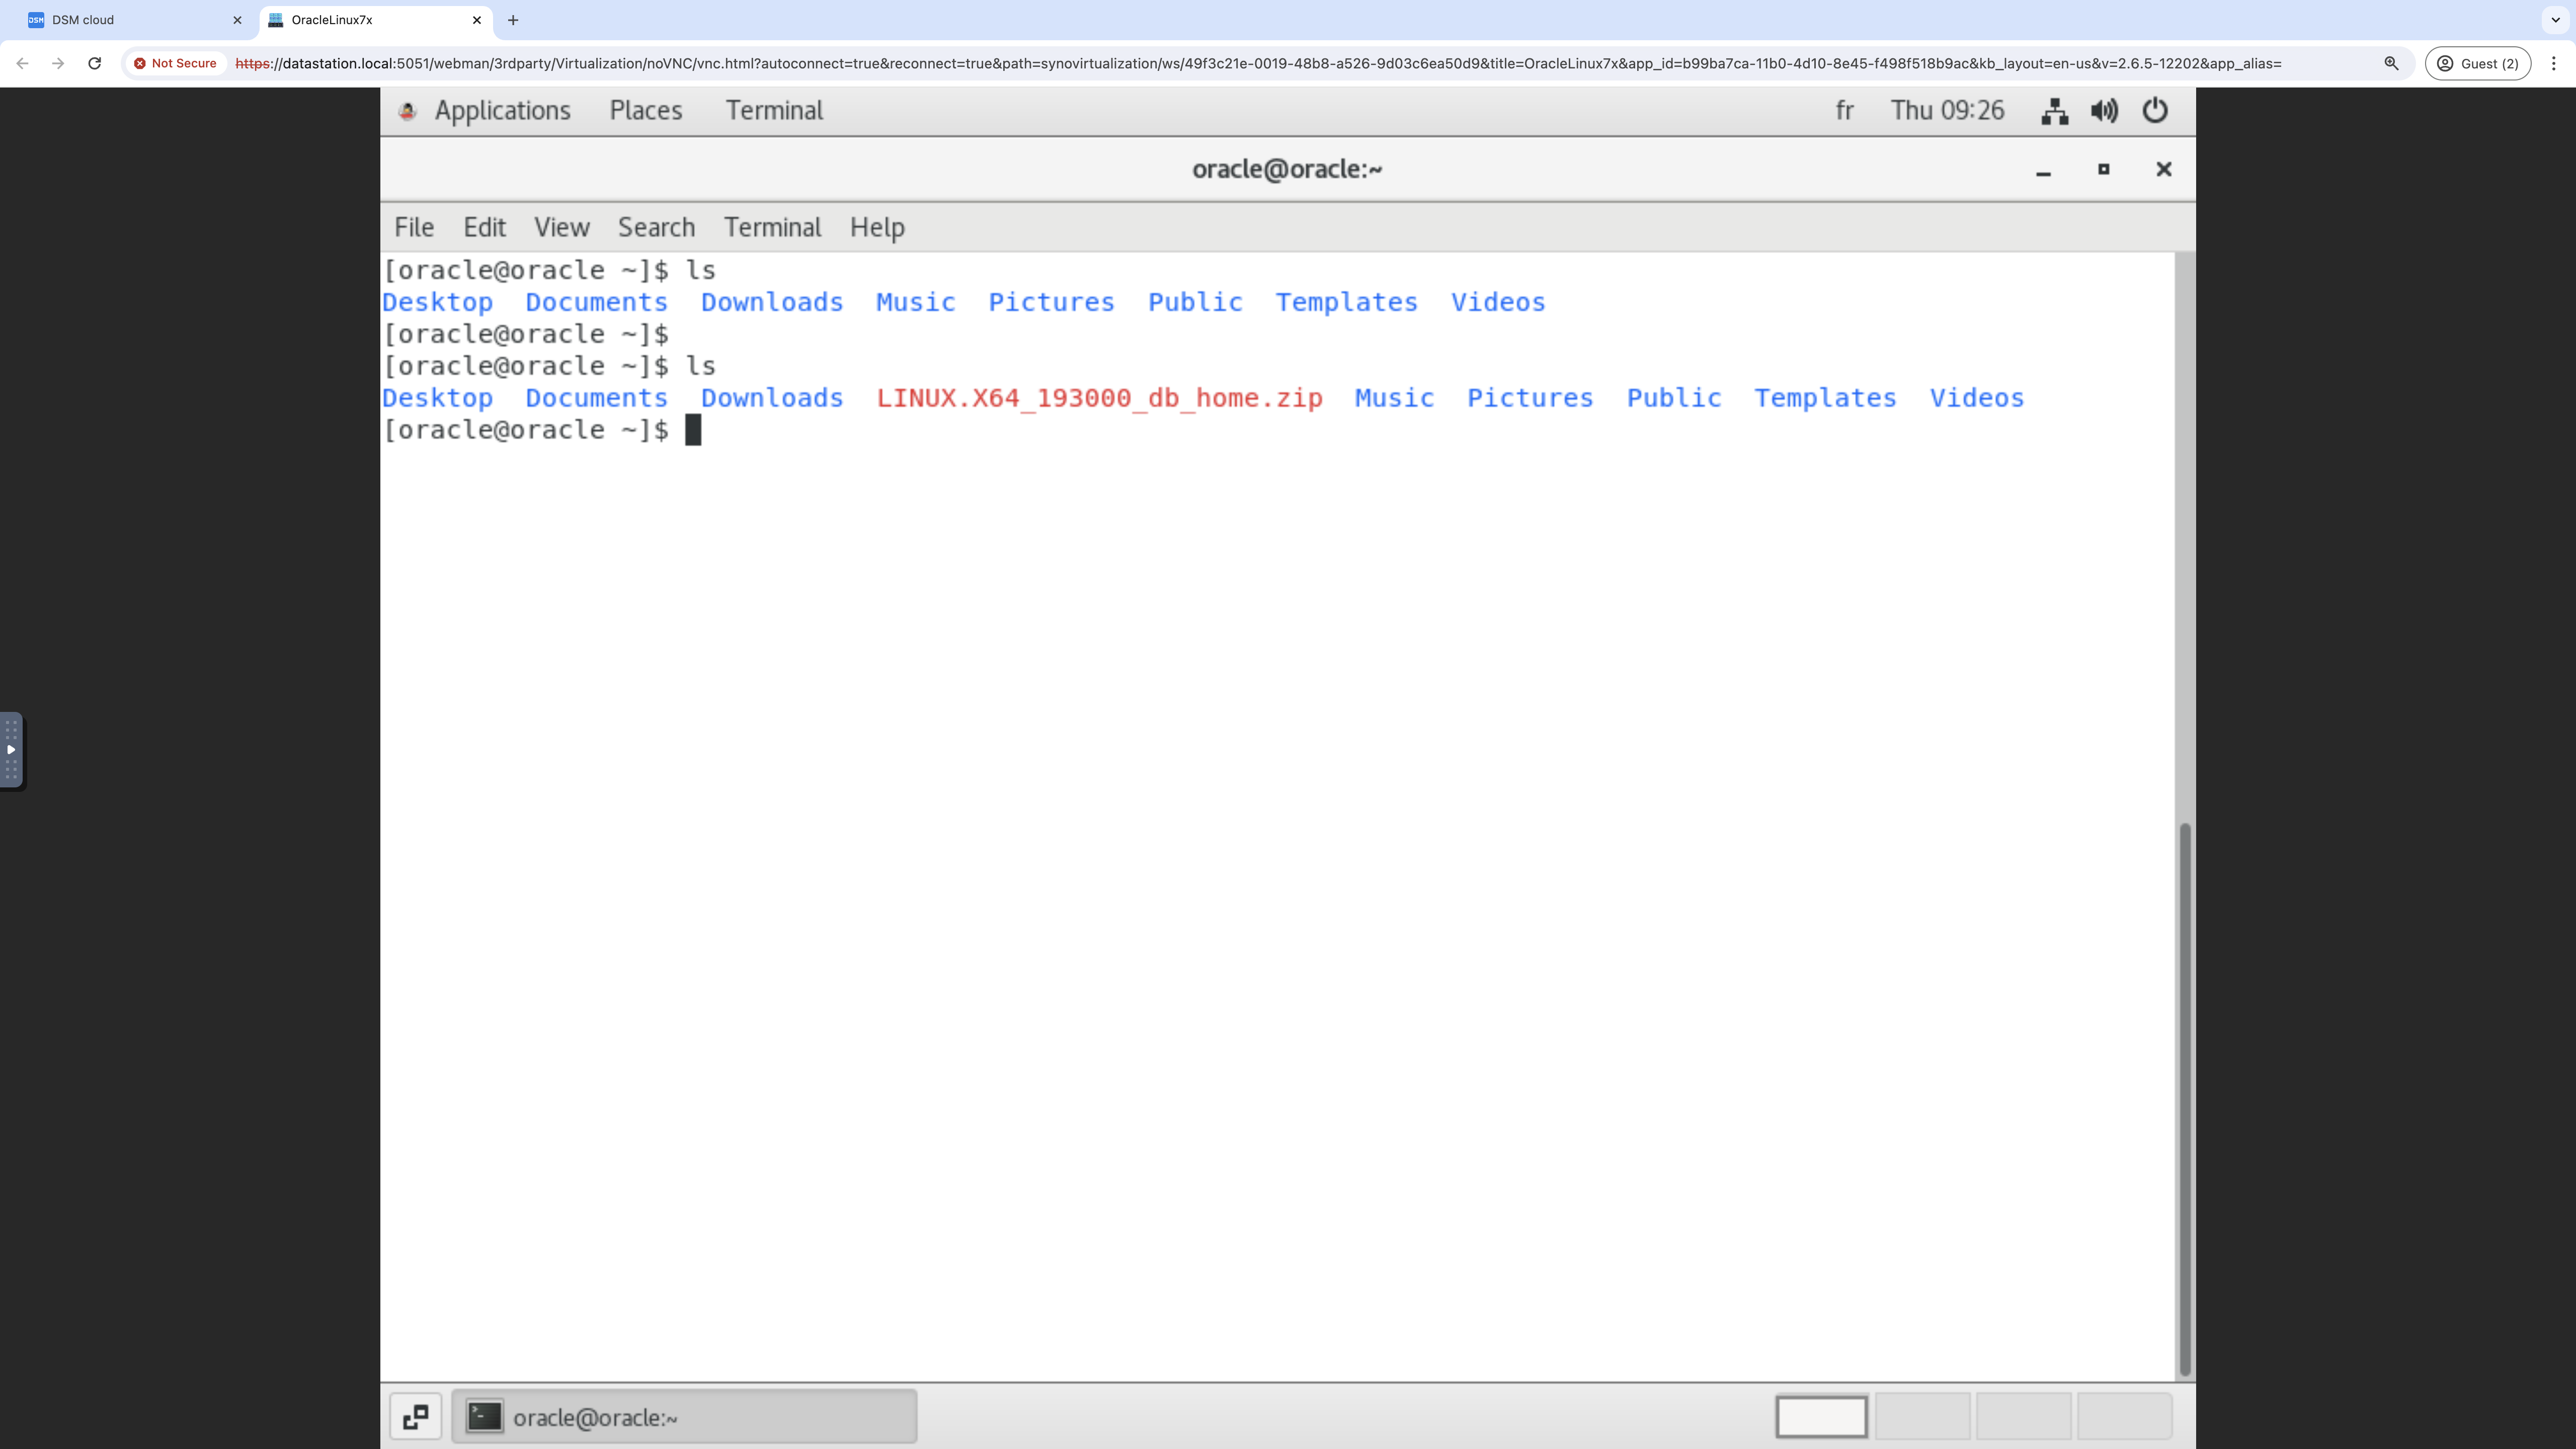
Exhibit 75: Oracle Database Media – Verify the Media in the Oracle User Home Directory
Section Outcome
The Oracle Database 19c archive is on the VM, the preinstallation package has run, the oracle account is ready, and SSH-based file transfer is available. In the reference build, storage use was approximately 10.17 GB. The next section creates the Oracle directories and runs the installer.
4.2. Install and Configure Oracle Database 19c
Use Oracle Universal Installer (OUI) to install Oracle Database 19c Enterprise Edition and create one container database CDB with one pluggable database PDB. The installer is available from the Oracle Database pages [➜ Link reference #23, Oracle Database 19c Oracle Universal Installer].
Note: The reference links are listed in the Link References file in folder 05_External_Links (refer to the downloadable publication package, chapter 7).
The steps below set the software directories, memory, character set, datafile and recovery locations, and operating-system groups.
The steps in this section are:
Step 1 – Log In
Step 2 – Create the Oracle Directories
Step 3 – Launch Oracle Universal Installer
Step 1 – Log In
Log in with the Oracle installation-owner account (oracle), which will own the software binaries.
Step 2 – Create the Oracle Directories
Create the Oracle base and Oracle inventory directories in accordance with the Oracle Optimal Flexible Architecture (OFA) recommendations. Specify the correct owner, group, and permissions for these directories.
# mkdir -p /u01/app/oracle
# mkdir -p /u01/app/oraInventory
# chown -R oracle:oinstall /u01/app/oracle
# chown -R oracle:oinstall /u01/app/oraInventory
Run the directory-creation and ownership commands with root privileges.
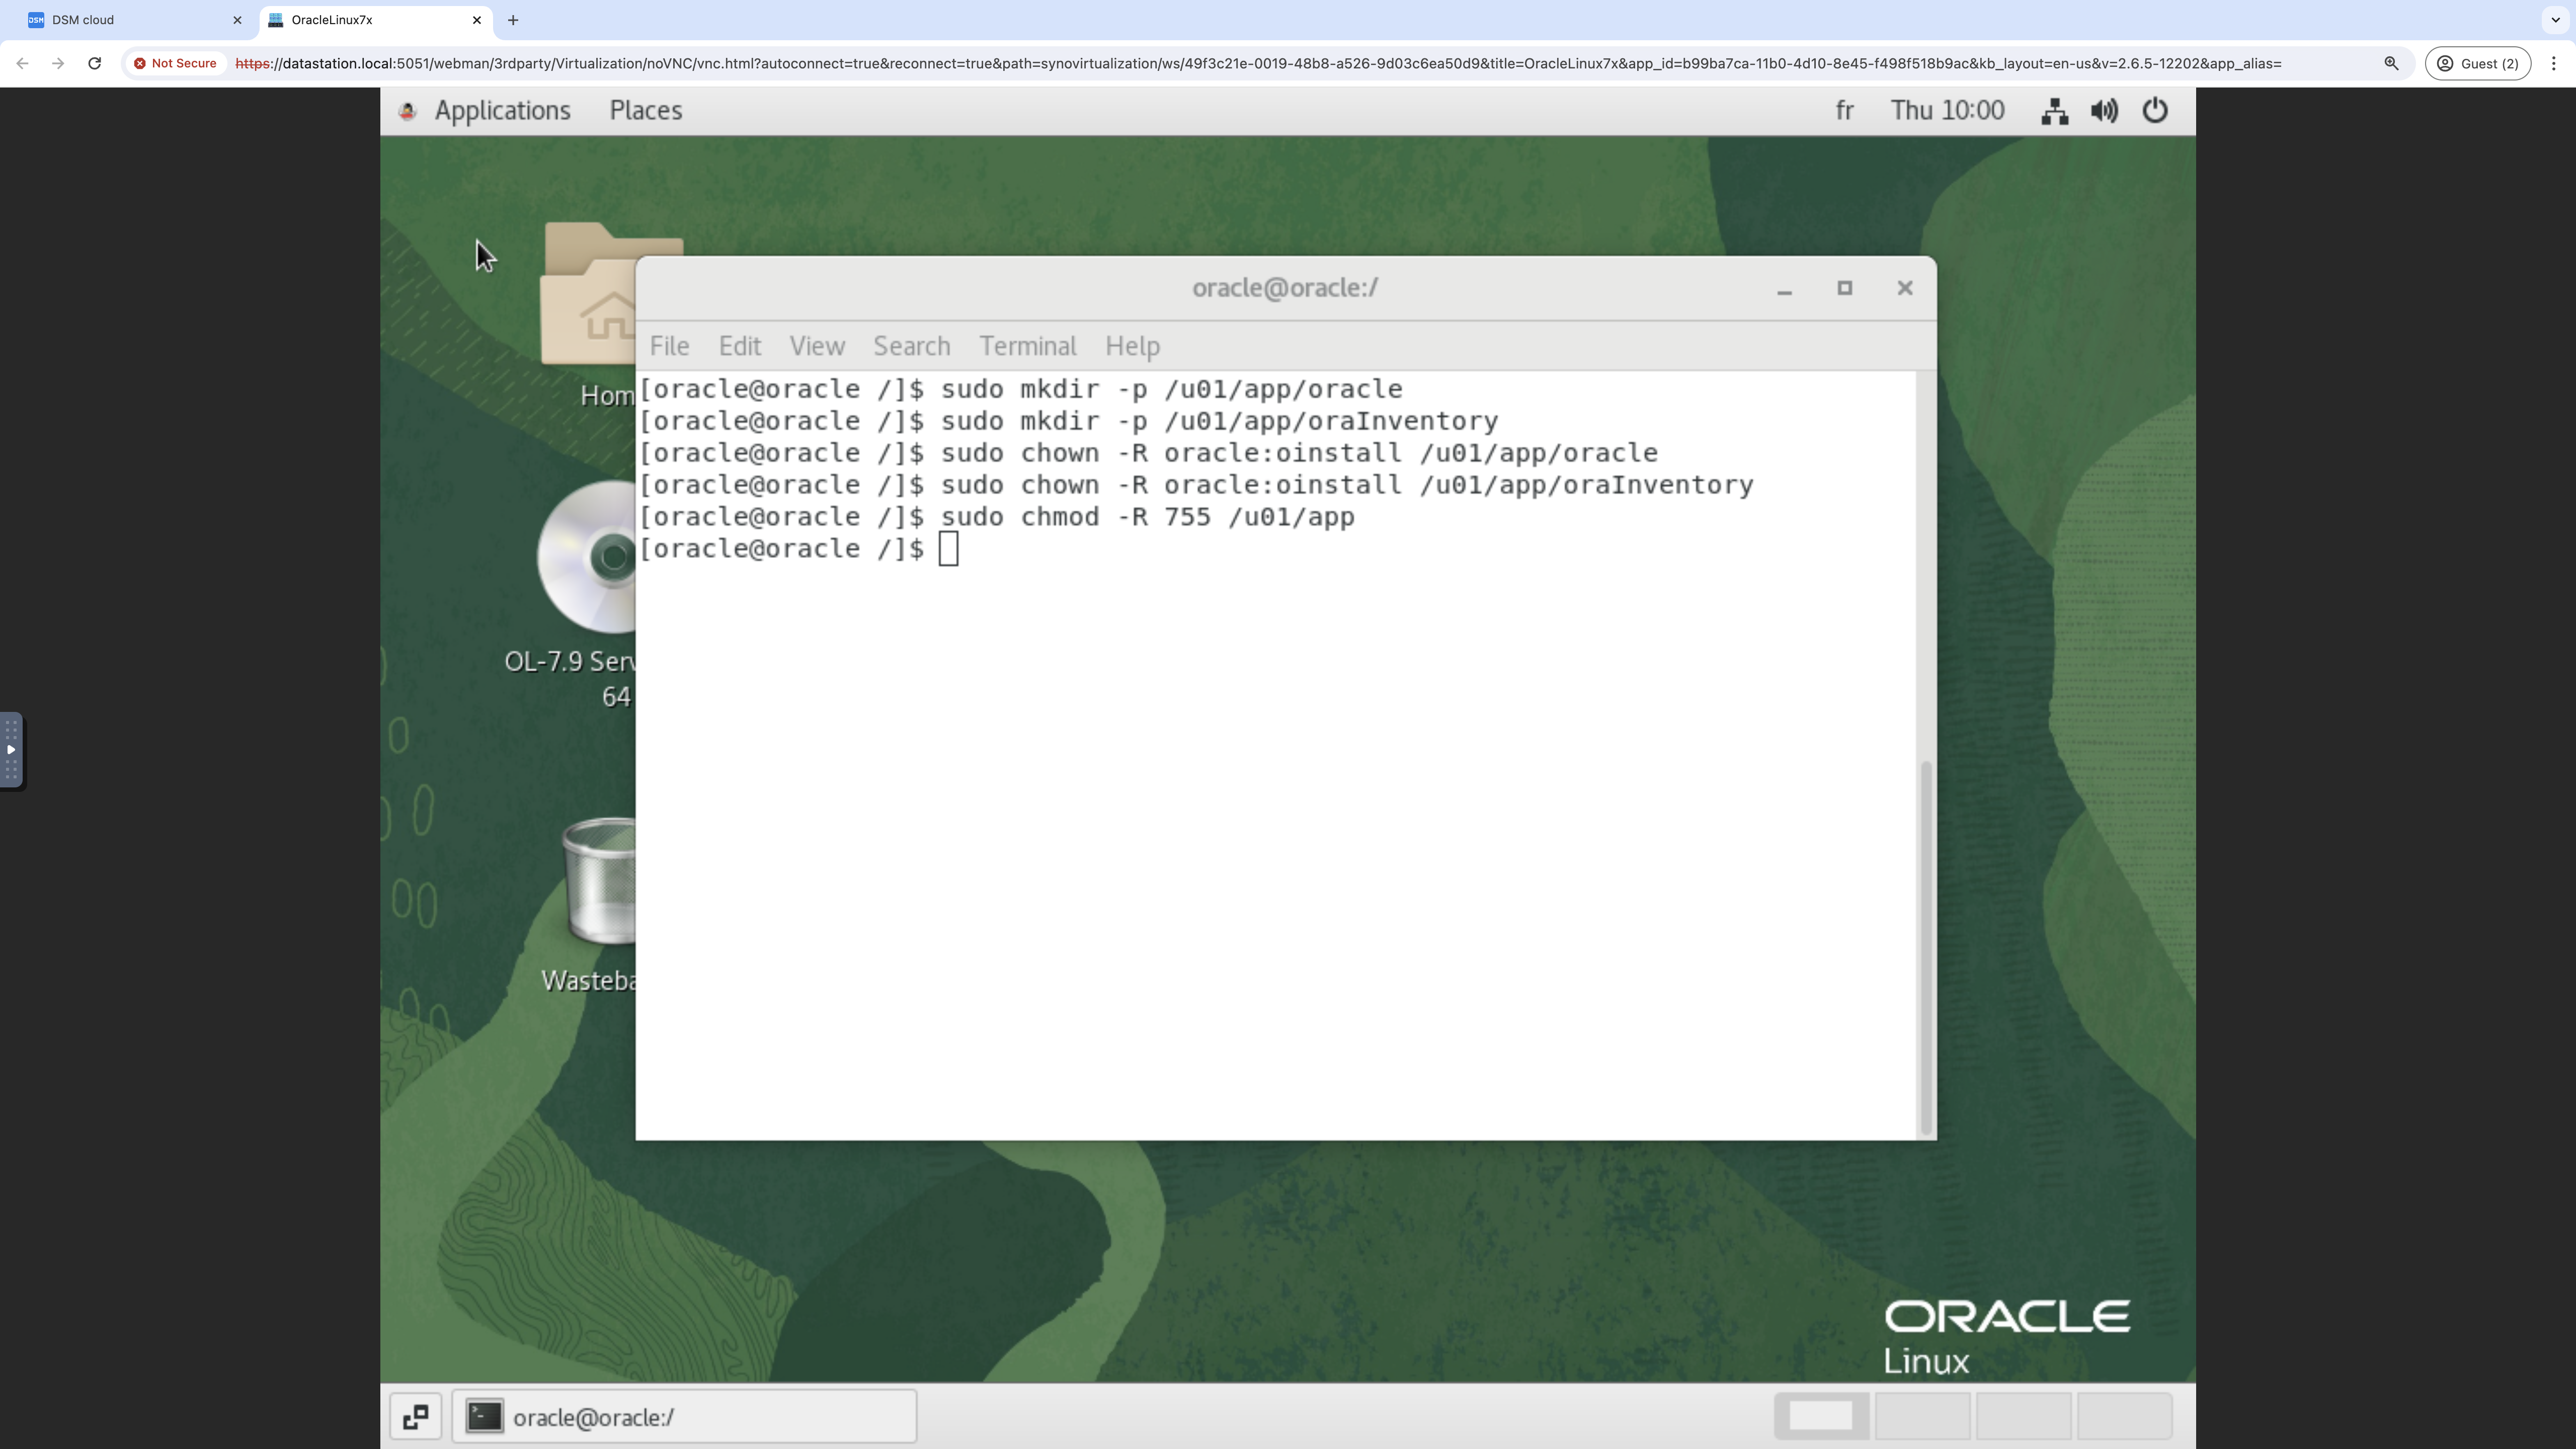
Exhibit 76: Oracle Database Installation – Create the Oracle Directories
Create an OFA-compliant Oracle home directory and extract the downloaded image files into this directory. The example uses approximately 16.8 GB of storage, including the archive.
$ mkdir -p /u01/app/oracle/product/19.0.0/dbhome_1
$ cd /u01/app/oracle/product/19.0.0/dbhome_1
$ unzip -q ~/LINUX.X64_193000_db_home.zip
The Oracle Database installation files are extracted into the Oracle home directory. Verify that the extraction completes without errors and that the runInstaller executable is available before proceeding.
Step 3 – Launch Oracle Universal Installer
In this step, Oracle Database 19c is installed and configured using Oracle Universal Installer (OUI). The installer guides the deployment of the database software and the creation of the reference database.
Set ORACLE_HOME and launch the installer by running the following commands:
export ORACLE_HOME=/u01/app/oracle/product/19.0.0/dbhome_1
cd $ORACLE_HOME && ./runInstaller
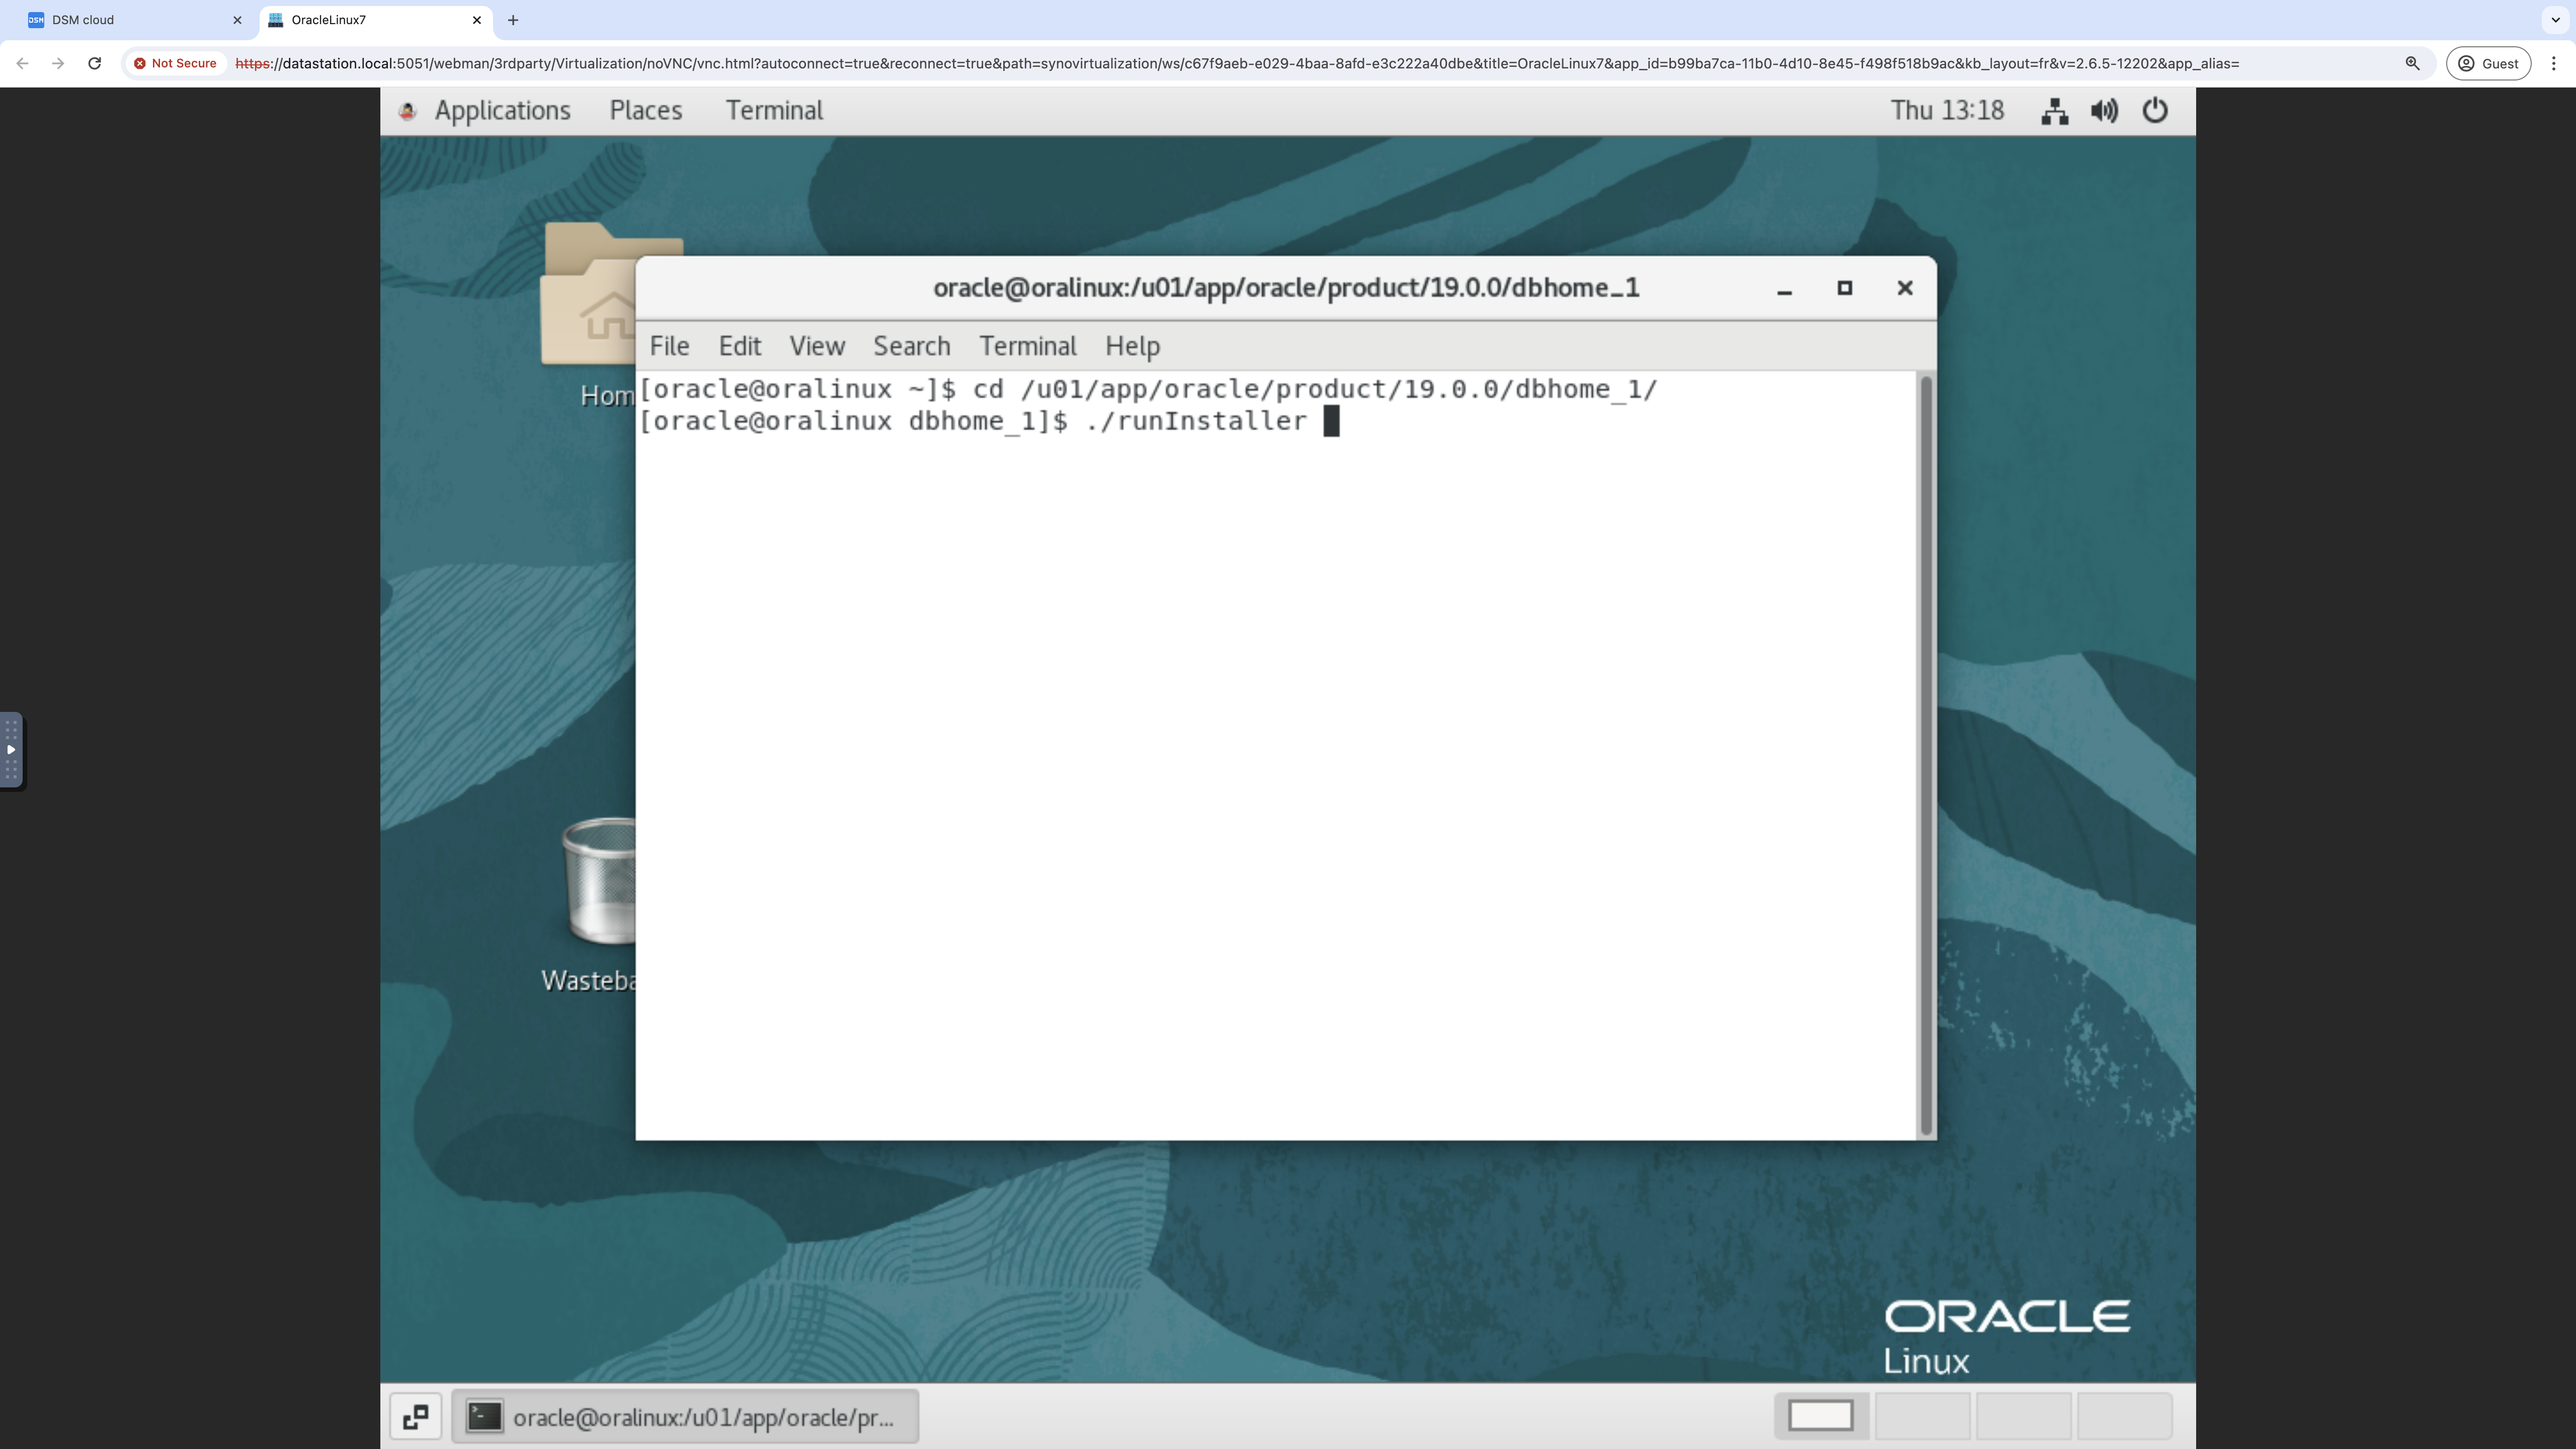
Exhibit 77: Oracle Database Installer – Launch the Installer
Select Create and configure a single instance database, and then select Next.
This selection installs the Oracle Database software and creates the reference database in a single procedure. The installer then guides the selection of the system class, database edition, and other configuration settings defined in Chapter 1.
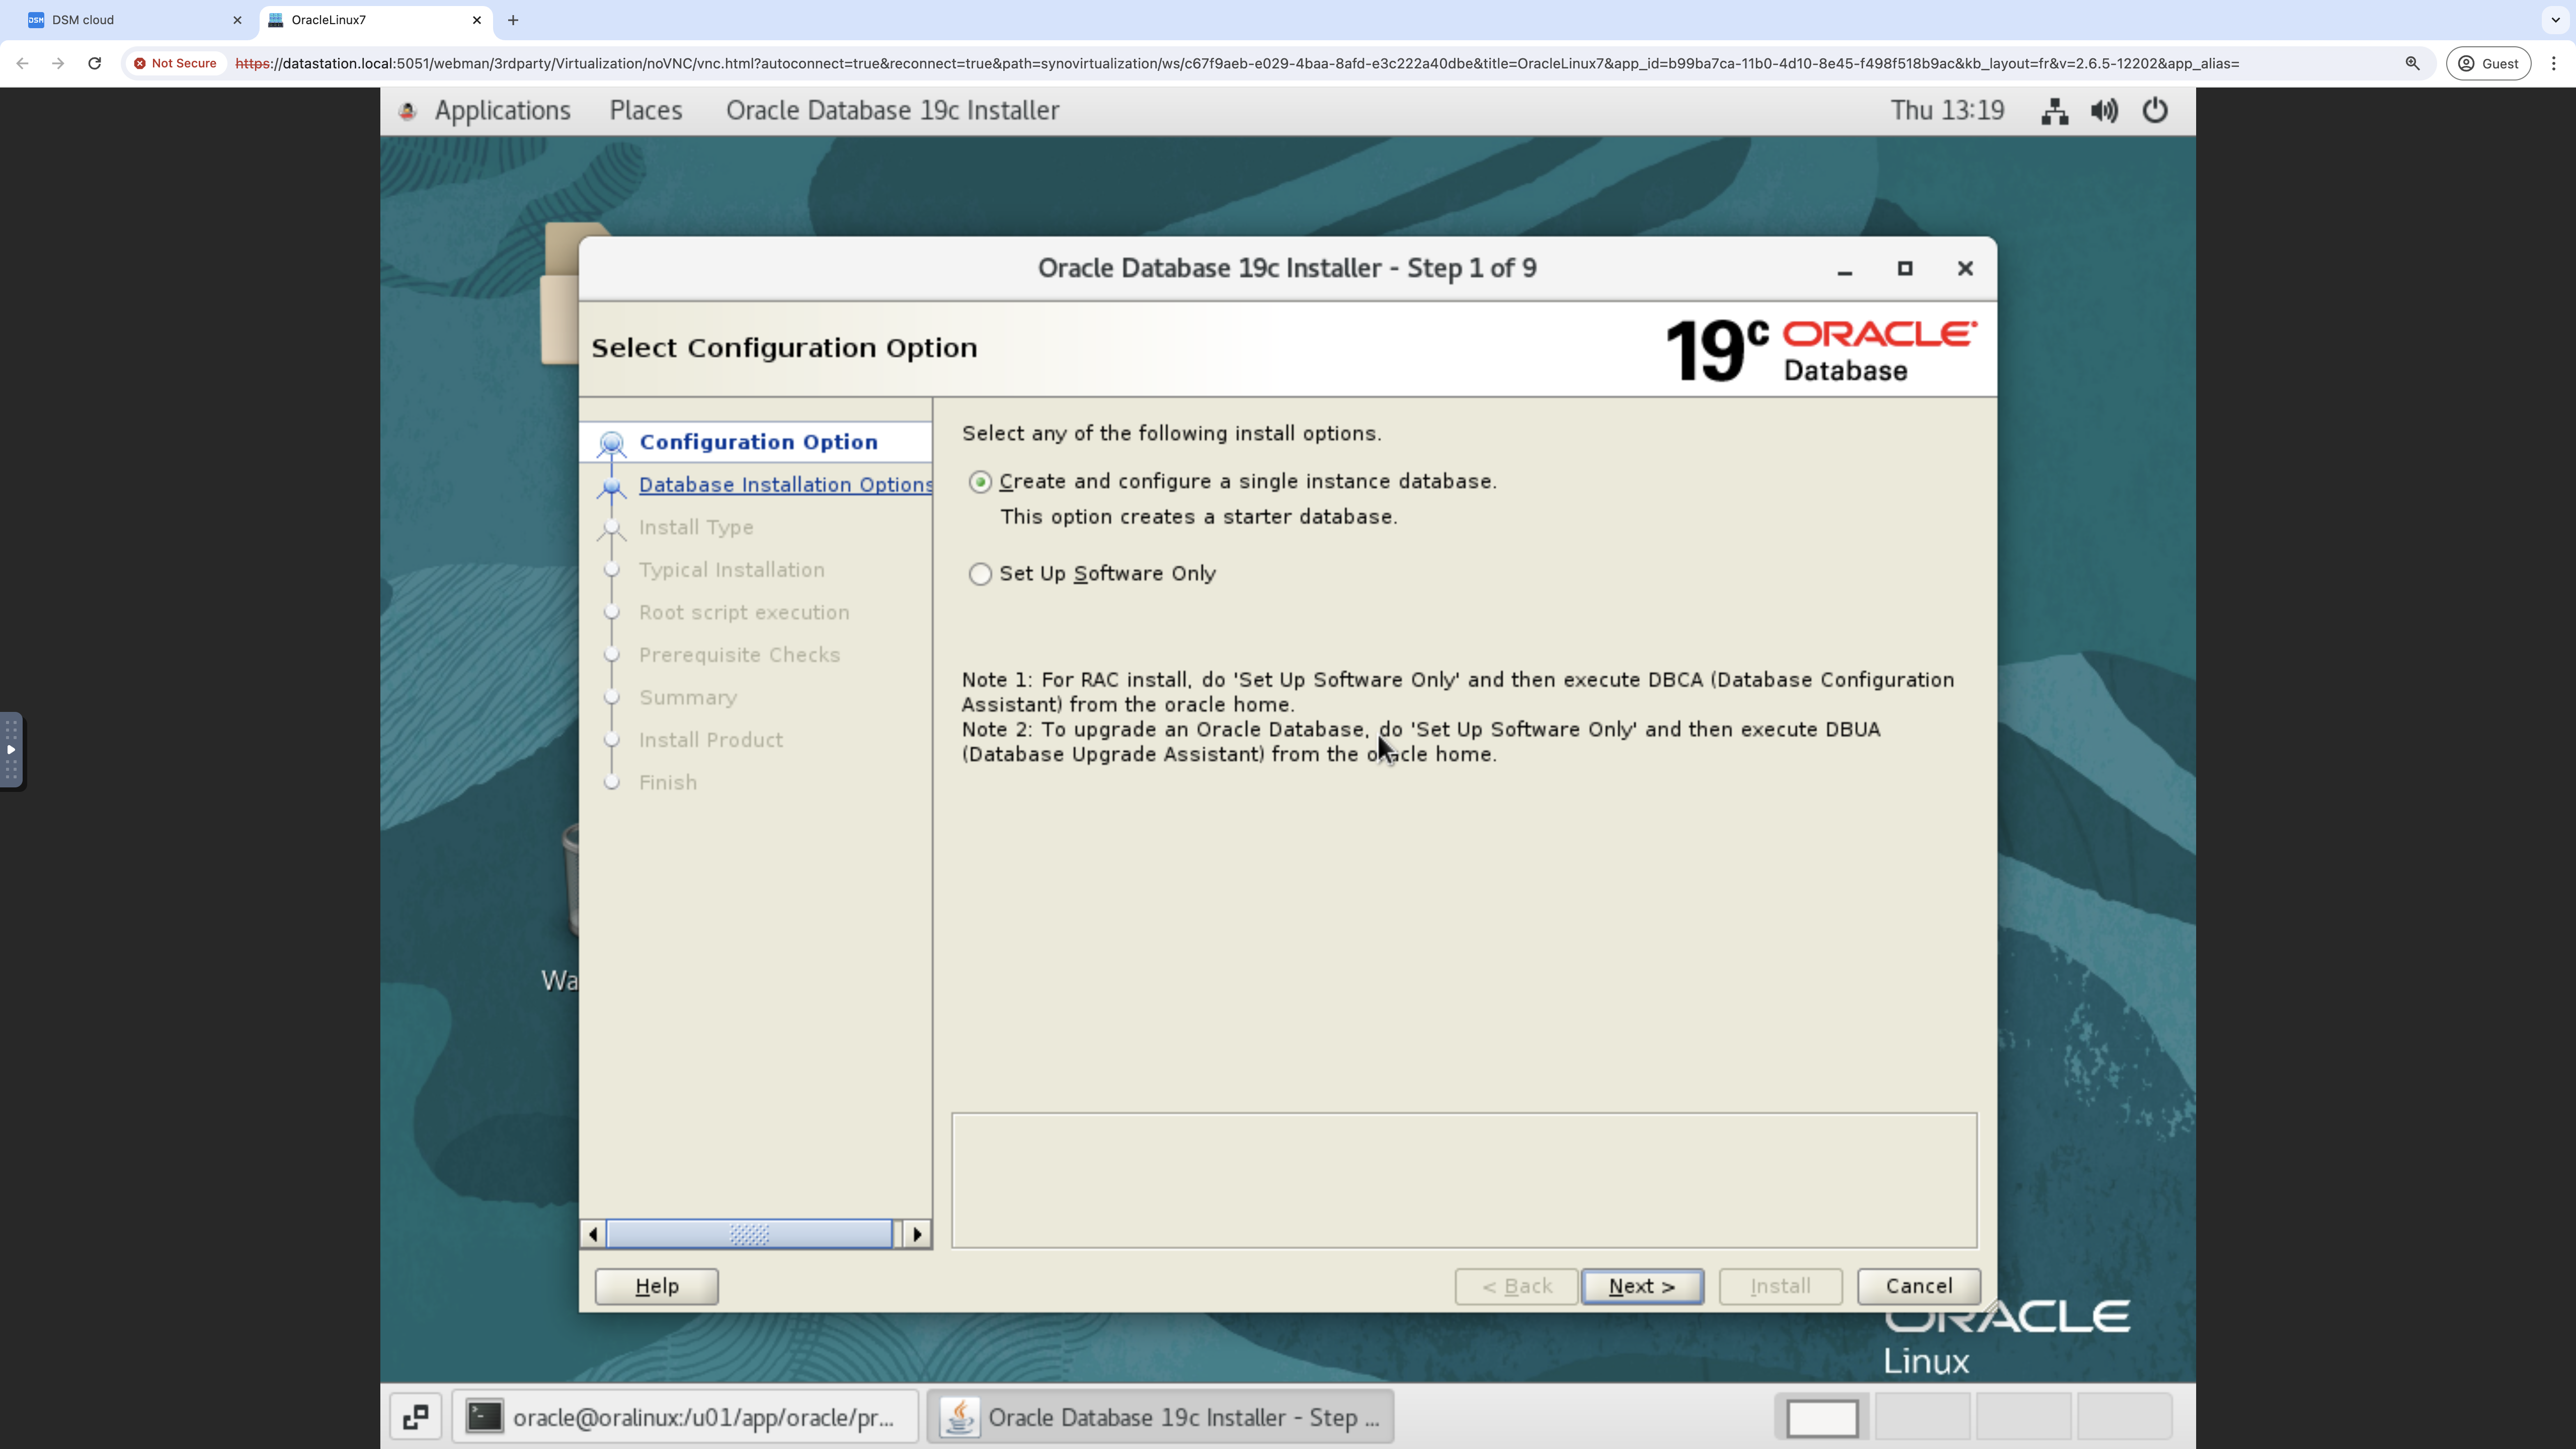
Exhibit 78: Oracle Database Installer – Select the Configuration Option
For a typical installation, select Server Class, and then select Next.
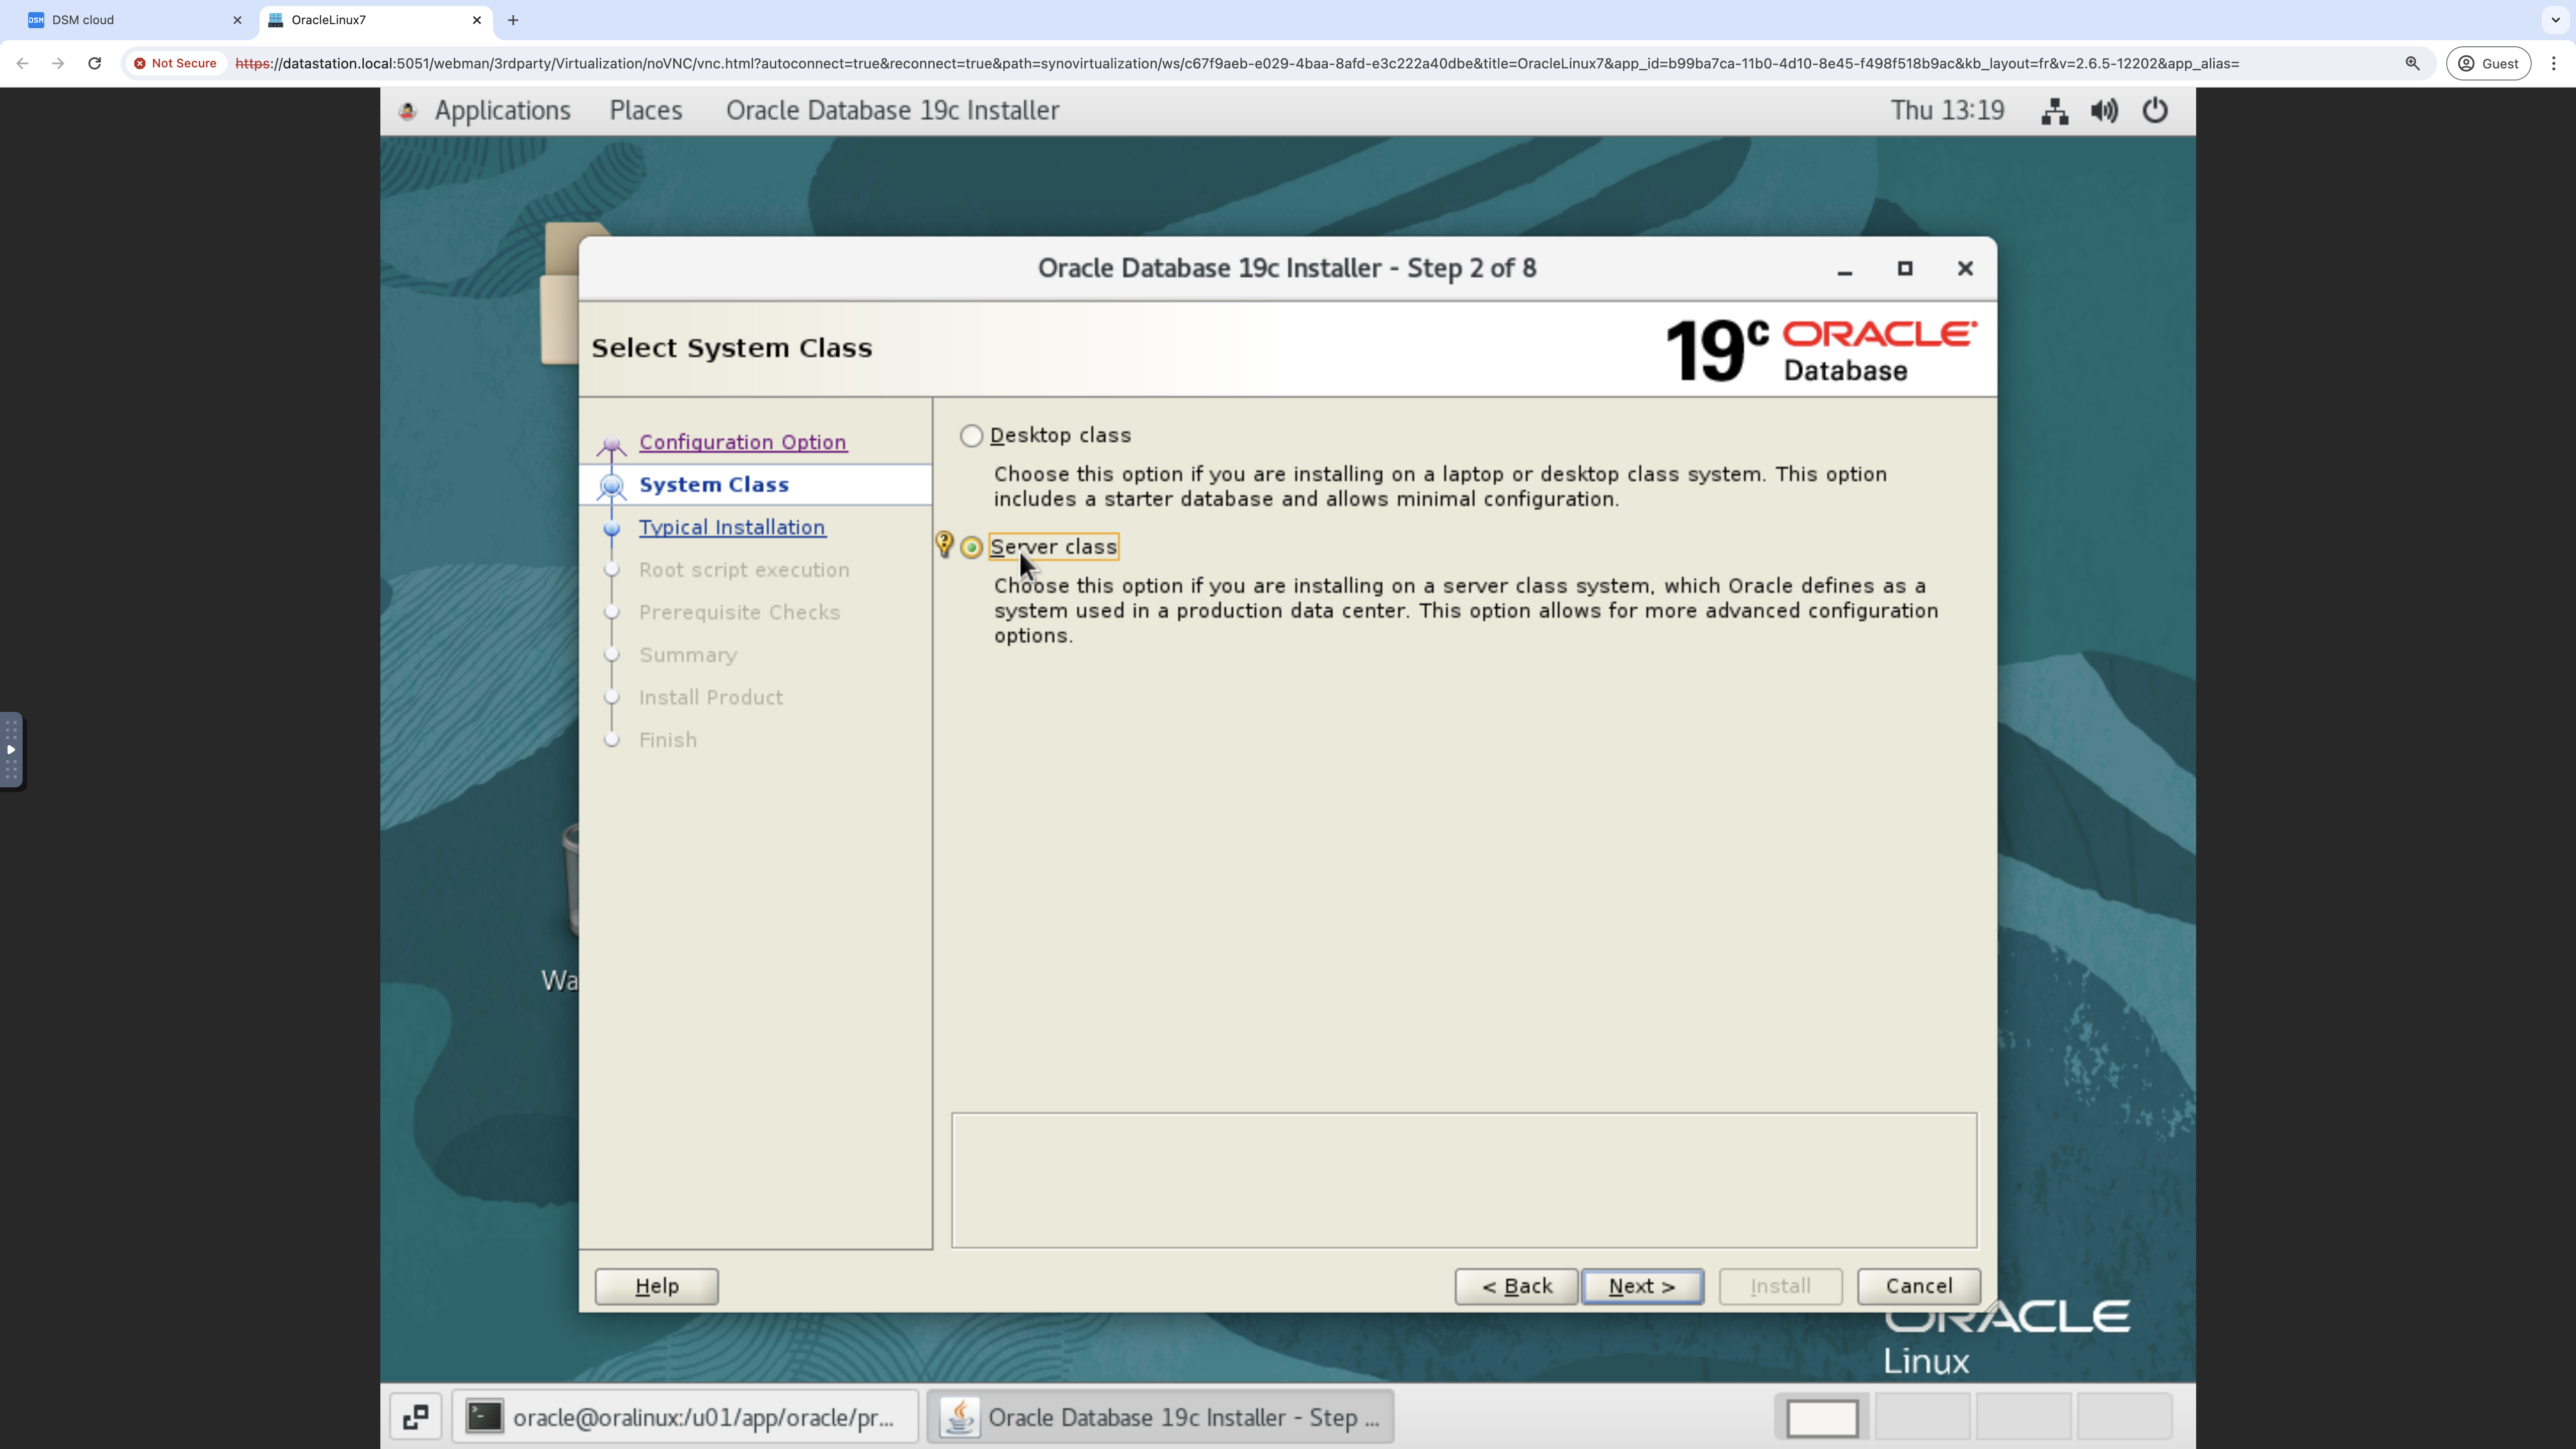
Exhibit 79: Oracle Database Installer – Select the System Class
For the database edition, select Enterprise Edition, and then select Next.
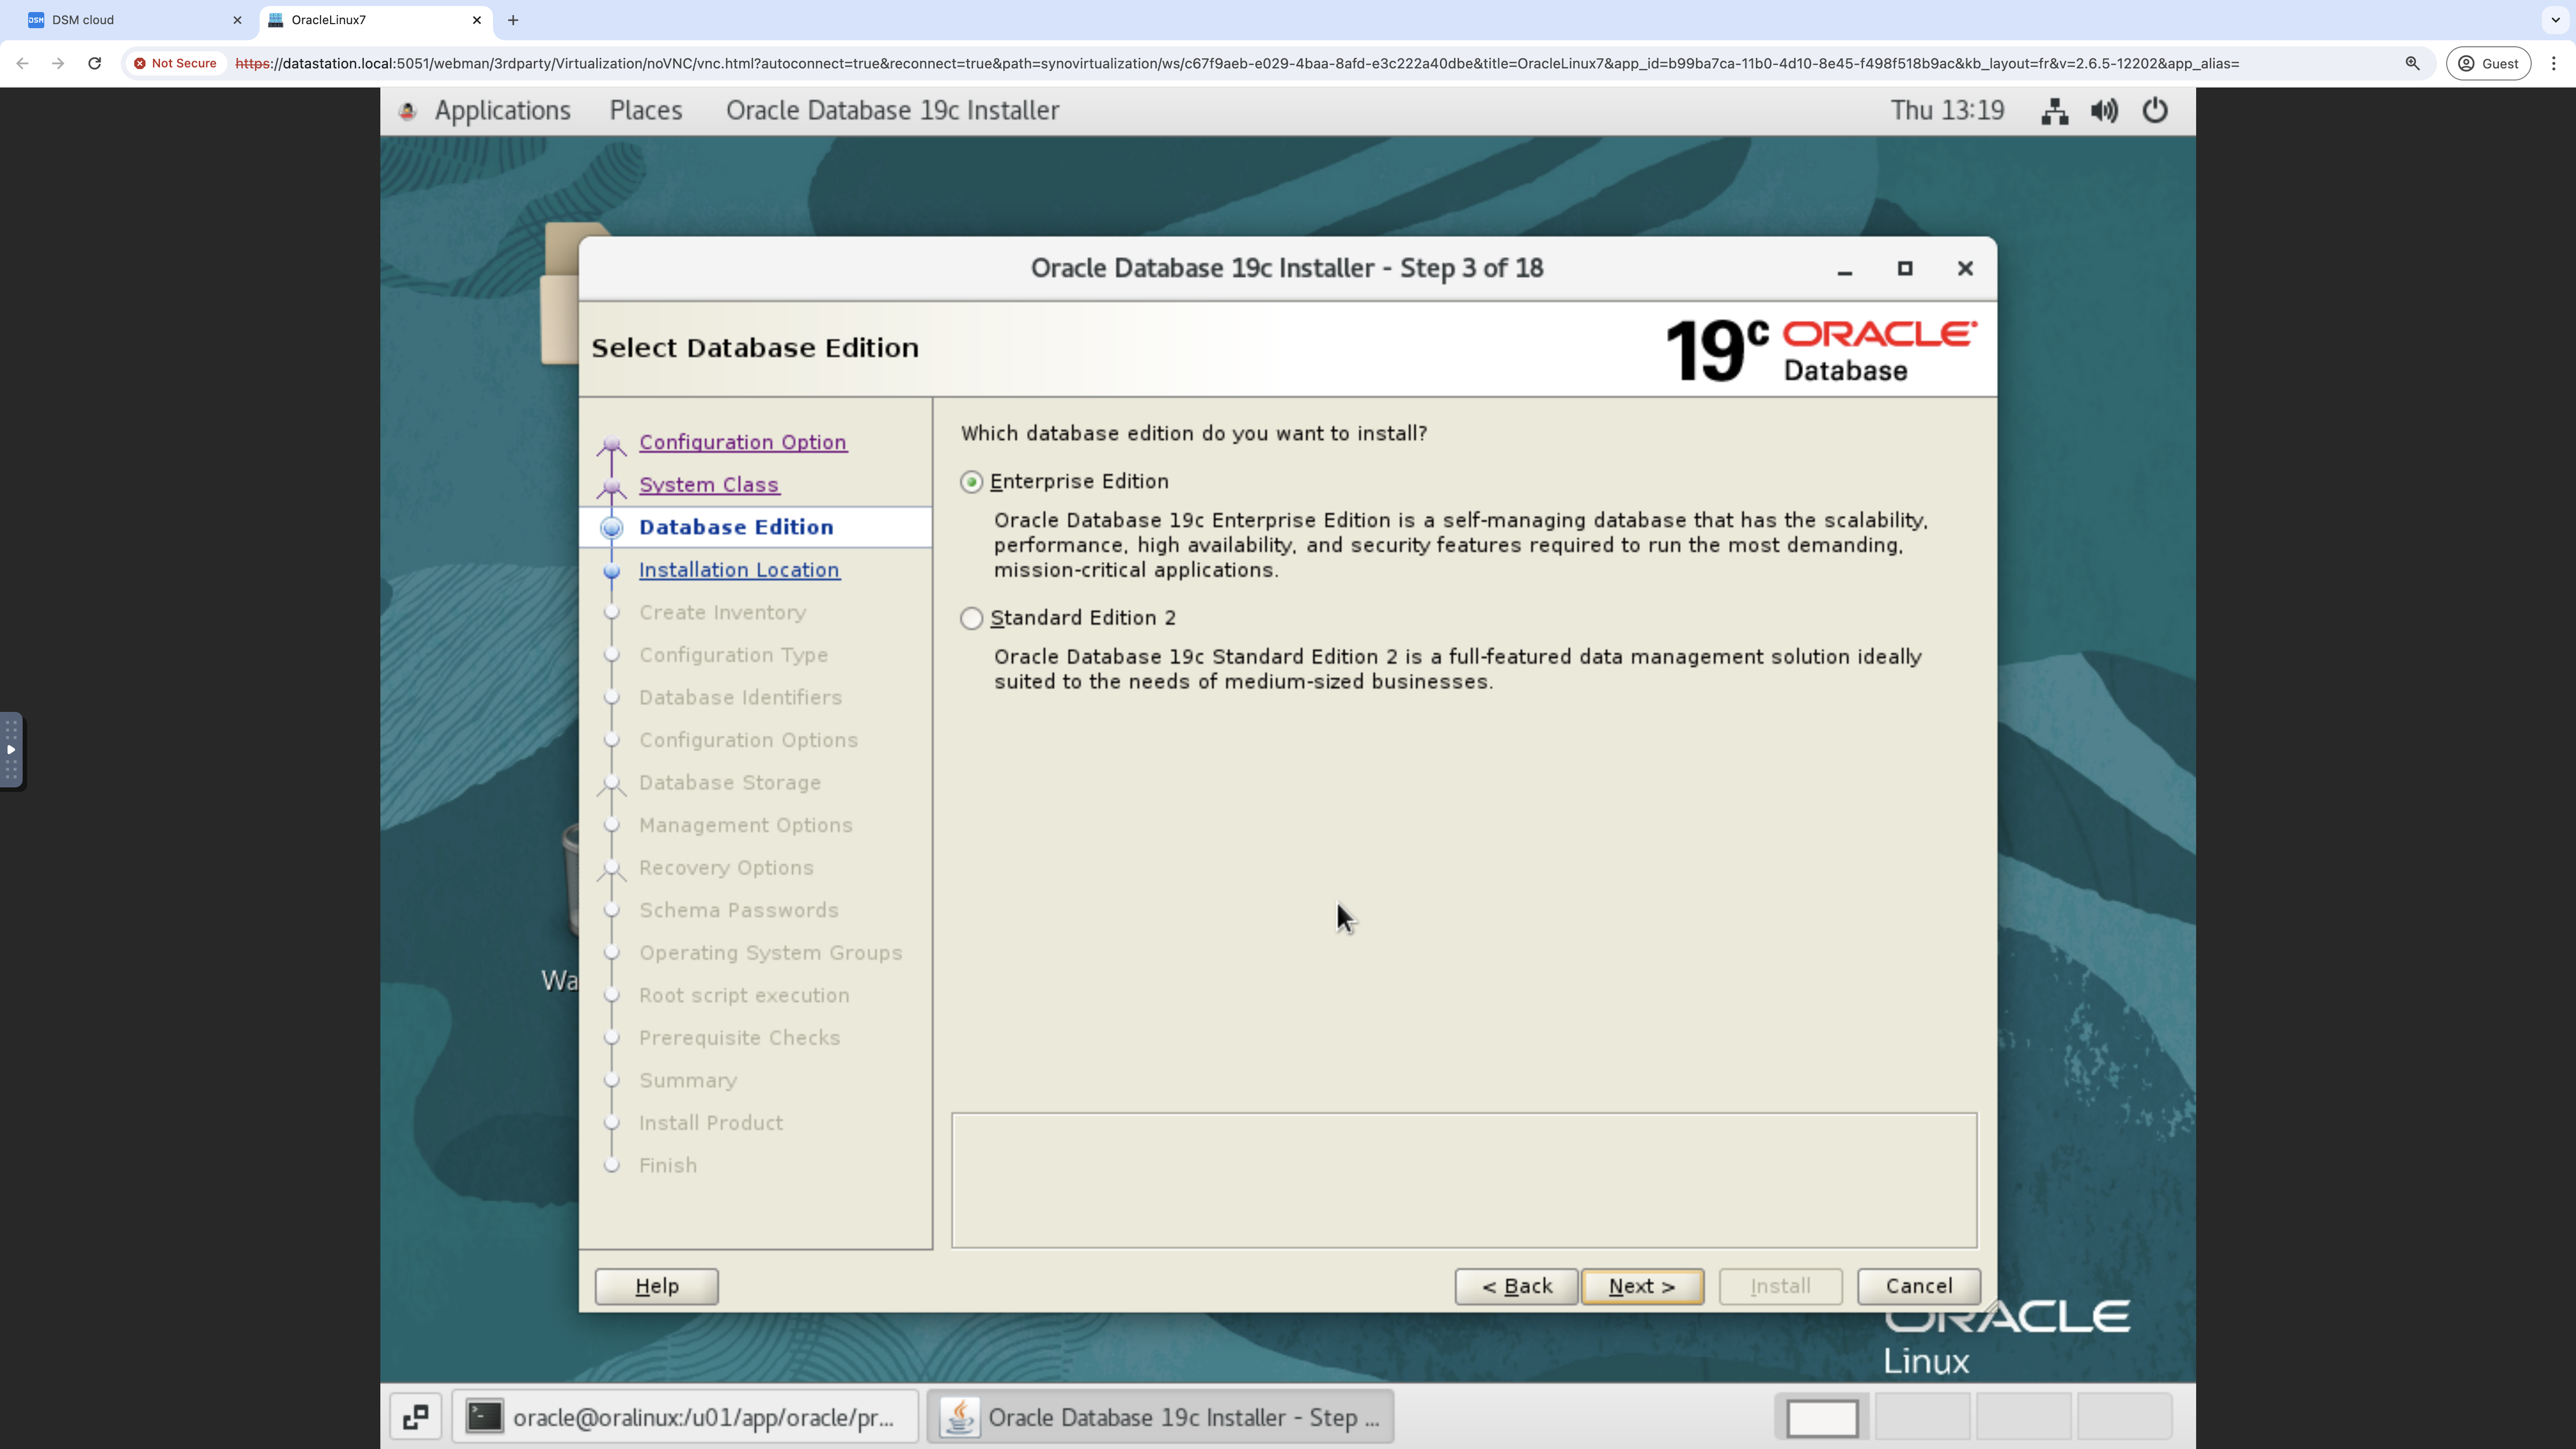
Exhibit 80: Oracle Database Installer – Select Enterprise Edition
Specify a path for all Oracle software and configuration-related files installed by the installation owner. Select Next.
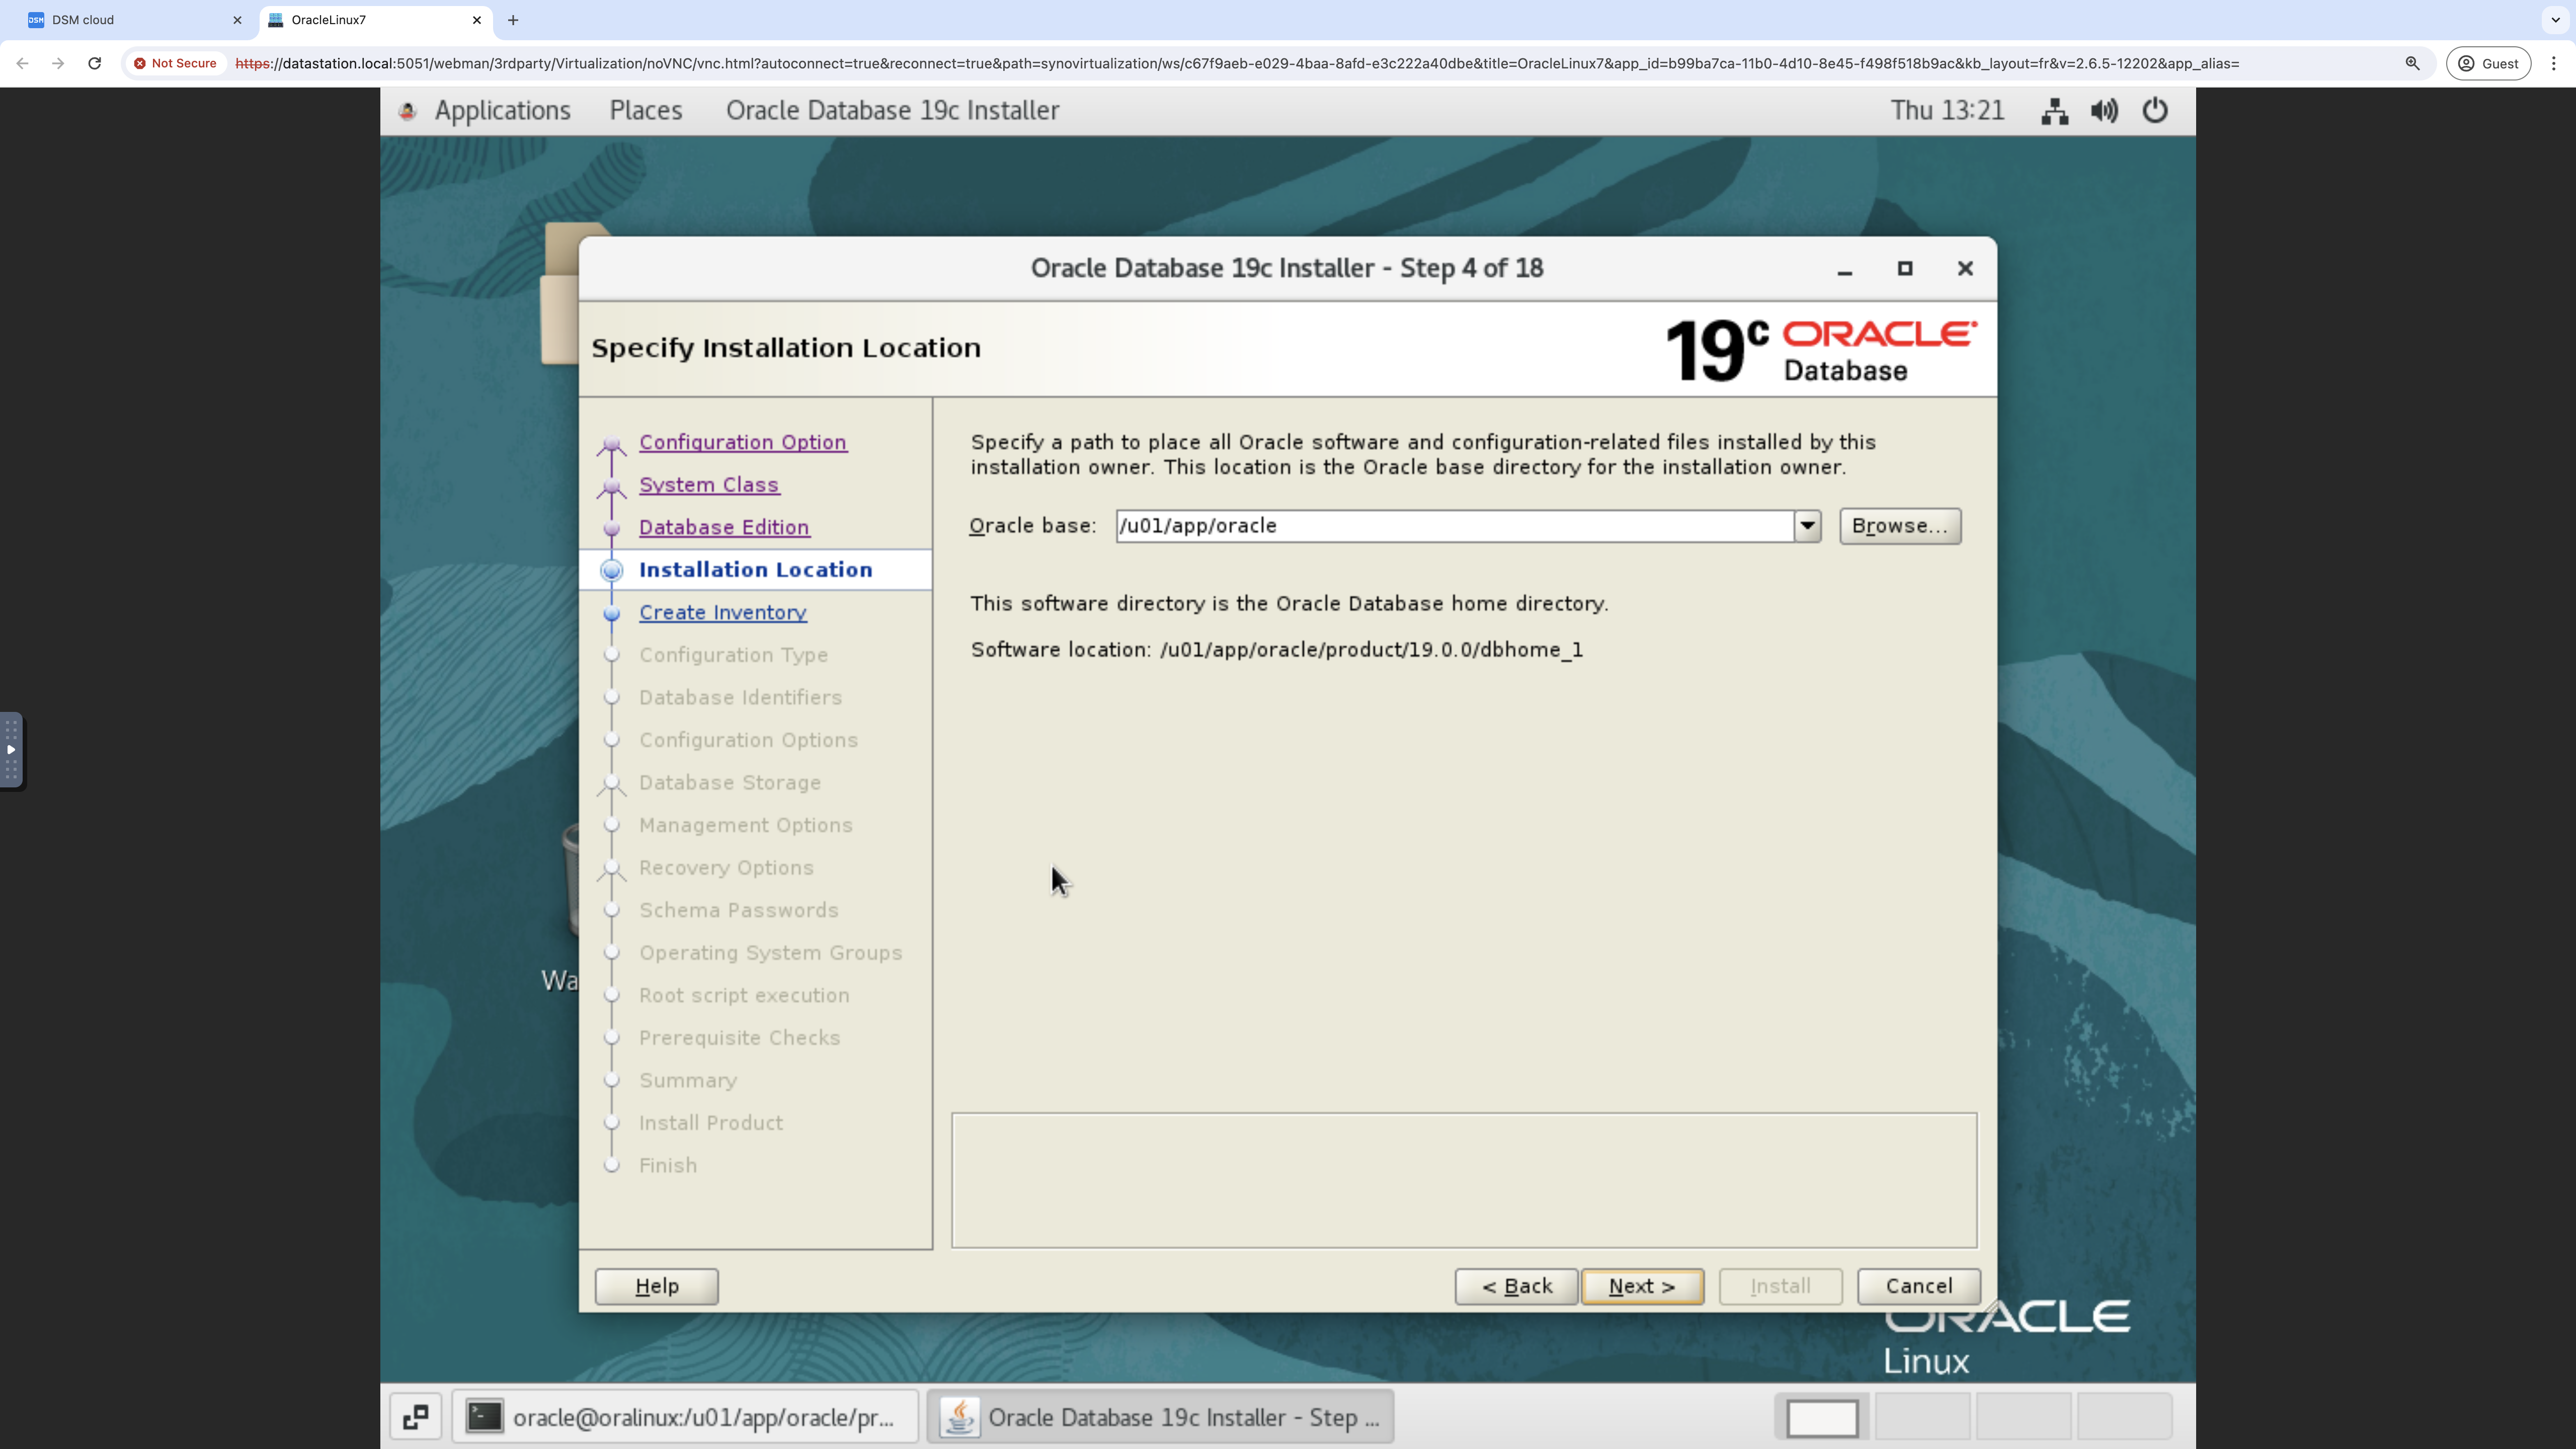
Exhibit 81: Oracle Database Installer – Specify the Installation Location
Specify a directory for the installation metadata files. Select Next.
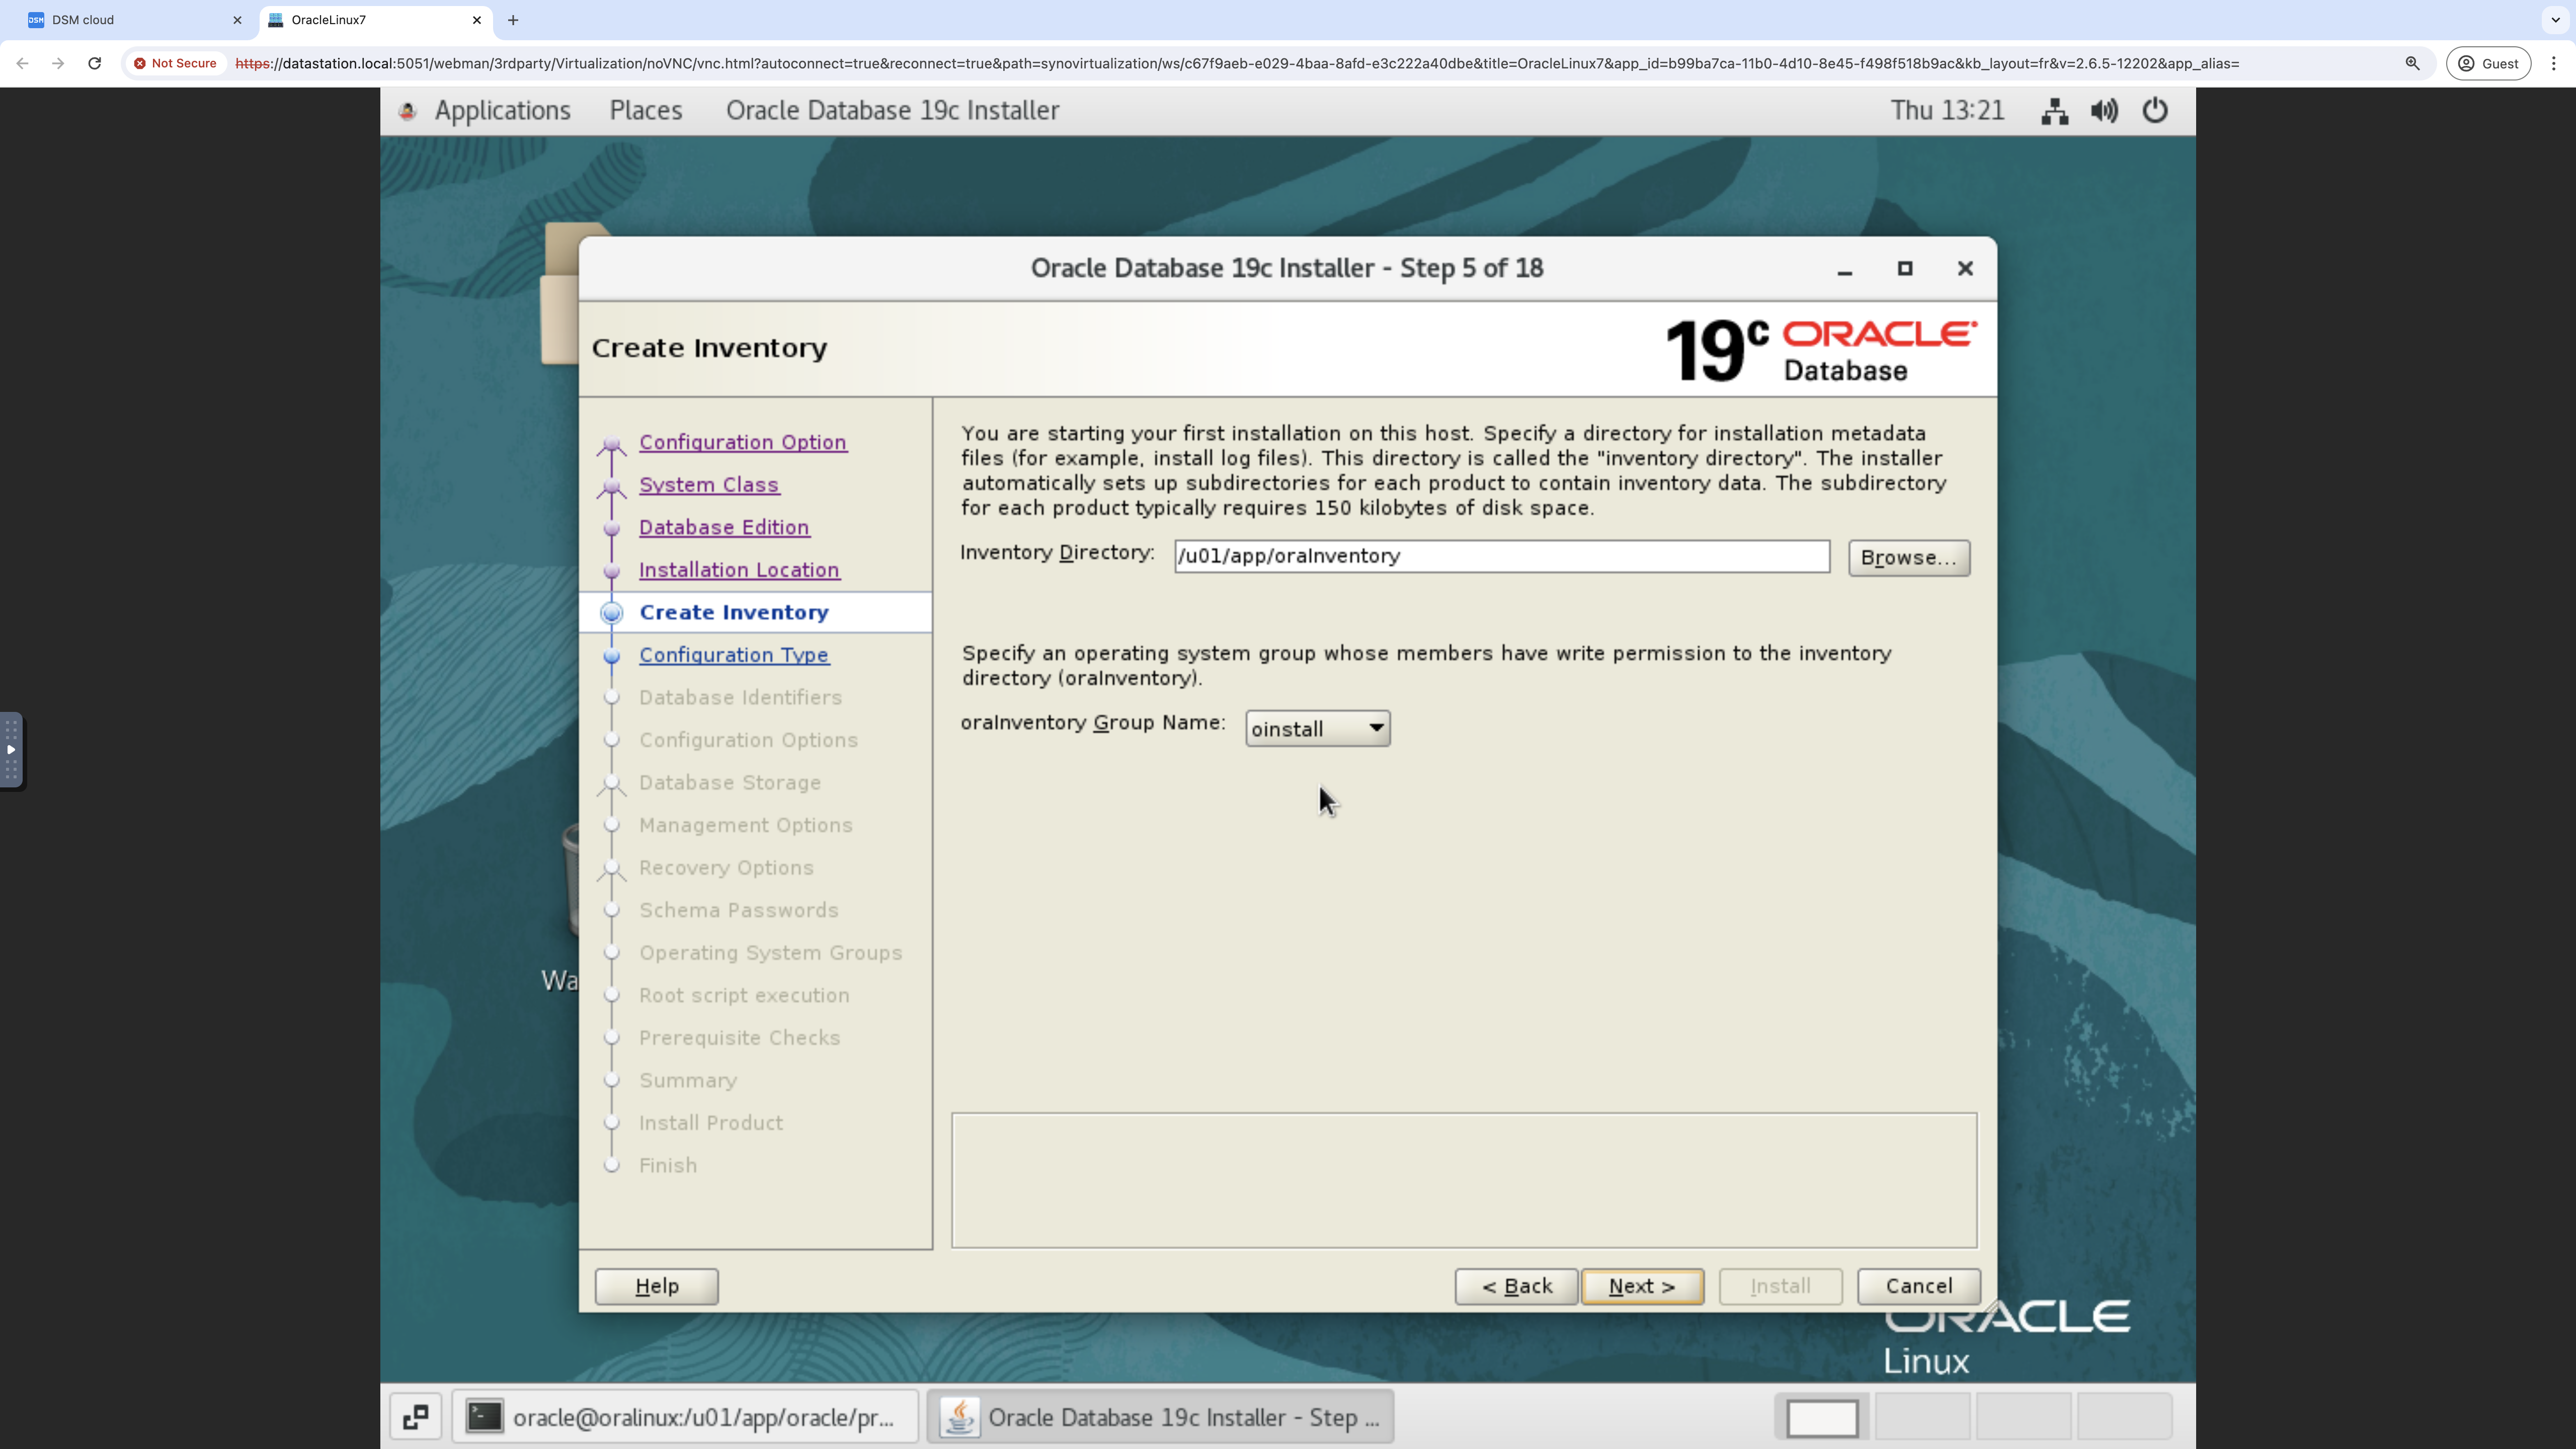
Exhibit 82: Oracle Database Installer – Configure the Oracle Inventory
Note: The directory is called the inventory directory.
Select General Purpose/Transaction Processing as the database type, and then select Next.
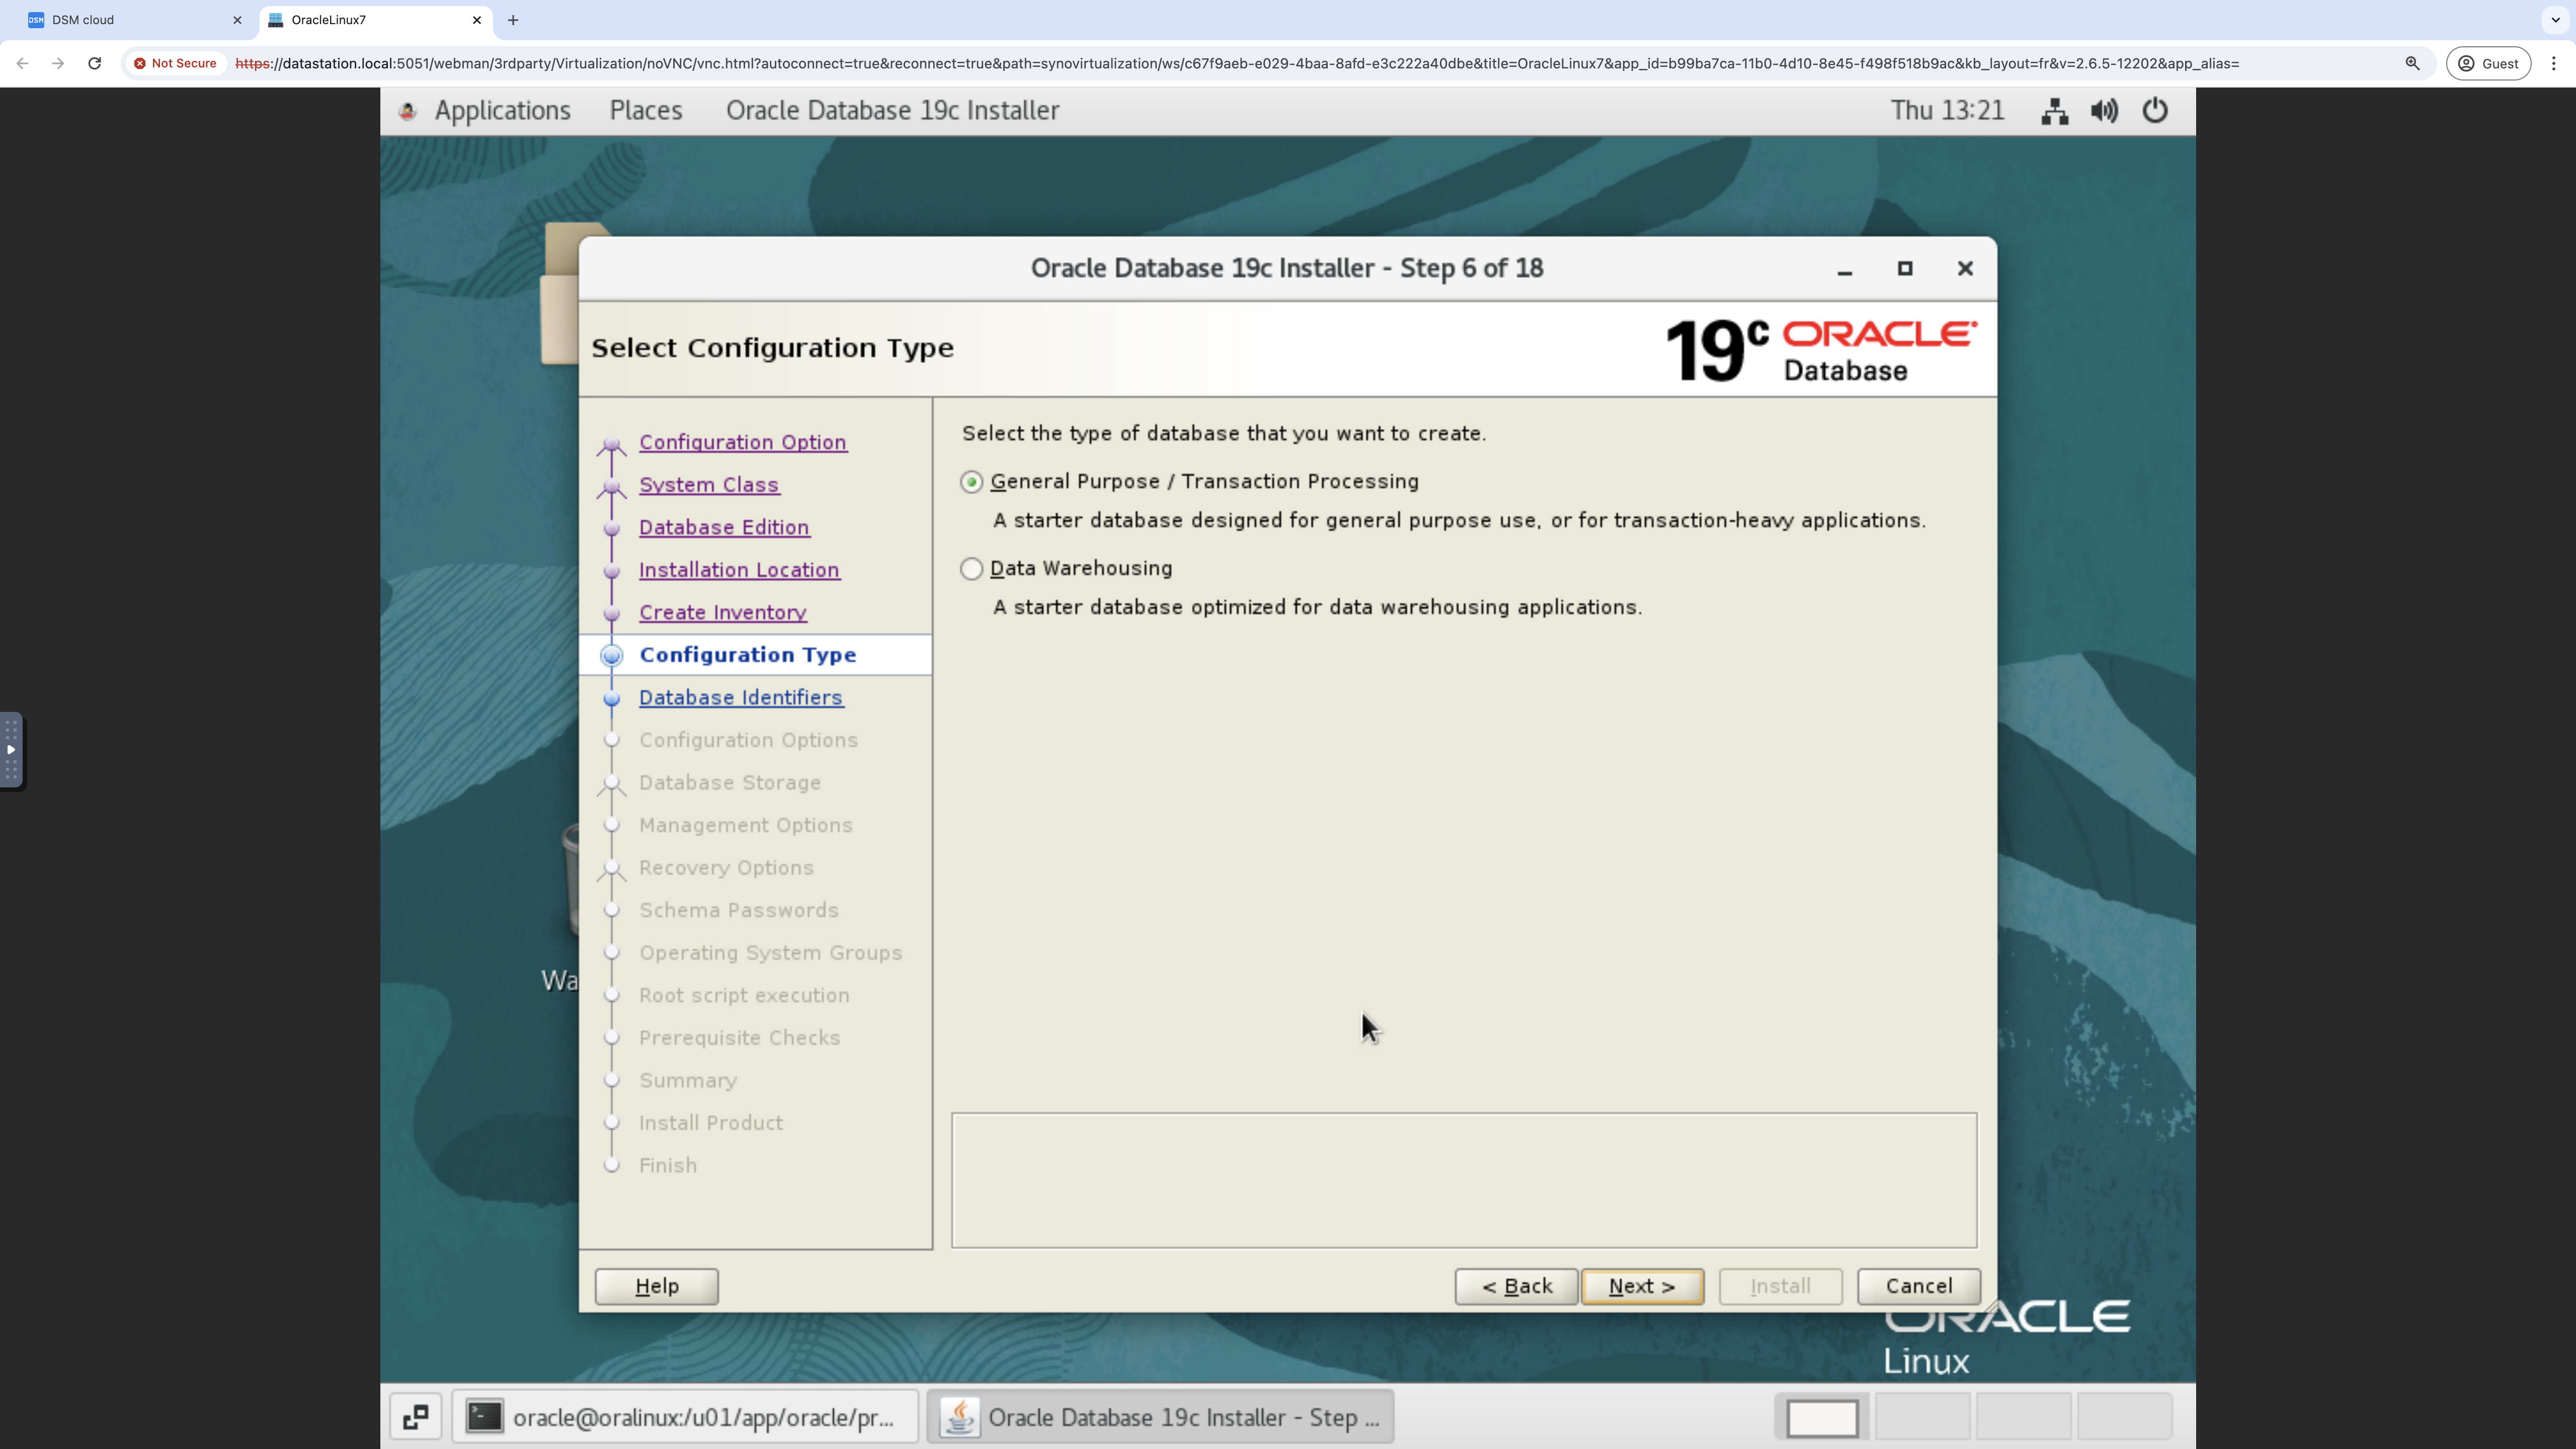
Exhibit 83: Oracle Database Installer – Select the Database Type
Provide the global database name, Oracle system identifier (SID), and pluggable database name, and select Create as Container Database. Then select Next.
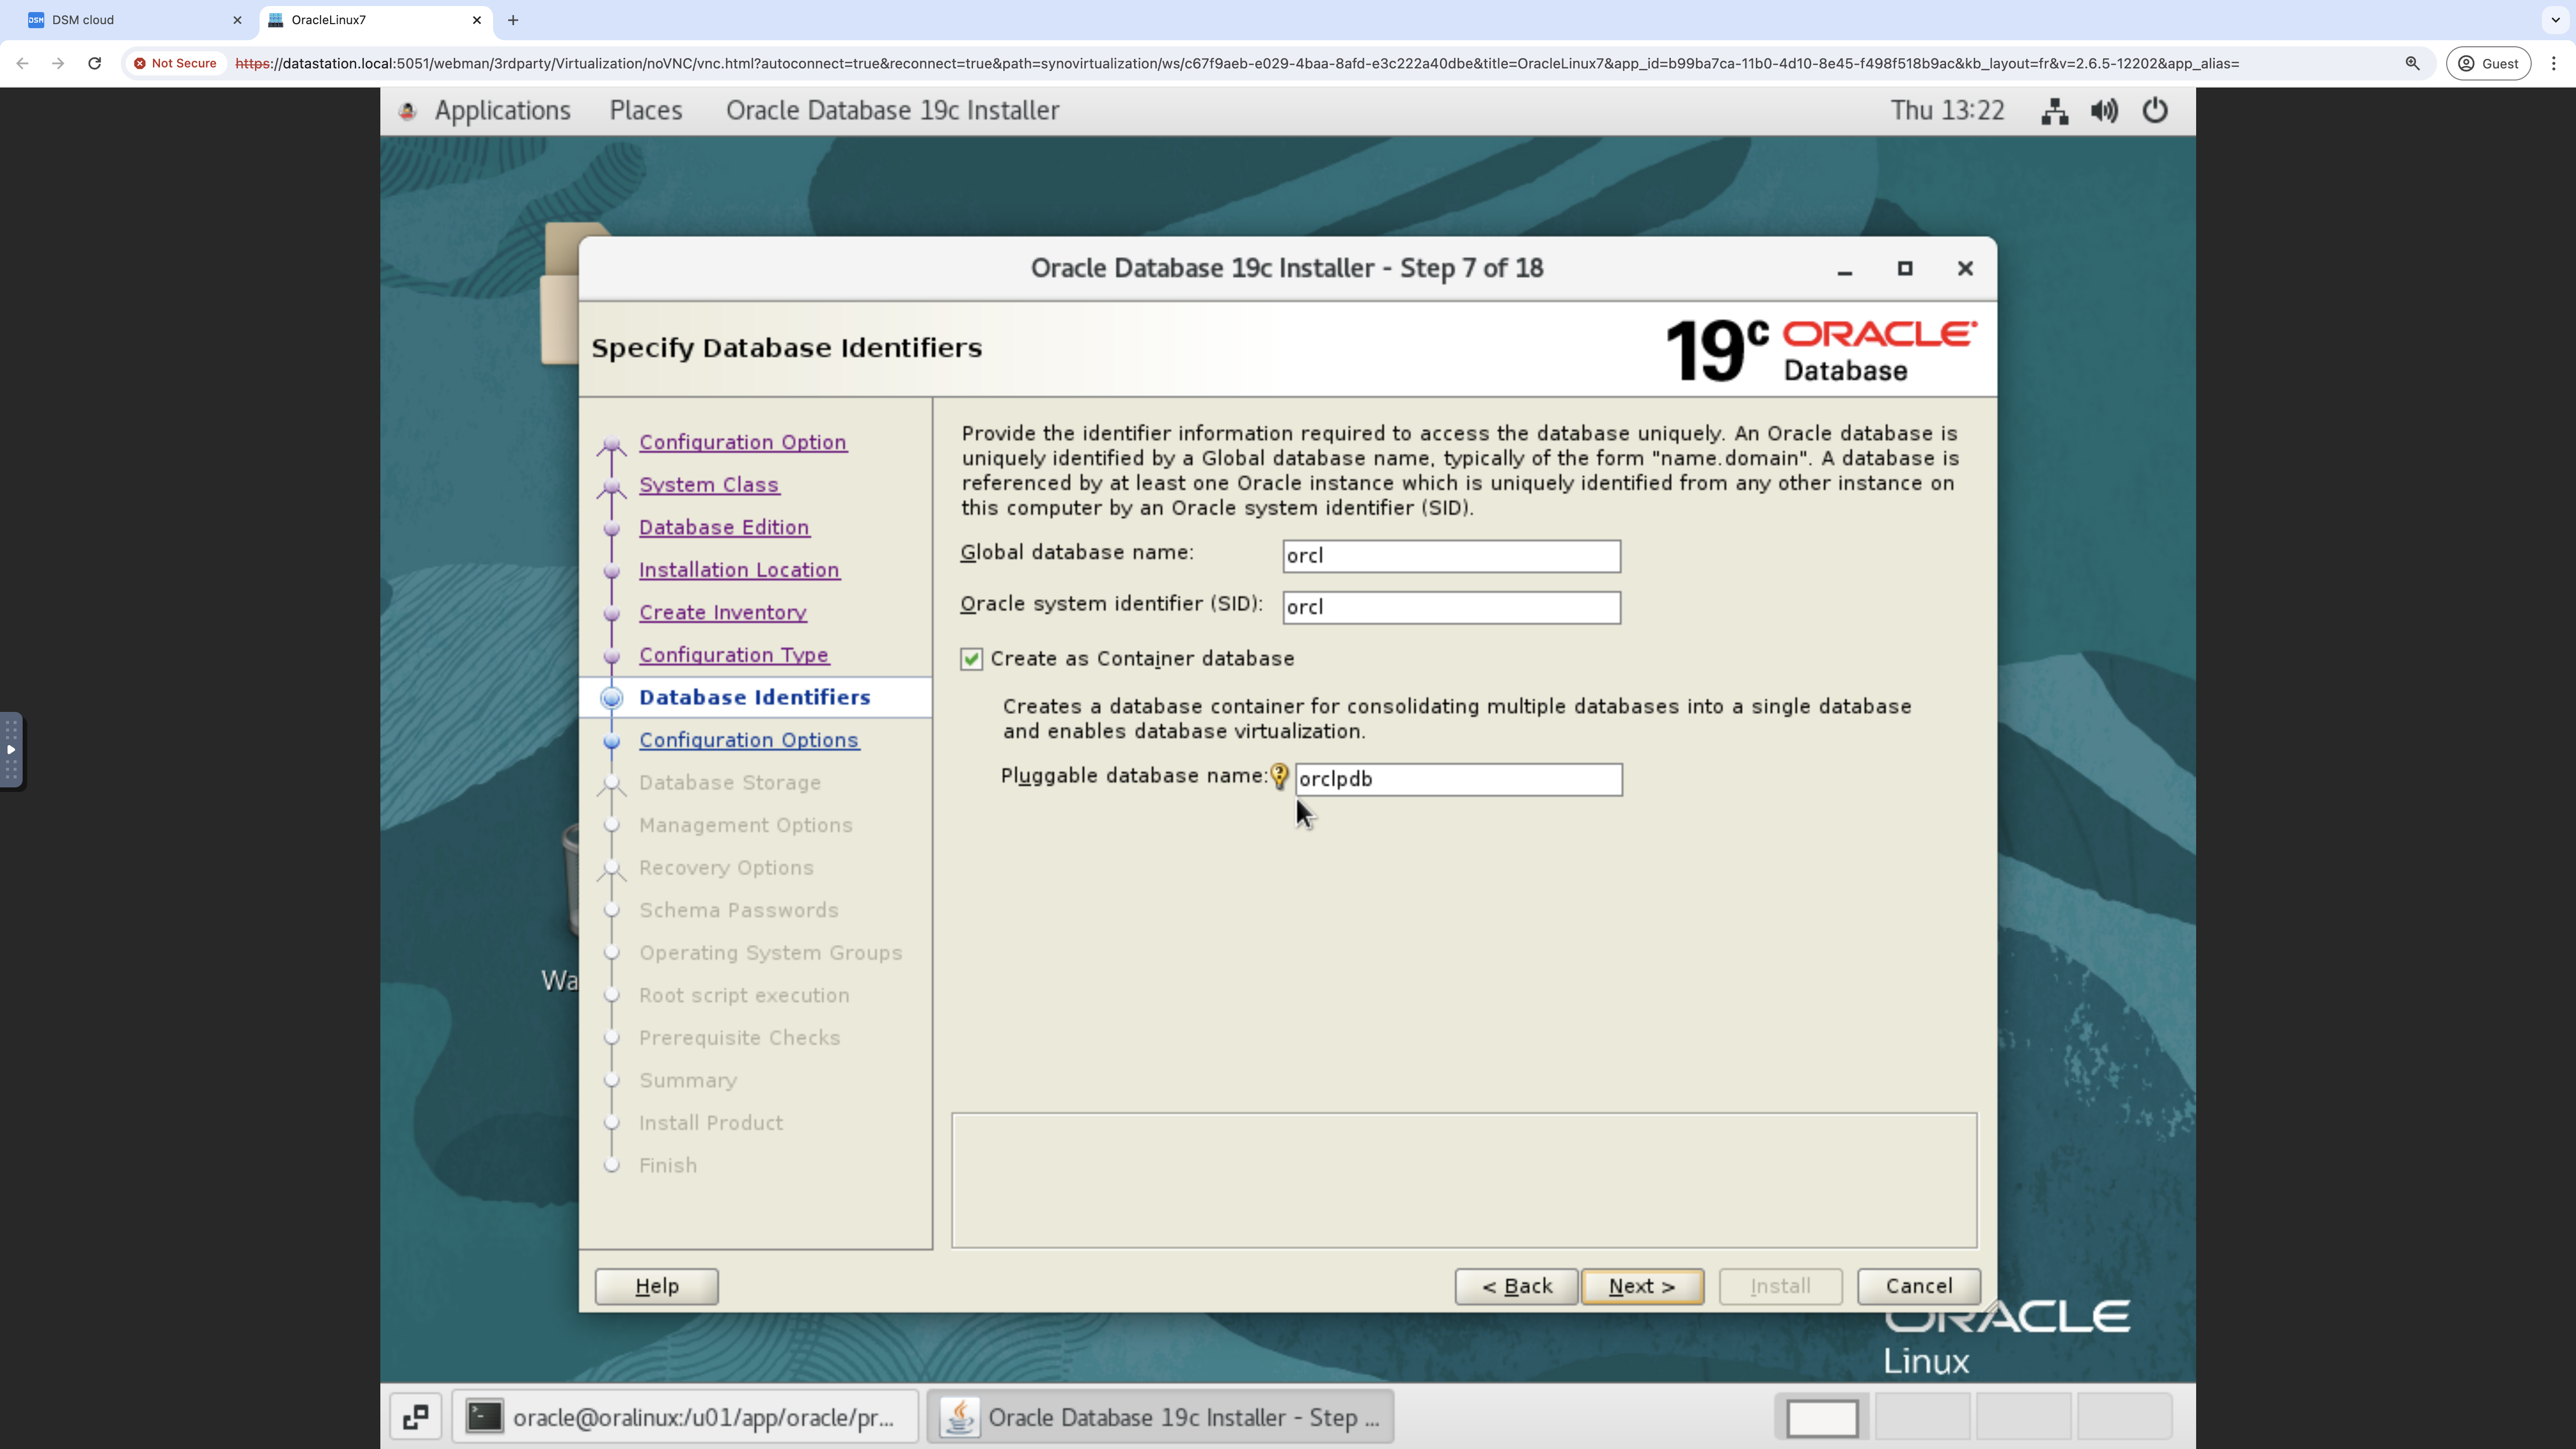
Exhibit 84: Oracle Database Installer – Configure Database Naming and Containers
Select Enable Automatic Memory Management, and then go to the Character sets tab.
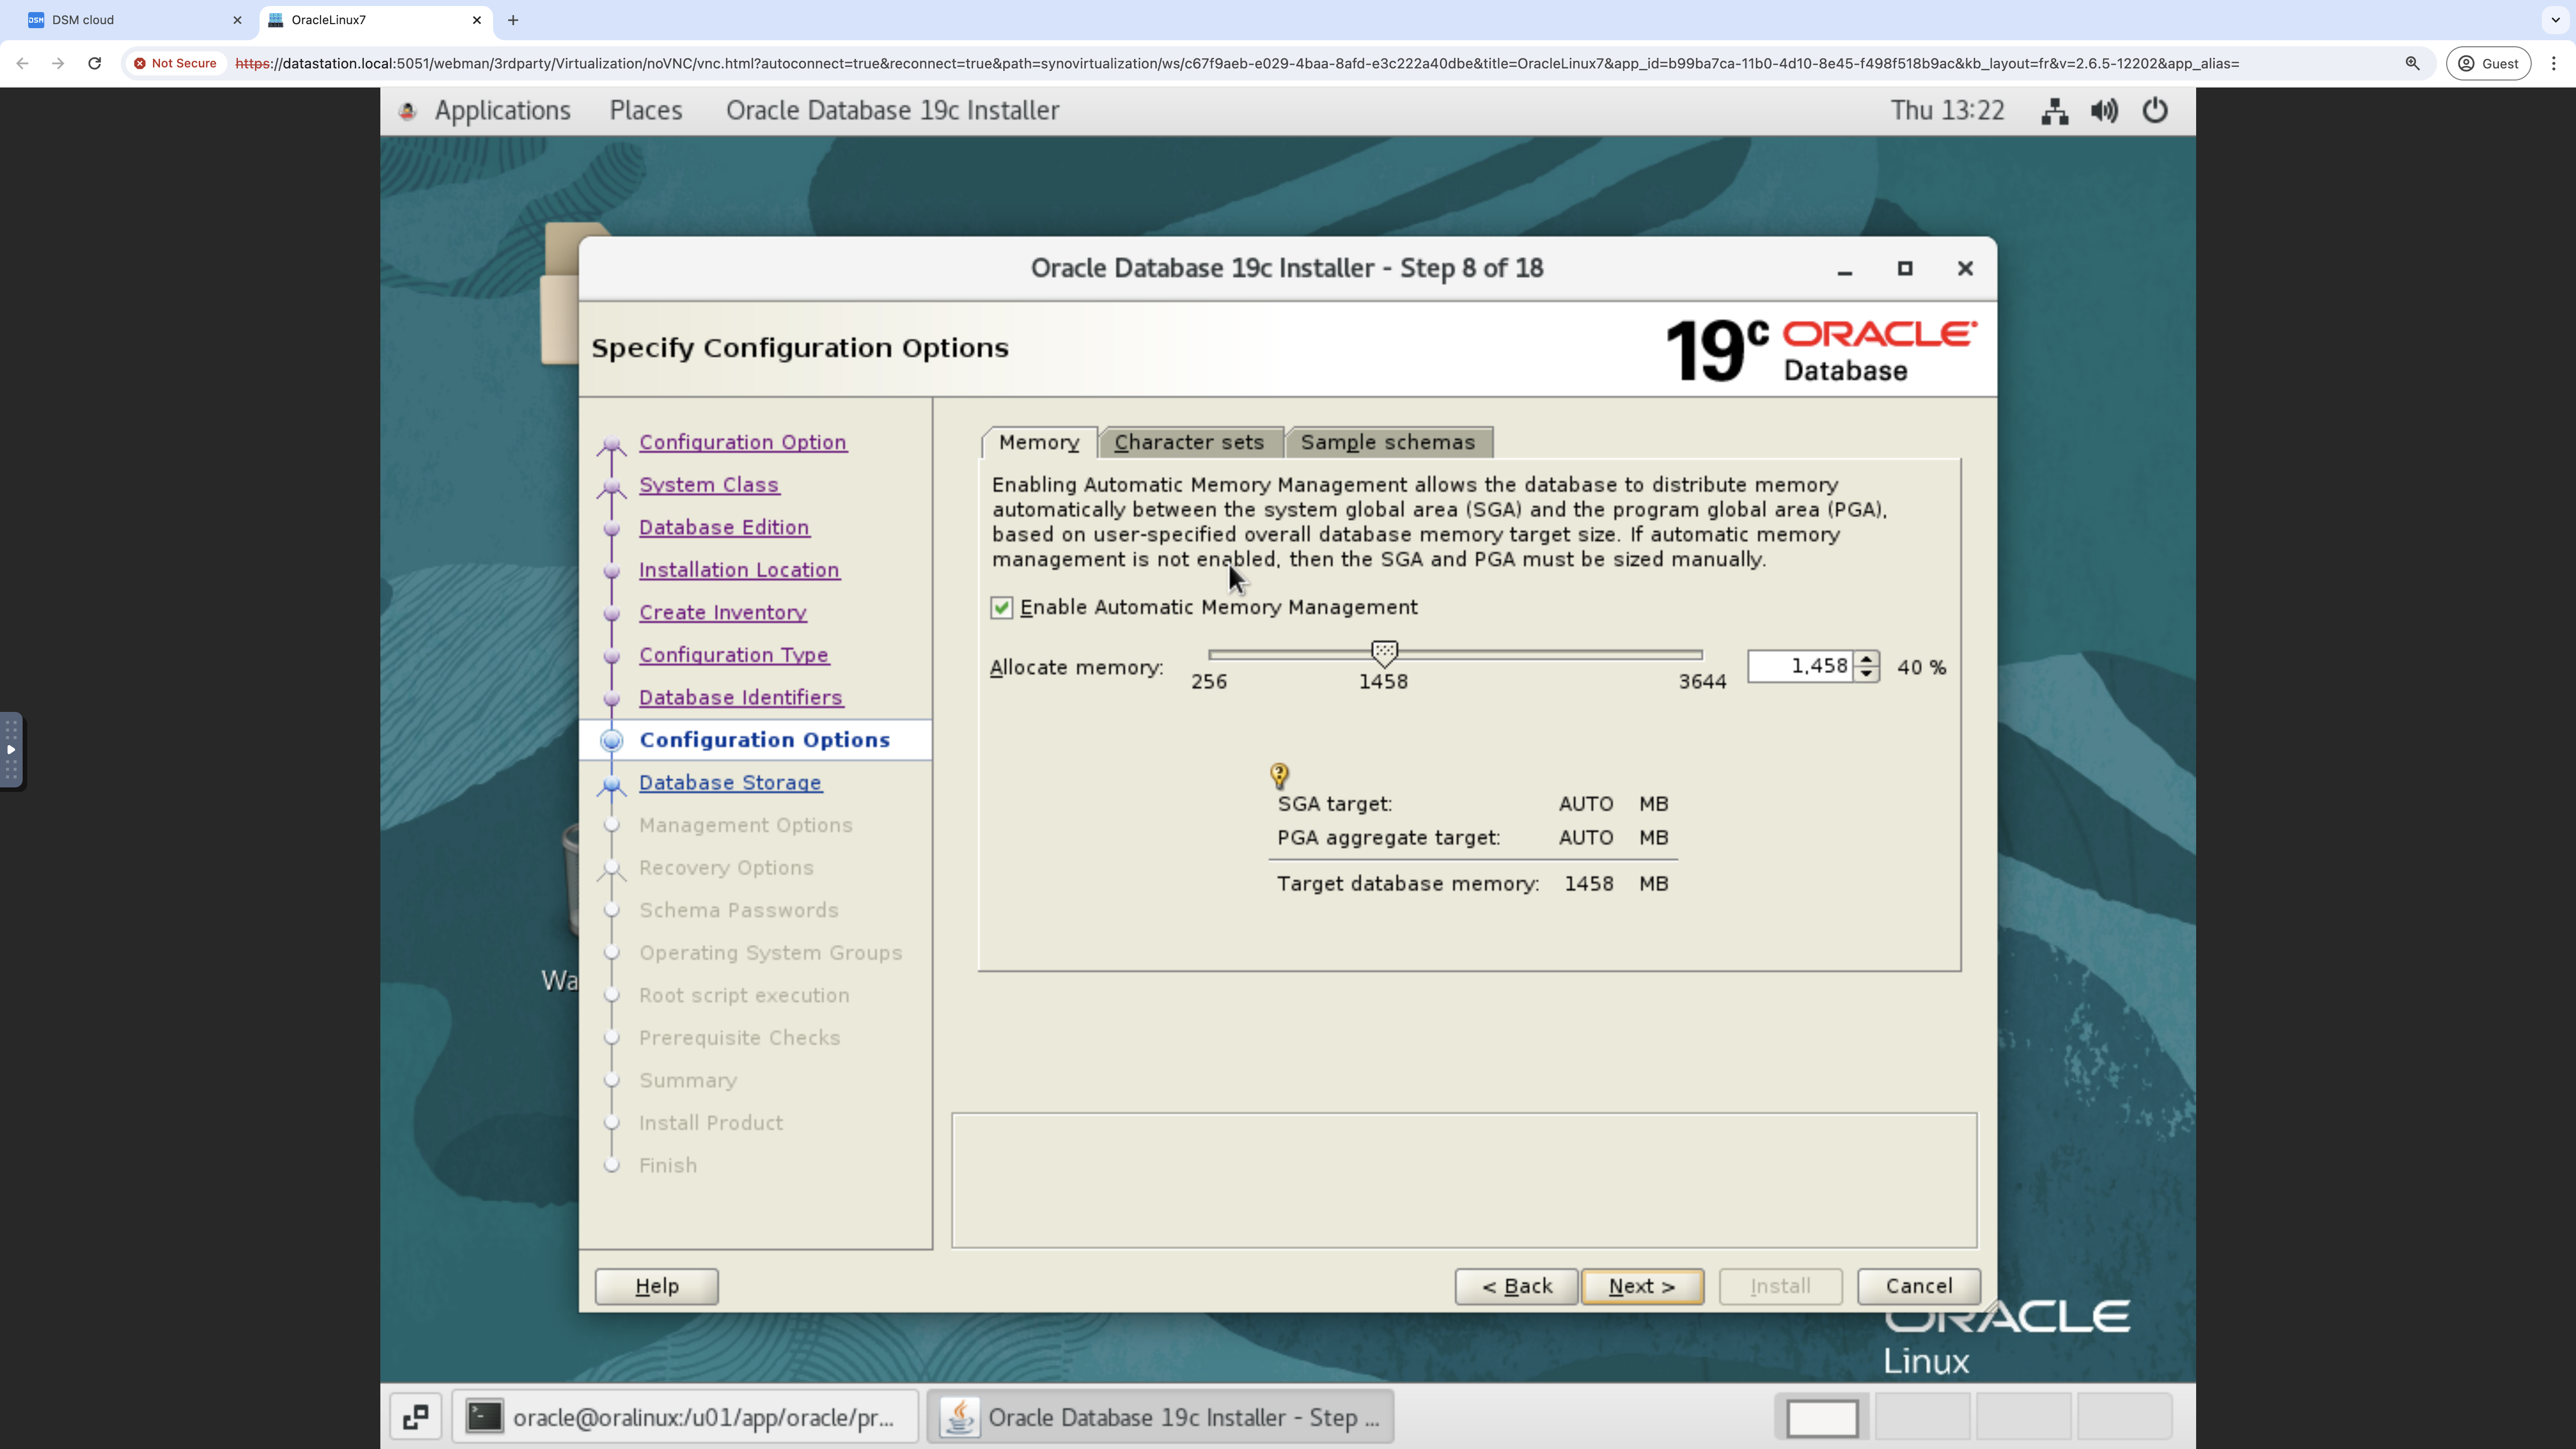
Exhibit 85: Oracle Database Installer – Configure Database Memory
Select Use Unicode (AL32UTF8), and then select Sample Schemas.
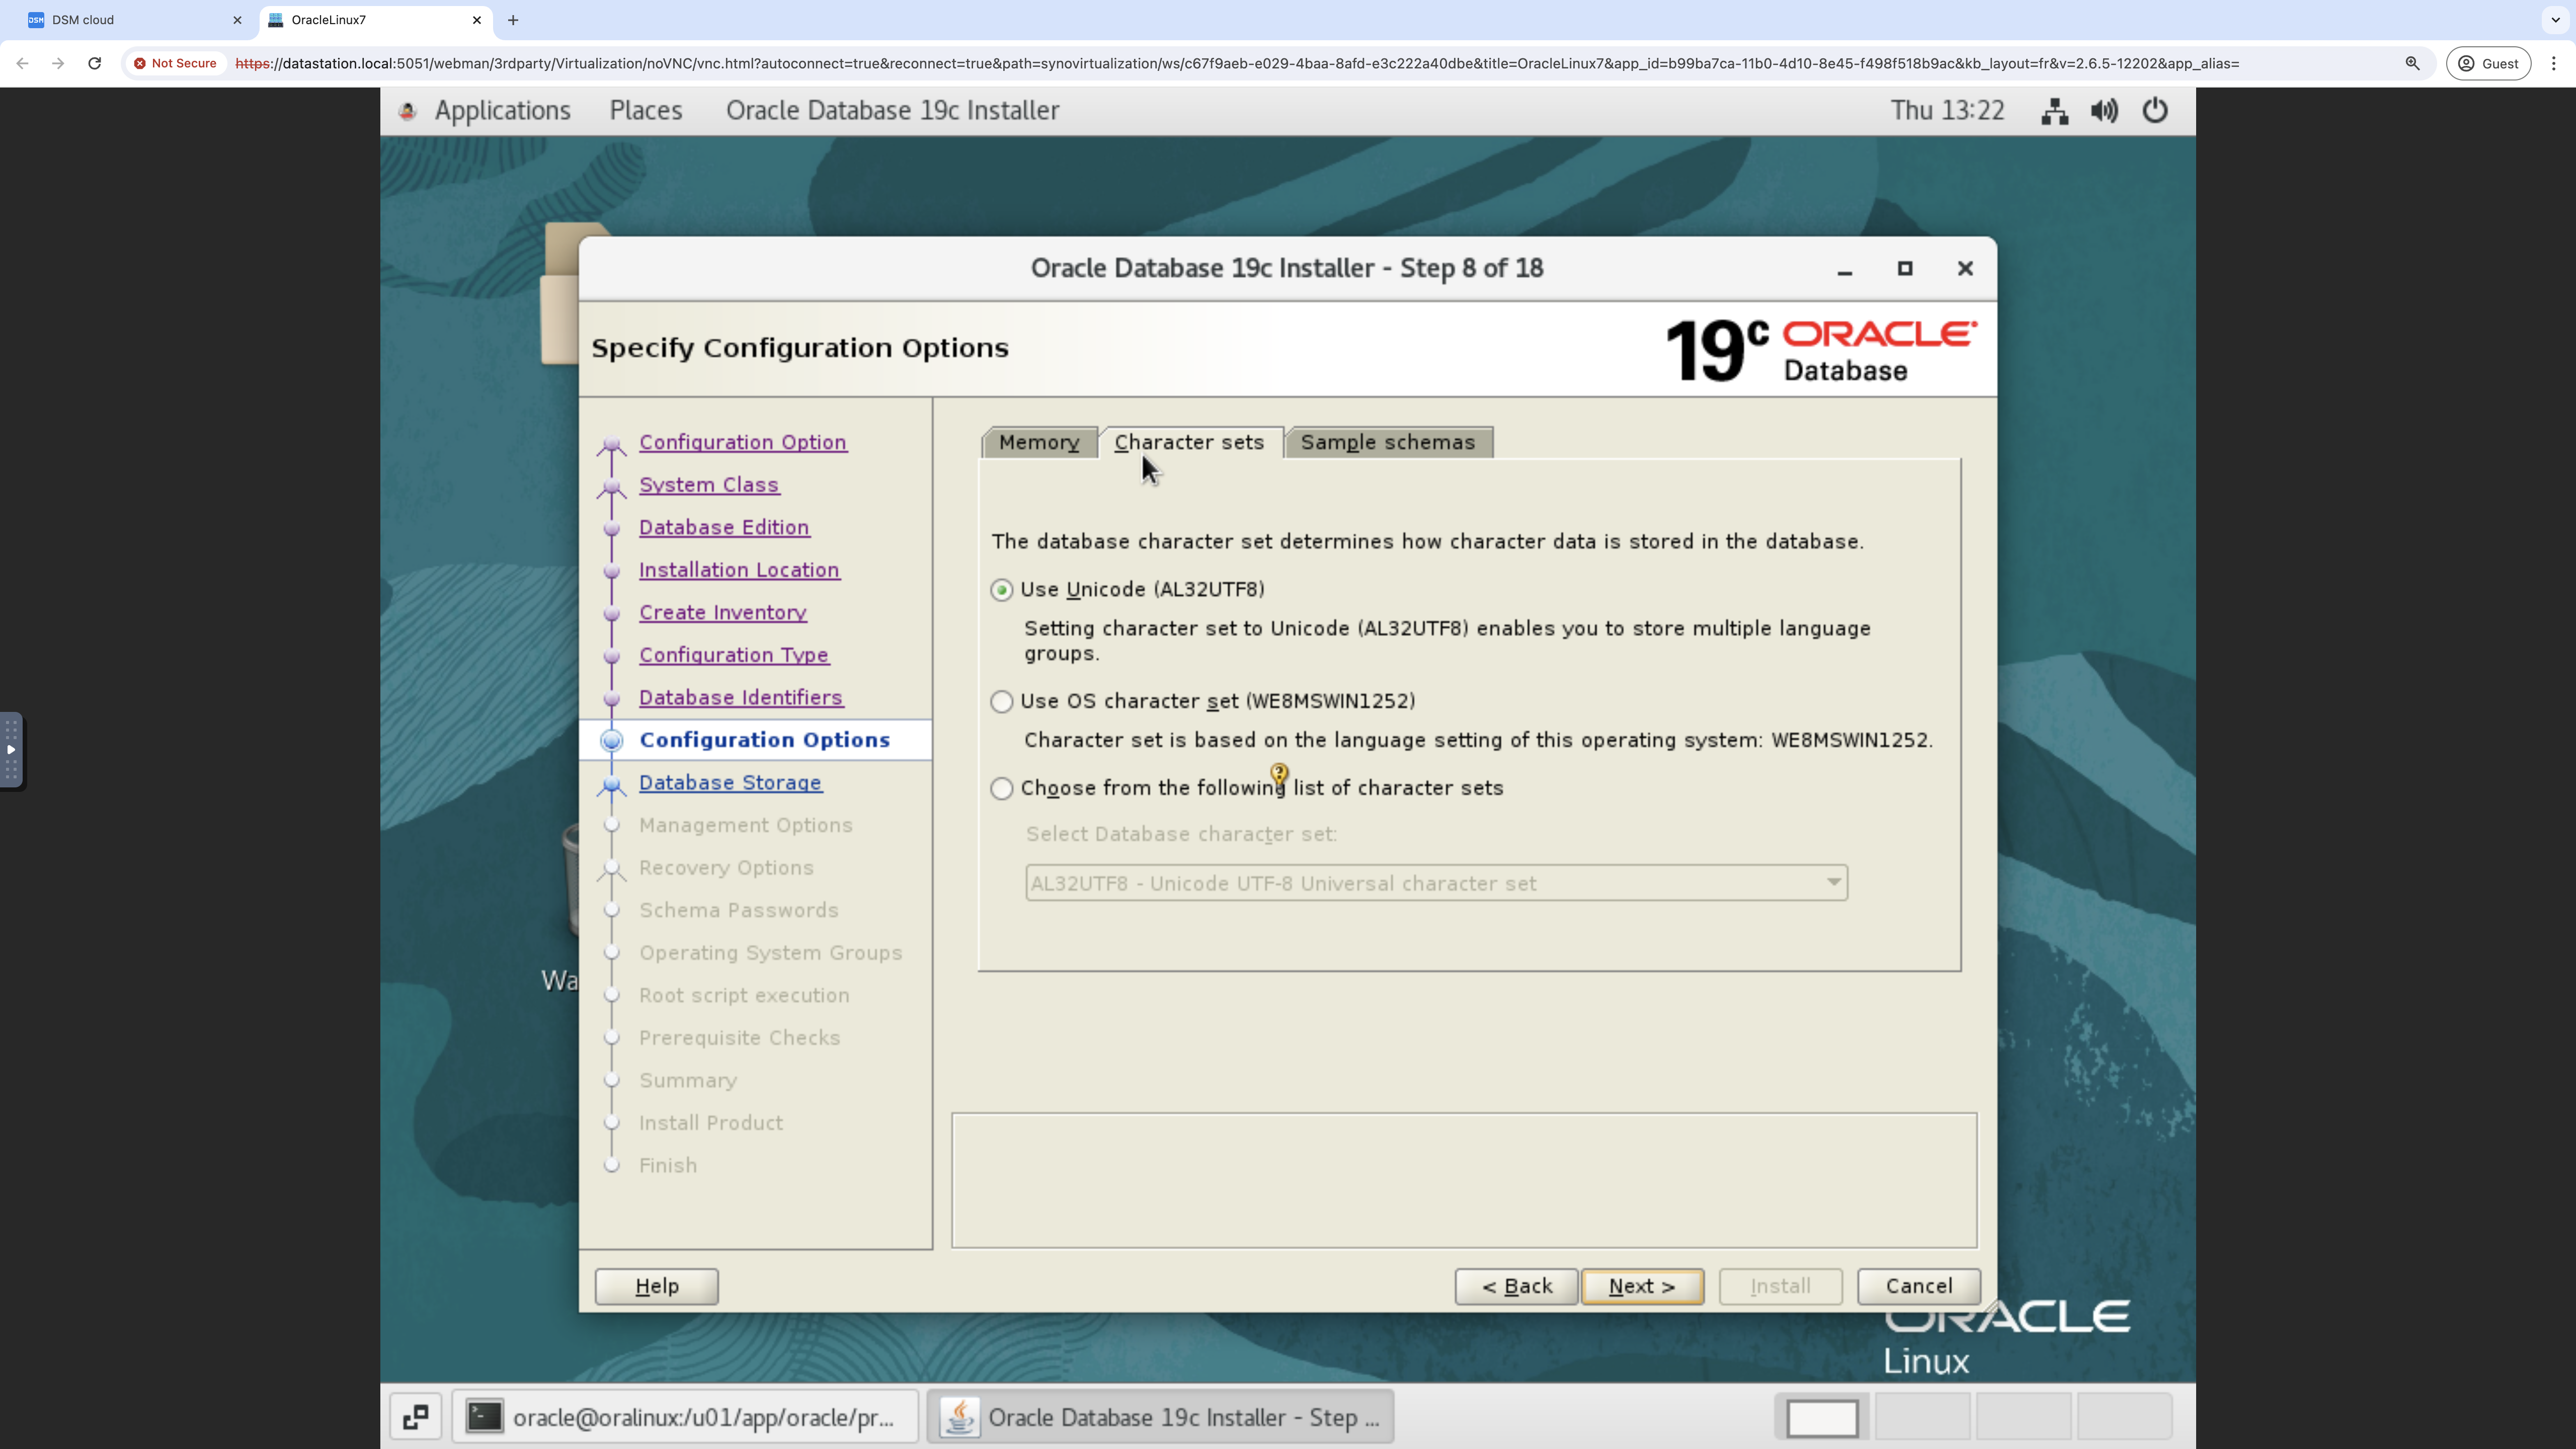
Exhibit 86: Oracle Database Installer – Select the Database Character Set
Select Install sample schemas, and then select Next.
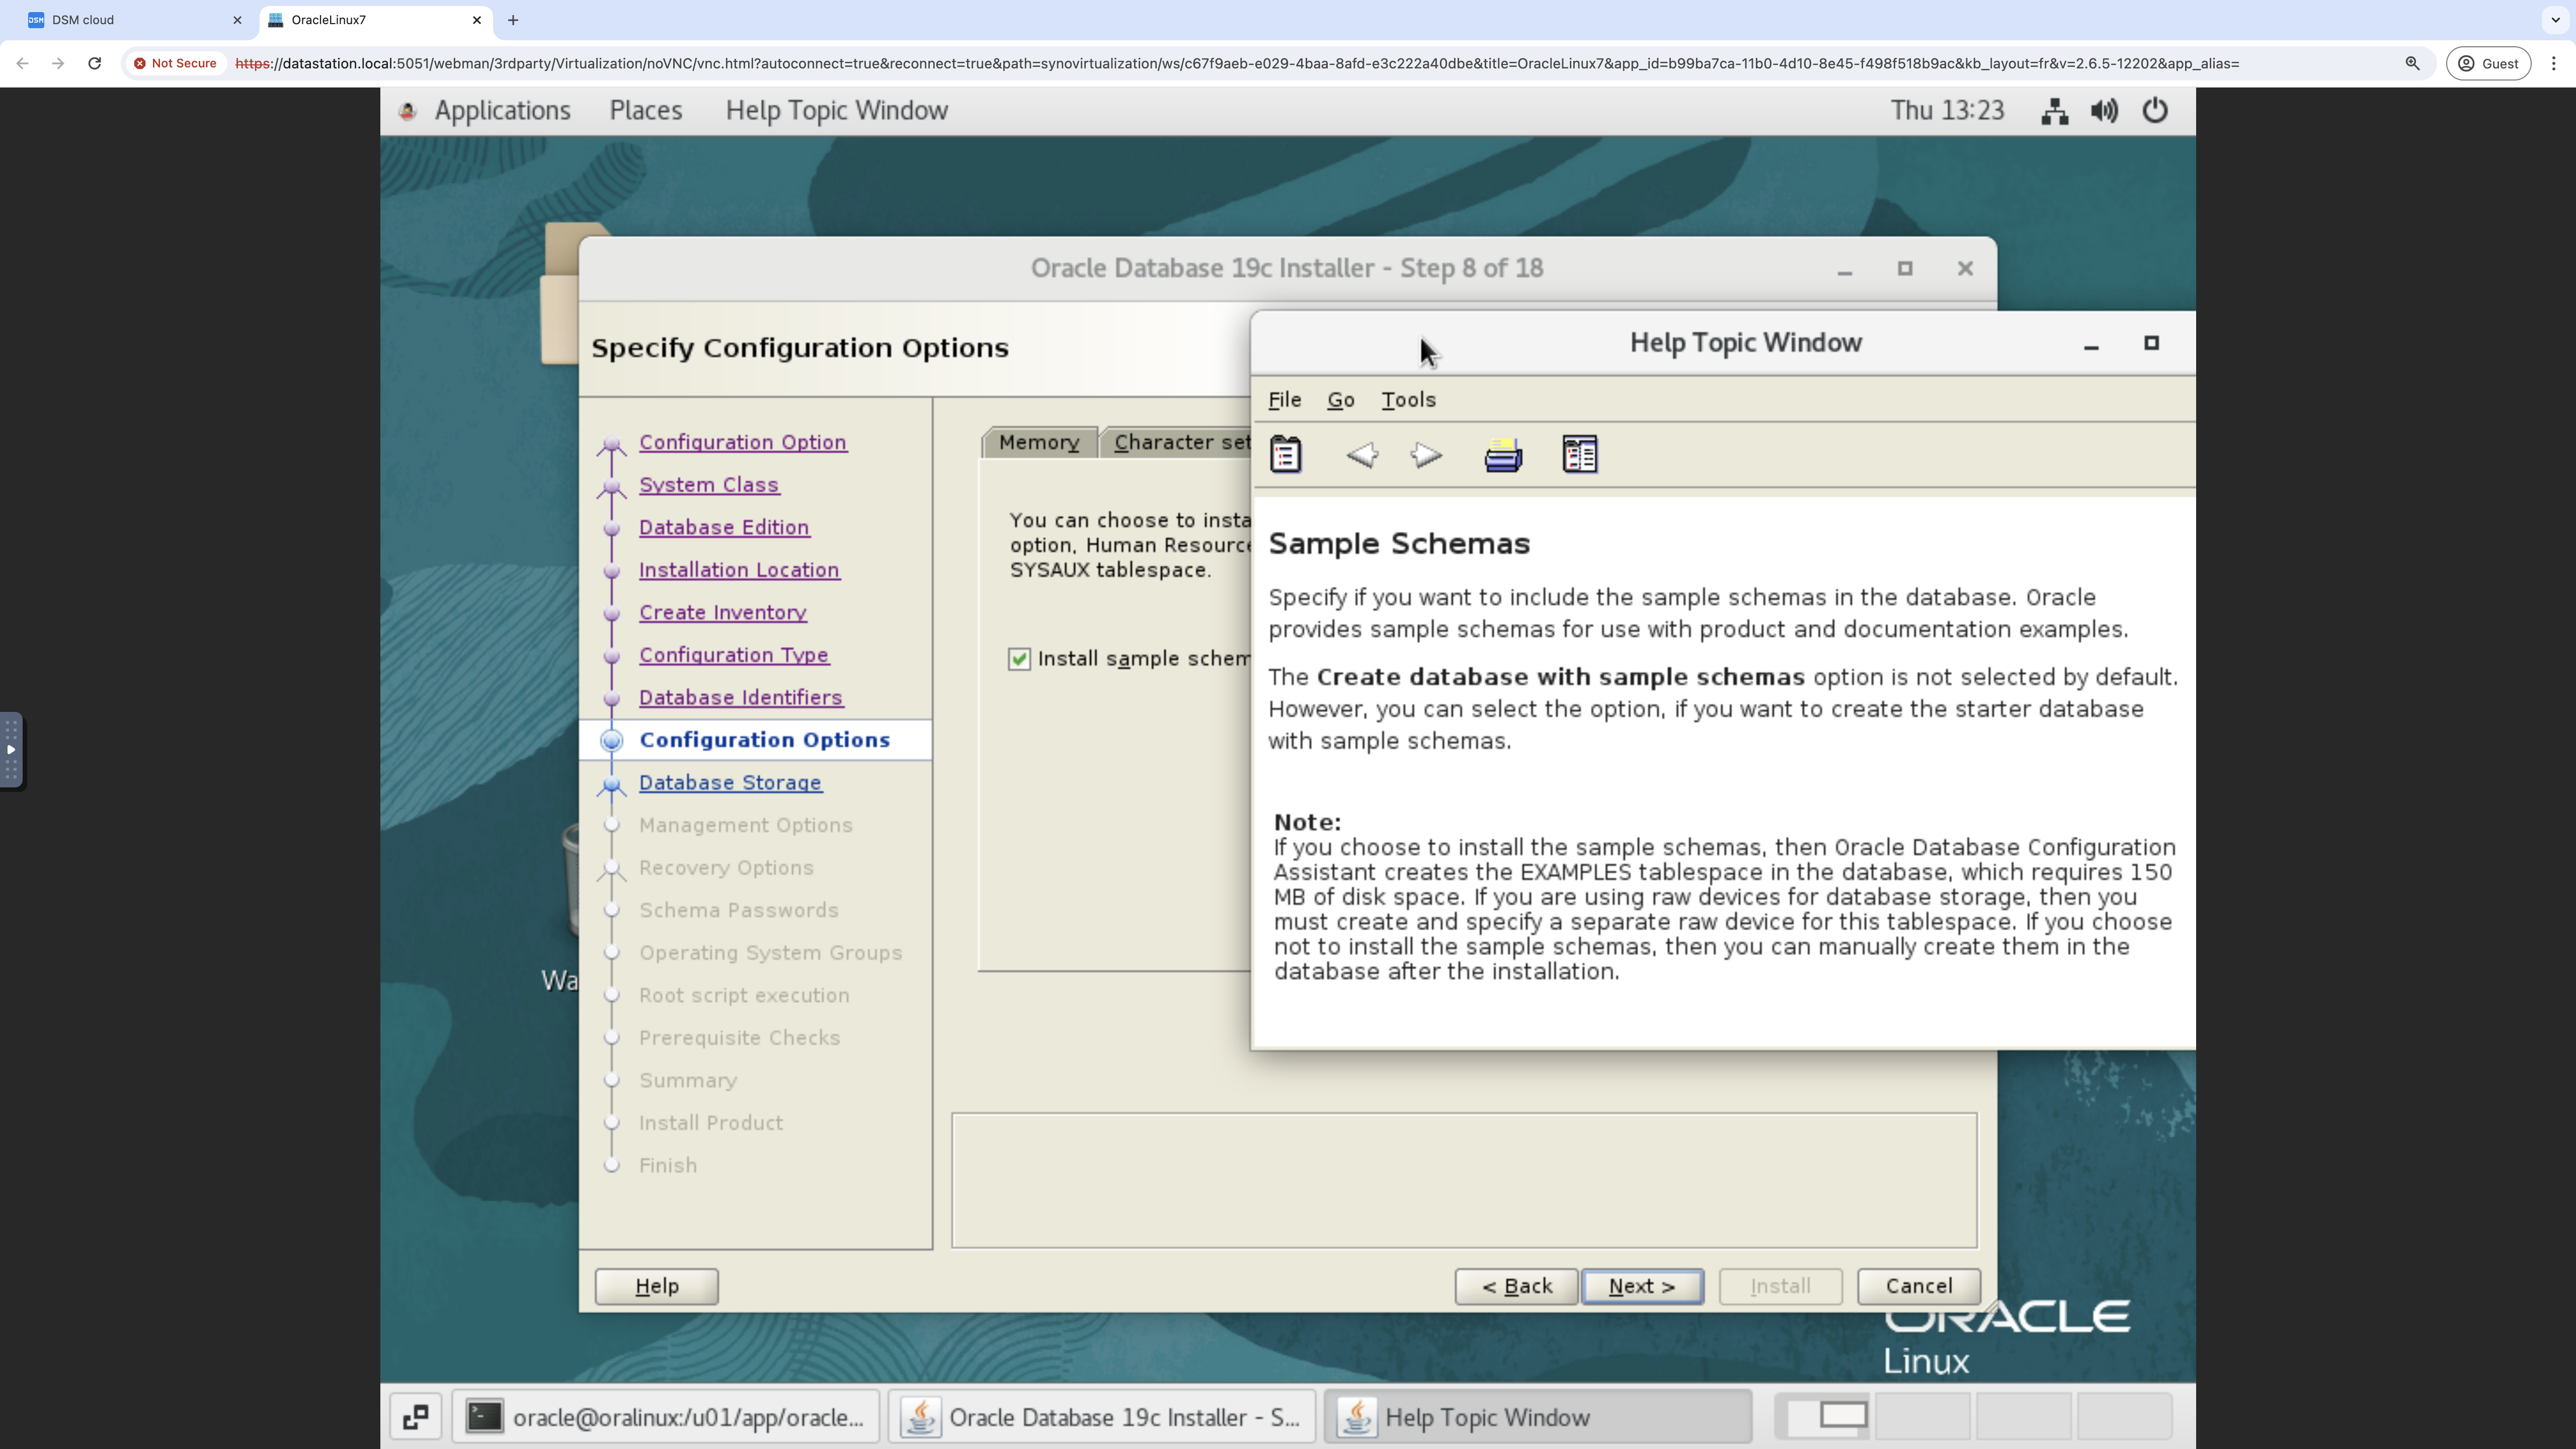
Exhibit 87: Oracle Database Installer – Configure Sample Schemas
Select File System, specify the database file location, and then select Next.
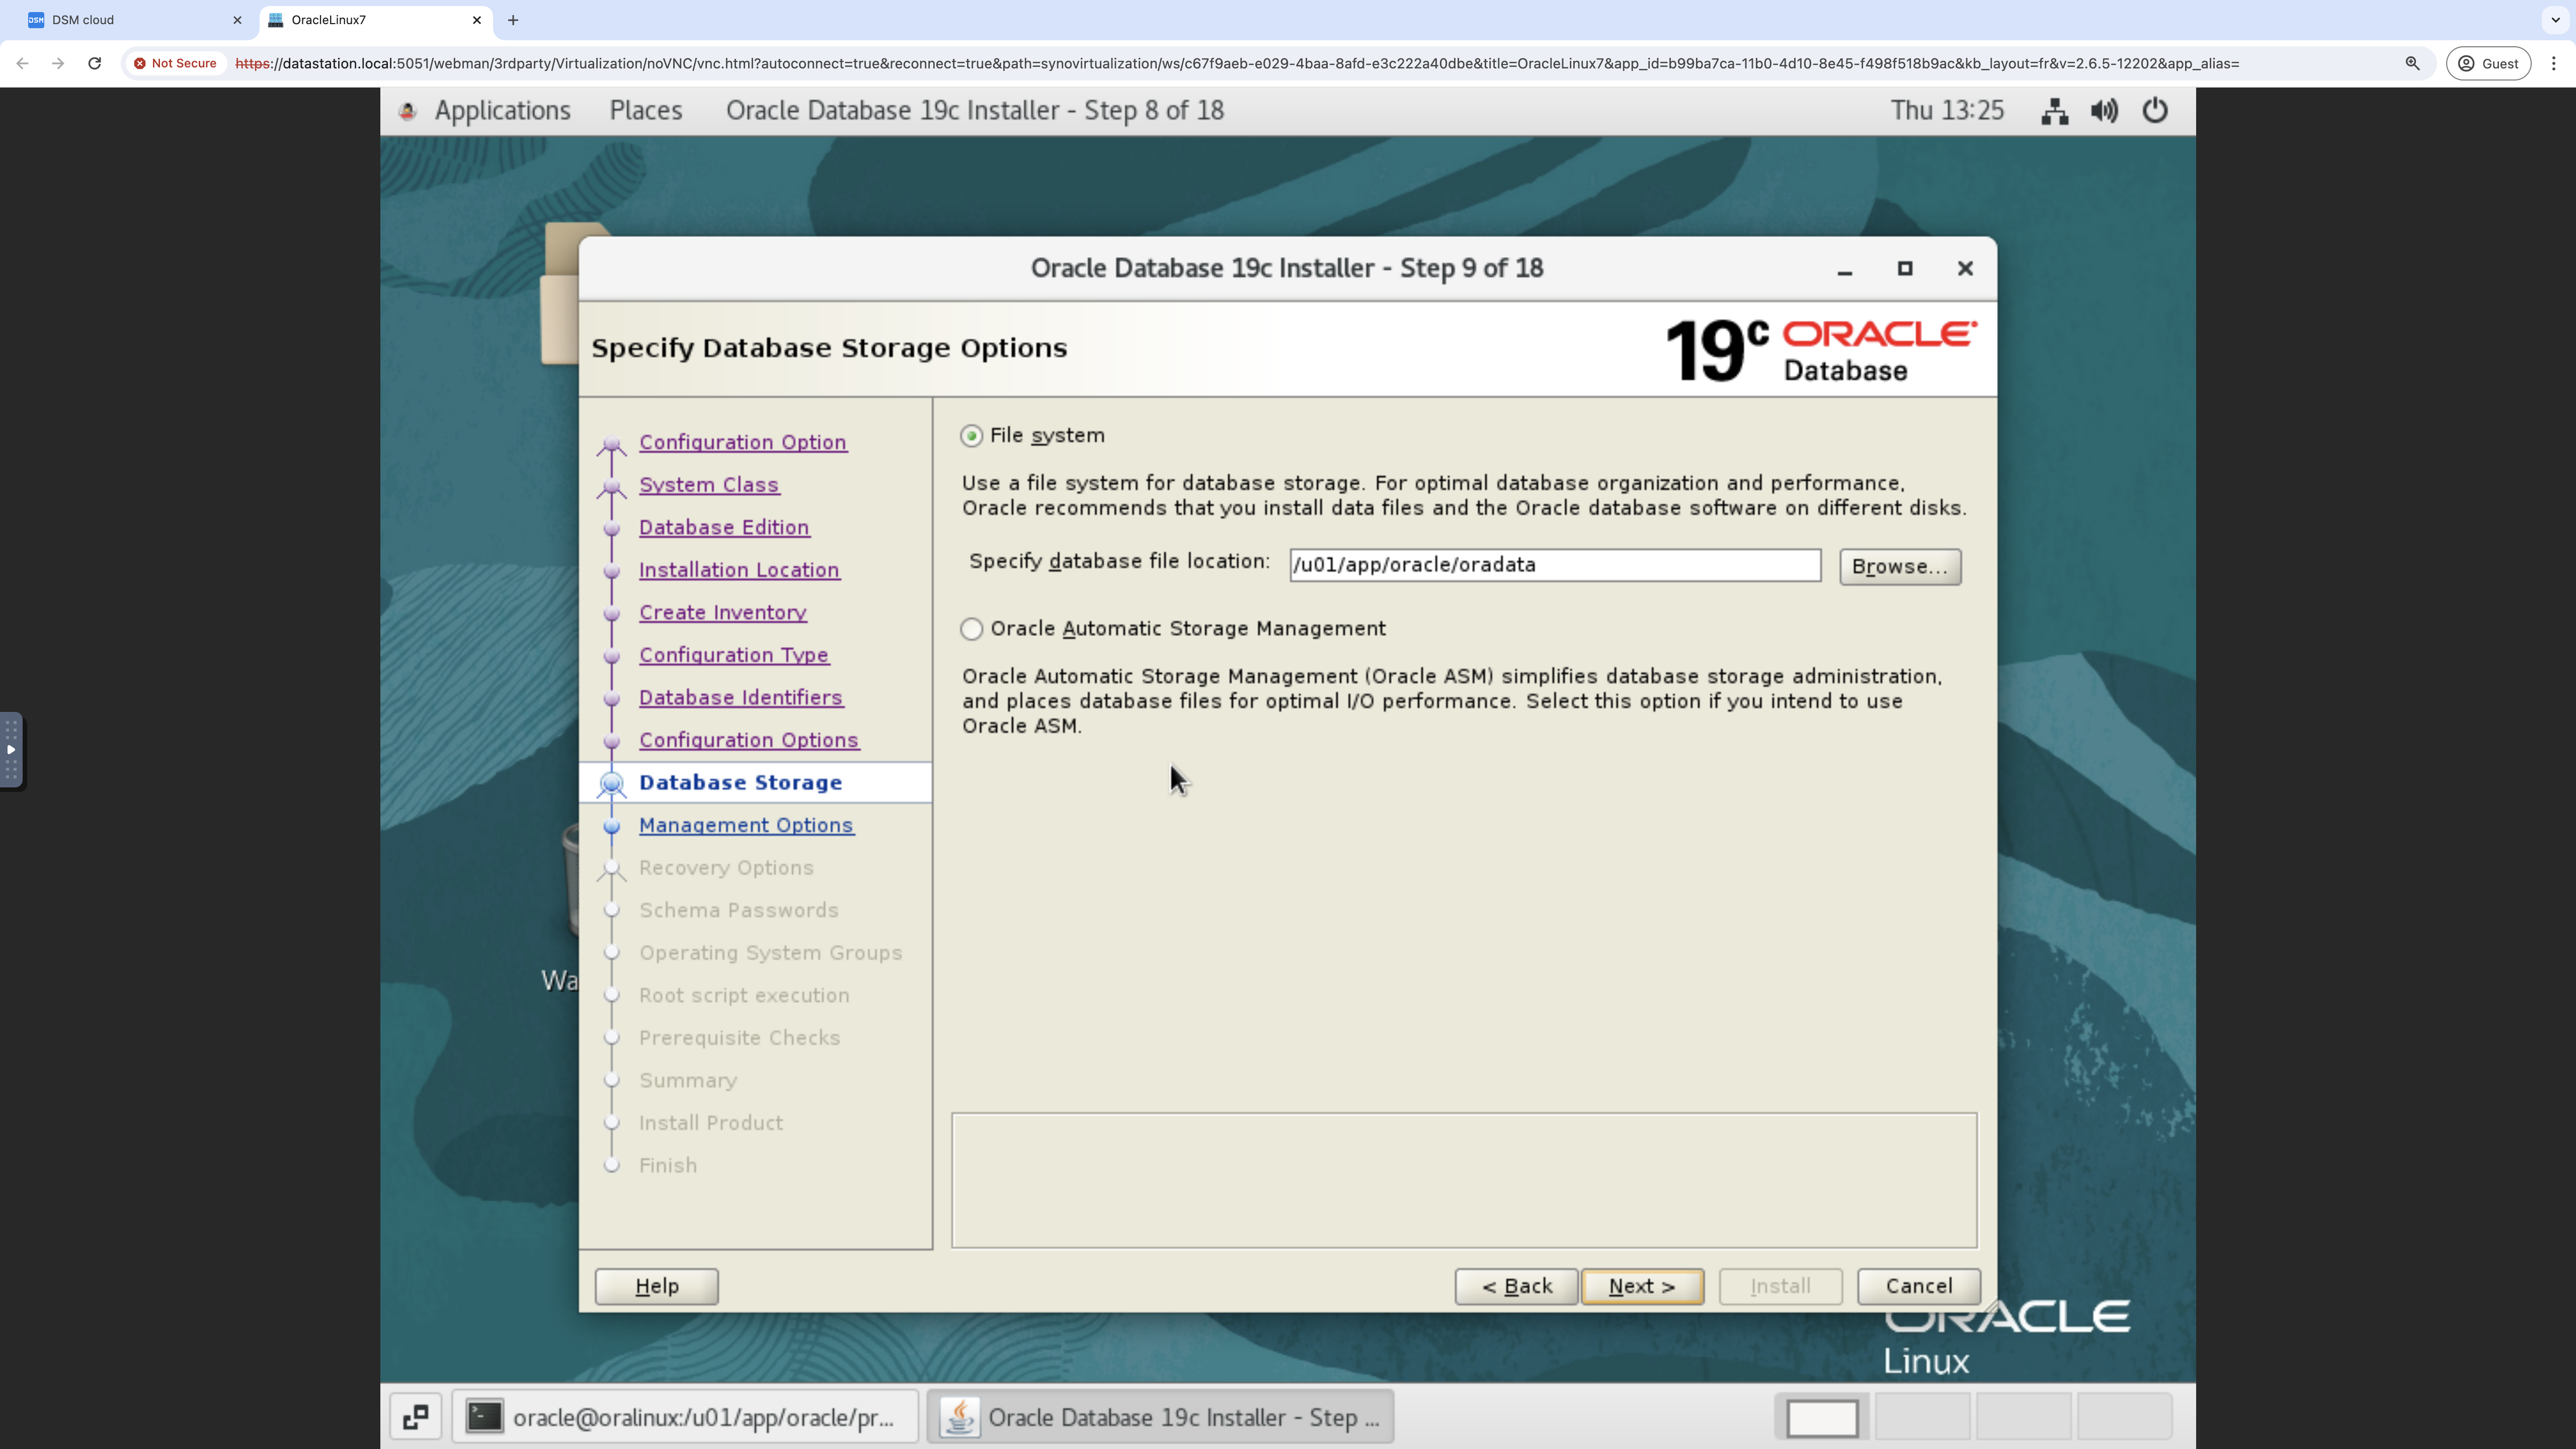
Exhibit 88: Oracle Database Installer – Select the Datafile Location
Registration with Enterprise Manager Cloud Control is optional. Leave the option unselected, and then select Next.
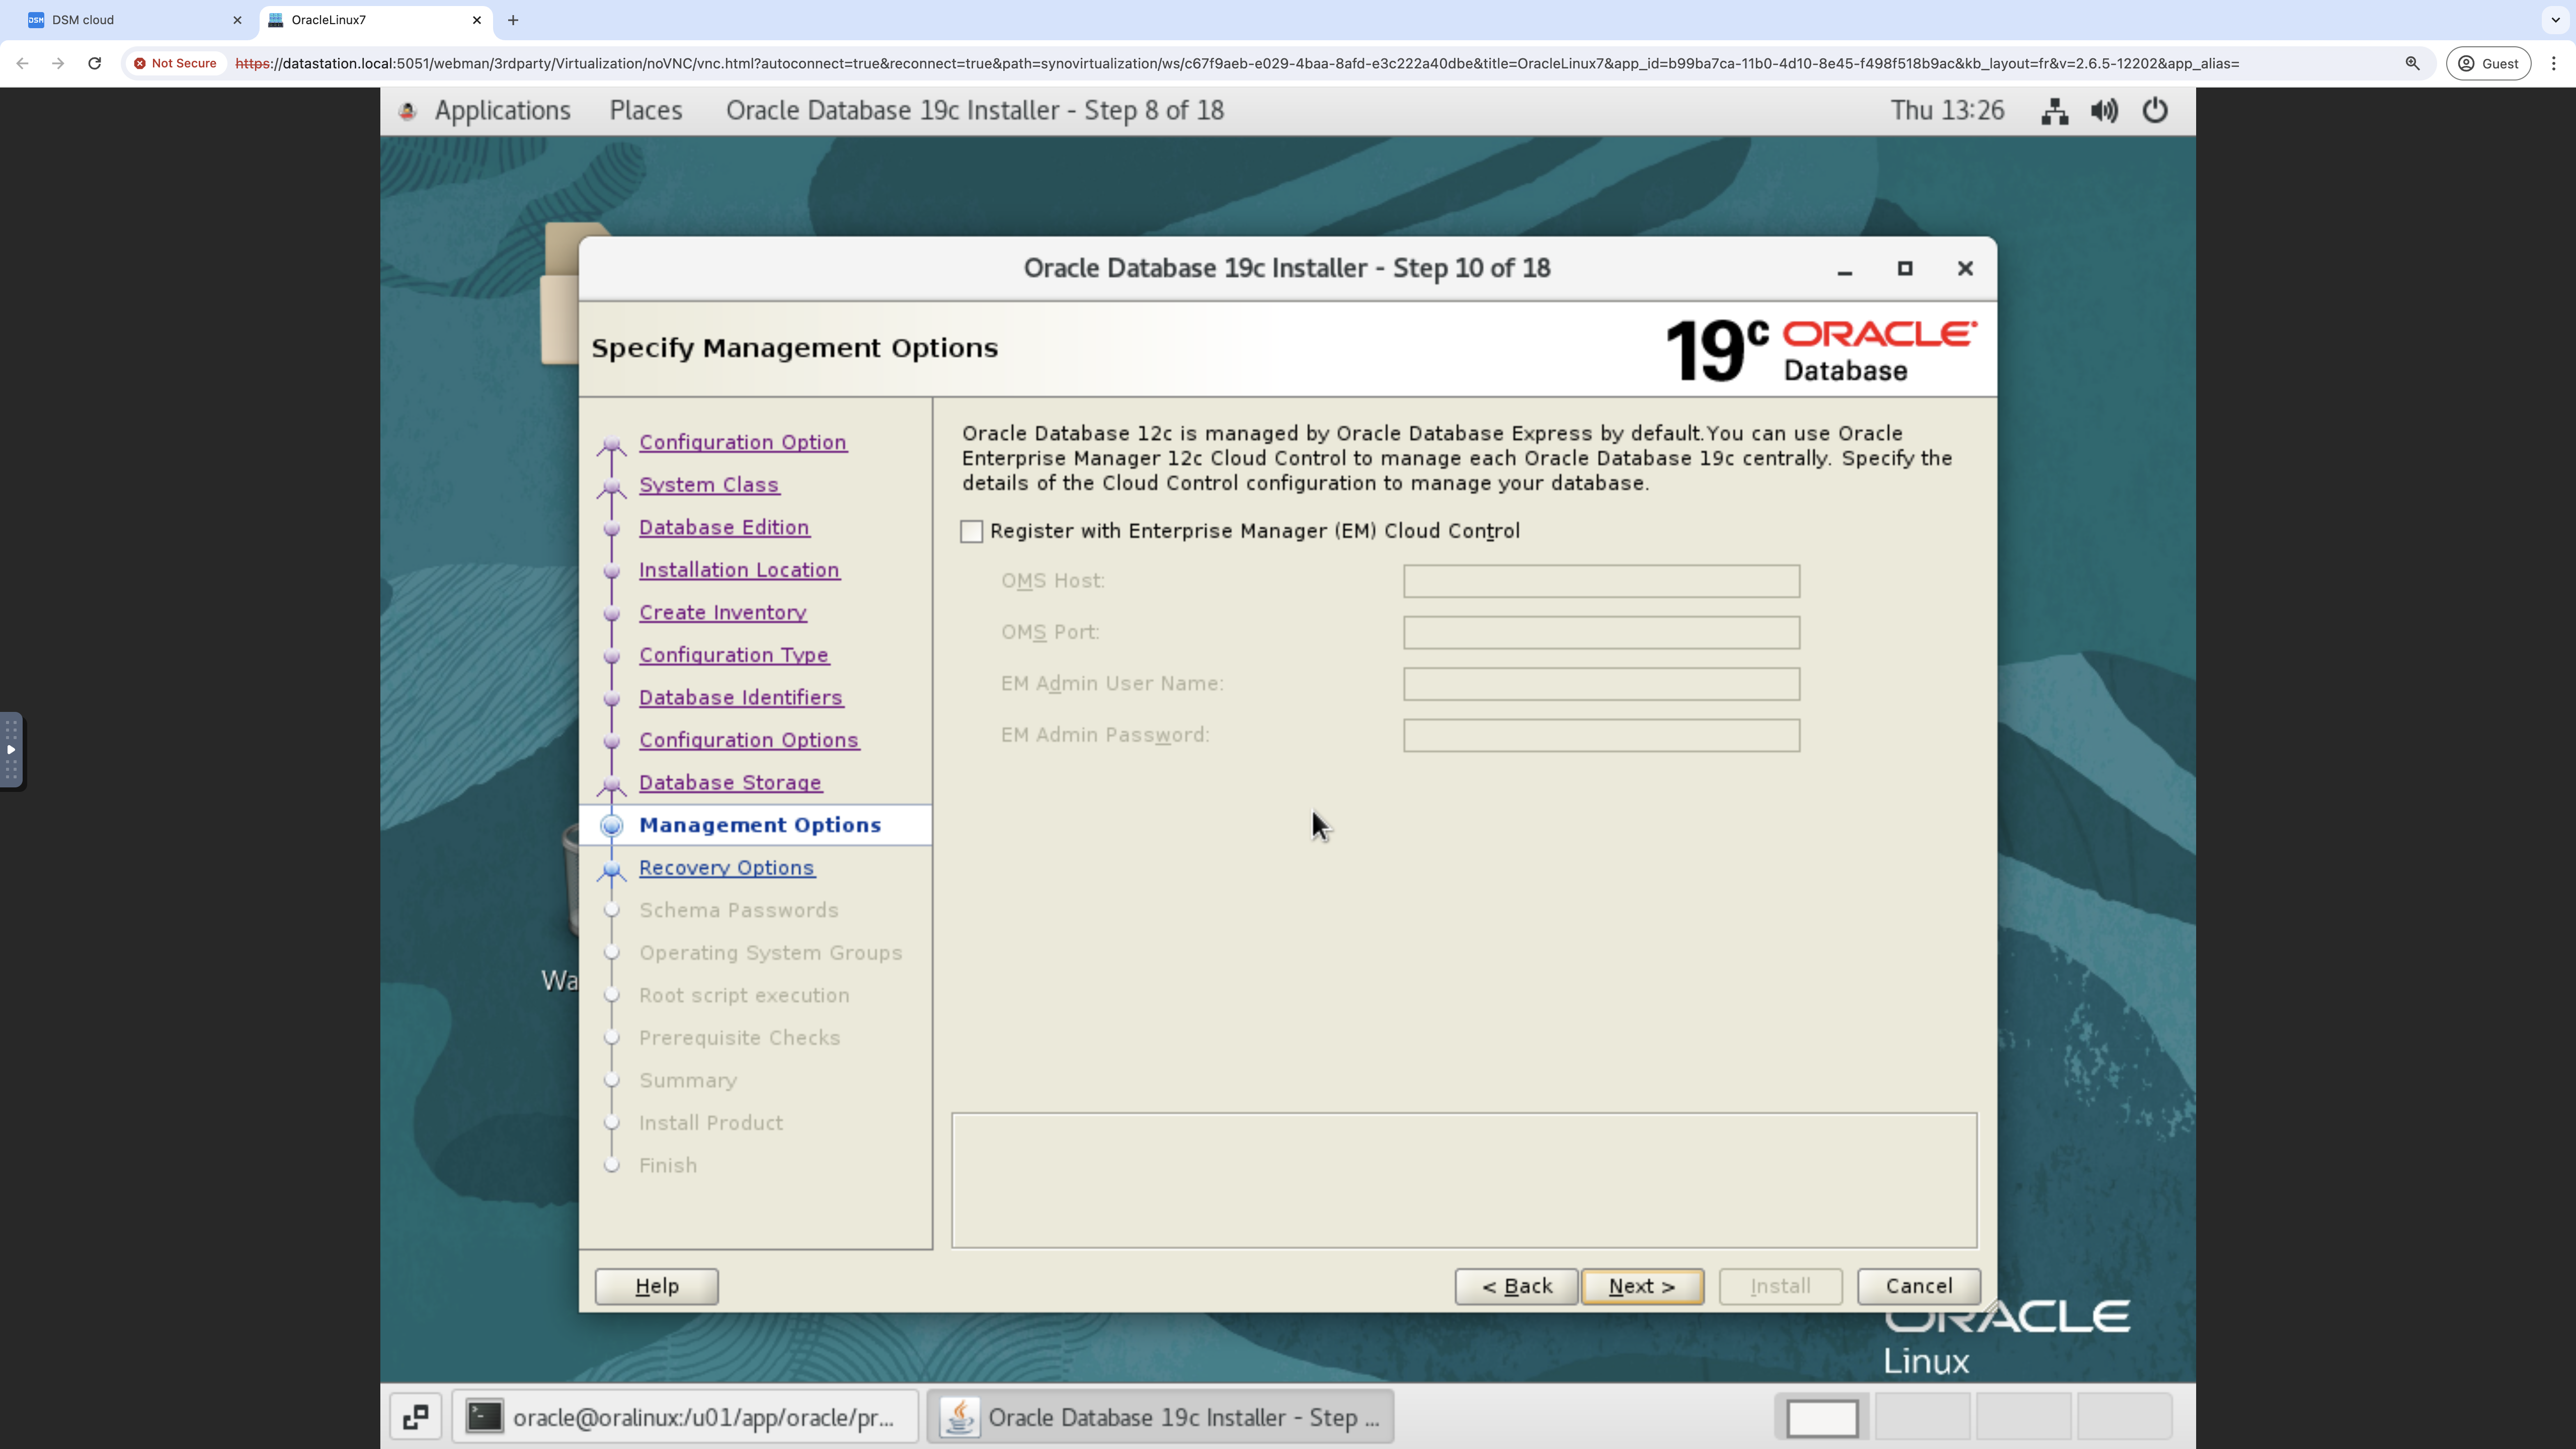
Exhibit 89: Oracle Database Installer – Configure Management Options
Select Enable Recovery and File System, provide the recovery-area path, and then select Next.
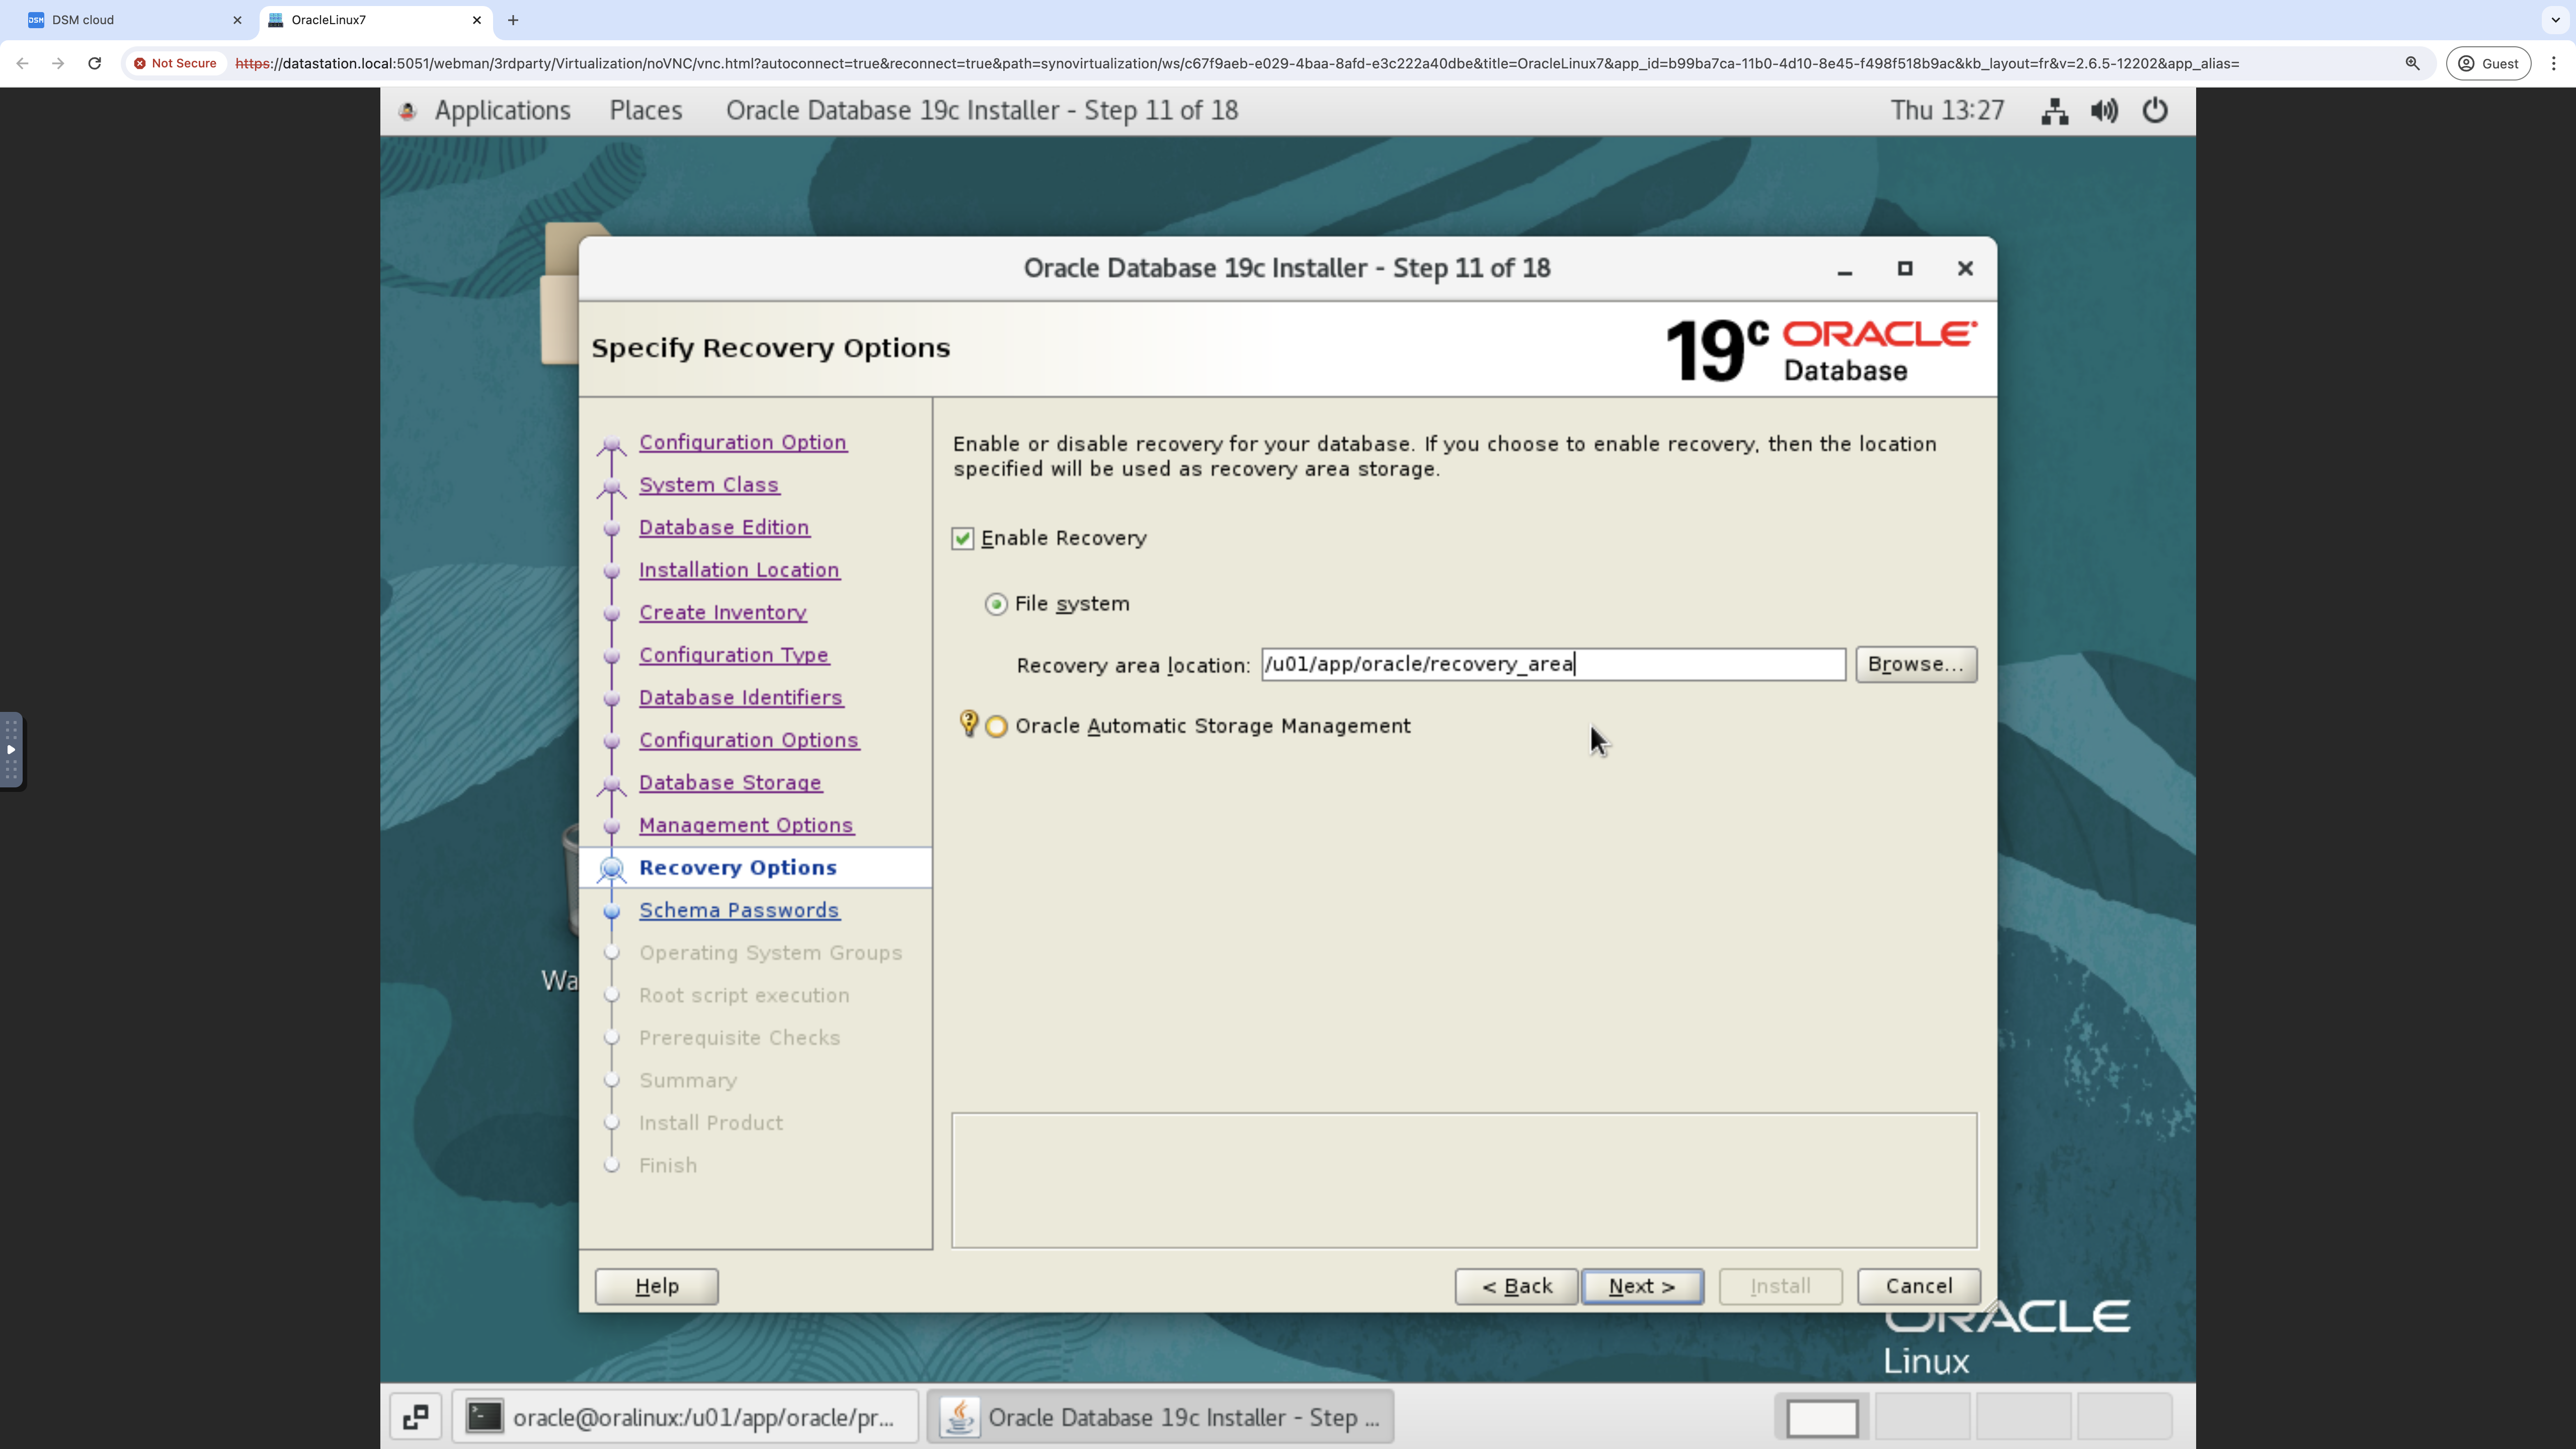
Exhibit 90: Oracle Database Installer – Configure Recovery Options
Select the option Use the same password for all accounts, and then select Next.
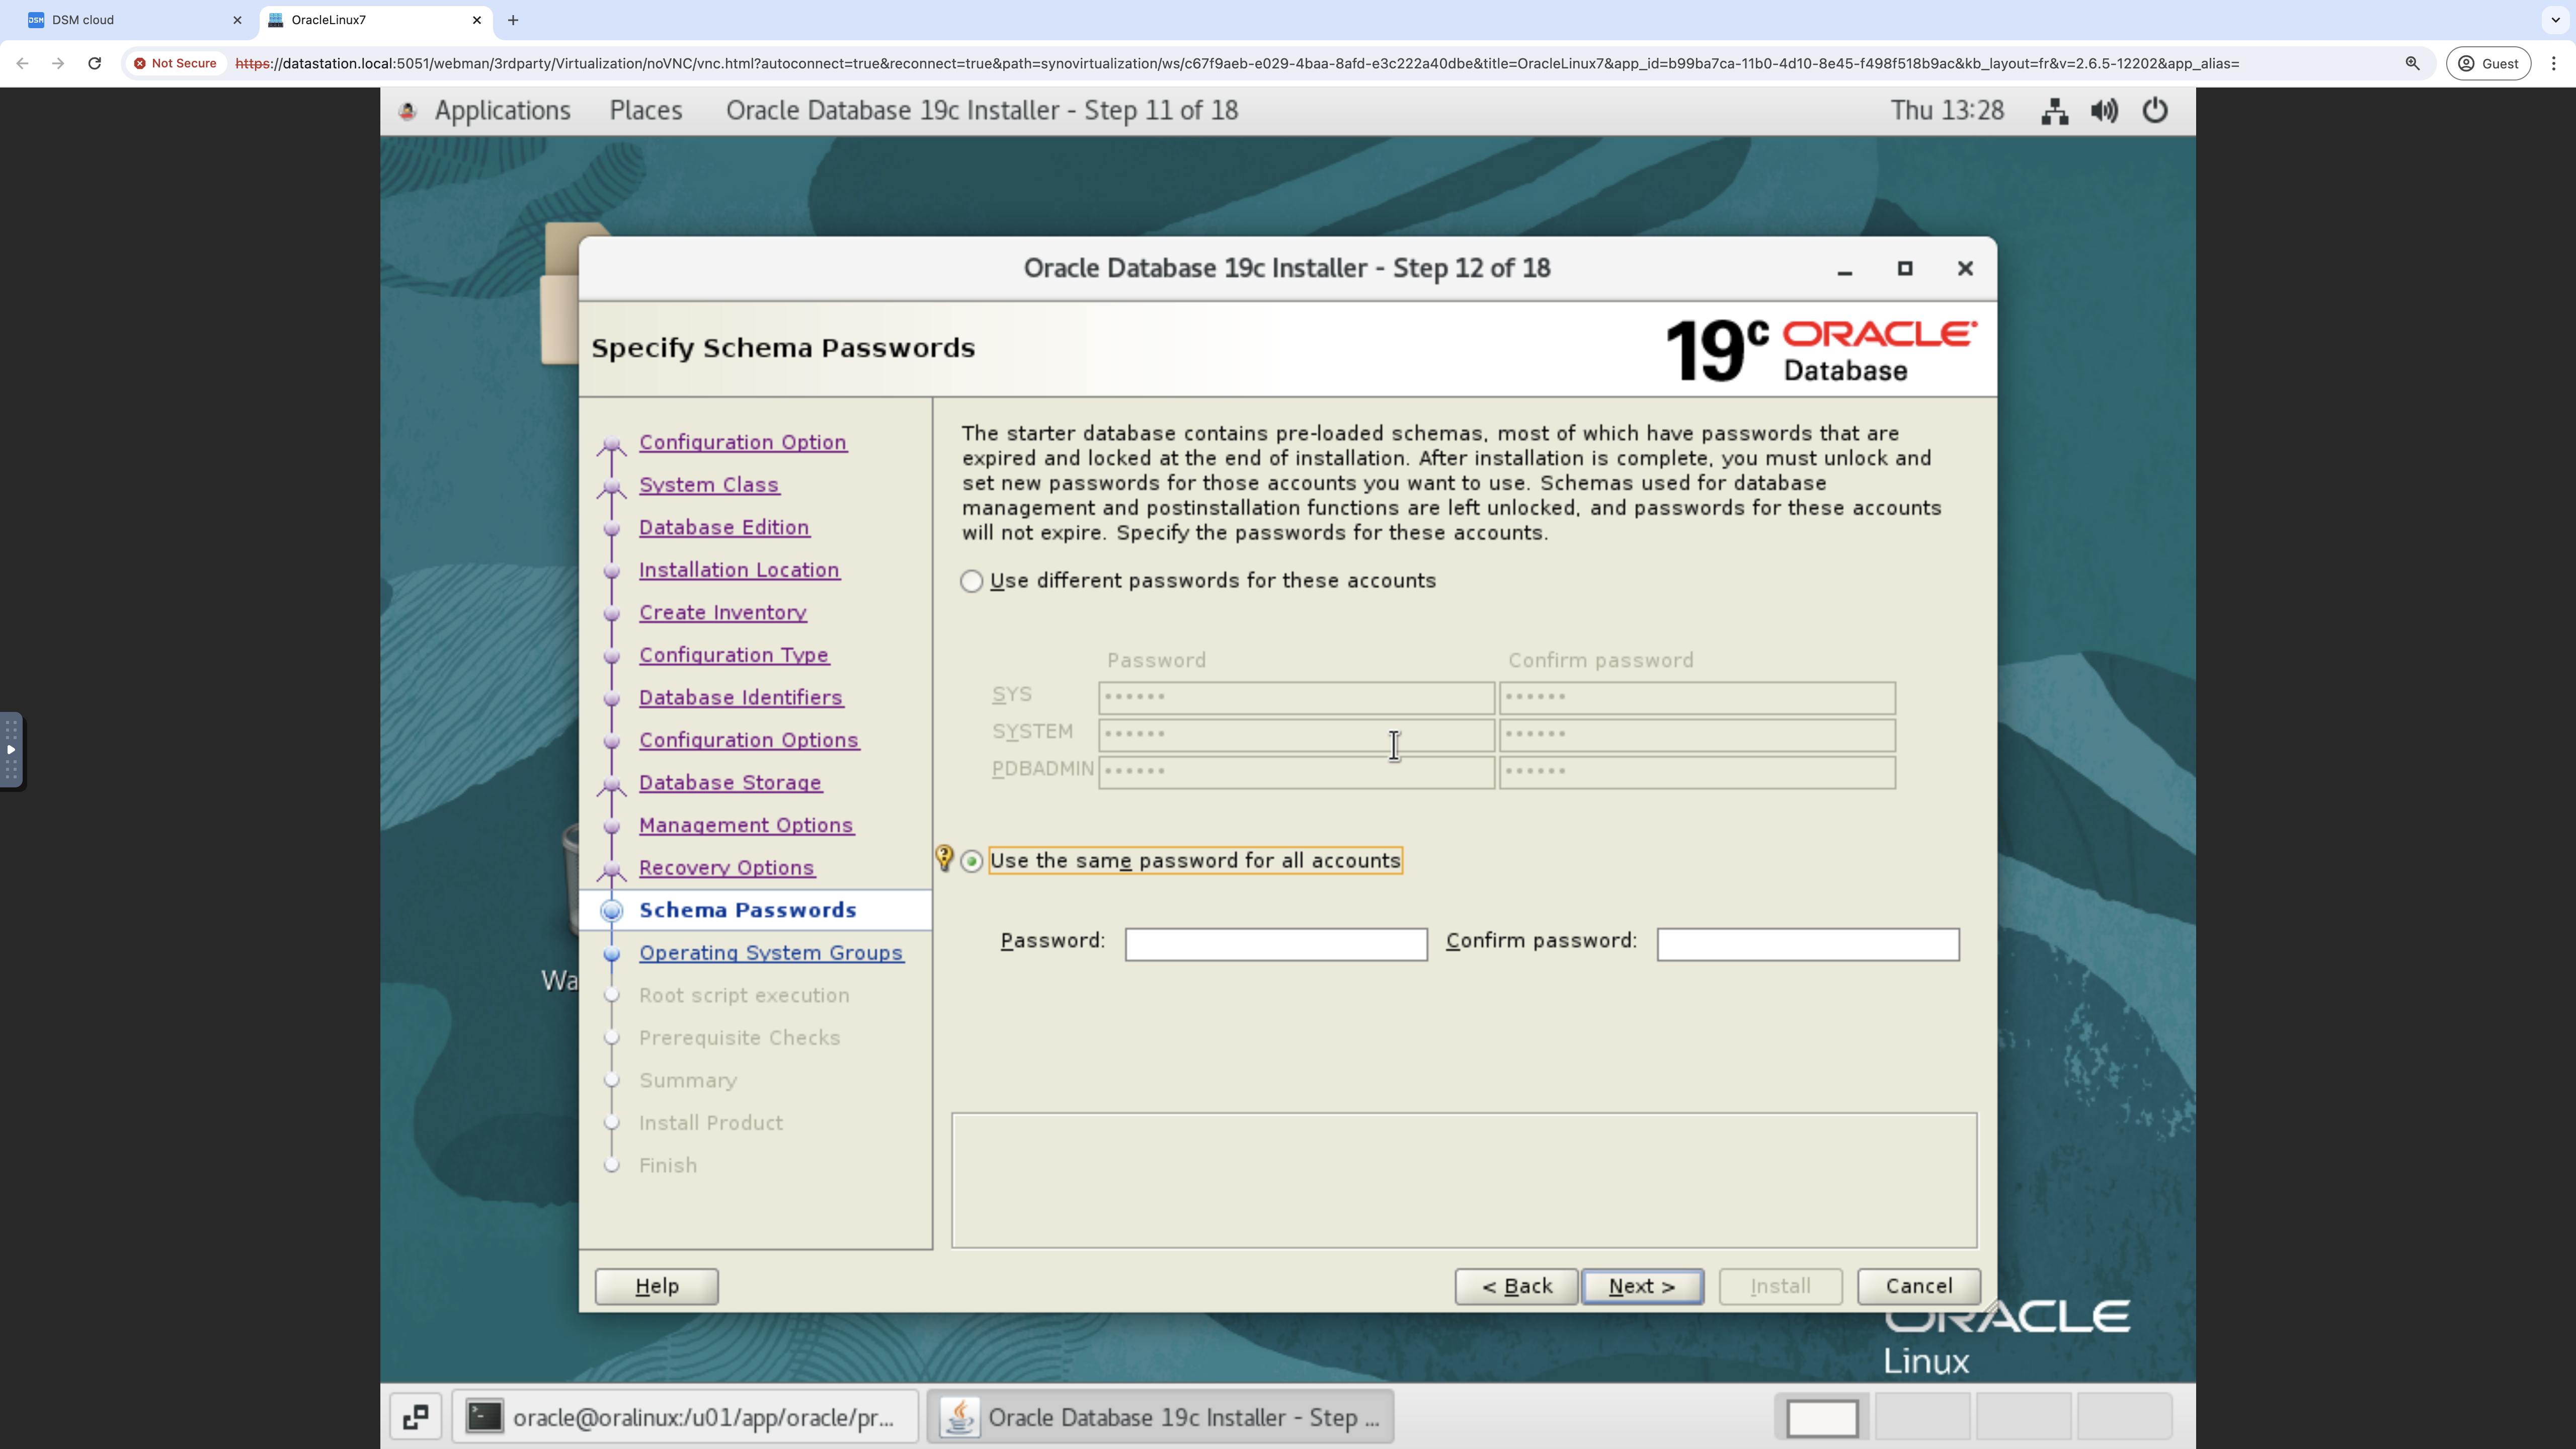
Exhibit 91: Oracle Database Installer – Set Schema Passwords
Provide the privileged operating-system groups shown in the screenshot. Then select Next.
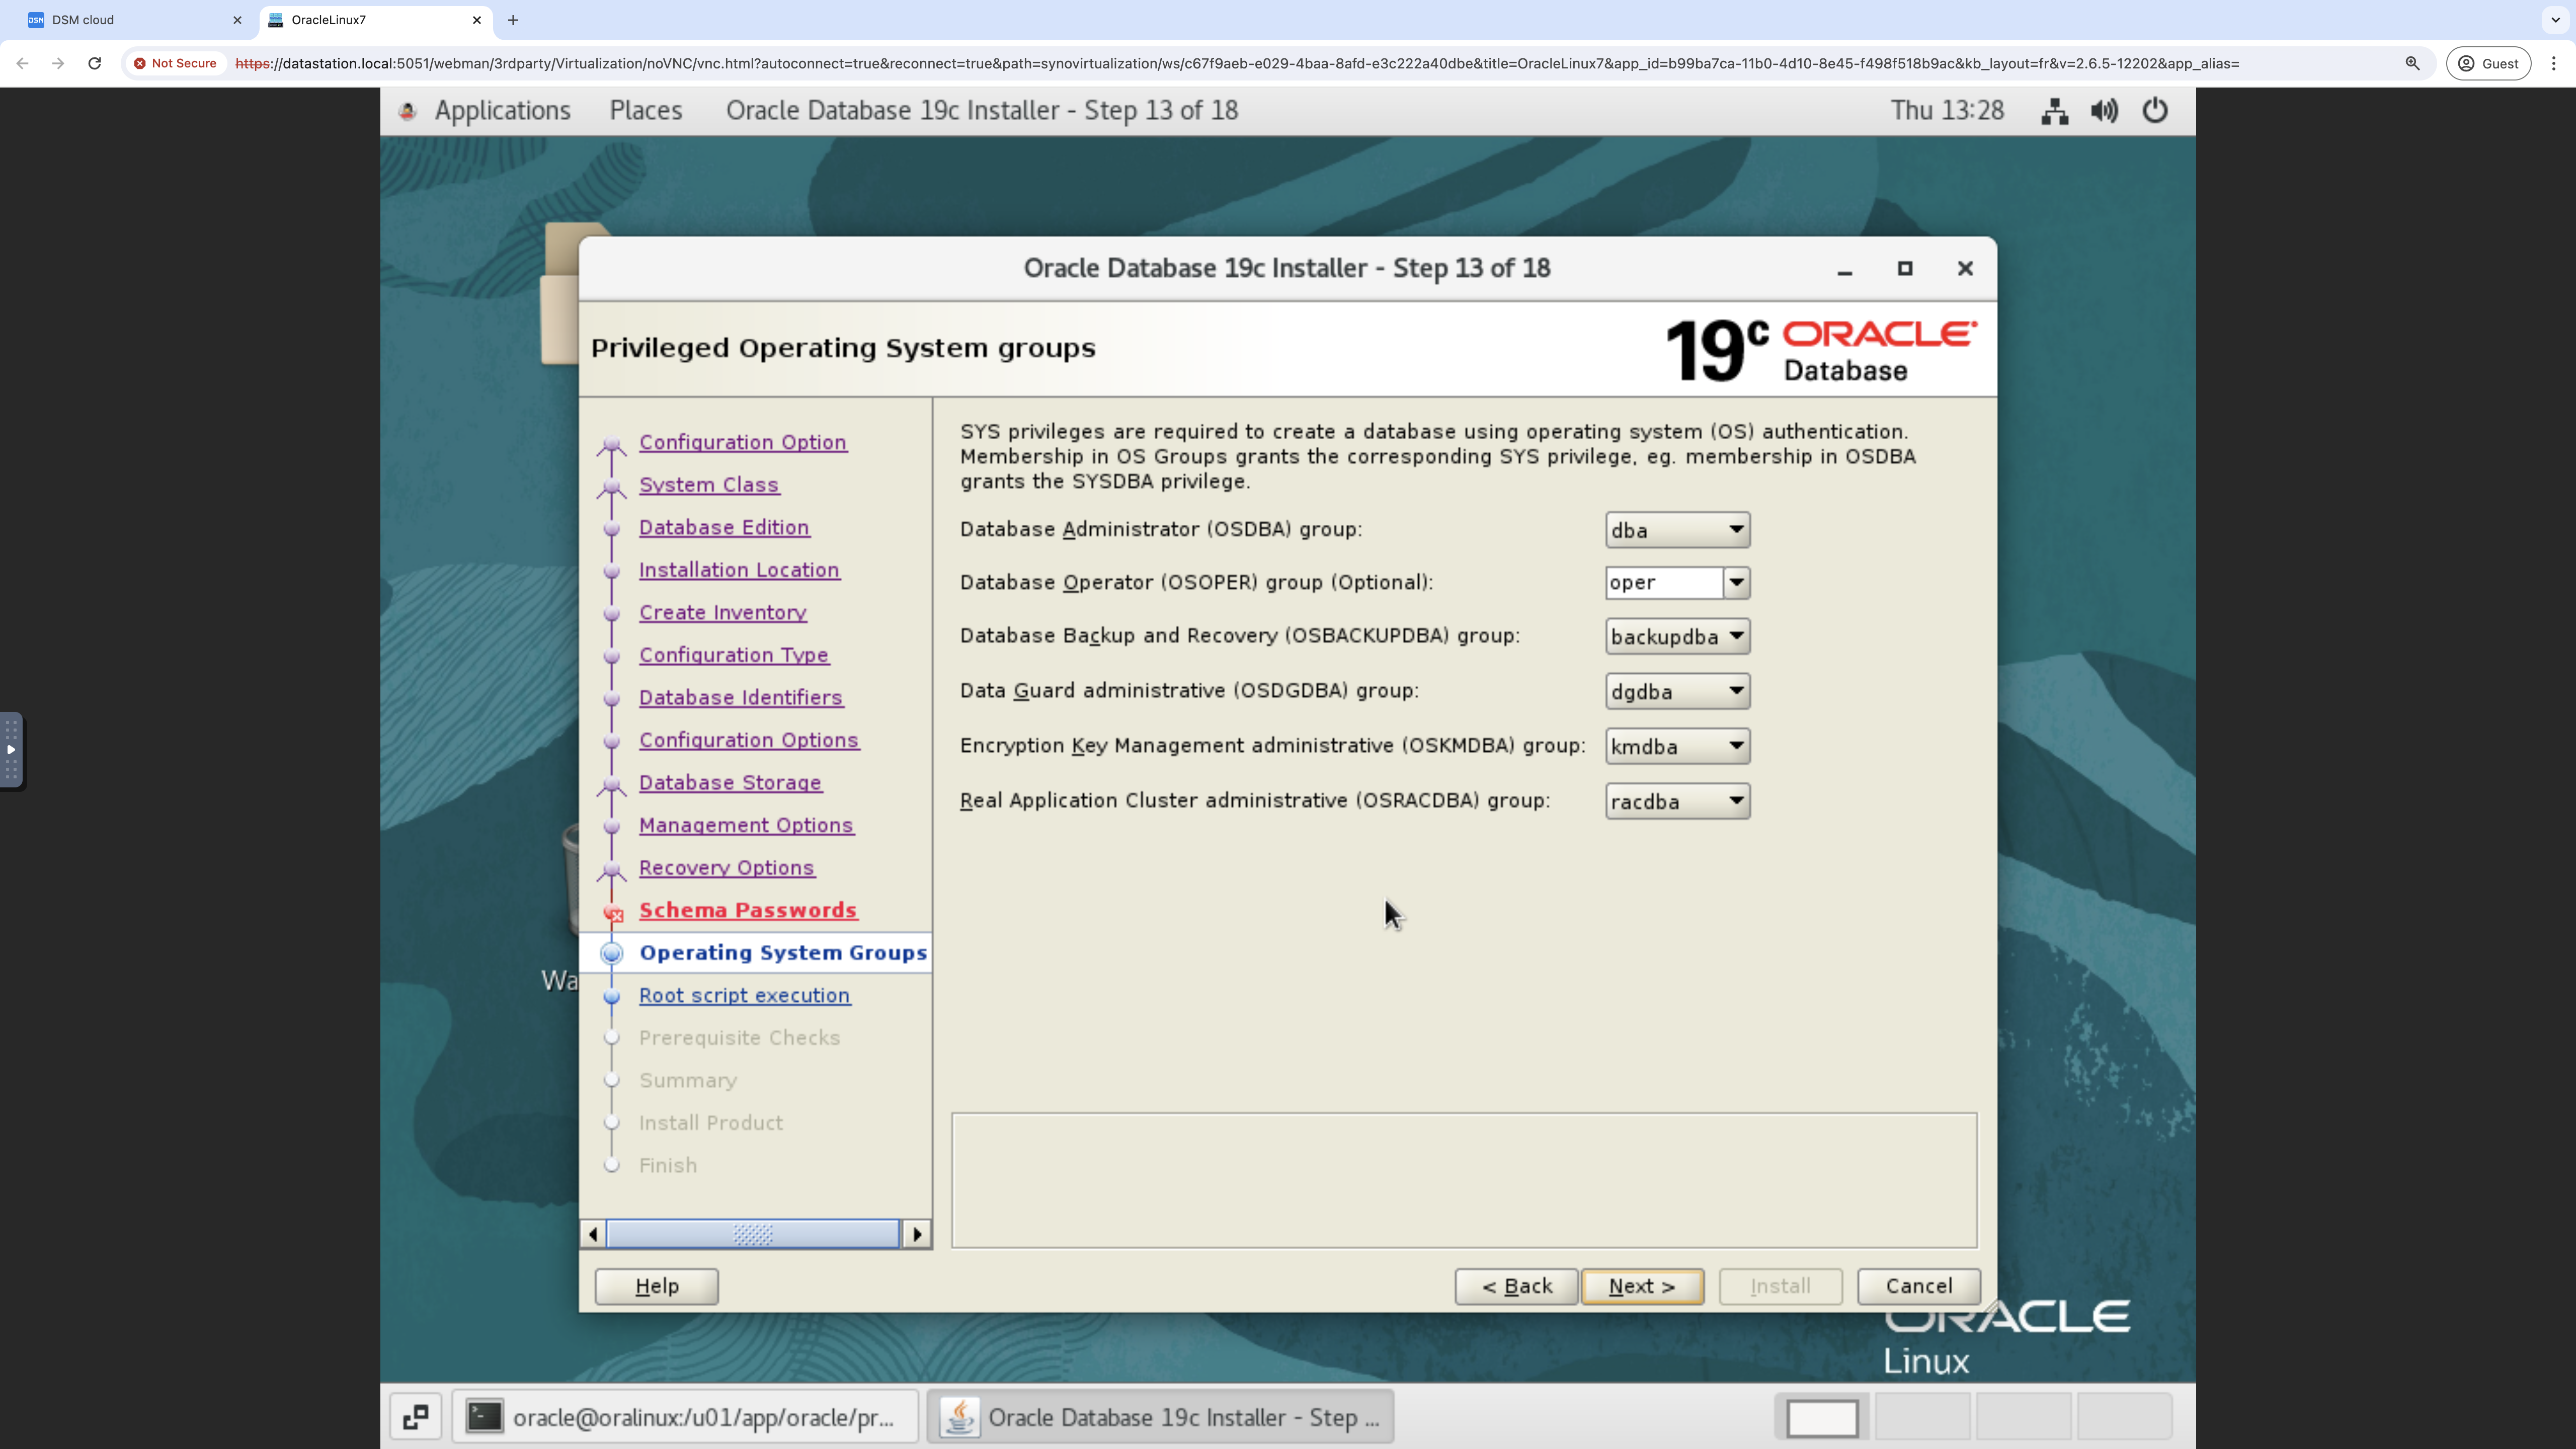
Exhibit 92: Oracle Database Installer – Select Operating System Groups
For root-script execution, select Automatically run configuration scripts and Use sudo. Provide the path to sudo and the password, and then select Next.
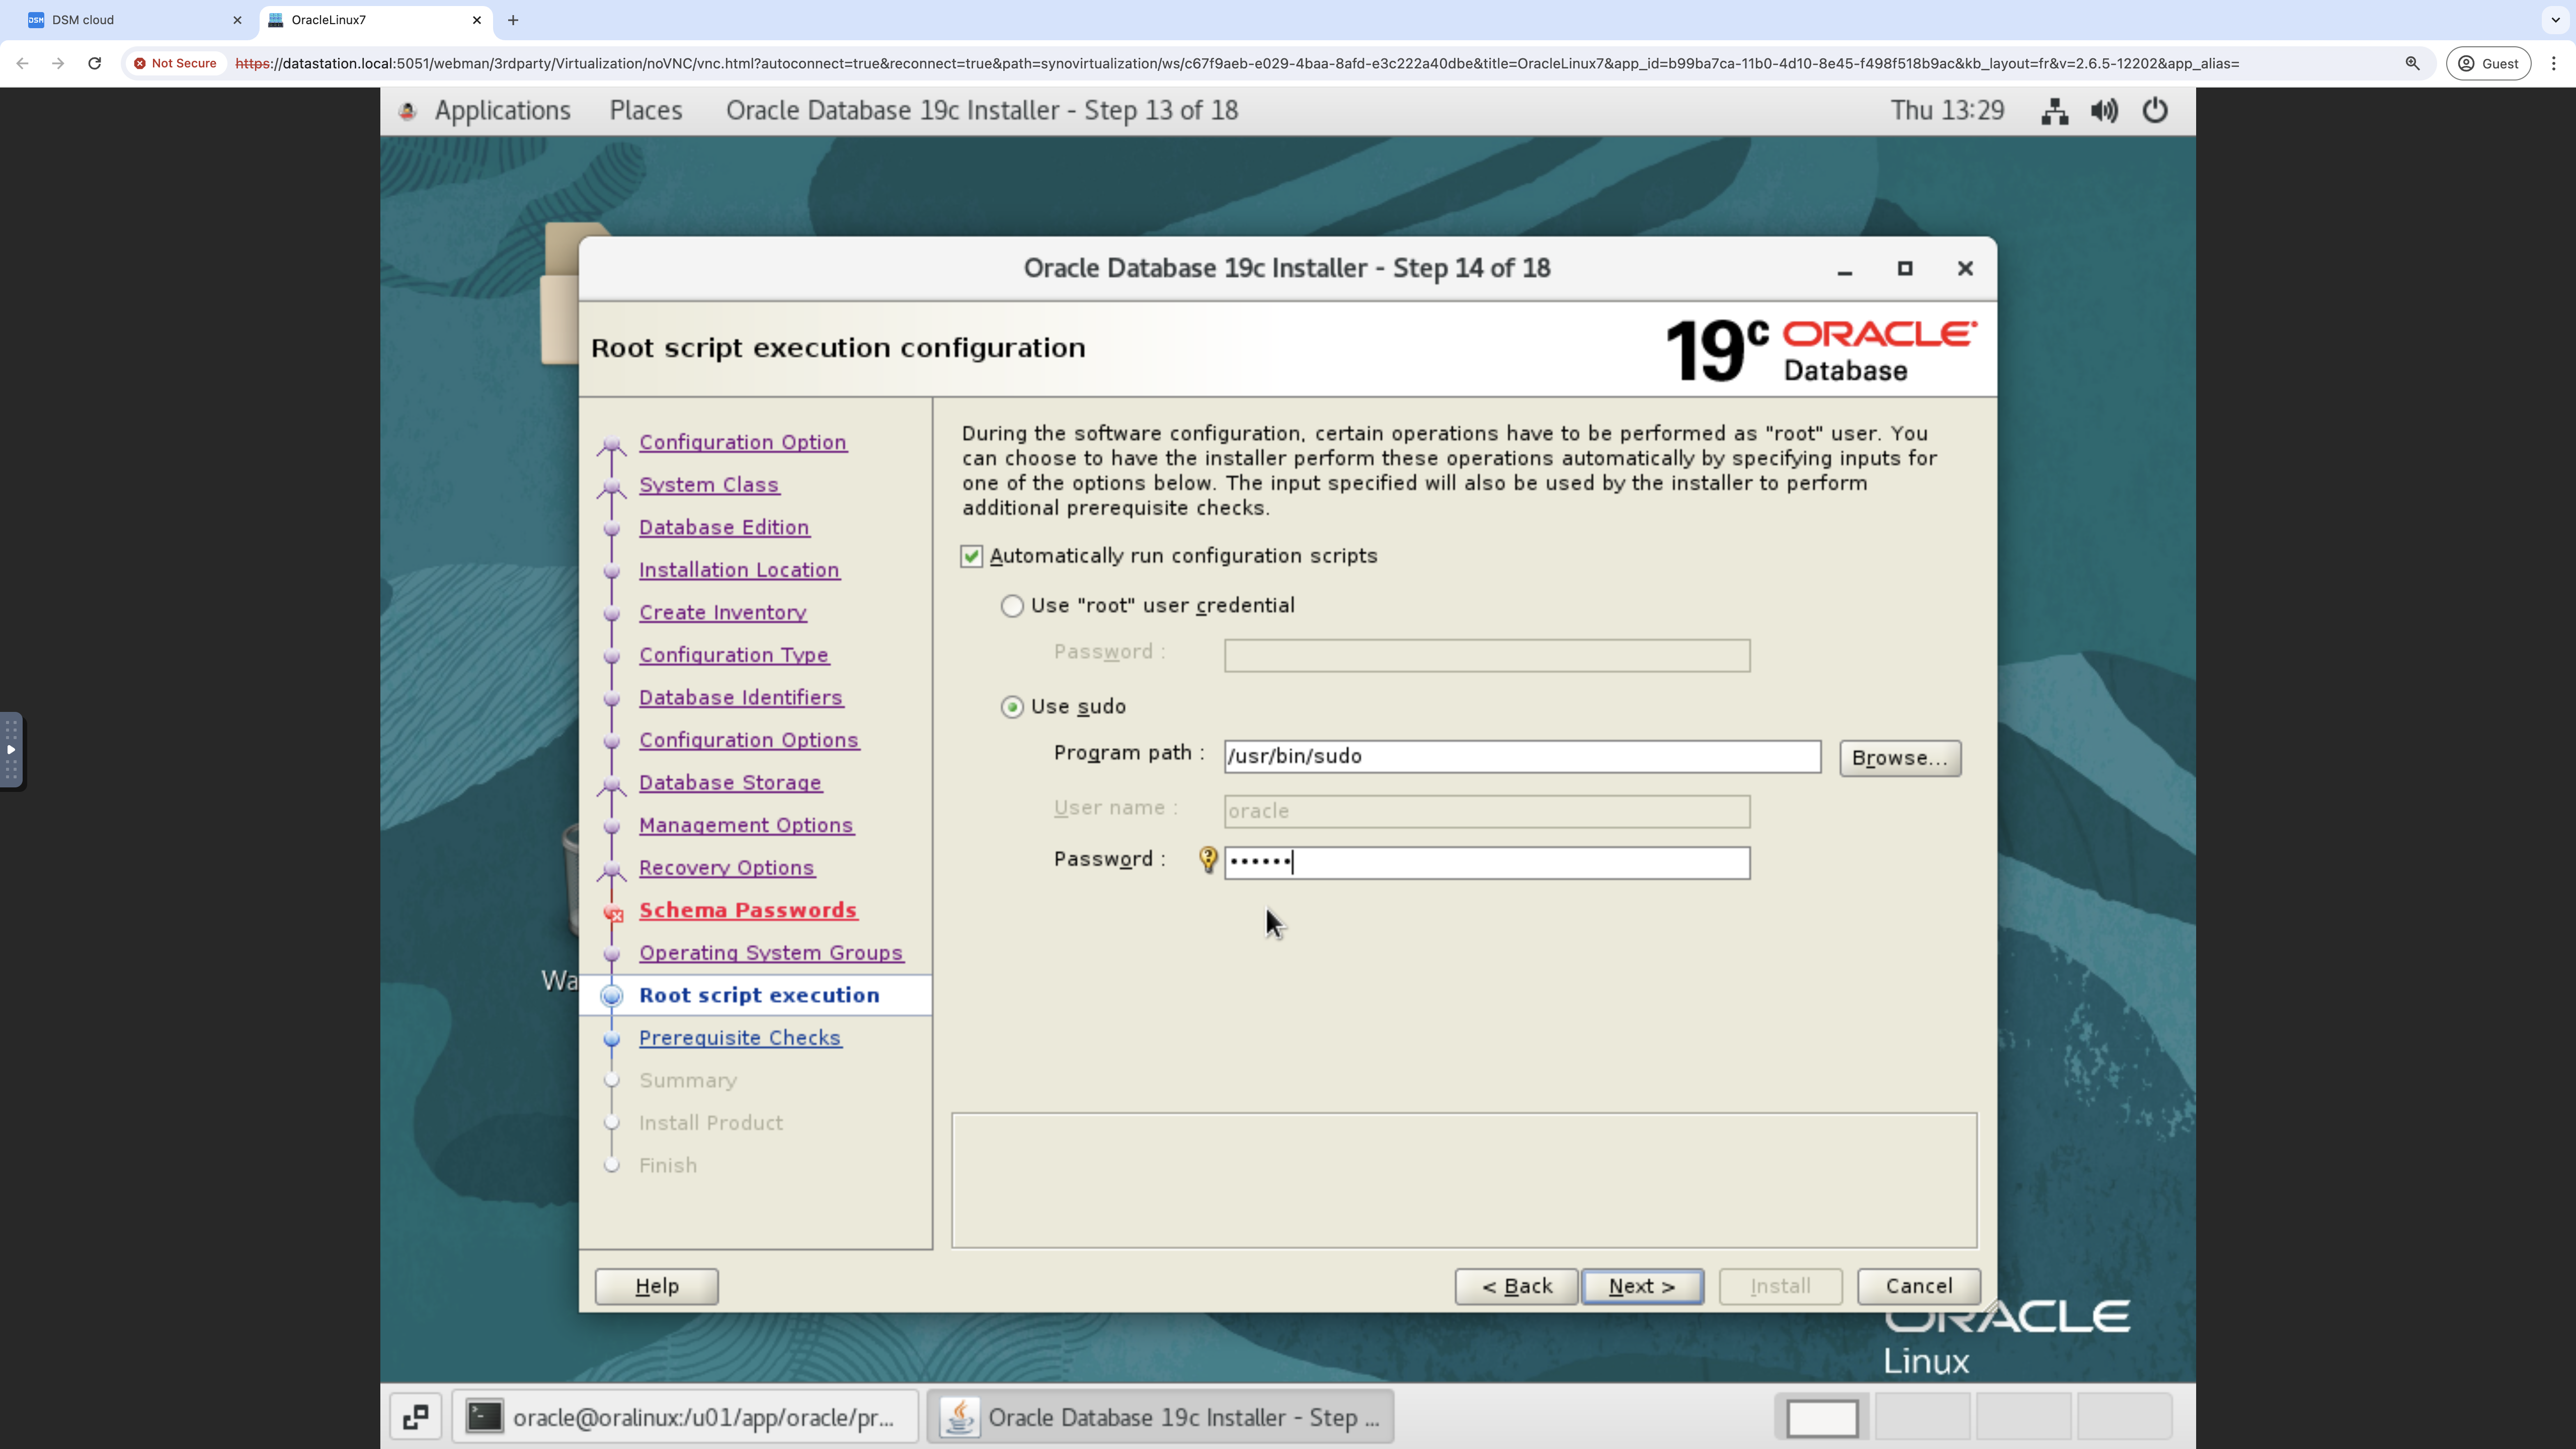
Exhibit 93: Oracle Database Installer – Configure Root Script Execution
The Oracle Database installation response file can now be reviewed, and previous selections can be changed if necessary.
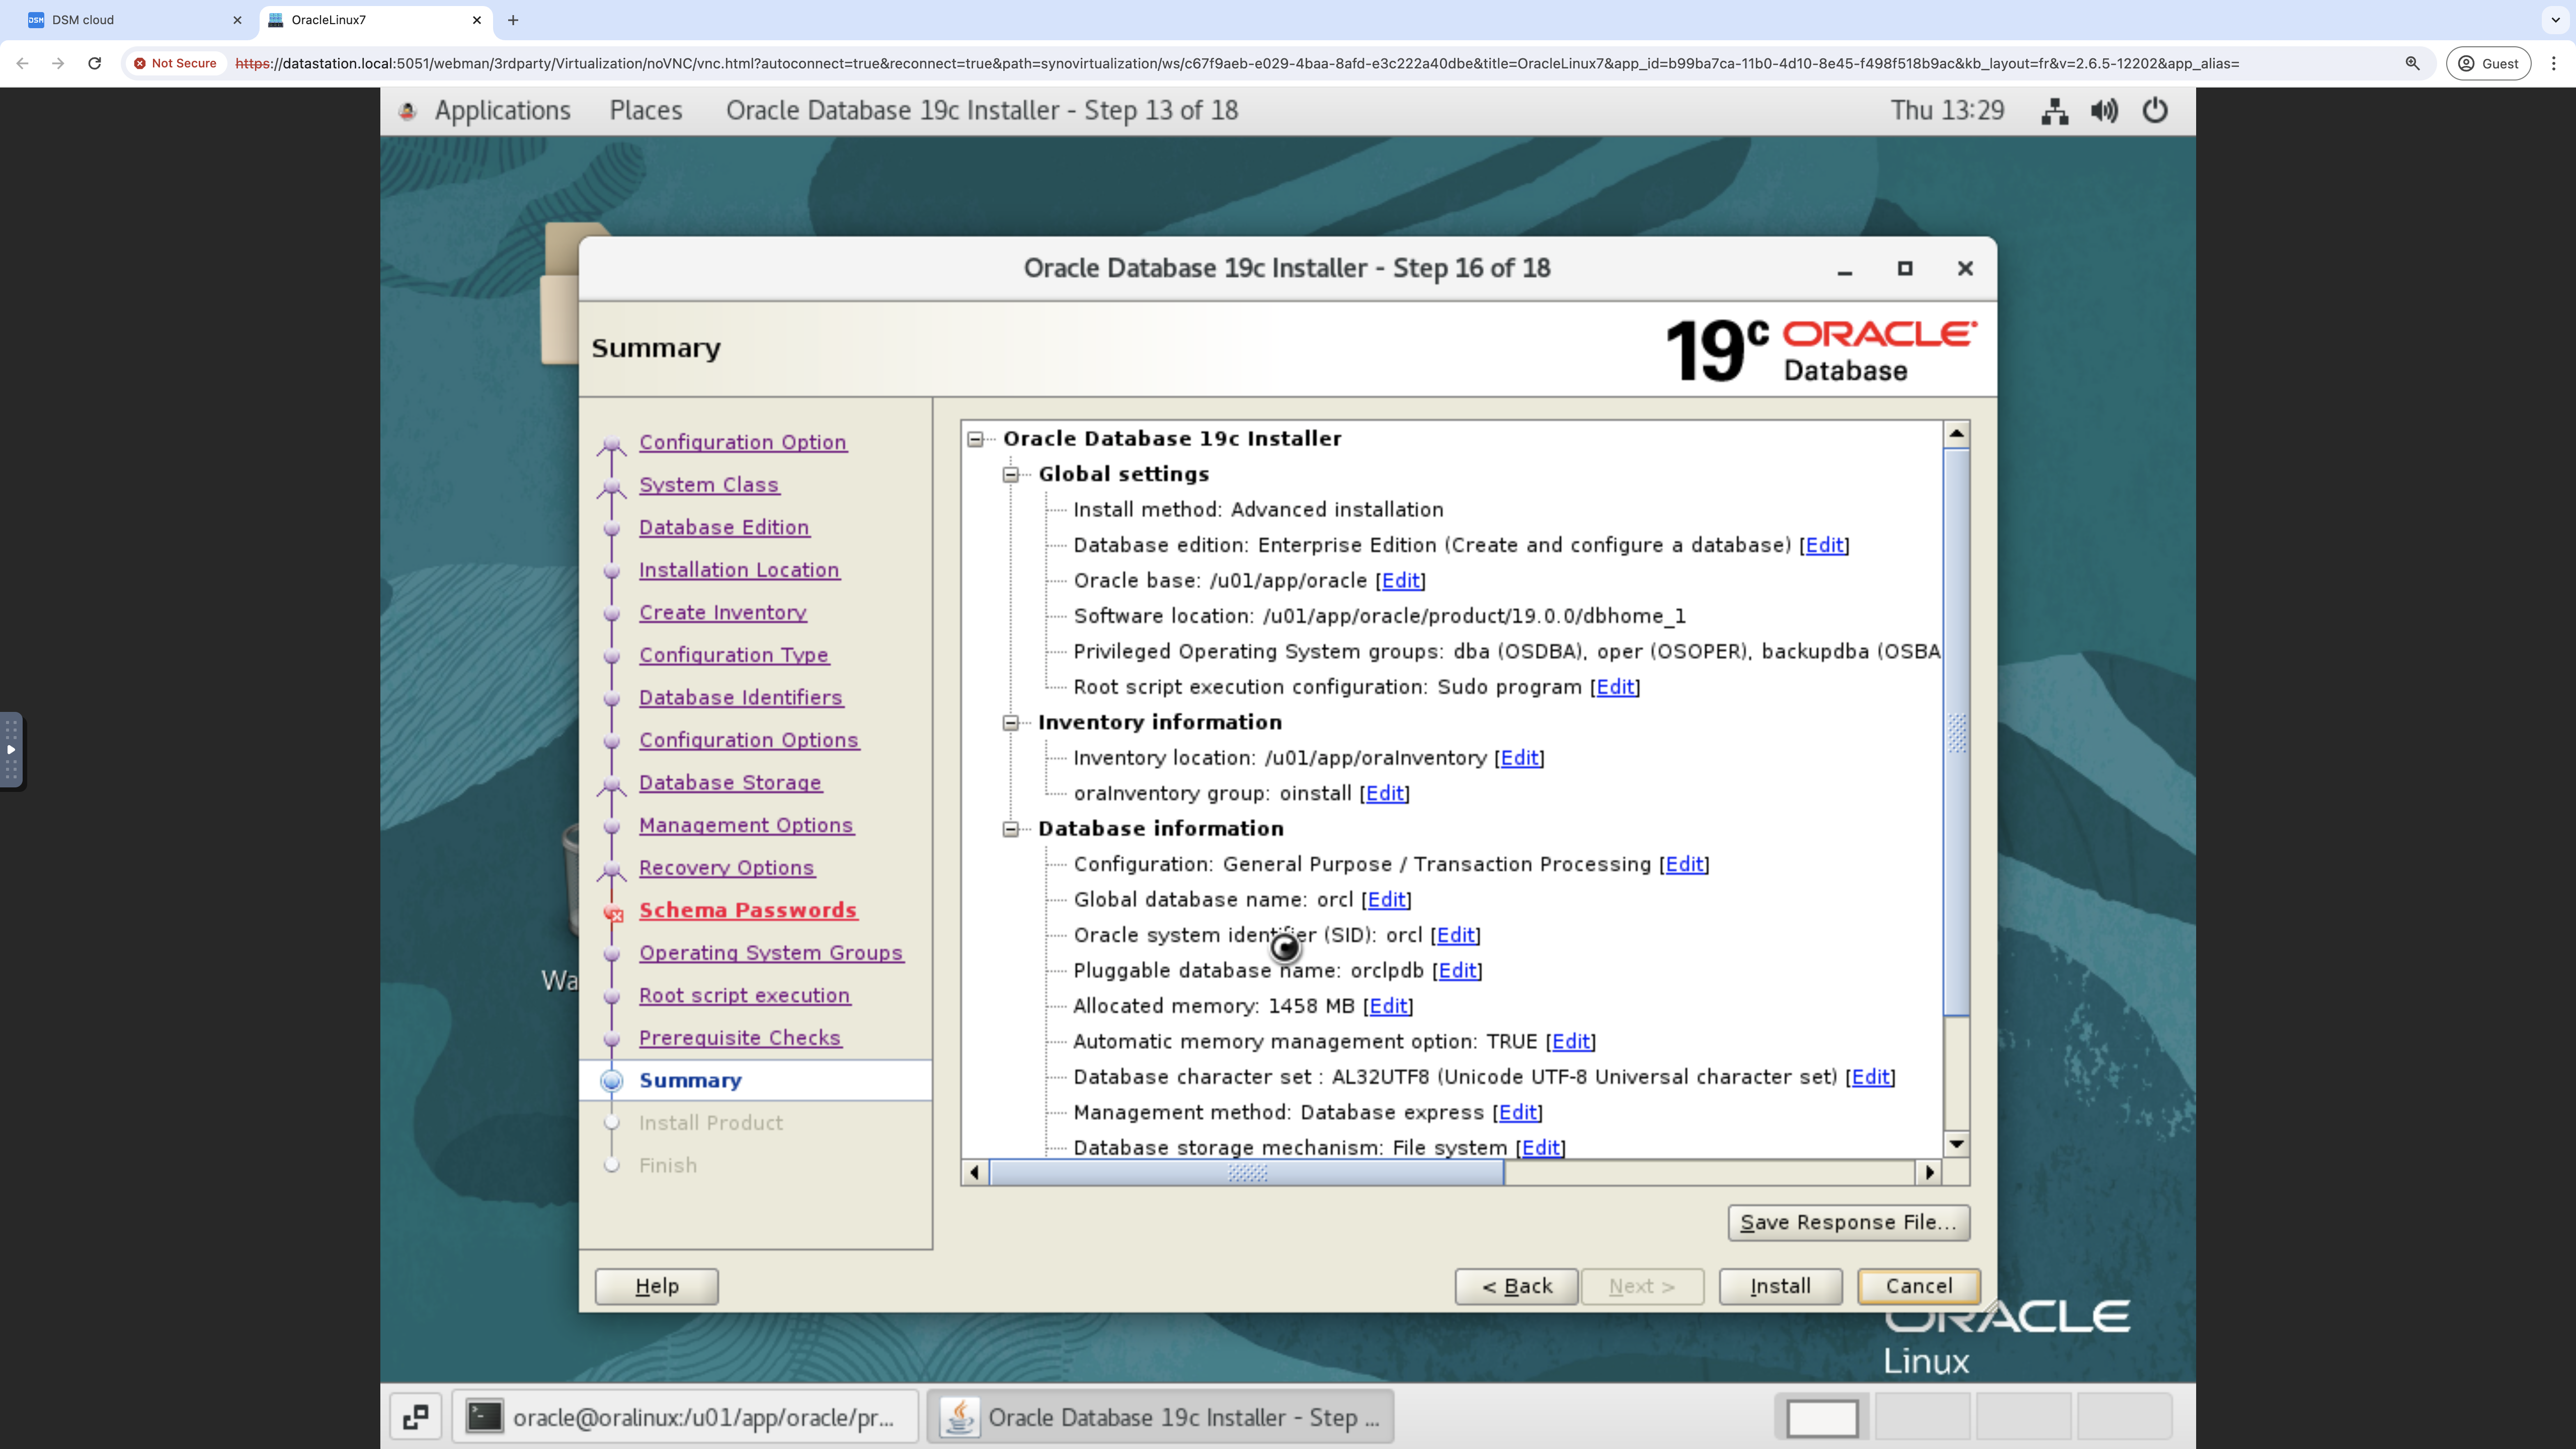
Exhibit 94: Oracle Database Installer – Review the Installation Summary (1 of 2)
Scroll down for additional information.
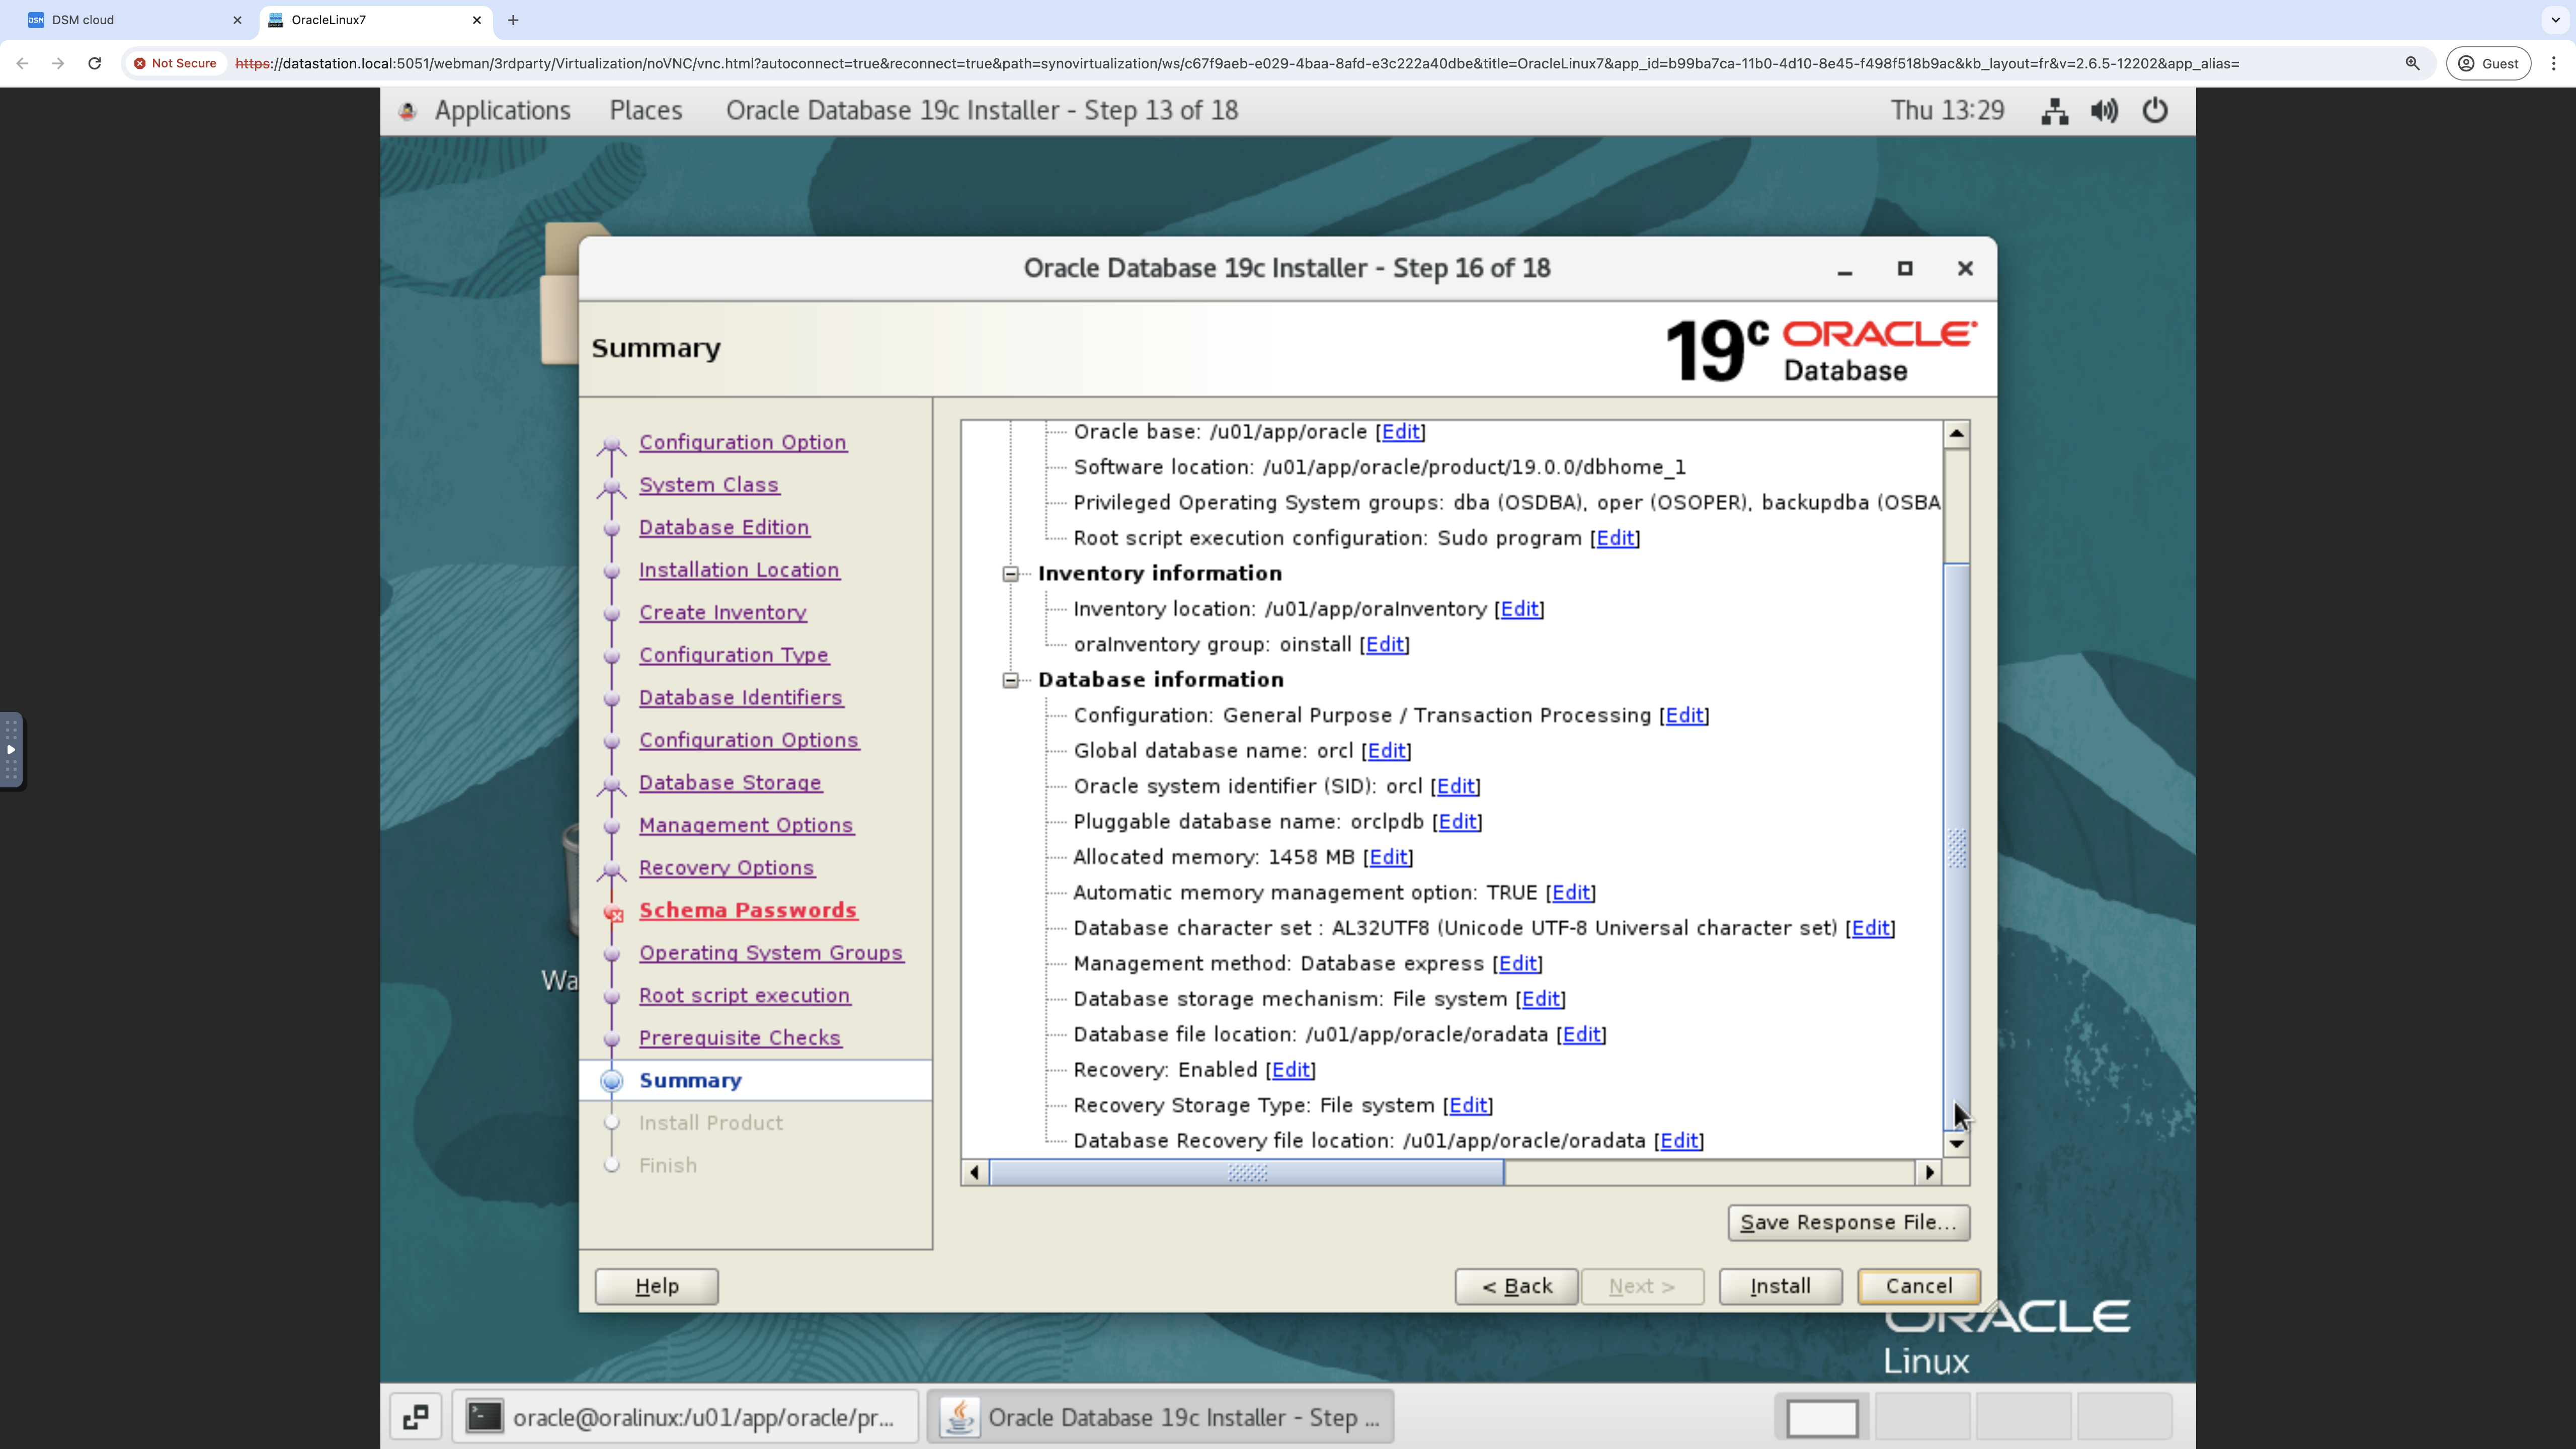
Exhibit 95: Oracle Database Installer – Review the Installation Summary (2 of 2)
Select Install to launch the engine installation.
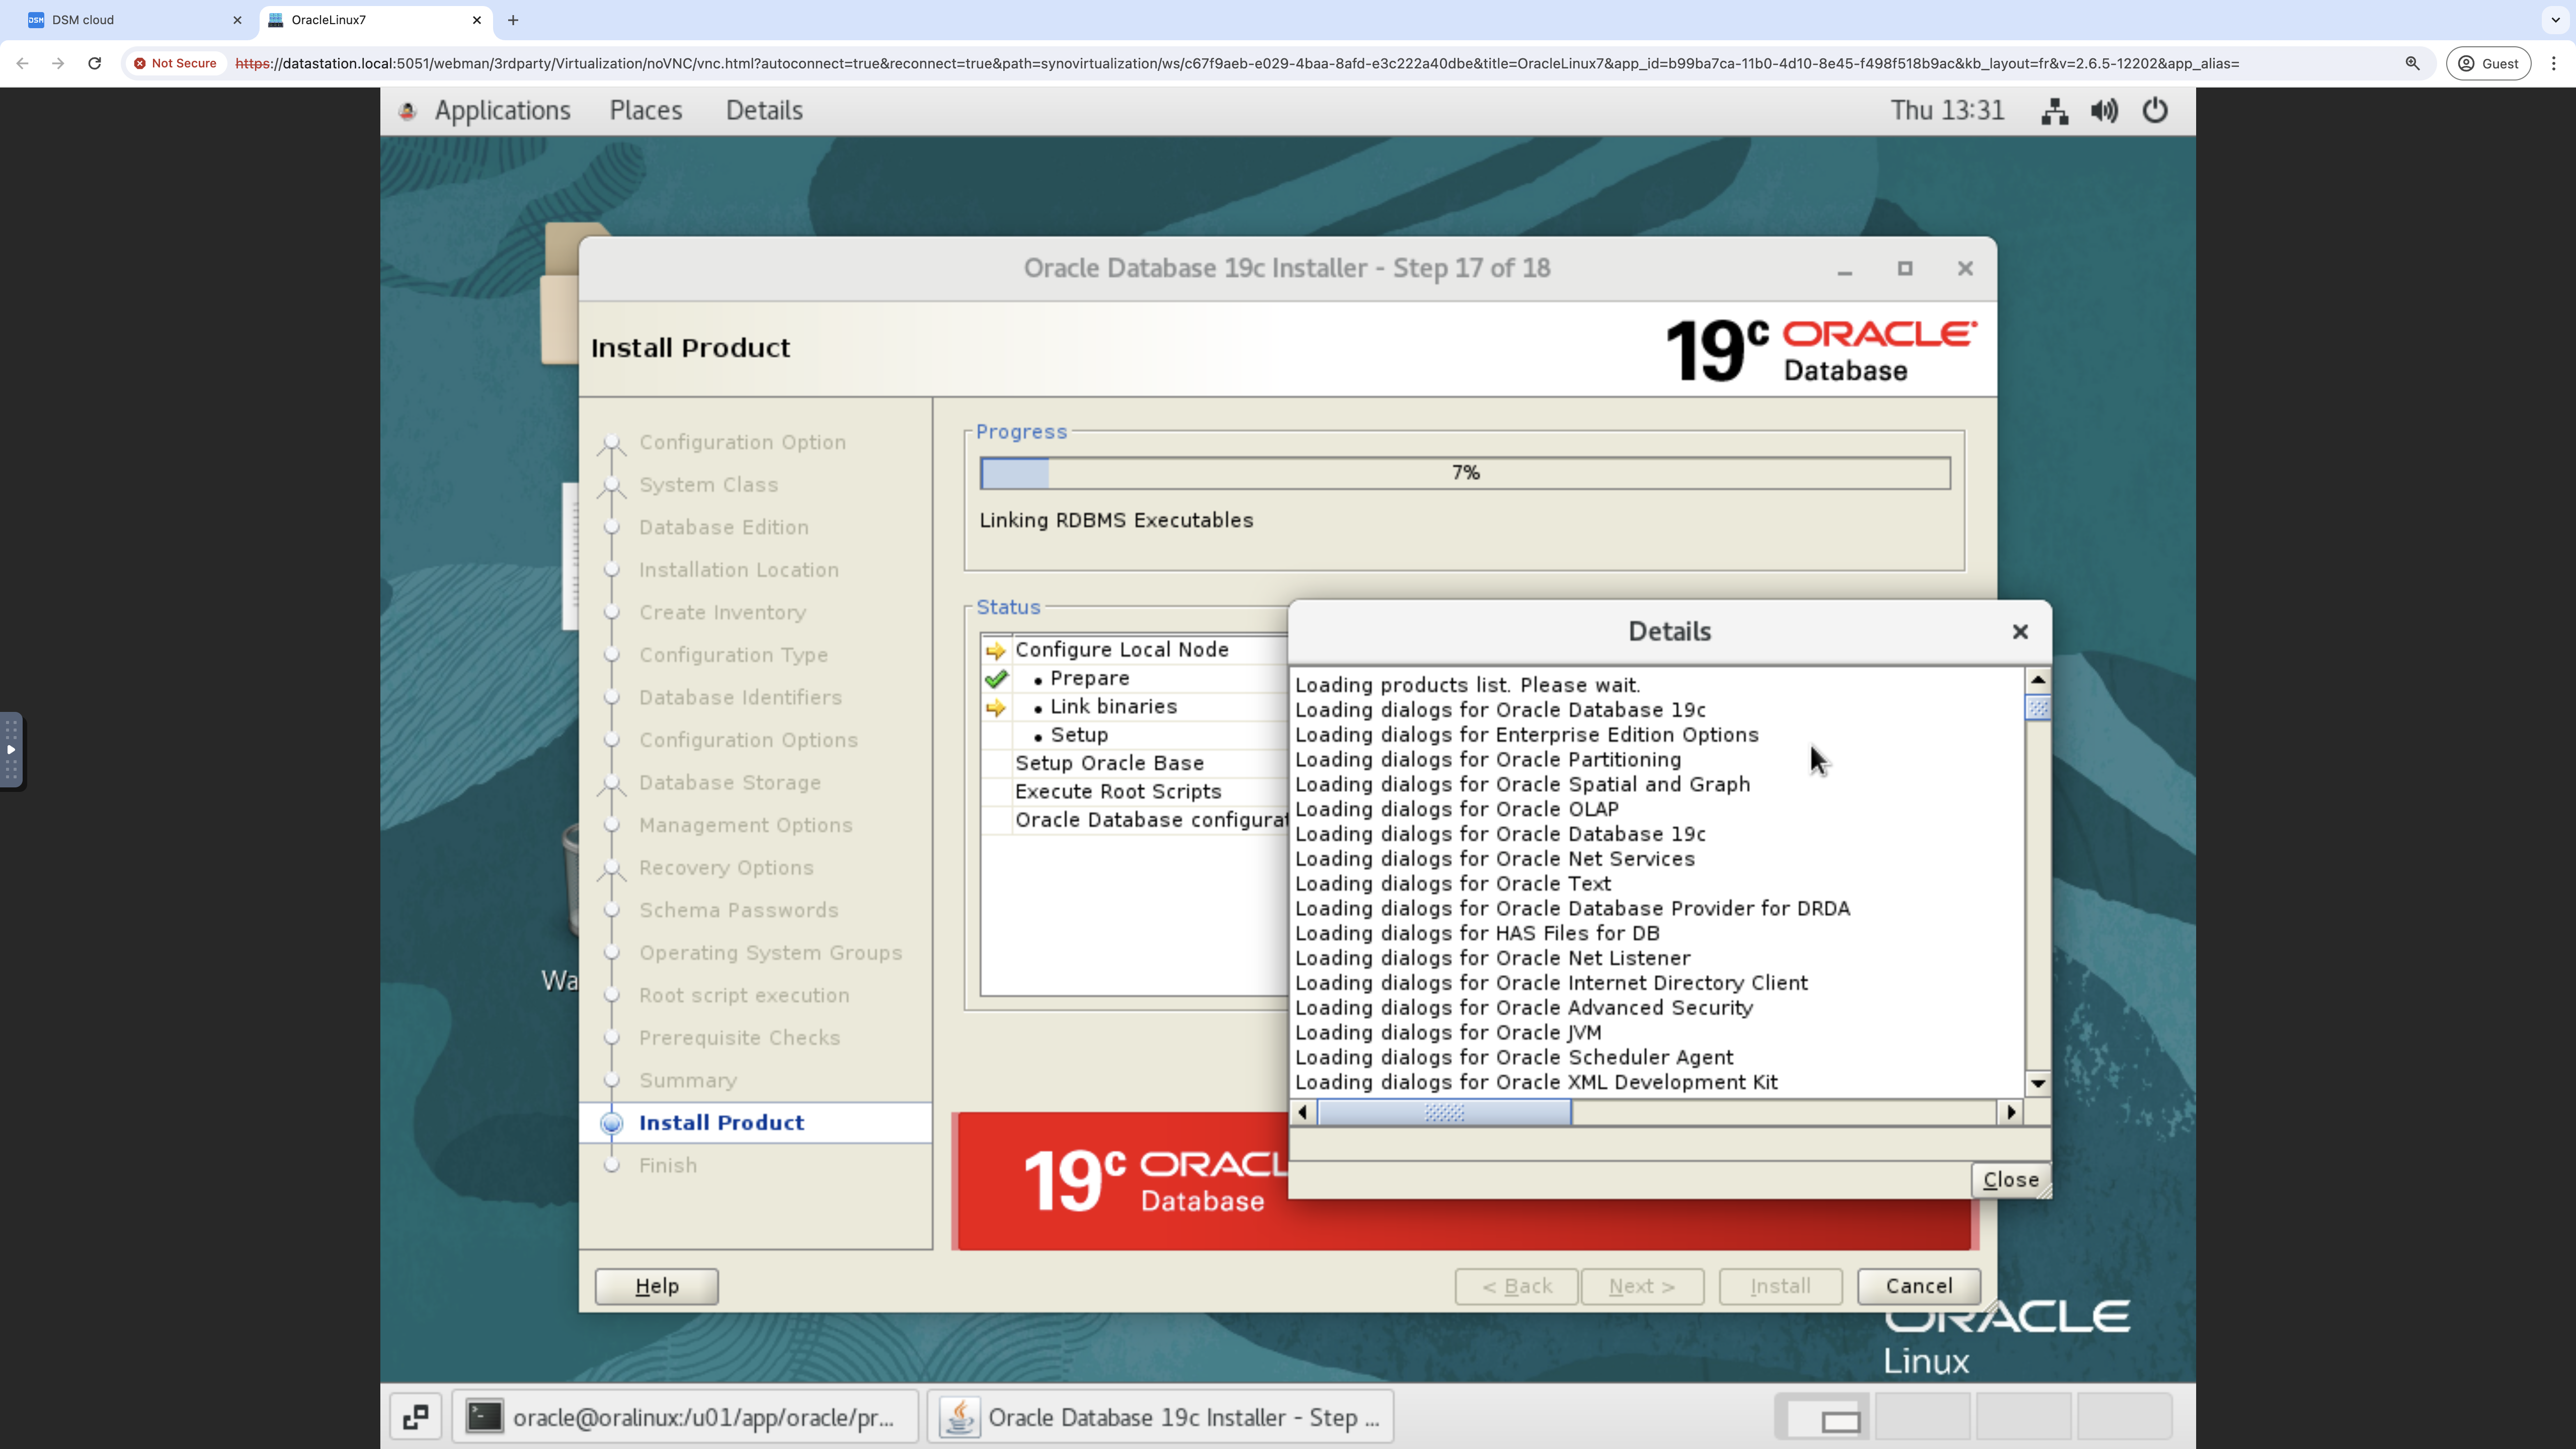
Exhibit 96: Oracle Database Installer – Install Oracle Database Software
Select Install to start the Oracle Database software installation. When prompted, select Yes to allow the required configuration scripts to run with elevated privileges.
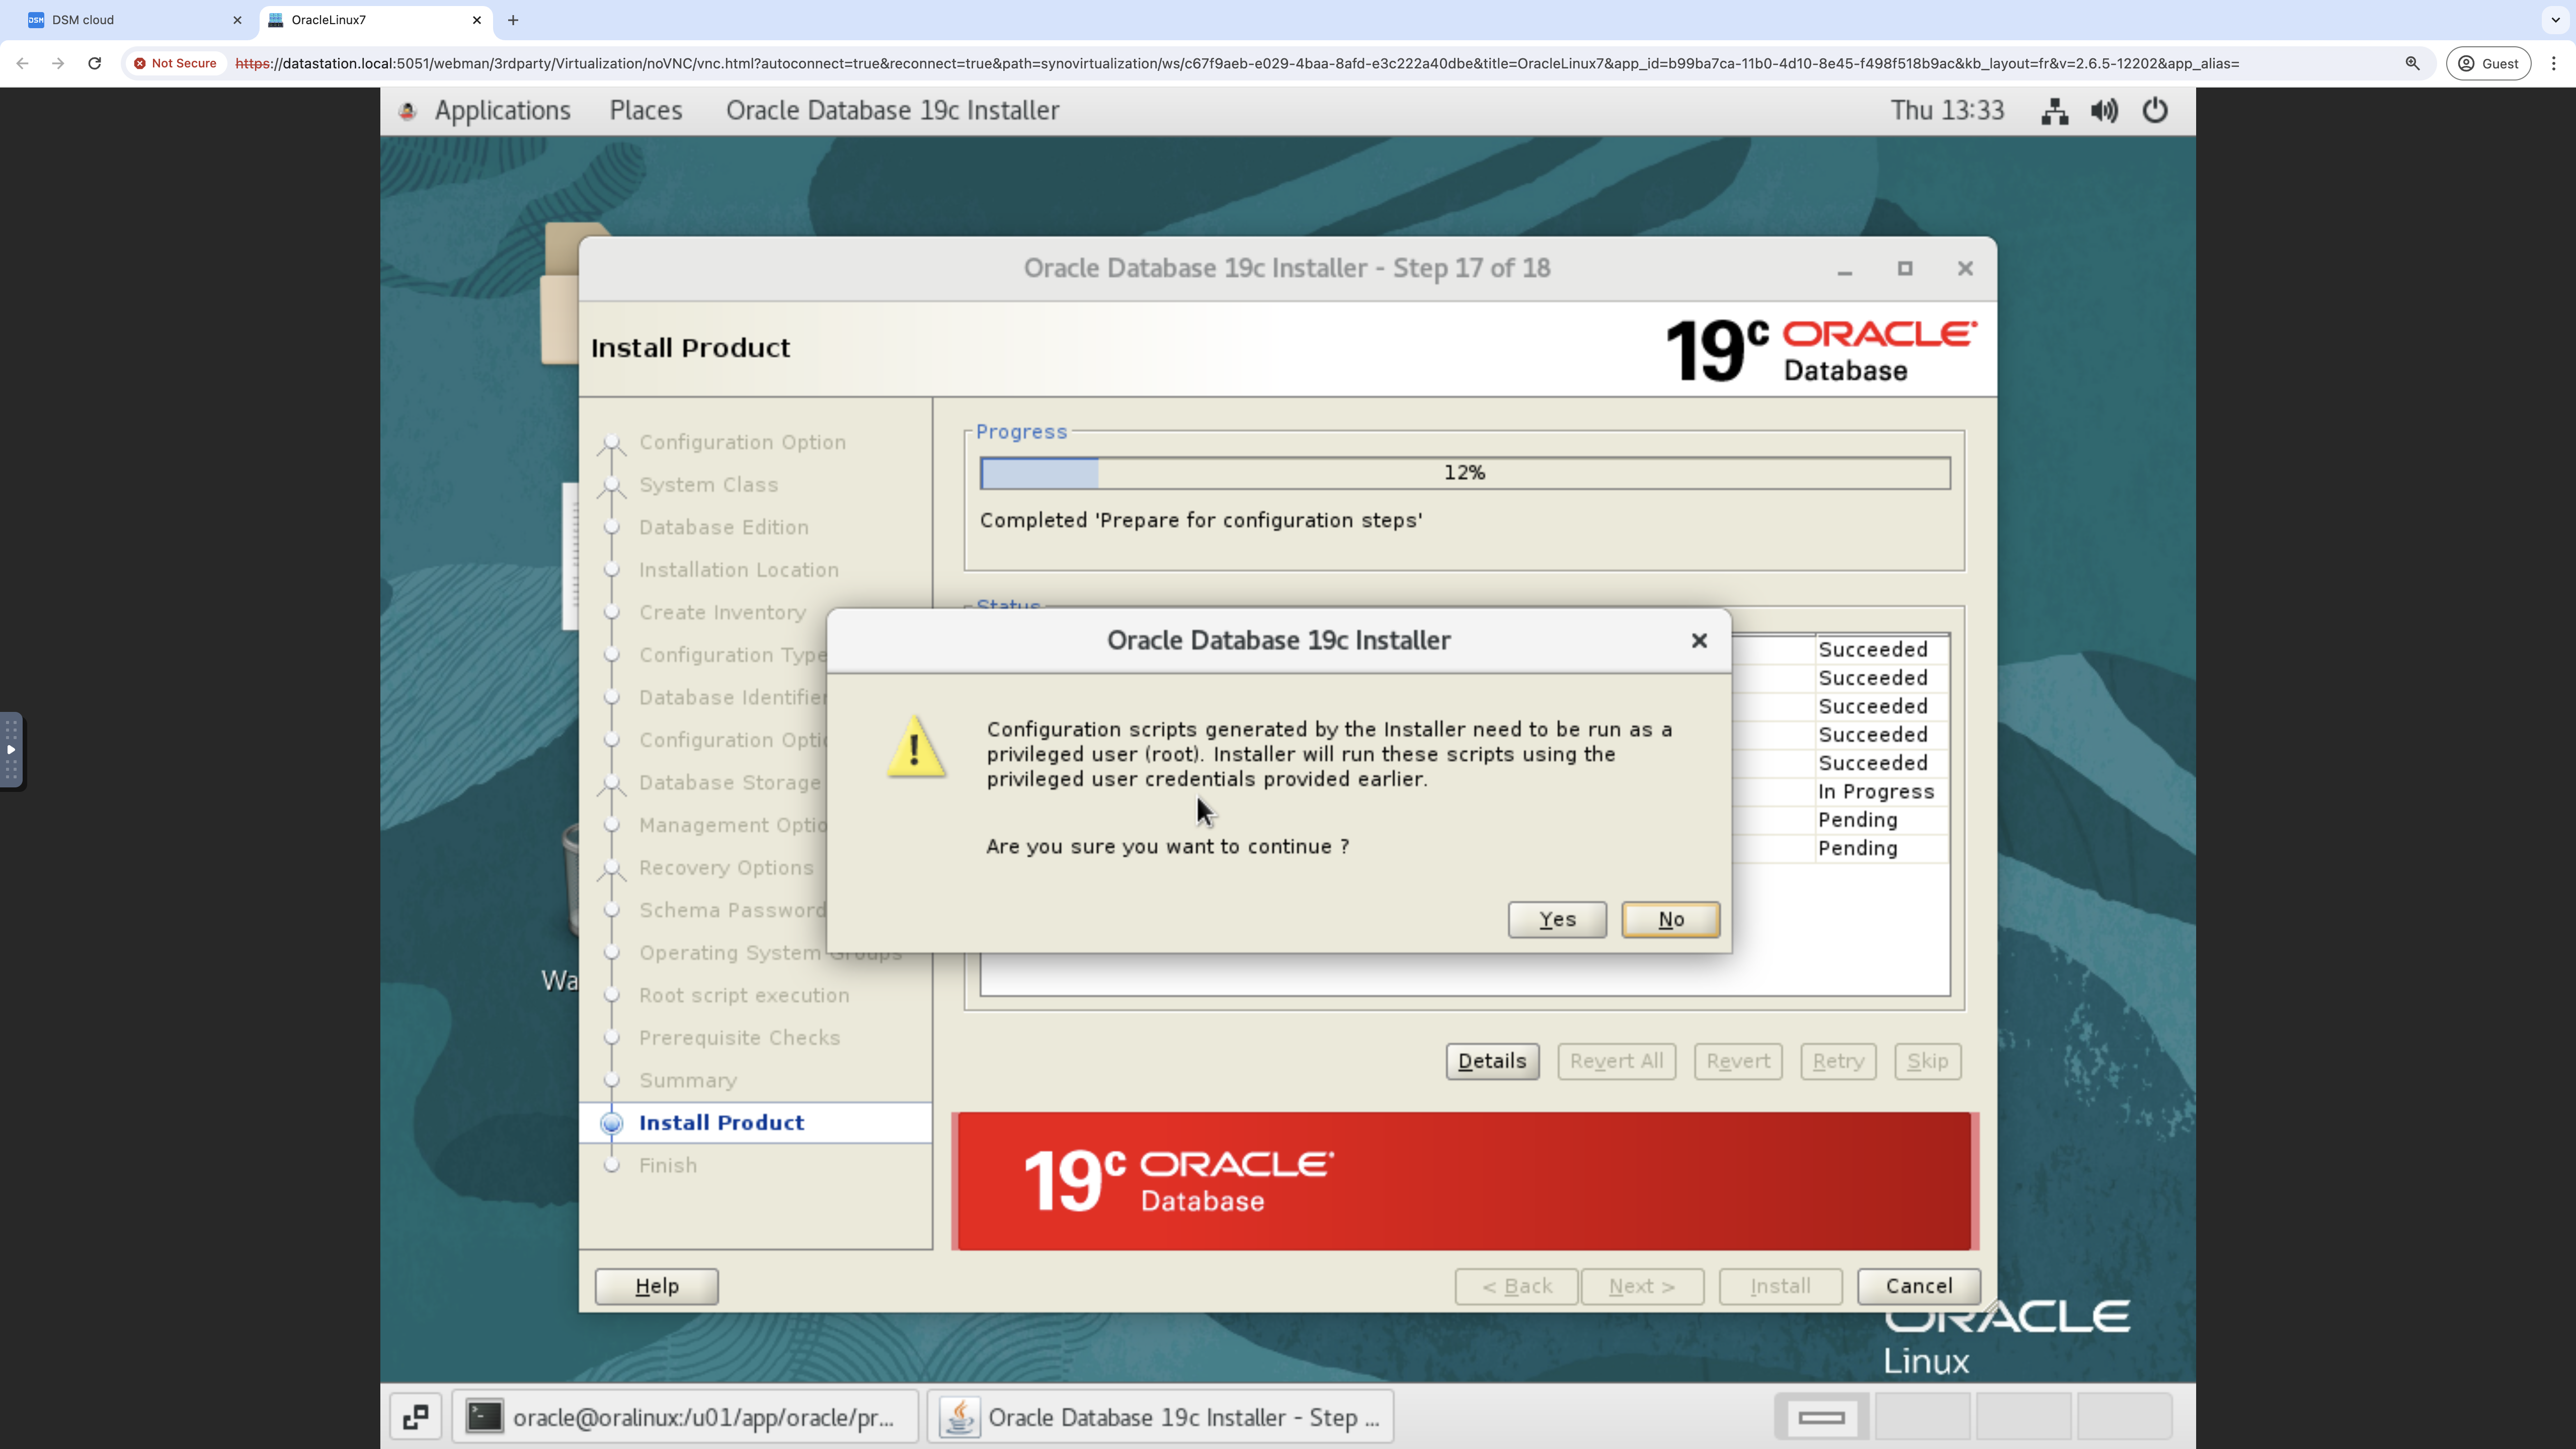
Exhibit 97: Oracle Database Installer – Confirm Root Script Execution
When the configuration process is complete, review the installation summary and database-creation results. In the reference installation shown here, the Oracle Universal Installer reports that one or more configuration assistants were skipped (they are not required for the selected database configuration).
The required configuration assistants completed successfully, and the reference CDB/PDB configuration was created as intended.
Close the Oracle Universal Installer.
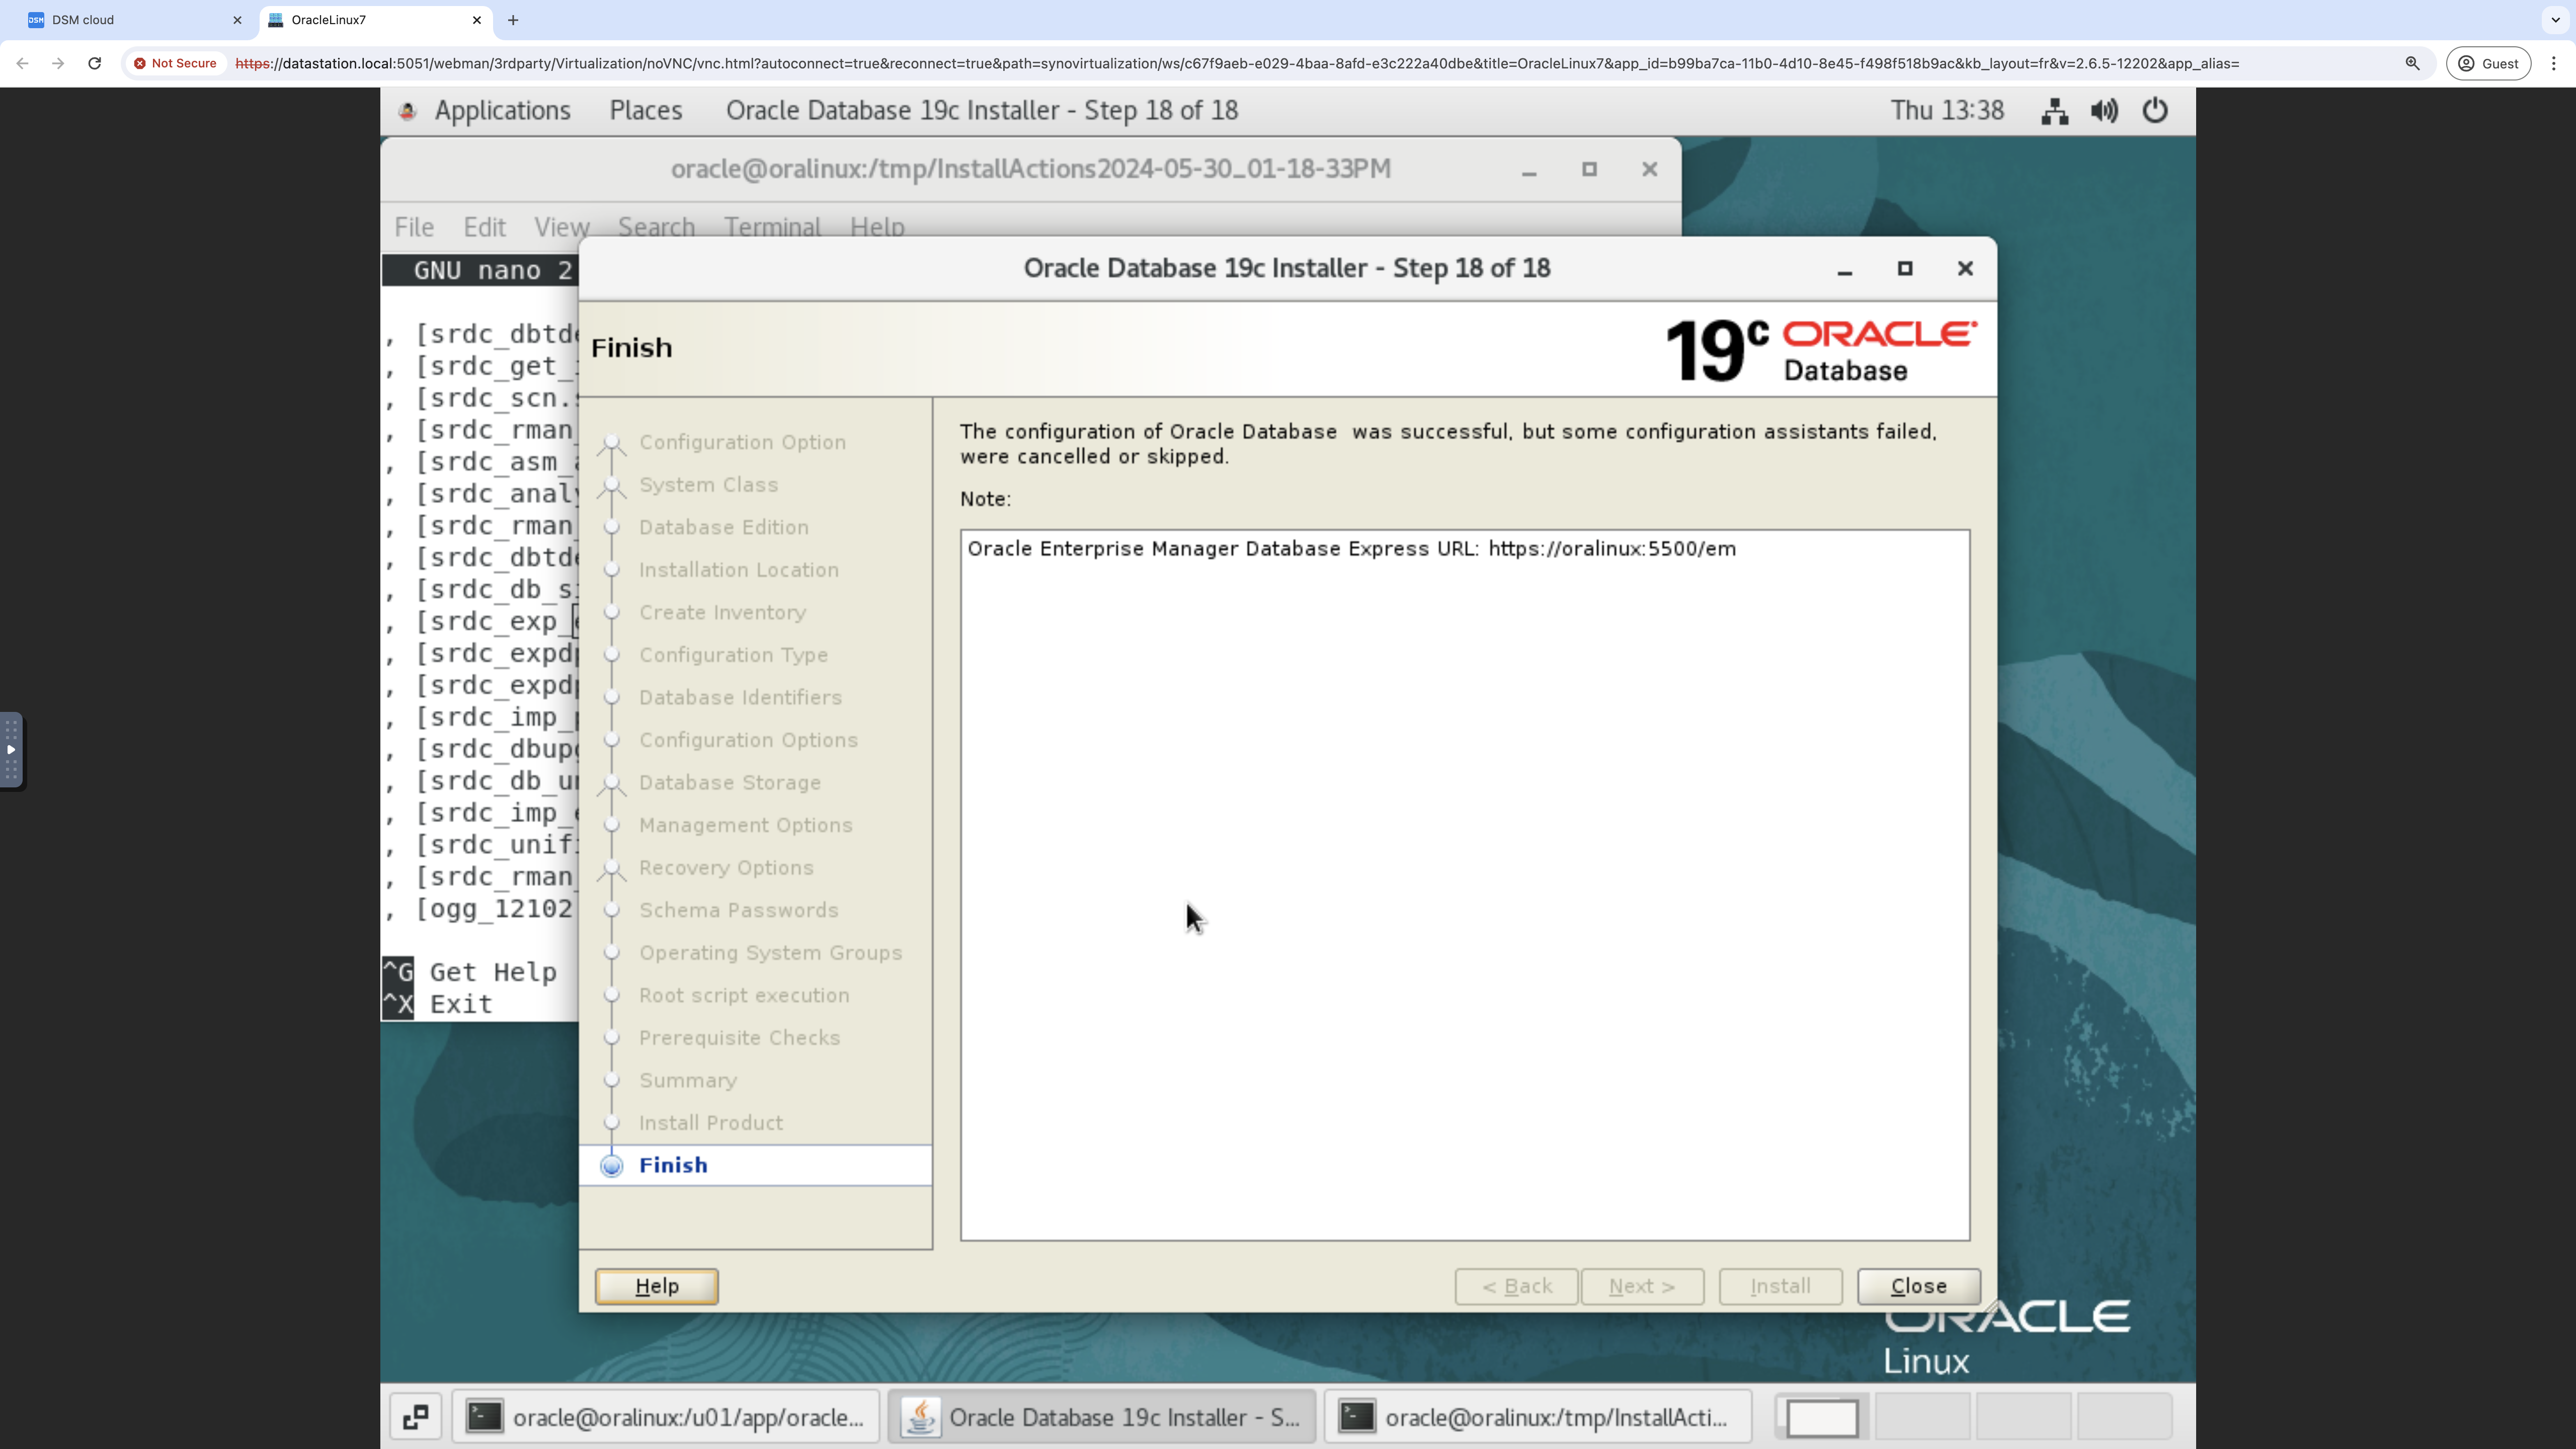
Exhibit 98: Oracle Database Installer – Complete the Installation
Chapter Outcome
Congratulations! Oracle Database 19c Enterprise Edition is installed, and the reference CDB and PDB have been created with the documented memory, character set, storage, recovery, and operating system group settings. The virtual machine now contains the sandbox designed in Chapter 1.
The resulting virtual machine provides a reproducible Sandbox / Learning environment.
Before using the sandbox, verify that the CDB and PDB are accessible and review any warnings reported during installation. Resolve outstanding configuration issues before proceeding with the practical exercises in Chapter 5.
5. Design Oracle Database Non-Production Environments
Chapters 1 to 4 built a small learning sandbox. This chapter explains how to design an environment for a different task. For example, troubleshooting a slow production batch, testing a migration, and training a DBA each require different data, resources, and controls.
Sections 5.1 to 5.5 revisit the five design decisions. Section 5.6 brings the choices together. Section 5.7 describes three anonymized OMTCO projects, and Section 5.8 compares their results and conclusions.
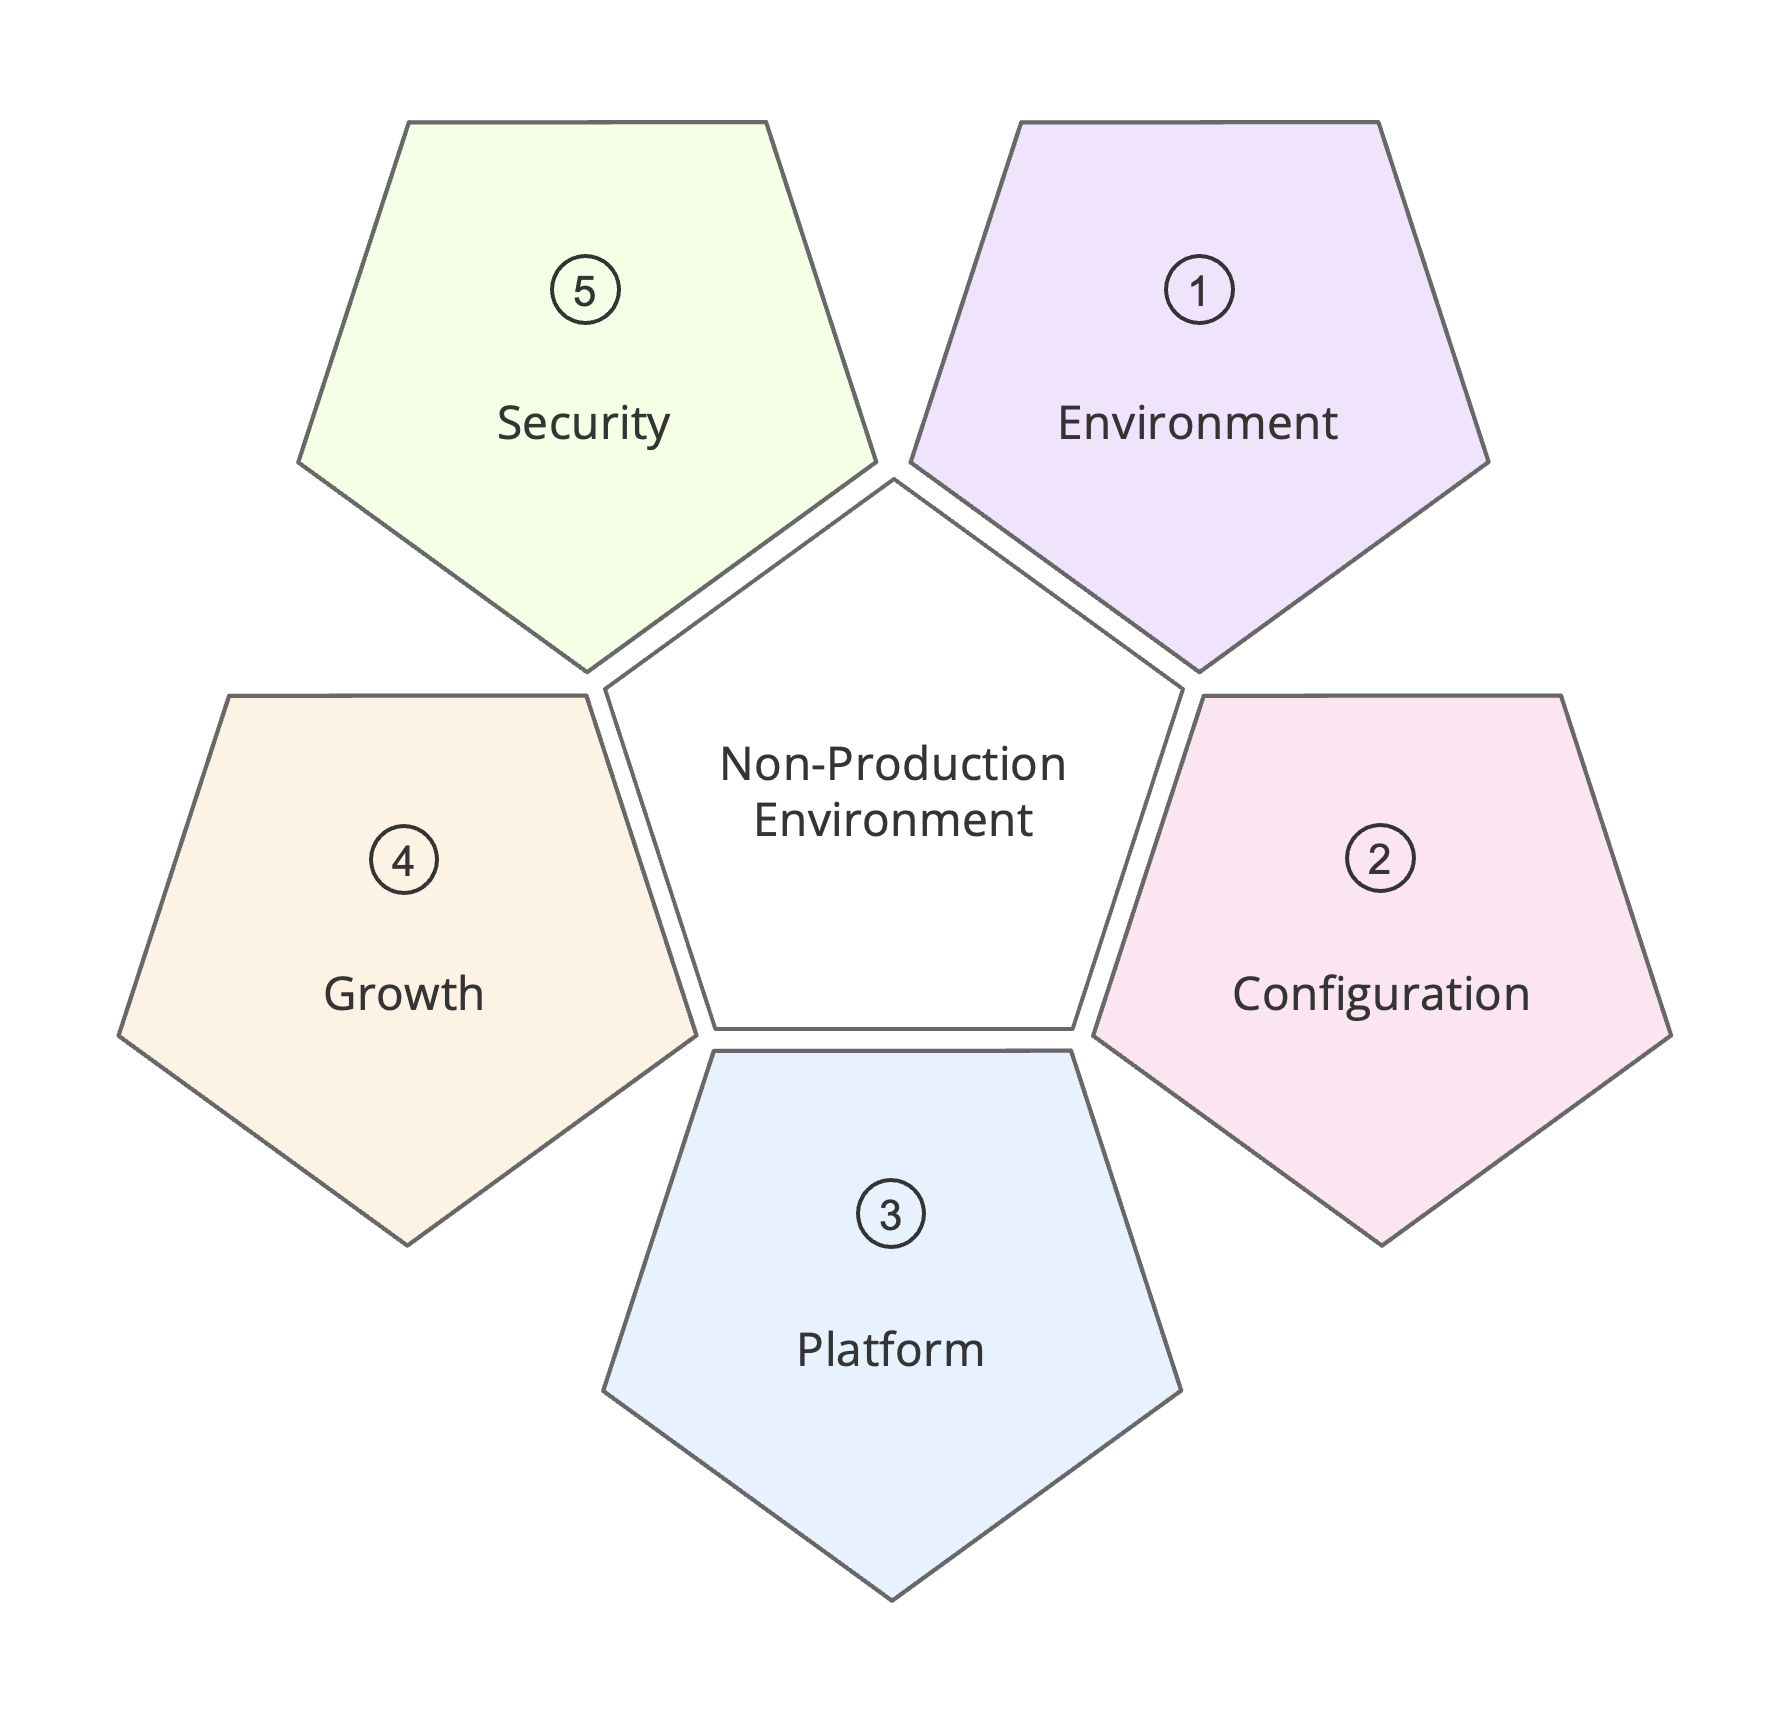
Exhibit 99: Environment Design – Five Design Decisions for an Oracle Database Environment
Environment defines the purpose, users, workload, data, duration, and required production fidelity. A disposable training sandbox needs less production alignment than a targeted regression test.
Configuration identifies the database release, edition, architecture, Enterprise Options, and Management Packs required by the planned work. These choices are made for the scenario, not inherited automatically from the reference sandbox.
Platform matches the selected database configuration to a compatible operating system, deployment model, and resource baseline. The reference sandbox uses Oracle Linux 7.9 and VirtualBox; other scenarios may require a production-like platform.
Growth establishes the initial CPU, memory, and storage requirements, together with the resize, rebuild, upgrade, and retention decisions appropriate to the environment.
Security establishes data handling, identities, connectivity, patching, encryption, auditing, and cleanup controls according to the environment’s purpose and risks.
The decisions affect one another. A different database release may change operating-system certification; an Enterprise Option may change licensing requirements; and production-derived data may require stronger controls and longer validation.
Design and Reassessment Lifecycle
Define the purpose, select the database configuration, and check its prerequisites. Then confirm the platform, resources, security controls, and licensing before building the environment.
This is a loop, not a one-time checklist: any change will trigger a verification of the decisions. Revisit the decisions whenever the purpose, configuration, platform, capacity, connectivity, data, or licensing conditions change.
5.1. Environment – Purpose and Production Fidelity
Start with the question the project must answer.
For instance: a batch investigation must reproduce the conditions that cause the slowdown; a migration test must represent the target design; a training sandbox only needs the components required by the exercise.
Record the test objective and acceptance criteria. Then identify the production data, configuration, and workload needed to make the result useful. Record any differences from production that could affect the conclusion.
Design Requirements
Write down who will use the environment, which data and workload it needs, and which connections are required. Set its expected lifetime and decide whether to retain it or rebuild it after each test.
Two examples show why this distinction matters:
Development environment – Developers need to change code, debug problems, and test integrations. Match production where the work depends on its database features or architecture. Other parts of the environment can stay simpler.
Testing / Validation environment – Reproduce the production characteristics that affect the test. A functional test may need the same database features and representative data. A performance test may also need comparable CPU, memory, and storage. A full production copy is expensive – it is needed only when the test depends on it.
Licensing is a separate decision gate. The label non-production does not by itself determine the applicable rights; assess the planned activities, users, connectivity, data use, edition, and features under the governing terms and the companion licensing publication.
Refer to the OMTCO publication Licensing Oracle Database in Non-Production Environments, available at https://omtco.eu/publications.
Choose data and capacity to suit the test. Keep the environment small and simple, using where this does not change the validity of the result. Representative, sanitized, or synthetic data can be used whenever production data is not needed for the test.
Environment Selection Framework and Scenarios
Use the decision tree below to select the scenario based on purpose, required capabilities, and the required level of production alignment.
Distinguish the type of non-production environment: Validation (replication of production) vs. New Project (PoC) vs Sandbox / Learning.
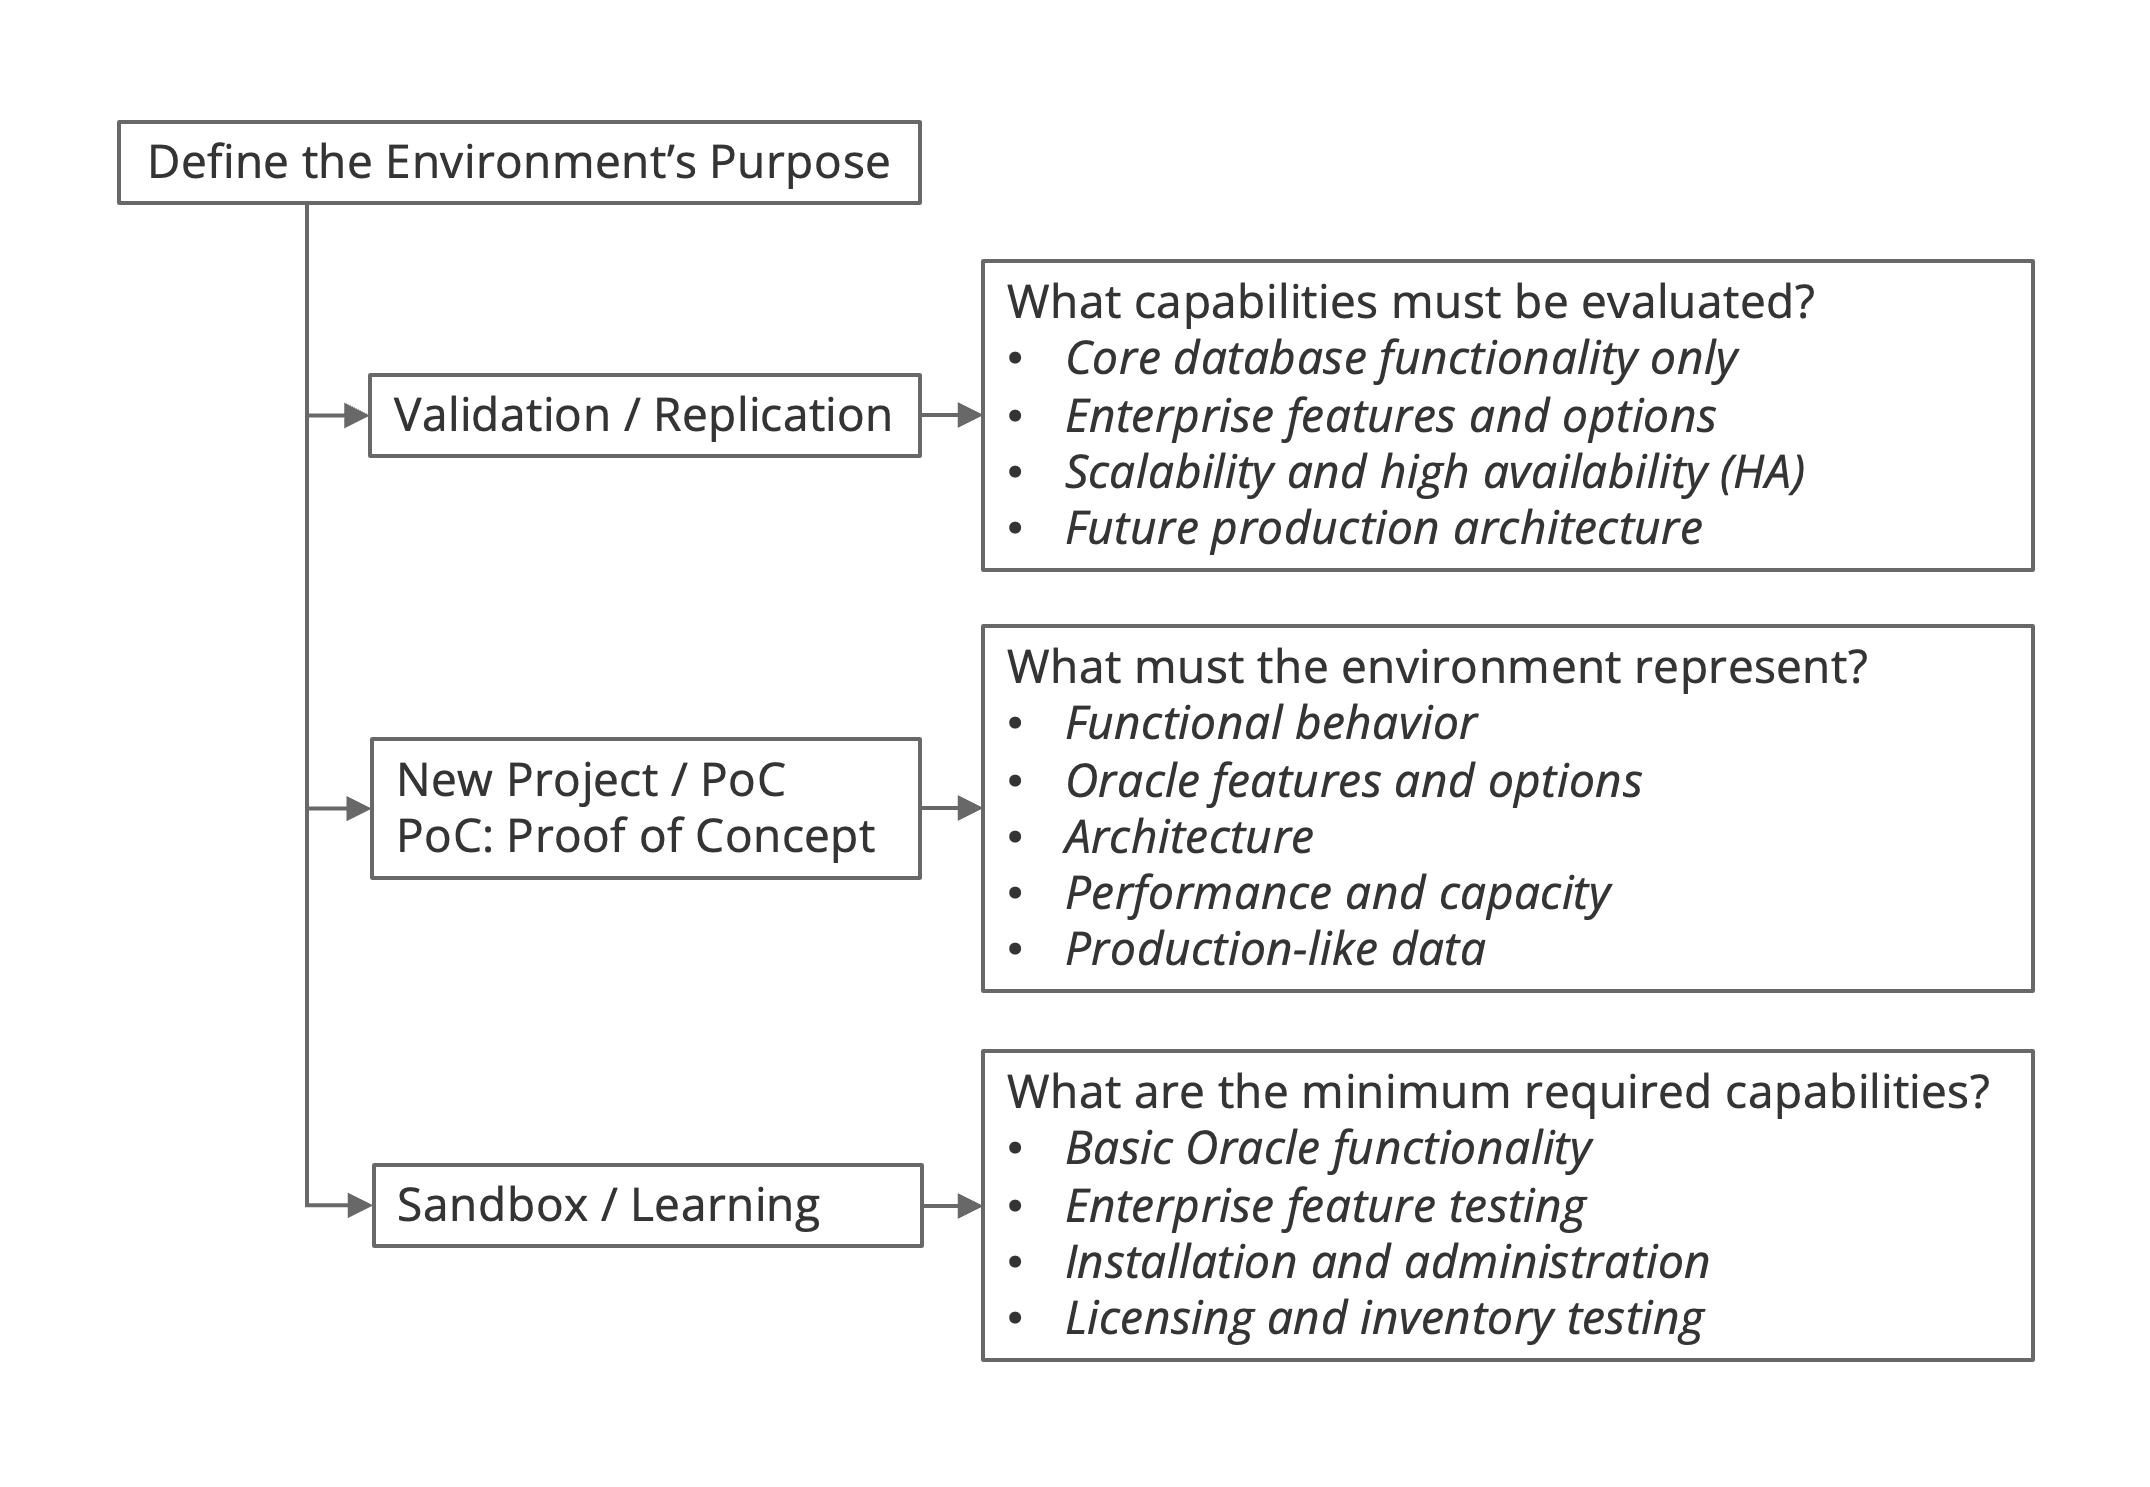
Exhibit 100: Environment Selection – Purpose Decision Tree
After selecting the scenario, translate it into practical design requirements. The table below shows the objective, key considerations, and design implications for each case.
|
Production Replication
|
Reproduce the production behavior needed to investigate a performance or configuration problem.
|
Required fidelity to production; feature parity; architecture relevance; sanitized (anonymized) production data or representative data; cost control.
|
Reproduce only the production elements that are necessary for the test objective. Alignment may be required for editions, options, topology, and data characteristics, but not necessarily at full production scale.
|
|
New Project / Proof of Concept
|
Evaluate a future solution, architecture, or features before deployment.
|
Target capabilities; scalability expectations; cost constraints; security needs; future migration path.
|
Build the environment around the capabilities to be evaluated. Database edition, infrastructure model, and security controls should be selected according to the target use case rather than assumed.
|
|
Sandbox /
Learning
|
Support learning, isolated experiments, short-lived tests, or administrative practice.
|
Simplicity; low cost; minimal resources; safe isolation; disposability.
|
Use the lightest environment that still supports the intended exercise. The setup may range from a minimal edition for basic learning to a small Enterprise Edition environment where specific enterprise features (Enterprise Options / Management Packs) must be tested.
|
Exhibit 101: Environment Selection – Scenario Objectives and Design Implications
The scenario defines the purpose, but not the Oracle Database edition, platform, architecture, or resources. Evaluate those separately against the functional and technical requirements.
Decision Output
Record the scenario and the required production alignment, capabilities, resources, data controls, and lifecycle.
Treat the scenario classification as a technical design baseline only; it does not establish a licensing model. Complete the licensing assessment separately before the environment is used.
5.2. Configuration – Database Release, Edition, Capabilities
Once the purpose of the environment is set, choose the relevant database configuration. Select the release and edition first, then add only the features, the Enterprise Options, or the Management Packs that are required.
Check compatibility, certification, support lifecycle, scalability, and licensing as part of the same decision.
The reference sandbox build, installed in this guide, uses Oracle Database 19c Enterprise Edition. Enterprise Edition advantage: it permits the usage of all Oracle Enterprise Options and Management Packs. Choose another release or edition when the project requires it and adapt the installation procedure accordingly.
Database Architecture
Database architecture is part of the configuration decision. Select the CDB/PDB layout, number of PDBs, and any architecture-dependent capabilities based on the objective of the environment. Reproduce production topology only when the result depends on it; otherwise keep the non-production configuration simpler and confirm the support and licensing implications of any added capability.
⚠ Oracle Licensing – Without an Oracle Multitenant license, up to three (3) user-created PDBs may be created in each CDB at any time (Oracle licensing at time of publication). Deployments beyond this limit require assessment of the applicable Oracle Multitenant licensing requirements. Consult the publications about Oracle licensing:https://omtco.eu/search.
Oracle Database Editions Overview
Edition and release are separate decisions. The edition determines the available capabilities and licensing model, while the release determines compatibility, certification, patching, and lifecycle.
The following exhibit summarizes the edition lineage; current availability and support status must be confirmed before selection.
|
Enterprise Edition (EE)
|
7
|
1992
|
Currently available (2025)
|
|
Standard Edition (SE)
|
7.2
|
1995
|
12.1.0.1 (discontinued in 2015)
|
|
Standard Edition One (SE1)
|
10g
|
2003
|
12.1.0.1 (discontinued in 2015)
|
|
Standard Edition 2 (SE2)
|
12.1.0.2
|
2015
|
Currently available (2025)
|
|
Personal Edition (PE)
|
7
|
1992
|
Currently available (2025)
|
|
Express Edition (XE) / Free Edition
|
10g
|
2005
|
Currently available (2025)
|
Exhibit 102: Database Selection – Evolution of Oracle Database Editions
Features, Enterprise Options, and Management Packs
The selected edition defines which built-in features are available and which Enterprise Options or Management Packs are technically available for the configuration.
Distinguish these categories before enabling functionality:
-
Features are capabilities included with the selected Oracle Database offering and edition. The capabilities of Enterprise Options and Management Packs are also called features.
-
Enterprise Options are separately licensed capabilities available with Enterprise Edition, such as Oracle Partitioning, Oracle Real Application Clusters (RAC), and Oracle Advanced Security. Some options may be licensed at no additional cost; others require a commercial license.
-
Management Packs are separately licensed groups of management and diagnostic capabilities, such as Oracle Diagnostics Pack and Oracle Tuning Pack. Some packs may be licensed at no additional cost; others require a commercial license.
Selection Criteria
Evaluate the required database features together with hardware, operating-system, scalability, budget, and licensing constraints. Choose an edition that meets current needs and leaves a practical path to future growth or production.
Select the release for application compatibility, Oracle certification, support lifecycle, and the intended production target. Use the lowest edition that meets the functional and capacity requirements. Add an Enterprise Option or Management Pack only when the use case needs it, the edition supports it, and the necessary rights are available. Finally, verify the operating system and deployment combination and keep a practical upgrade or migration path.
Decision Output
Record the selected release and Release Update, edition, multitenant architecture, required features, Enterprise Options, and Management Packs, together with the certification, support, and licensing rationale.
Document any restrictions on feature usage and identify capabilities that require additional (paid-for) Oracle licenses. Review these decisions whenever the database configuration or intended use changes.
5.3. Platform – Operating System and Deployment Platform
Once the database configuration is selected, choose the operating system and deployment platform. Check that the complete combination is supported and that it suits the workload, security requirements, and expected lifetime.
Technical Prerequisite Gate
Check the selected database release and Release Update against the operating-system release and kernel. Then check the required packages, users, groups, kernel settings, and resource limits. Confirm CPU, memory, disk and temporary space, network settings, and hostname resolution. Include any requirements of the selected database architecture and features.
Support for an Oracle Database major release is not sufficient by itself. The final combination of database release and Release Update, operating-system release and kernel, host architecture, virtualization or cloud layer, and required capabilities must be supportable. For virtualized deployments, also confirm host/guest architecture compatibility and assess any optional platform component governed by terms separate from the base product.
Operating System Selection
The operating system must be certified for the selected Oracle Database configuration and suitable for the environment’s purpose and lifecycle.
Check Oracle certification, compatibility, support model, operational standards, and team skills. Oracle Linux is a common choice for Oracle Database, but another certified operating system may be appropriate when required by the application or target production standard.
Deployment Environment
Choose an on-premises, cloud, or hybrid deployment model based on operational requirements. On-premises deployments provide more direct control but require hardware and maintenance. Cloud deployments offer elastic capacity and managed services but introduce different cost and governance considerations.
A hybrid model combines on-premises control with cloud capacity and may support workload distribution, disaster recovery, or regulatory requirements.
Platform Selection Workflow and Scenario Guidance
The workflow below shows the platform selection process.
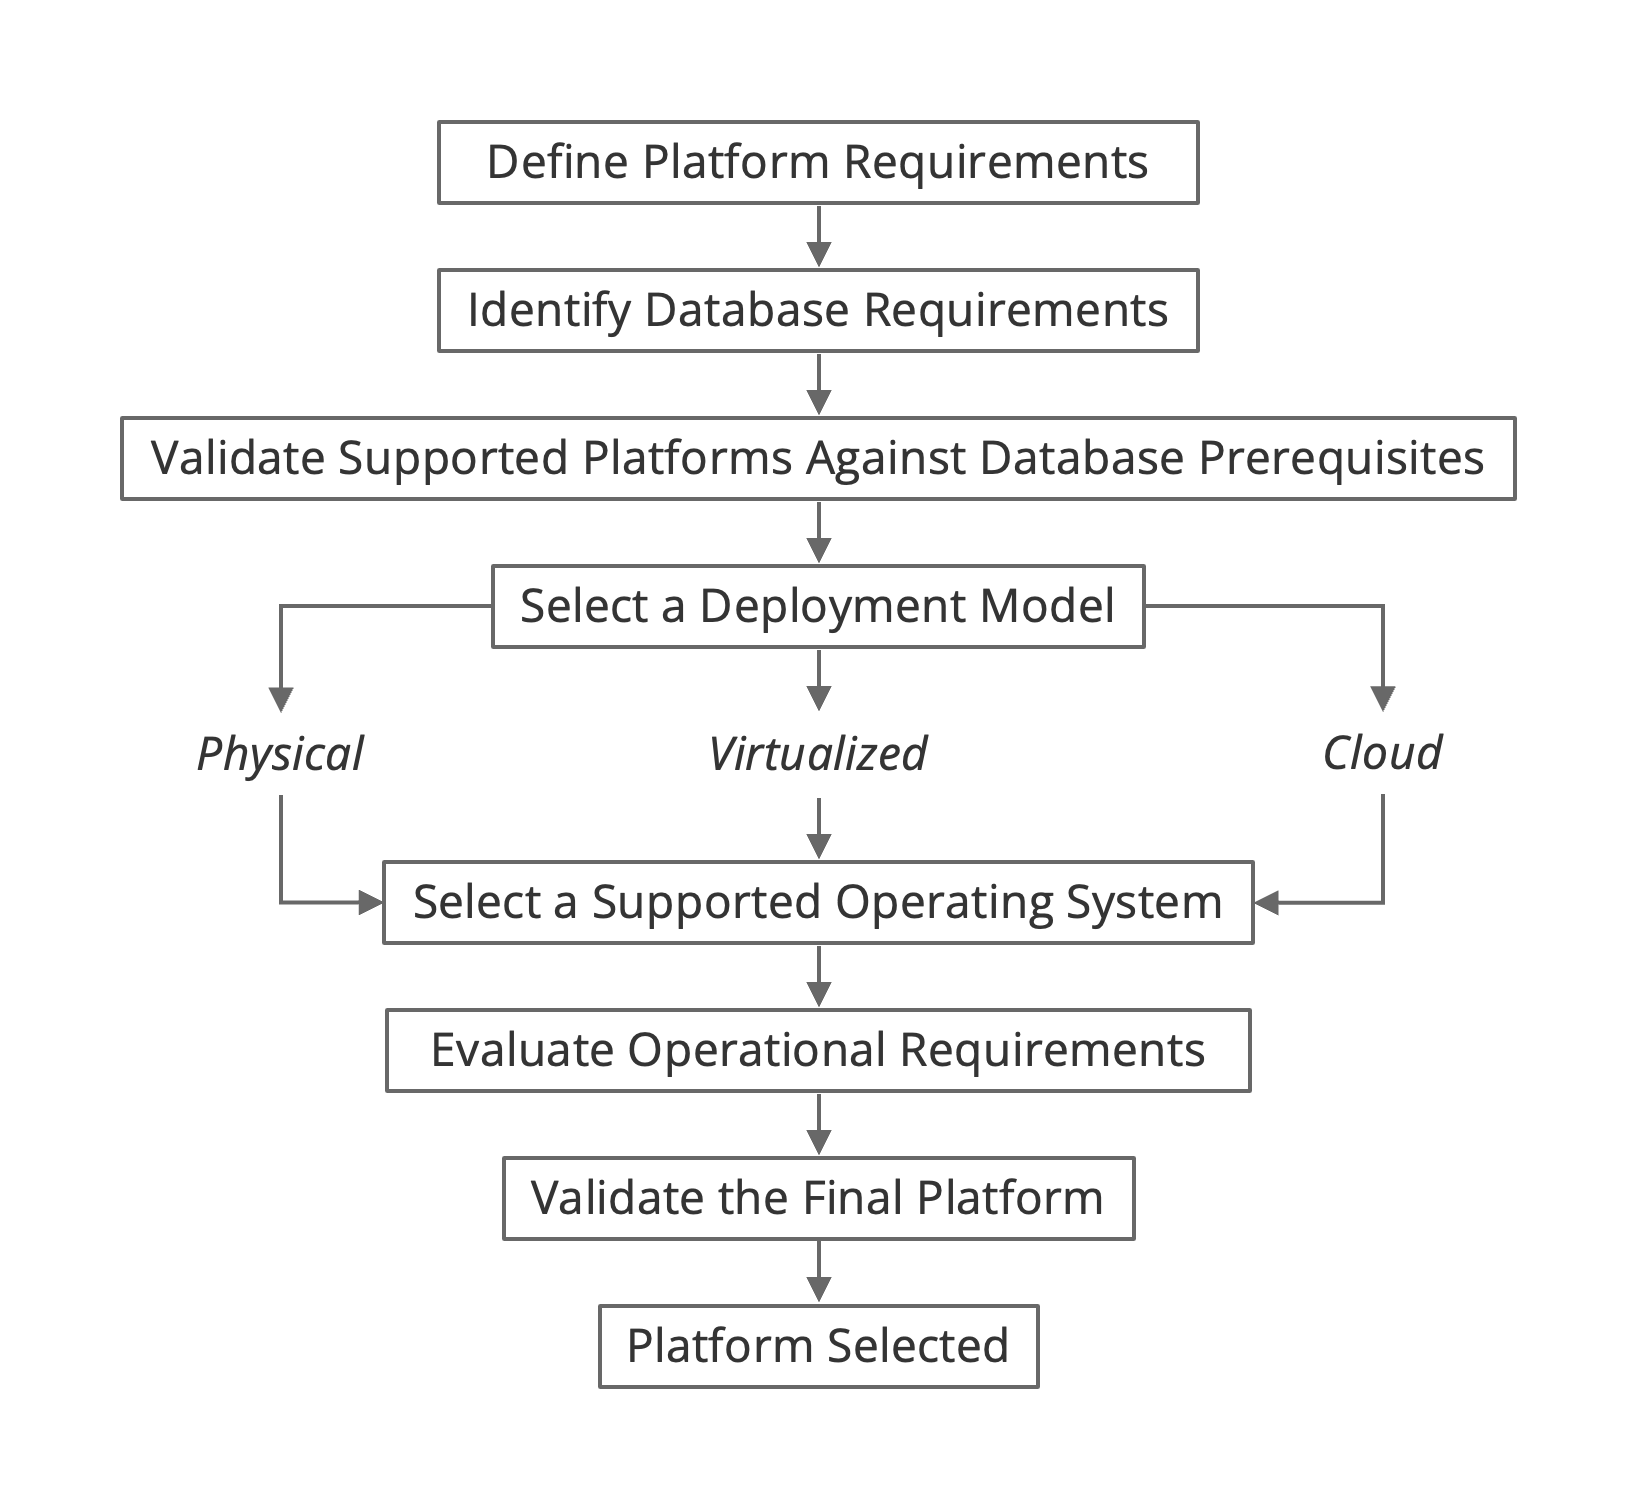
Exhibit 103: Platform Selection – Selection Workflow
Each step of the platform selection process can be applied to the three non-production environments: Production Replication, New Project / Proof of Concept, and Sandbox / Learning.
Use the following scenario-based recommendations to apply the platform selection process to the intended use of the environment.
|
Identify Database Requirements
|
Capture the production database architecture and configuration with integration requirements.
|
Define functional and technical requirements and select a database architecture and configuration that meet project or PoC requirements.
|
Define the testing or learning objective, minimum capacity, and required features such as data injection and environment lifetime.
|
|
Validate Supported Platforms
|
Confirm that the target platform supports the same Oracle Database configuration and production dependencies.
|
Identify Oracle-certified platforms that meet the project requirements and remain aligned with future production use and policies.
|
Confirm that the selected lightweight platform supports the required database release and features.
|
|
Select Deployment Model
|
Match the production deployment model where it affects the test; document any differences.
|
Select physical, virtualized, or cloud deployment according to future production requirements.
|
Use a disposable model, typically a virtual machine or cloud environment.
|
|
Select Supported Operating System
|
Use the same certified operating system and major version as production whenever possible.
|
Select an Oracle-certified OS; Oracle Linux is preferred where no project constraint dictates another supported OS.
|
Select an Oracle-certified operating system for the selected database release and deployment constraints.
|
|
Evaluate Operational Requirements
|
Validate the backup, monitoring, patching, security, network, storage, and recovery behavior required by the test scope.
|
Define backup, monitoring, patching, automation, security, disaster recovery, skills, support, and operating-cost requirements.
|
Prioritize simple provisioning and decommissioning.
|
|
Validate Final Platform
|
Confirm the required production alignment, Oracle certification, capacity, connectivity, and readiness for the planned tests.
|
Confirm that the selected architecture aligns with the production target and satisfies the project or PoC requirements.
|
Confirm that the platform supports the test objective, required features, isolation rules, budget, and cleanup.
|
Exhibit 104: Platform Selection – Recommendations by Scenario
Decision Output
Record the selected deployment model, host architecture, operating-system release and kernel, virtualization layer, resource baseline, and the certification evidence for the complete database configuration.
5.4. Growth – Scalability and Lifecycle Planning
Non-production environments change. Workload, data volume, integrations, support status, or the test objective may outgrow the original design. Decide in advance whether the next step is to resize, rebuild, upgrade, or move the environment. Do not build for production scale before it is needed.
Growth and Scalability Strategies
Growth can be managed by adding resources to one system, distributing a workload, or adjusting the database architecture. The choice depends on what the non-production environment must demonstrate.
Vertical scaling increases the CPU, memory, or storage allocated to an existing server or virtual machine. It is often the simplest response to a temporary test requirement, provided the platform supports the increase.
Horizontal scaling spreads supported workloads across multiple nodes, instances, or services. Use it only when the target architecture and test objective require it – for example, to validate an Oracle RAC configuration.
Partitioning may simplify the administration of large tables and improve queries that can prune irrelevant partitions. It should be included only when the use case justifies it and the necessary feature rights have been confirmed.
Multitenant architecture allows several PDBs to share one CDB and its instance resources. It can simplify administration, but it is a consolidation choice rather than a substitute for adding compute capacity.
Growth Planning Criteria
Estimate how users, workload, and data volumes may change during the environment’s useful life. Record the assumptions that drive CPU, memory, and storage sizing.
For workload planning, identify the expected number of users, transaction volume, peak periods, and representative batch jobs. Test the relevant peaks rather than applying a generic growth percentage.
For storage planning, include data growth, retention, archiving, temporary files, recovery requirements, and the space needed for integrations or test copies.
Keep a supported upgrade path and check application compatibility before changing the Oracle Database release, operating system, or platform.
The resulting design should state when resources will be increased, when the environment will be rebuilt, and which changes require a fresh technical or licensing review.
Growth Triggers and Scenario Guidance
The framework below identifies the appropriate responses for each growth trigger.
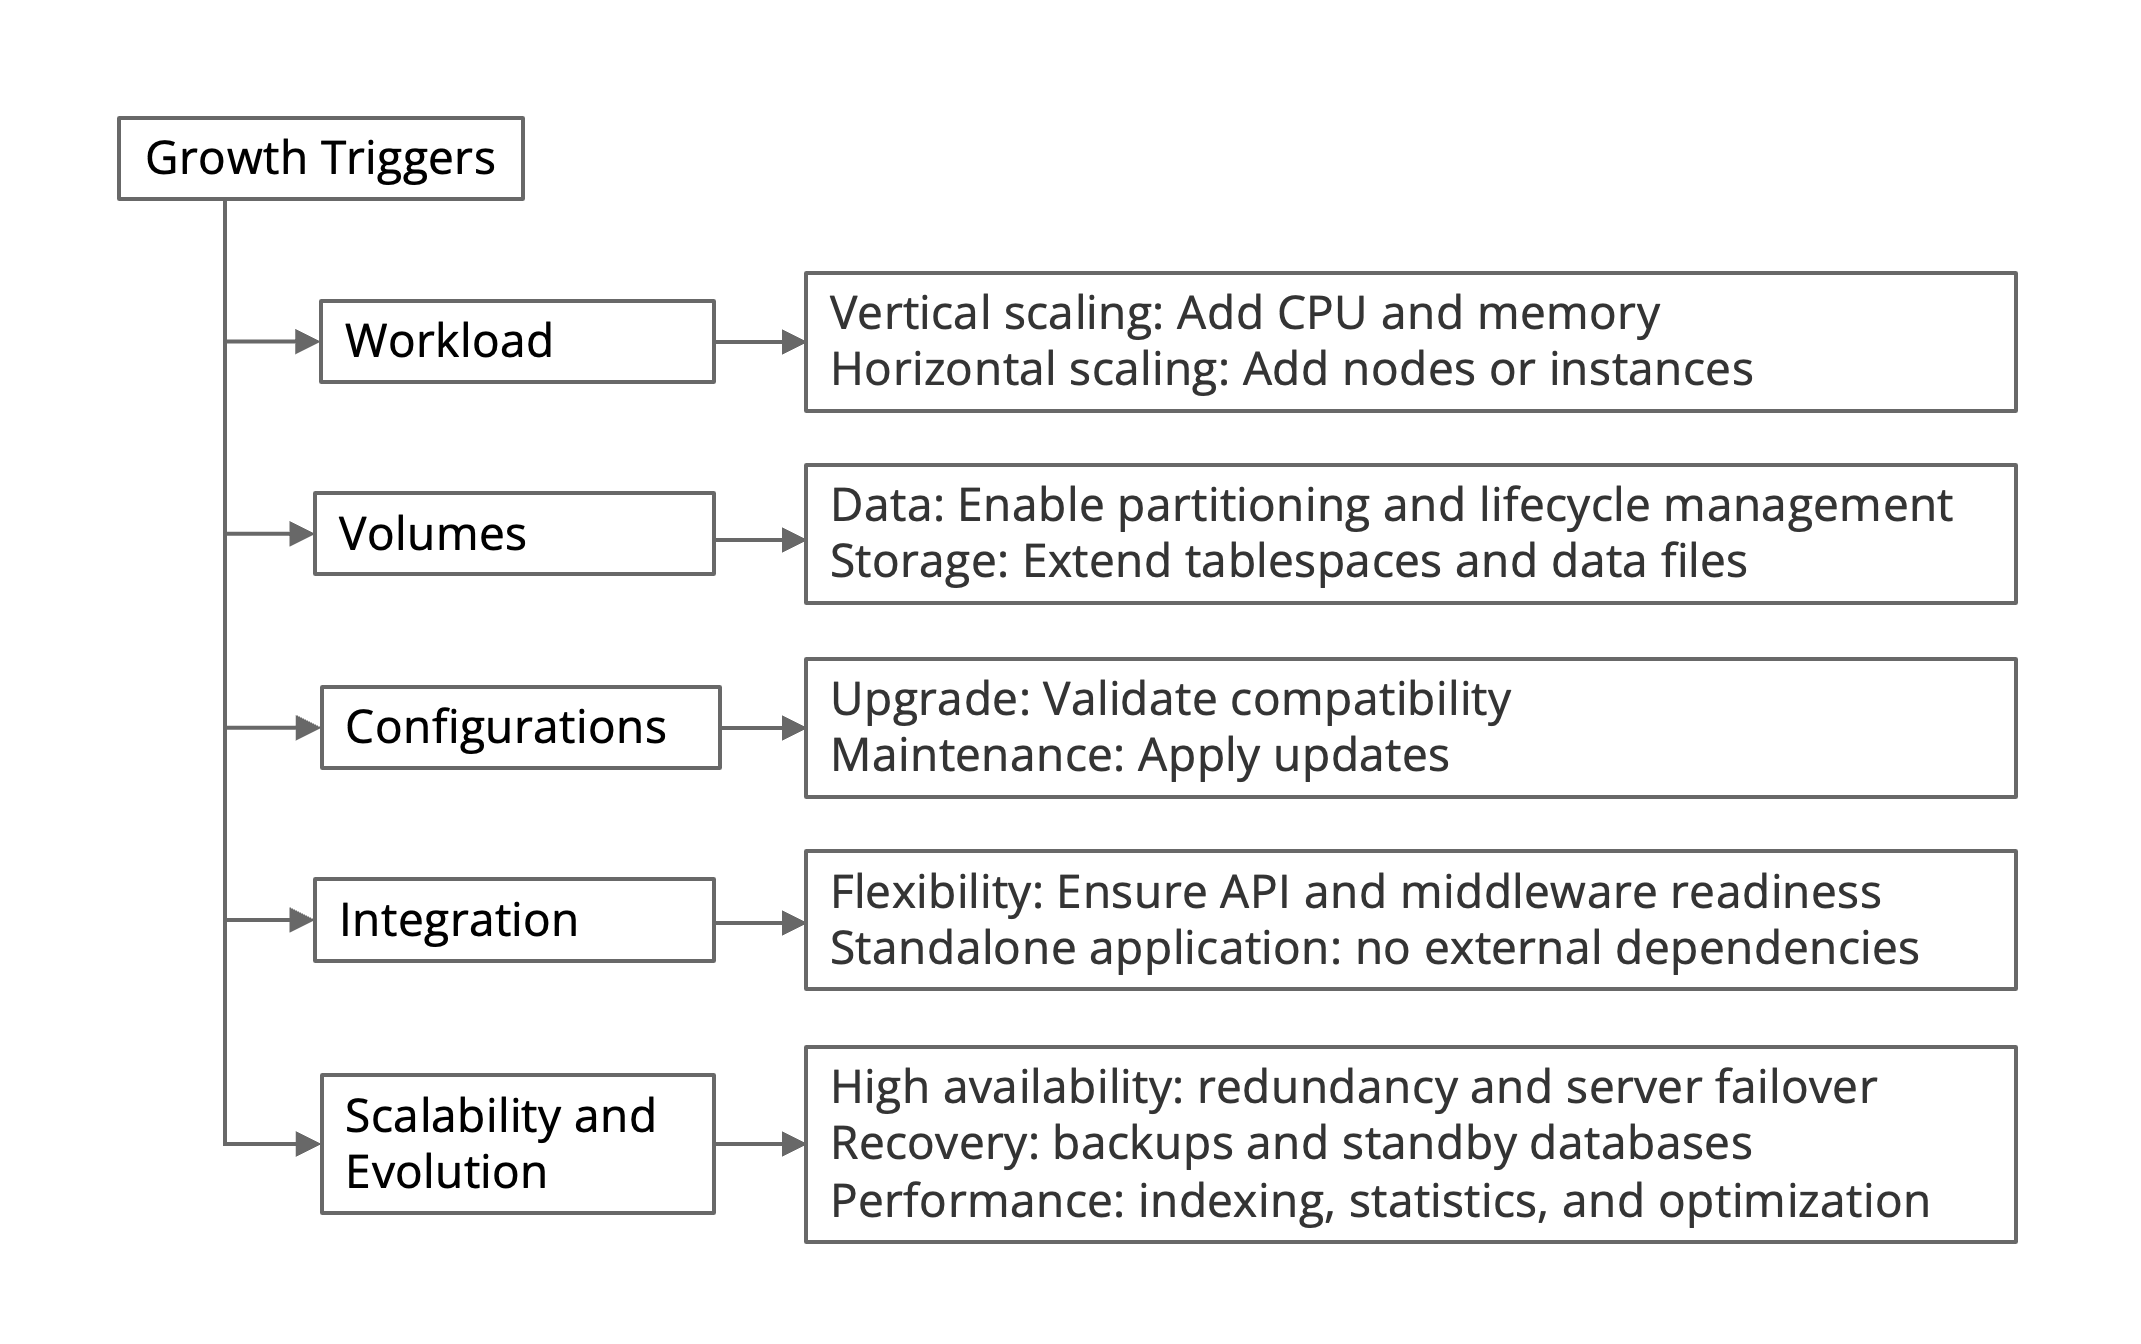
Exhibit 105: Scalability – Growth Triggers and Available Responses
The following table applies these considerations to the three primary non-production scenarios.
|
Production Replication
|
Preserve production representativeness with realistic workload and data-volume growth.
|
Match the production scaling and availability mechanisms that the tests need to cover.
|
Validate the workload and data growth, andSQL performancein scope. Include recovery and failover tests only when they are part of the objective.
|
|
New Project / PoC
|
Establish a scalable environment that can evolve toward the future production architecture.
|
Start with right-sized resources and ensure that the architecture can scale.
|
Validate projected workload and data growth, integration requirements, upgrade compatibility, operational cost, and the path to the target architecture.
|
|
Sandbox / Learning
|
Provide sufficient flexibility for experimentation while avoiding complexity or cost.
|
Use controlled resources, resource quotas, snapshots, or reset mechanisms.
|
Validate required features, resource quotas, environment isolation, and decommissioning.
|
Exhibit 106: Scalability – Resource Recommendations by Non-Production Scenario
Decision Output
Record the initial capacity, the tests that could require more resources, and the point at which the environment will be resized or rebuilt. For production replication, retain the characteristics that affect the test. For a new project, check the path to the intended production design.
Sandboxes should favor quick provisioning, isolation, and controlled resource use.
5.5. Security – Data Protection and Access Controls
The data and connections determine the security controls. A training VM with synthetic data has different needs from a test / staging environment holding production-derived data. Define access and cleanup rules for both.
Security Planning Criteria
Define the security baseline from the data and connections the environment will use. The following checks should be recorded in its design:
Identity and access – Identify the users and administrators, assign only the privileges they need, and keep credentials separate from production.
Data classification – Identify any production-derived, confidential, or regulated data. Decide whether it must be masked, subset, or replaced with synthetic data before it is loaded.
Encryption – Protect connections with TLS and determine whether encryption at rest is required for the data, platform, and operating model.
Network and configuration – Restrict connectivity to approved services, apply a supported security baseline, and plan operating-system and database patching.
Auditing and monitoring – Identify which logins, privileged activities, and security events must be recorded and how those records will be reviewed.
Lifecycle – Set retention periods for test data and credentials, and specify how the environment will be reset, archived, or removed after the exercise.
Security Control Baseline
Every non-production environment needs appropriate access restrictions, separate credentials and secrets, secure configuration, and suitable network controls.
Apply TLS, patching, logging, and auditing according to the data and connectivity risks; use additional protection where the environment contains sensitive information.
Environments containing production-derived or sensitive data require additional measures, including data masking or subsetting, encryption at rest, and enhanced monitoring.
Before the environment is used, verify that the selected security controls are implemented and appropriate for its intended purpose. Document any exceptions, their justification, and the required approvals. Reassess the security baseline whenever data sources, access requirements, or operating conditions change.
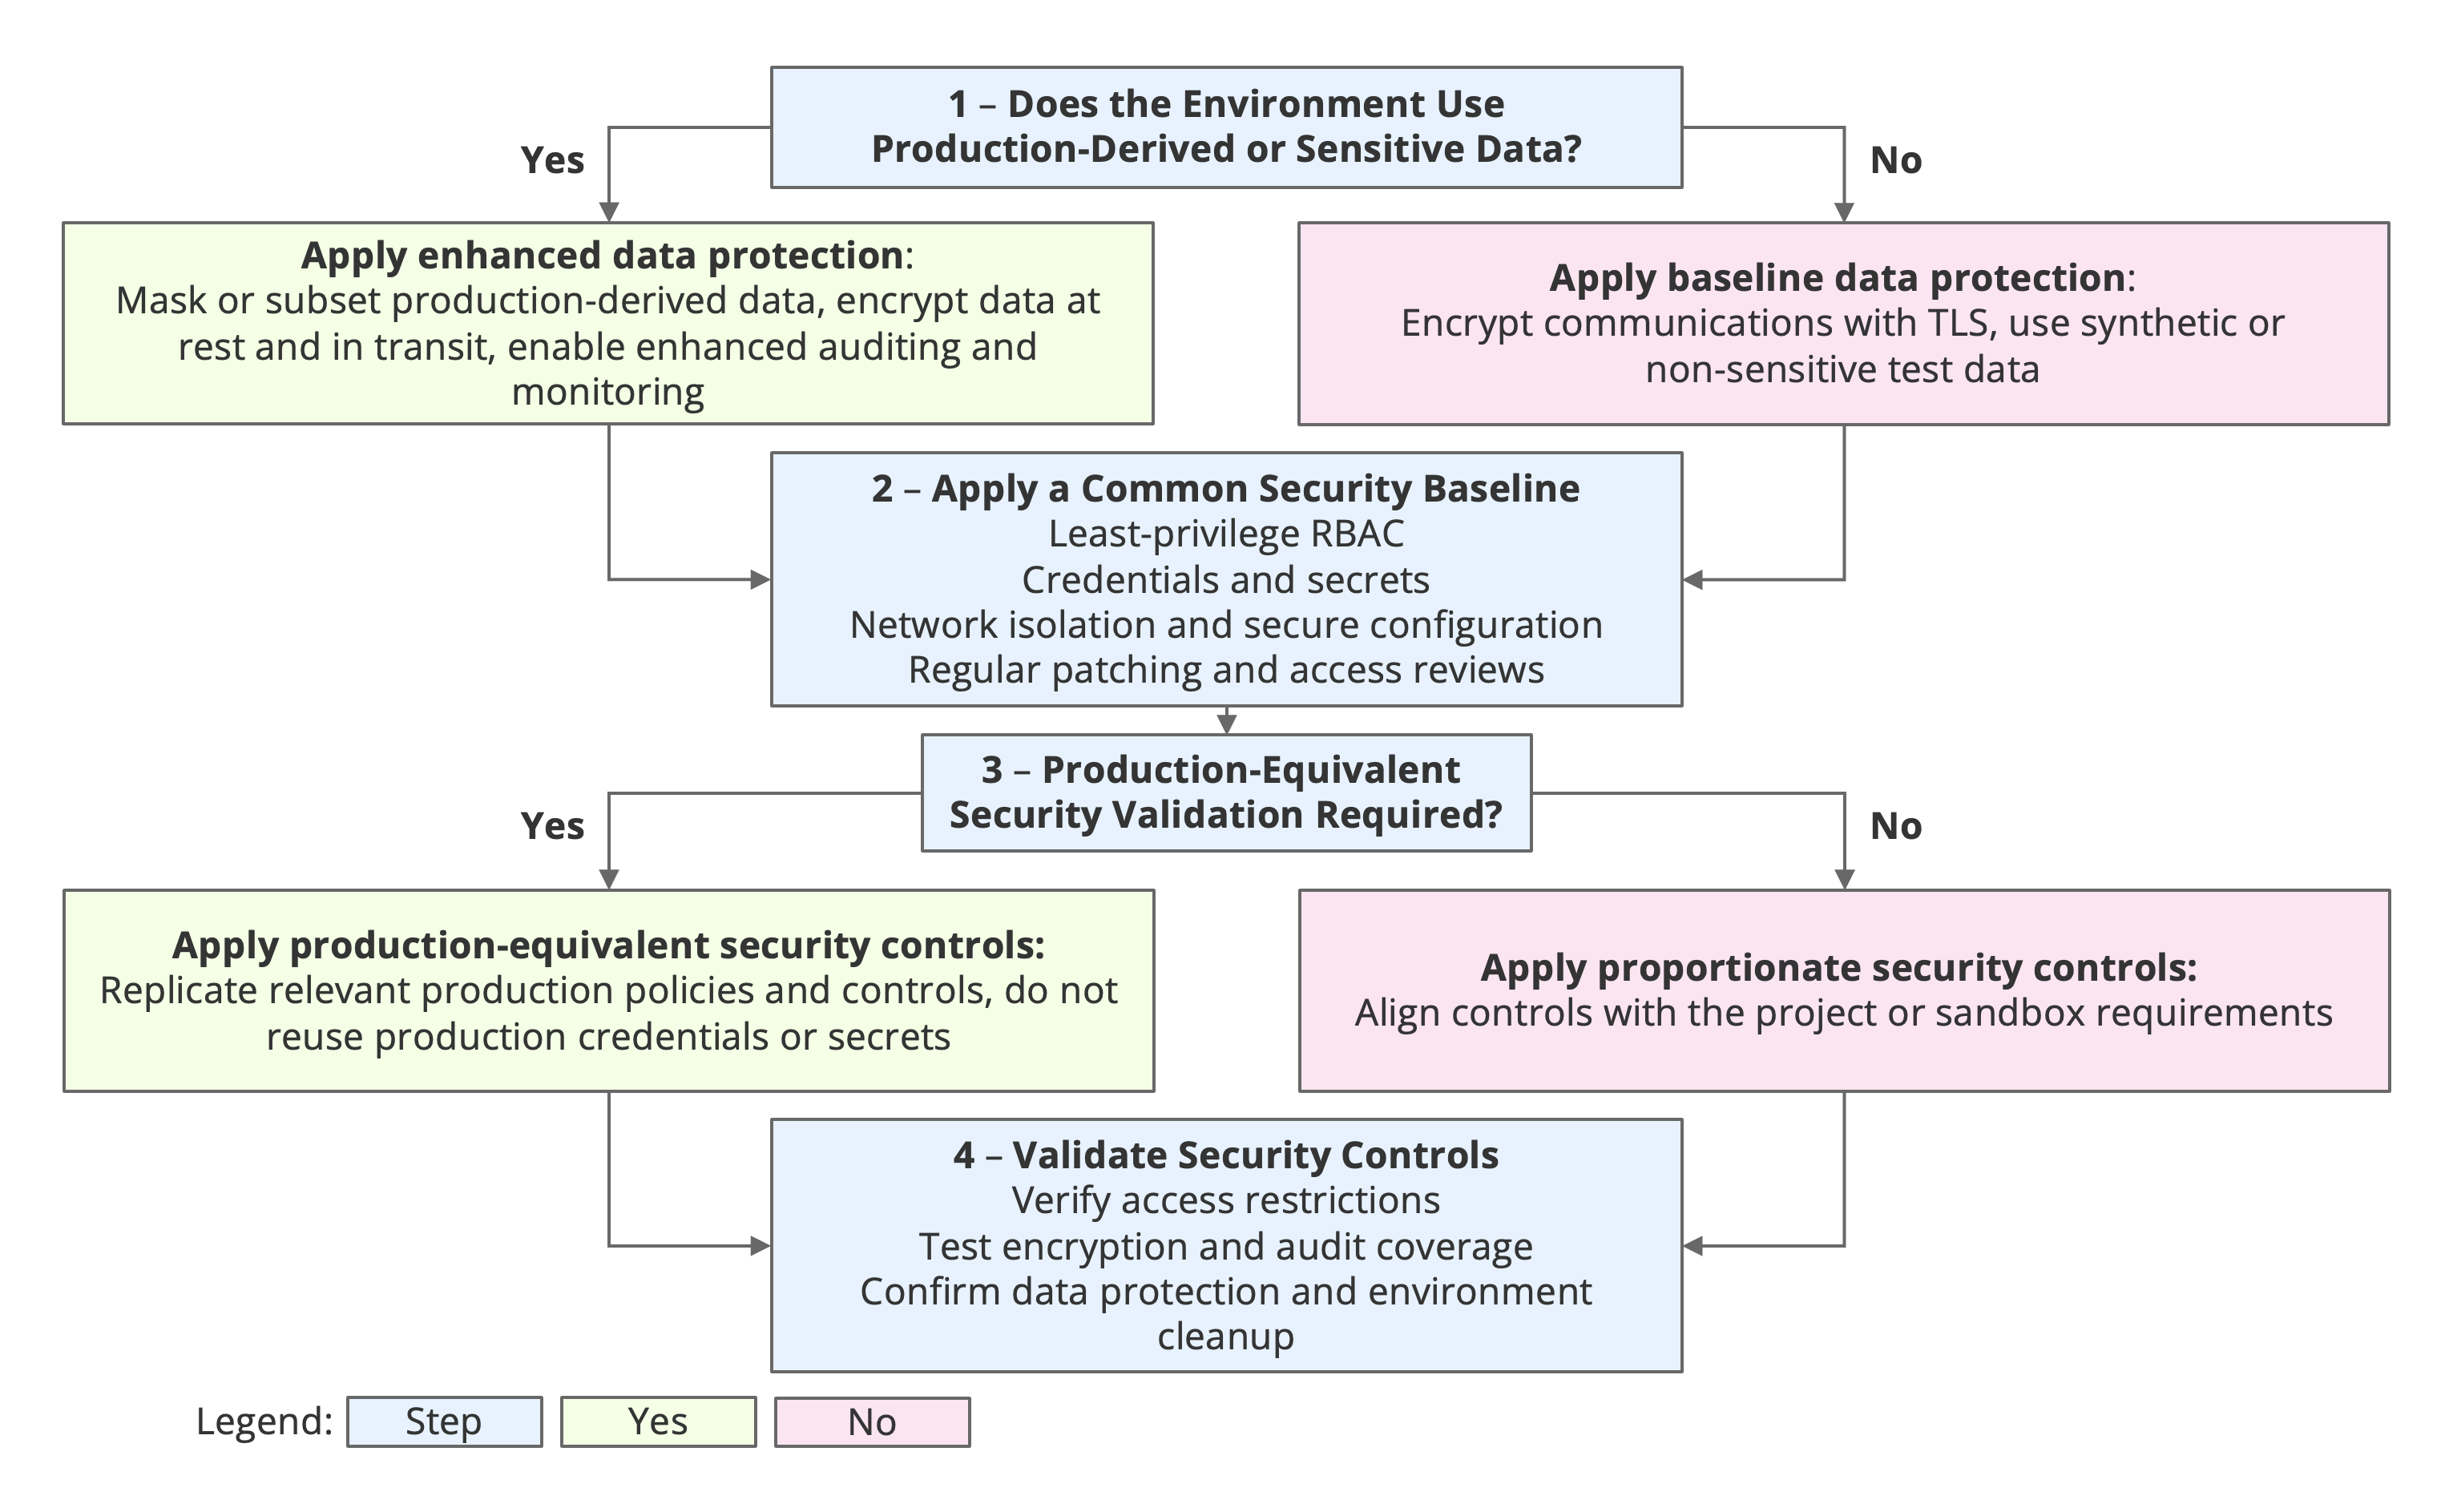
Exhibit 107: Security – Controls by Data Sensitivity and Validation Requirements
When production-equivalent security validation is required, relevant production policies and controls should be replicated without reusing production credentials or secrets.
|
Data Protection Requirements
|
Use production-derived data only when the test requires it; mask or subset sensitive data and retain production-equivalent classification controls.
|
Define data classification, retention, masking, encryption, and privacy requirements before representative data is introduced.
|
Use synthetic or anonymized data by default and prohibit uncontrolled copies of production data.
|
|
Identity and Access Controls
|
Use separate non-production identities and secrets, least privilege, and roles aligned with the production controls being validated.
|
Establish project-specific roles, approval paths, and environment-specific credentials that can evolve toward production.
|
Restrict access to named users, isolate administrative privileges, and rotate or remove credentials when the lab is reset.
|
|
Data and Communications Protection
|
Apply production-equivalent encryption, network segmentation, auditing, and monitoring without reusing production keys or secrets.
|
Apply TLS, appropriate encryption at rest, secure configuration, patching, logging, and monitoring from the initial design.
|
Use network isolation, TLS, secure defaults, minimal exposed services, and a defined cleanup process.
|
Exhibit 108: Security – Control Recommendations by Non-Production Scenario
Decision Output
Security controls should reflect the data, purpose, and required production alignment. Production-replication environments should reproduce relevant controls without reusing production credentials. New projects need a baseline that can evolve toward production. Sandboxes should emphasize isolation, restricted access, synthetic or anonymized data, and controlled resources.
Use least-privilege access, separate credentials, TLS, appropriate encryption at rest, data masking, network isolation, auditing, and monitoring as required. Check the Oracle Database edition, feature, and licensing implications before approving the security design.
5.6. Building a Scenario – Applying the Five Design Decisions
The tables below bring the earlier decisions together for the three scenarios (Production Replication, New Project / Proof of Concept, and Sandbox / Learning). Use them as a starting point, then adapt the choices to the project.
The right configuration depends on what the environment must reproduce, how long it will be used, and the workload it must support.
Read the tables in order: database release, edition and features, then operating system and platform. Production Replication follows the parts of production relevant to the test. Proof of concept follows the proposed target design. A learning sandbox needs to support its exercises and be easy to rebuild.
Oracle Database Version
The first table compares the Oracle Database release strategy for each use case.
|
Environment
|
Match the production release and Release Update (RU) when version fidelity affects the test.
|
Use Oracle AI Database 26ai for a certified greenfield target; retain 19c when application or migration dependencies require it.
|
Use the current Oracle Database Free release for general learning; use 19c or 26ai only when the exercise requires that release.
|
|
Configuration
|
Use the same supported database release and RU as production, with documented exceptions for the test objective.
|
Prefer 26ai for a certified greenfield design; use 19c when the target application or upgrade path depends on it.
|
Use Oracle Database Free for general labs or the exact target release when compatibility is the learning objective.
|
|
Platform Selection
|
Confirm certification of the production release and RU for the replicated compute and deployment model.
|
Validate the selected long-term release against the intended on-premises, cloud, or engineered-system target.
|
Choose the release according to the lab objective and the availability of a supported image or installation package.
|
|
Growth
|
Preserve the production upgrade and RU path so that scale and lifecycle tests remain representative.
|
Select a long-term release with a supported path to the planned production architecture.
|
Remain on a supported Free or long-term release and rebuild the lab when that is simpler than an in-place upgrade.
|
|
Security
|
Use a supported long-term release with the latest approved RU and applicable security updates.
|
Use a supported long-term release and establish an approved patch baseline before the environment is used.
|
Use a supported release and patch it before use; obsolete releases should be isolated and used only when the objective requires them.
|
Exhibit 109: Database Selection – Release Recommendations by Non-Production Scenario
Oracle Database Options and Management Packs
The second table compares edition, features, and optional packs for each use case.
|
Environment
|
Mirror only the production functionality required by the validation scope; verify equivalent non-production entitlement.
|
Select the minimum edition and separately licensed capabilities needed to prove the project requirements.
|
Use included functionality by default and avoid separately licensed options or packs unless the exercise is authorized.
|
|
Configuration
|
Enable only the production options and packs required for the validation; confirm licensing before use.
|
Use Standard Edition 2 when its limits satisfy the design; select Enterprise Edition only for required enterprise capabilities.
|
Keep the configuration minimal and limited to functionality included in the selected offering.
|
|
Platform Selection
|
Validate platform and topology dependencies for capabilities such as clustering, standby operation, and management tooling.
|
Choose capabilities supported by the target deployment model and include their licensing impact in the architecture decision.
|
Avoid topology-dependent options unless they are the explicit subject of an authorized exercise.
|
|
Growth
|
Reproduce only the scaling and availability capabilities under test; validate entitlement and cost before activation.
|
Introduce scaling capabilities only when projected workload, availability, or data growth justifies them.
|
Do not add scaling options unless the capability is being tested under appropriate rights.
|
|
Security
|
Replicate required database security controls and verify the licensing status of every selected option or pack.
|
Select only controls required by policy and available under the chosen offering and entitlement.
|
Rely on included security controls by default; do not activate paid options or packs without authorization.
|
Exhibit 110: Database Selection – Edition and Features by Non-Production Scenario
Operating System
The third table compares operating-system and platform choices for each use case.
|
Environment
|
Match the certified production OS major release and relevant kernel characteristics when they affect behavior.
|
Use the intended production OS; where no constraint exists, select a certified Oracle Linux release.
|
Use a certified Oracle Linux release in an isolated, disposable virtual machine or container.
|
|
Configuration
|
Treat OS certification for the selected database release as a mandatory configuration gate.
|
Select an Oracle-certified OS release that supports both the chosen database version and the target application stack.
|
Choose a lightweight certified OS release aligned with the installer or image used by the lab.
|
|
Platform Selection
|
Use the same certified OS as production whenever practical; reproduce only platform details relevant to the test.
|
Use the target platform’s certified OS; Oracle Linux is the default when no project constraint dictates another OS.
|
Prefer a disposable VirtualBox, cloud, or container environment based on a supported Oracle Linux image.
|
|
Growth
|
Match storage, kernel, and cluster characteristics that materially affect scalability or recovery behavior.
|
Choose an OS and platform that supports planned storage expansion, automation, high availability, and upgrades.
|
Use quotas, snapshots, and repeatable redeployment; move to a larger supported VM only when the exercise requires it.
|
|
Security
|
Apply production-equivalent hardening, patching, and monitoring without reusing production credentials or secrets.
|
Adopt a hardened, certified OS baseline that can evolve directly into the production standard.
|
Isolate the network, use non-production credentials and synthetic data, and keep the VM or container disposable.
|
Exhibit 111: Platform Selection – Operating System Recommendations by Scenario
Record the selected database configuration and platform before building. Check support and licensing for that combination. If a later test needs different data, features, capacity, or connections, revisit the affected choices.
5.7. Scenario Illustrations – Three Examples
The following anonymized examples are derived from OMTCO’s project experience. Each starts with a specific problem, explains the five design decisions, and ends with the test results. The comparison in Section 5.8 shows what could be concluded from each environment.
The three projects are:
-
Example 1 – a SQL performance regression following an Oracle Database Release Update
-
Example 2 – the consolidation of three departmental databases into a multitenant architecture
-
Example 3 – the implementation of a DBA training environment.
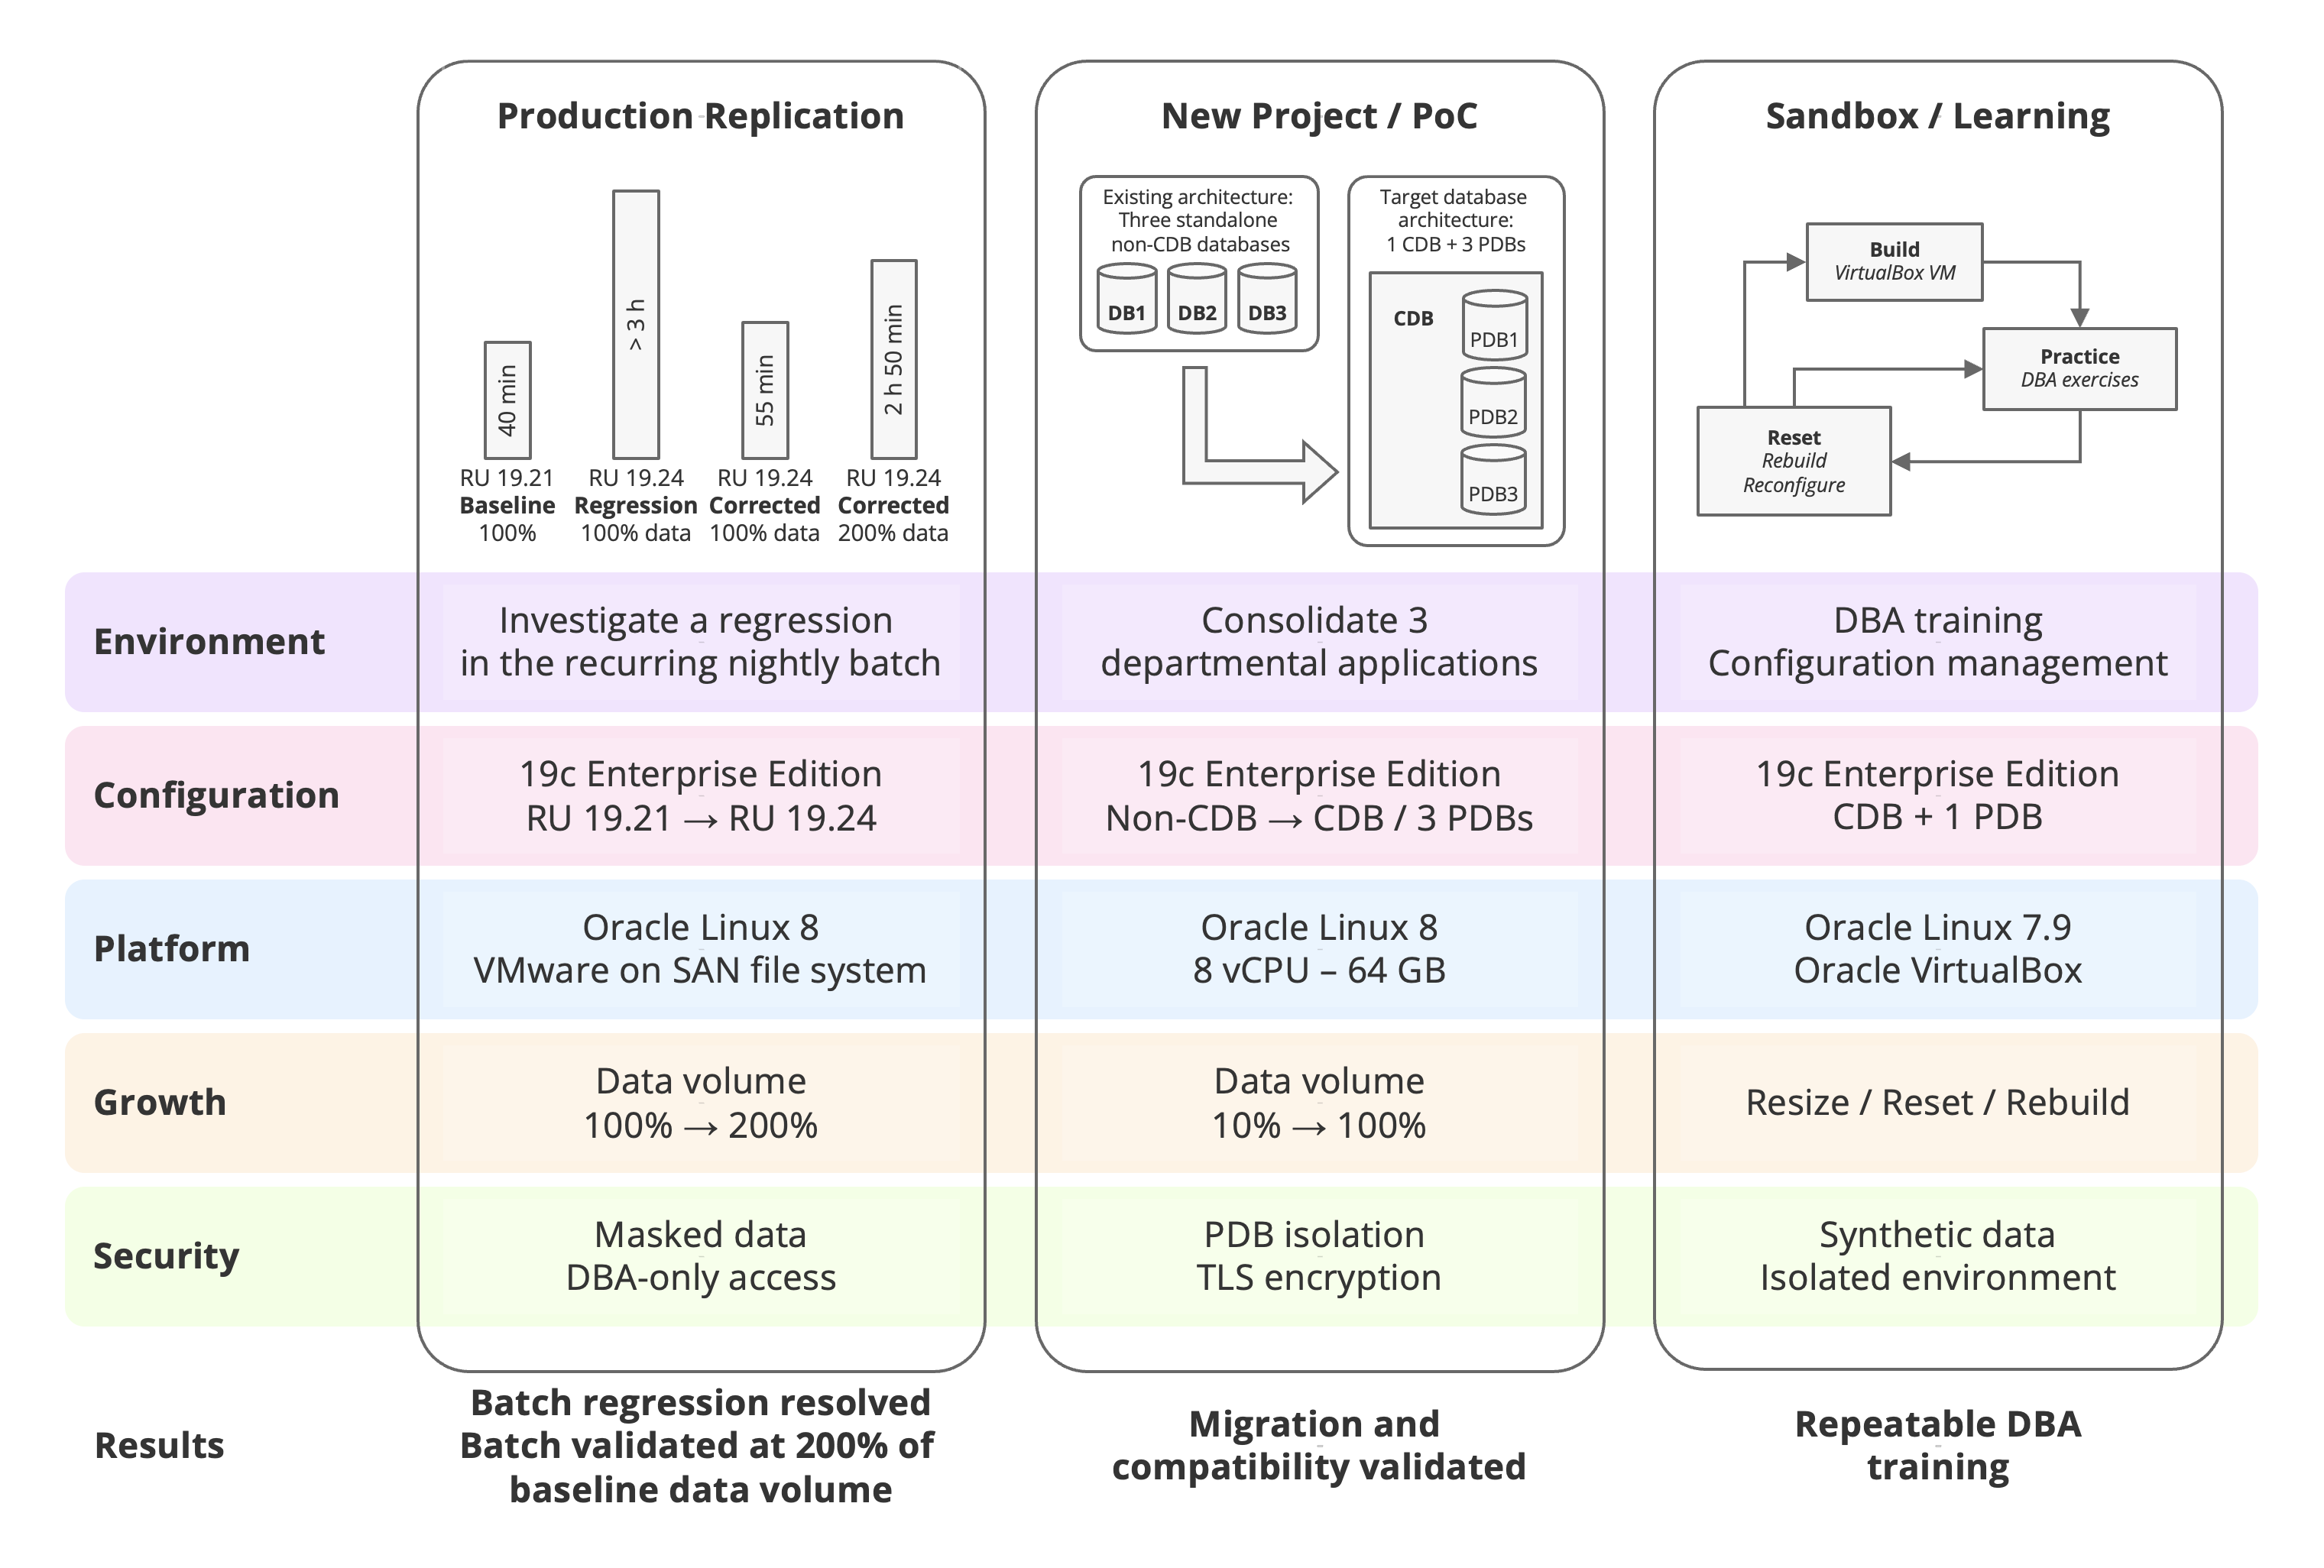
Exhibit 112: Scenario Illustrations – Three Examples Applying the Five Design Decisions
Production Replication – SQL Performance Regression
Context – After an Oracle Database 19c Enterprise Edition update from RU 19.21 to RU 19.24, a nightly batch slowed from a 40-minute run time to more than three hours (factor ~5 worsening). Initial checks of the network, system resources, storage, and application did not identify the cause.
Environment selection – The team used a Production Replication environment to reproduce the slowdown without affecting production. It was later used to test whether the corrected batch could process twice the production data volume within four hours.
New Project / Proof of Concept – Database Consolidation
Context – Three departmental applications ran on separate Oracle Database 19c non-CDB databases on Windows servers. The proposed design placed them in one CDB with three PDBs on Oracle Linux 8. Objectives: simplify administration and maintenance (server, DBA) tasks.
Environment selection – The team used a New Project / Proof of Concept environment to test the migration, application behavior, and shared resources. Oracle Database 19c was kept so that the project did not combine a change in database architecture with a release upgrade.
Sandbox / Learning – DBA Training
Context – DBAs needed an environment to practice installation, administration, and recovery without affecting operational systems (isolation from production).
Environment selection – The team started with the learning sandbox from Chapters 1 to 4: Oracle Database 19c Enterprise Edition on Oracle Linux 7.9 in VirtualBox. It could be changed, resized, or rebuilt for later exercises. Additional configurations can be established as training requirements evolve, subject to the technical prerequisites of each Oracle Database release.
5.7.1 Production Replication – SQL Performance Regression
Project Context
The batch remained slow after the initial infrastructure and application checks. The team set up a separate Production Replication environment to reproduce the problem, compare SQL plans, and test a correction.
After the regression was corrected, the tests were extended to twice the production data volume. The batch had to finish within a four-hour operational window.
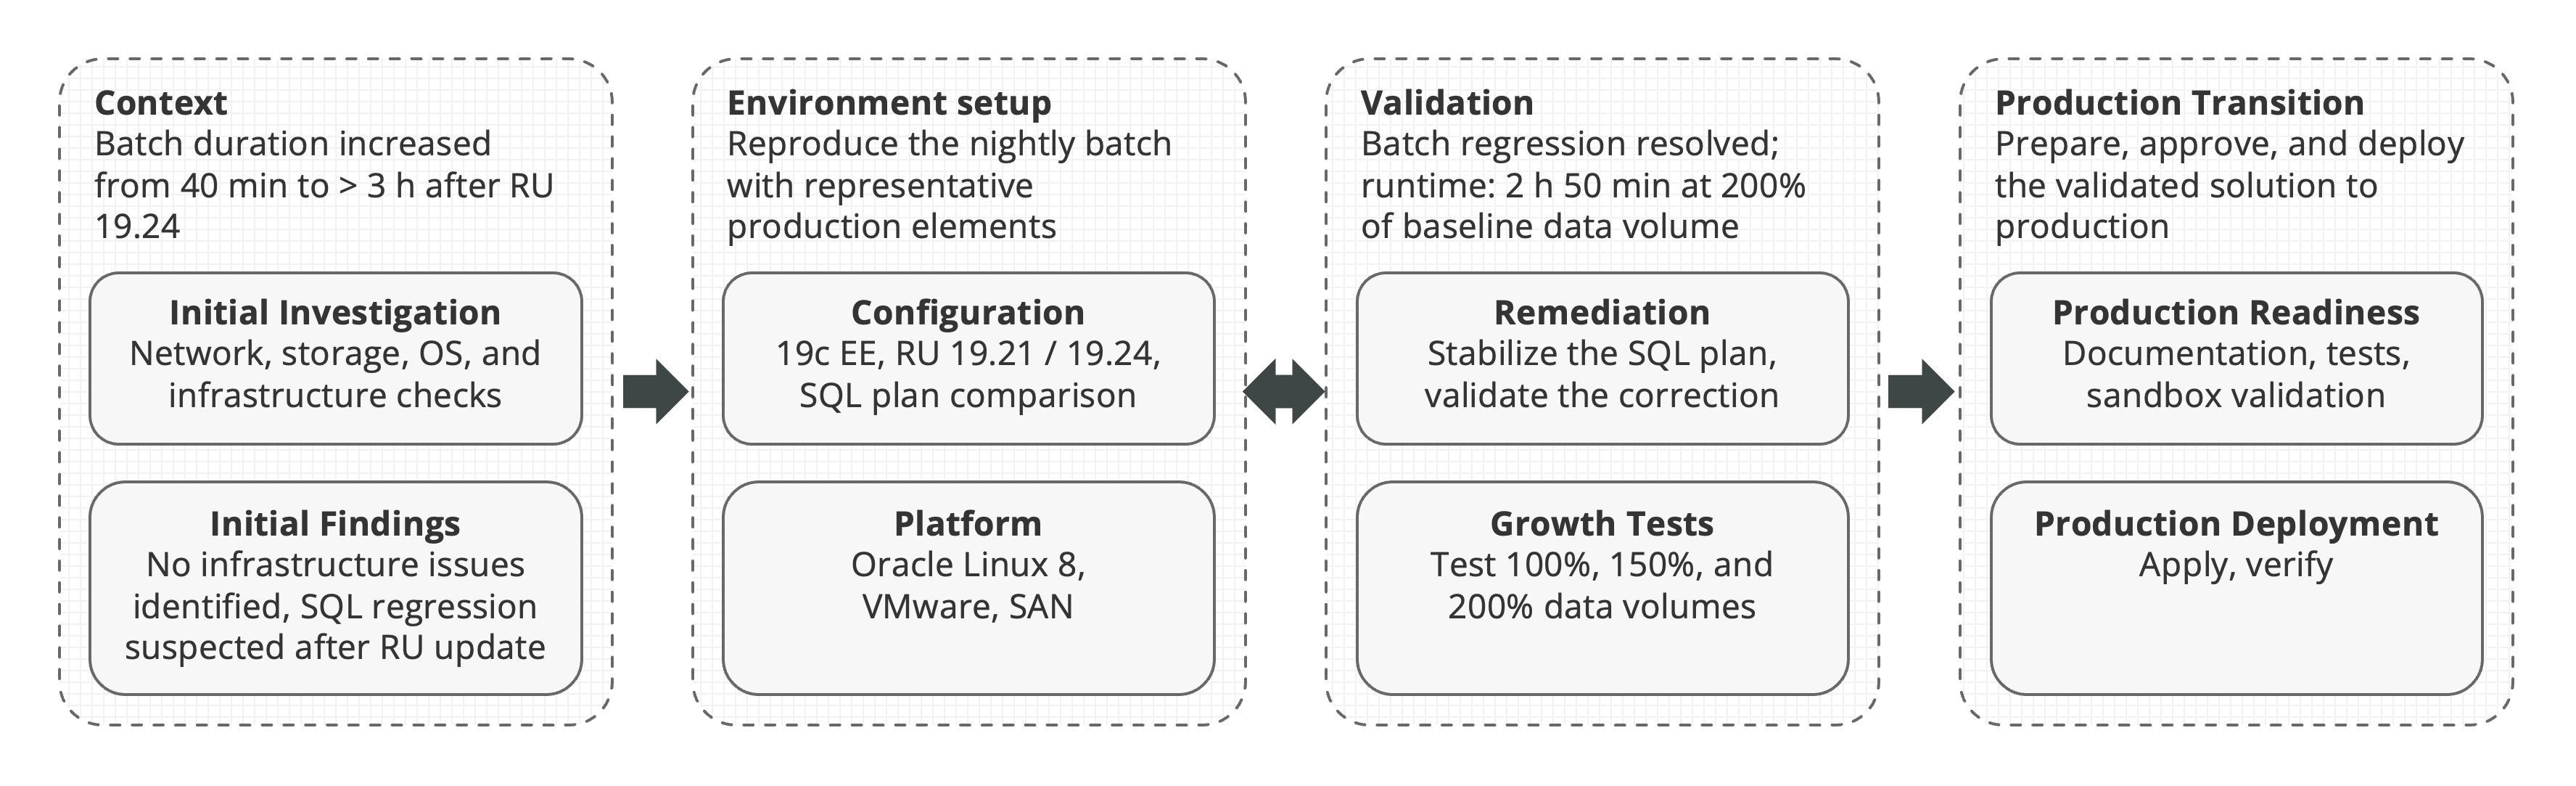
Exhibit 113: Production Replication – Overview
Key Points
The team reproduced the slowdown on RU 19.24, corrected the execution plan, and then tested larger data volumes:
-
Reproduced the affected nightly batch using production schemas, optimizer statistics, and the two largest tables at full volume
-
Compared SQL execution plans between RU 19.21 and RU 19.24 using DBMS_XPLAN
-
Applied a SQL plan baseline to stabilize the execution plan on RU 19.24
-
Tested the corrected batch at 100%, 150%, and 200% of production data volume against the four-hour processing window
At 200% of production data volume, the batch completed in 2 hours and 50 minutes.
Environment
The following database objects and settings needed to run the affected batch were copied:
-
Production schemas, indexes, and optimizer statistics
-
The two largest production tables are at full volume
-
Original batch SQL and relevant database initialization parameters
-
Separate test configurations for RU 19.21 and RU 19.24
Application servers, external interfaces, and interactive user workloads were left out. The batch SQL could run directly against the database, without dependencies on the application layer.
This kept the comparison focused on the batch without copying the whole production environment.
Configuration
Both test configurations used Oracle Database 19c Enterprise Edition with applicable one-off patches and identical test data.
The following were compared between RU 19.21 and RU 19.24:
-
Optimizer parameters, including optimizer_features_enable
-
SQL execution plans using DBMS_XPLAN.DISPLAY_CURSOR
-
SQL identifiers, PLAN_HASH_VALUE, join methods, access paths, and cardinality estimates
-
SQL trace results, including elapsed time and database wait events
-
Oracle Partitioning, retained for the affected production table
The comparison showed that the SQL join execution plan had changed after the RU update. A SQL plan baseline was applied on RU 19.24 to restore the previous plan, and the batch was tested again. The investigation did not require Oracle RAC, Active Data Guard, or Diagnostics and Tuning Packs, hence saving license costs.
Platform
The test environment retained the production platform characteristics that could affect the SQL performance comparison. The platform used the following configuration:
-
Operating system: Oracle Linux 8
-
Kernel: Unbreakable Enterprise Kernel (UEK)
-
Virtualization: VMware
-
Storage: Same SAN storage tier as production
-
Database: Oracle Database 19c Enterprise Edition
-
Data: Two production tables at full volume, using masked data
The test VM used a smaller SAN LUN because only the objects needed by the batch were copied, rather than the entire production database.
Oracle Linux 8, VMware, and the same SAN storage tier as production were kept. The storage allocation was later increased for the data-volume tests. This mirrored execution conditions comparable to production. Storage capacity was subsequently extended to accommodate the growth tests.
Growth
After the plan was corrected on RU 19.24, the batch was rerun with increasing data volumes. The main target was a four-hour window at 200% capacity.
The capacity tests followed three stages:
-
100% of production data volume: Establish a performance baseline with the corrected SQL execution plan.
-
150% of production data volume: Evaluate batch performance at an intermediate growth level.
-
200% of production data volume: Validate the target capacity, the batch completed in 2 hours and 50 minutes, within the four-hour processing window.
The production partitioning scheme, SQL plan baseline, and statistics-gathering process were kept throughout these tests.
Security
Masked production data was used. The masking had to protect sensitive values while retaining the data characteristics needed to reproduce the batch behavior.
The following security measures were applied:
-
Customer names, addresses, and banking details were replaced with masked values.
-
Primary and foreign keys, referential integrity, and relevant data distributions were preserved to maintain realistic SQL execution conditions.
-
Dedicated DBA accounts were used instead of production credentials.
-
Database links and direct connectivity to production systems were excluded.
-
Network access was restricted to the investigation team.
These measures allowed the team to investigate the SQL regression and conduct capacity tests using representative data while keeping the sandbox isolated from production systems.
After the investigation and capacity tests, the environment and its masked data were deleted.
Project Result
The RU update had changed the SQL execution plan. Applying a SQL plan baseline resolved the regression on RU 19.24.
At twice the production data volume, the corrected batch finished in 2 hours and 50 minutes. This left 1 hour and 10 minutes within the four-hour window for the tested workload. It did not measure the performance of application servers or concurrent interactive users, which were outside the test scope.
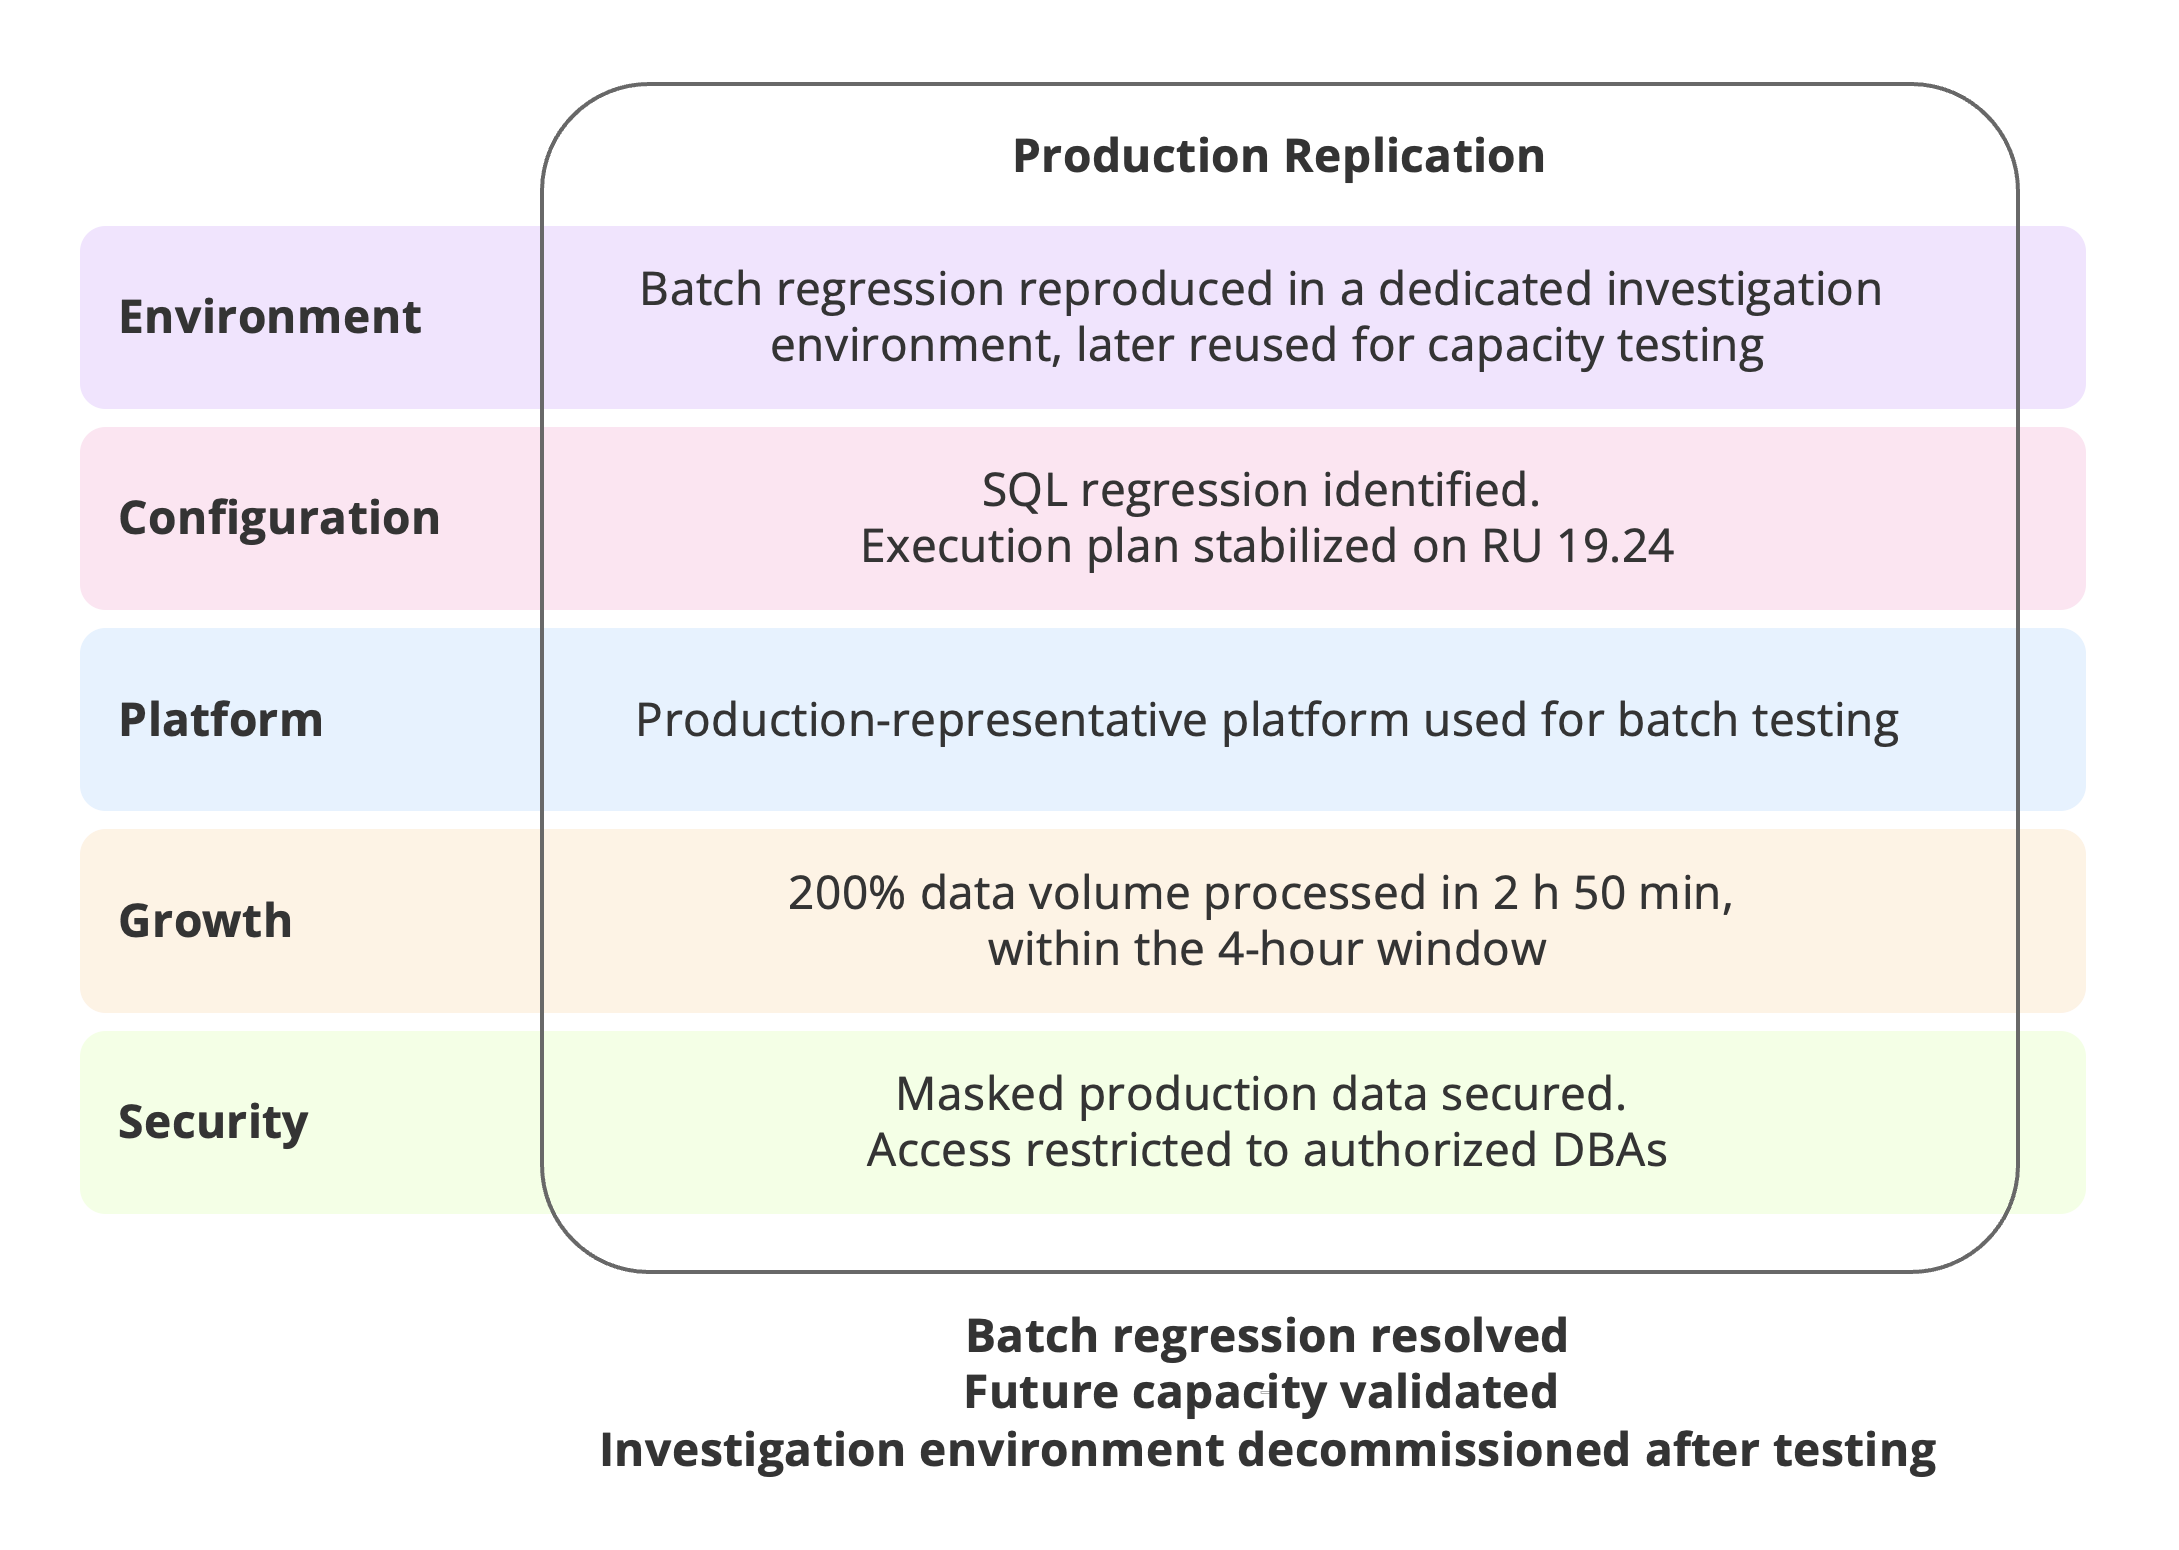
Exhibit 114: Production Replication – Results
5.7.2 New Project / Proof of Concept – Database Consolidation
Project Context
Three departmental applications ran on separate Oracle Database 19c non-CDB databases on Windows servers. Each database needs its own administration and maintenance.
The proposed target was one Oracle Database 19c Enterprise Edition CDB with three PDBs on Oracle Linux 8, one PDB per application. The main objective was to consolidate administration tasks and save costs.
Oracle Database 19c was kept separating the architecture change from a database release upgrade.
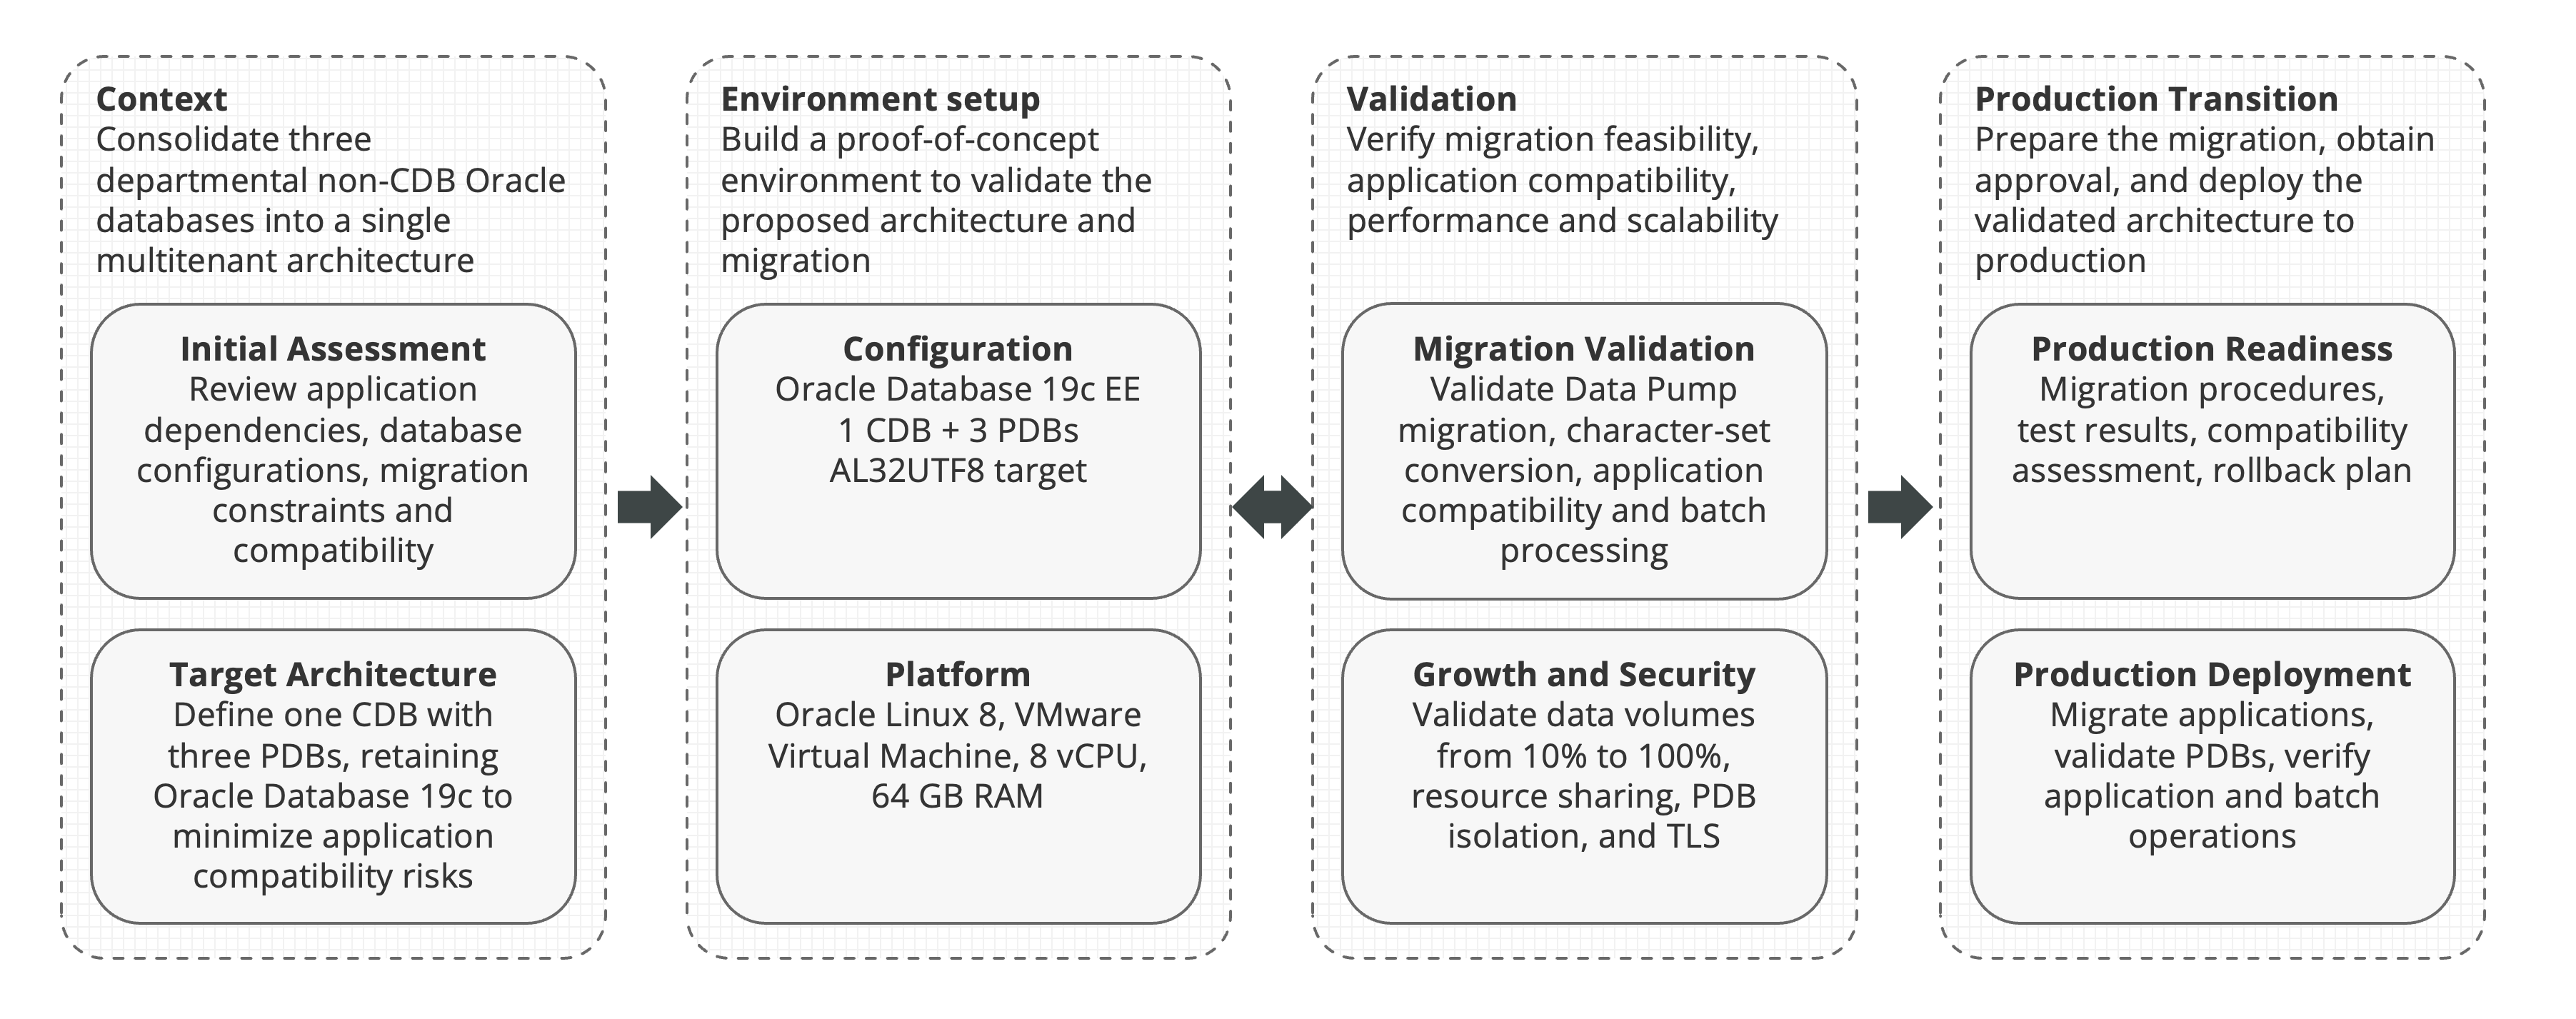
Exhibit 115: New Project / Proof of Concept – Overview
The team built a proof of concept to test migration, application compatibility, and resource sharing before a production migration decision.
Key Points
The team tested whether the three applications could run in separate PDBs within one CDB and checked the migration and administration procedures – while maintaining application compatibility and operational reliability.
-
Establish an Oracle Database 19c Enterprise Edition CDB with three PDBs on Oracle Linux 8, one PDB per departmental application.
-
Validate the migration of application schemas and data from the existing Windows-hosted non-CDB databases, including character set conversion from WE8MSWIN1252 to AL32UTF8.
-
Verify application connectivity, SQL and batch processing, scheduled jobs, privileges, and resource sharing across the three PDBs.
-
Assess database administration, backup and recovery procedures, PDB isolation, and performance as data volumes increase.
Environment
The Proof-of-Concept test environment contained copies of the three applications’ database objects and data, together with the proposed target CDB.
The sandbox included:
-
Three source databases are hosted on Windows servers, represented by copies of their application schemas, data, and relevant database objects.
-
One Oracle Database 19c Enterprise Edition Container Database (CDB) with three Pluggable Databases (PDBs), one dedicated to each application.
-
Representative application datasets, including the objects, dependencies, and data required to validate migration and application compatibility.
-
Test connections and batch execution procedures for each application, allowing their operation against the corresponding PDB to be verified.
The source production databases stayed in operation and were not changed. The team tested the database migration and the application components needed for validation. Production cutover and live user traffic were outside the scope.
This environment allowed the team to evaluate the target architecture and migration procedures before making changes to the operational systems.
Configuration
The target configuration used Oracle Database 19c Enterprise Edition with a single Container Database (CDB) hosting three Pluggable Databases (PDBs), one for each departmental application.
The Proof of Concept focused on the following configuration and migration activities:
-
CDB and PDB configuration: Create three PDBs with dedicated application schemas, services, and database accounts.
-
Data migration: Use Oracle Data Pump to export the application schemas from the existing non-CDB databases and import them into their respective PDBs.
-
Character set conversion: Validate the migration from WE8MSWIN1252 to AL32UTF8, checking character integrity and identifying potential data conversion issues.
-
Application compatibility: Verify database connections, SQL execution, scheduled jobs, privileges, and dependencies within each PDB.
-
Resource management: Evaluate CPU and memory consumption under concurrent application workloads and assess resource allocation between PDBs.
-
Backup and recovery: Validate RMAN backup procedures and the ability to recover the consolidated environment.
The team checked that each application could connect to its own PDB and run its SQL, jobs, and batch processing. Concurrent tests then checked how the applications shared resources in the CDB.
The consolidation also required a review of Oracle Multitenant licensing implications before production deployment.
Platform
The Proof of Concept used a dedicated virtual machine running Oracle Linux 8 to evaluate migration from three separate Windows-hosted databases to a consolidated Oracle Database environment.
The target platform included:
-
Operating system: Oracle Linux 8
-
Database: Oracle Database 19c Enterprise Edition
-
Architecture: One CDB hosting three PDBs
-
Compute: 8 vCPUs
-
Memory: 64 GB RAM
-
Storage: Dedicated virtual storage for database files, recovery files, and migration datasets
The team ran the three application workloads together and monitored CPU, memory, and storage activity for contention between PDBs. The platform size supported the three applications during functional and concurrent workload testing.
The move to Oracle Linux also required checks of administration procedures and application connections. The Proof of Concept was intended to assess the suitability of the consolidated architecture. The 8-vCPU, 64-GB VM was the test configuration. Production sizing still depended on workload measurements and expected growth.
Growth
The team increased the data volume of the largest application while keeping representative workloads running in the other two PDBs.
The tests used three data volumes:
-
10% of production data volume: Validate the initial migration, application functionality, and baseline performance.
-
50% of production data volume: Evaluate the impact of increasing data volume on SQL execution, batch processing, and shared resources.
-
100% of production data volume: Validate the application’s full production data volume and assess its impact on the other two PDBs.
At each stage, the team monitored CPU, memory, storage activity, SQL execution times, and batch duration. It also checked whether the larger application affected the other two PDBs.
These measurements helped assess the 8-vCPU, 64-GB test configuration and identify changes needed before production deployment.
The tests also provided a basis for estimating future storage requirements, although they did not constitute a long-term capacity forecast.
Security
The following security measures were implemented:
-
Data protection: Mask sensitive application data while preserving referential integrity and the data characteristics required for functional and performance testing.
-
PDB isolation: Verify that application accounts and privileges are restricted to their respective PDBs, preventing unauthorized access to other applications’ data.
-
Access control: Use dedicated database accounts and credentials for each application, with administrative privileges restricted to authorized personnel.
-
Network security: Restrict access to the sandbox and configure separate database services for each PDB, without allowing direct connections to production databases.
-
Backup and recovery: Protect RMAN backup files and validate the recovery procedures for the consolidated environment.
The tests checked that each application’s accounts stayed within its own PDB. The proof of concept remained isolated from production throughout the evaluation.
Project Result
The team consolidated the three application environments into one Oracle Database 19c CDB with three PDBs on Oracle Linux 8.
The team migrated the schemas and data with Data Pump, including the conversion from WE8MSWIN1252 to AL32UTF8. Connections, SQL, scheduled jobs, and privileges were then tested for each application.
The concurrent tests covered resource sharing and access isolation. The largest application’s dataset reached its full production volume on the 8-vCPU, 64-GB VM.
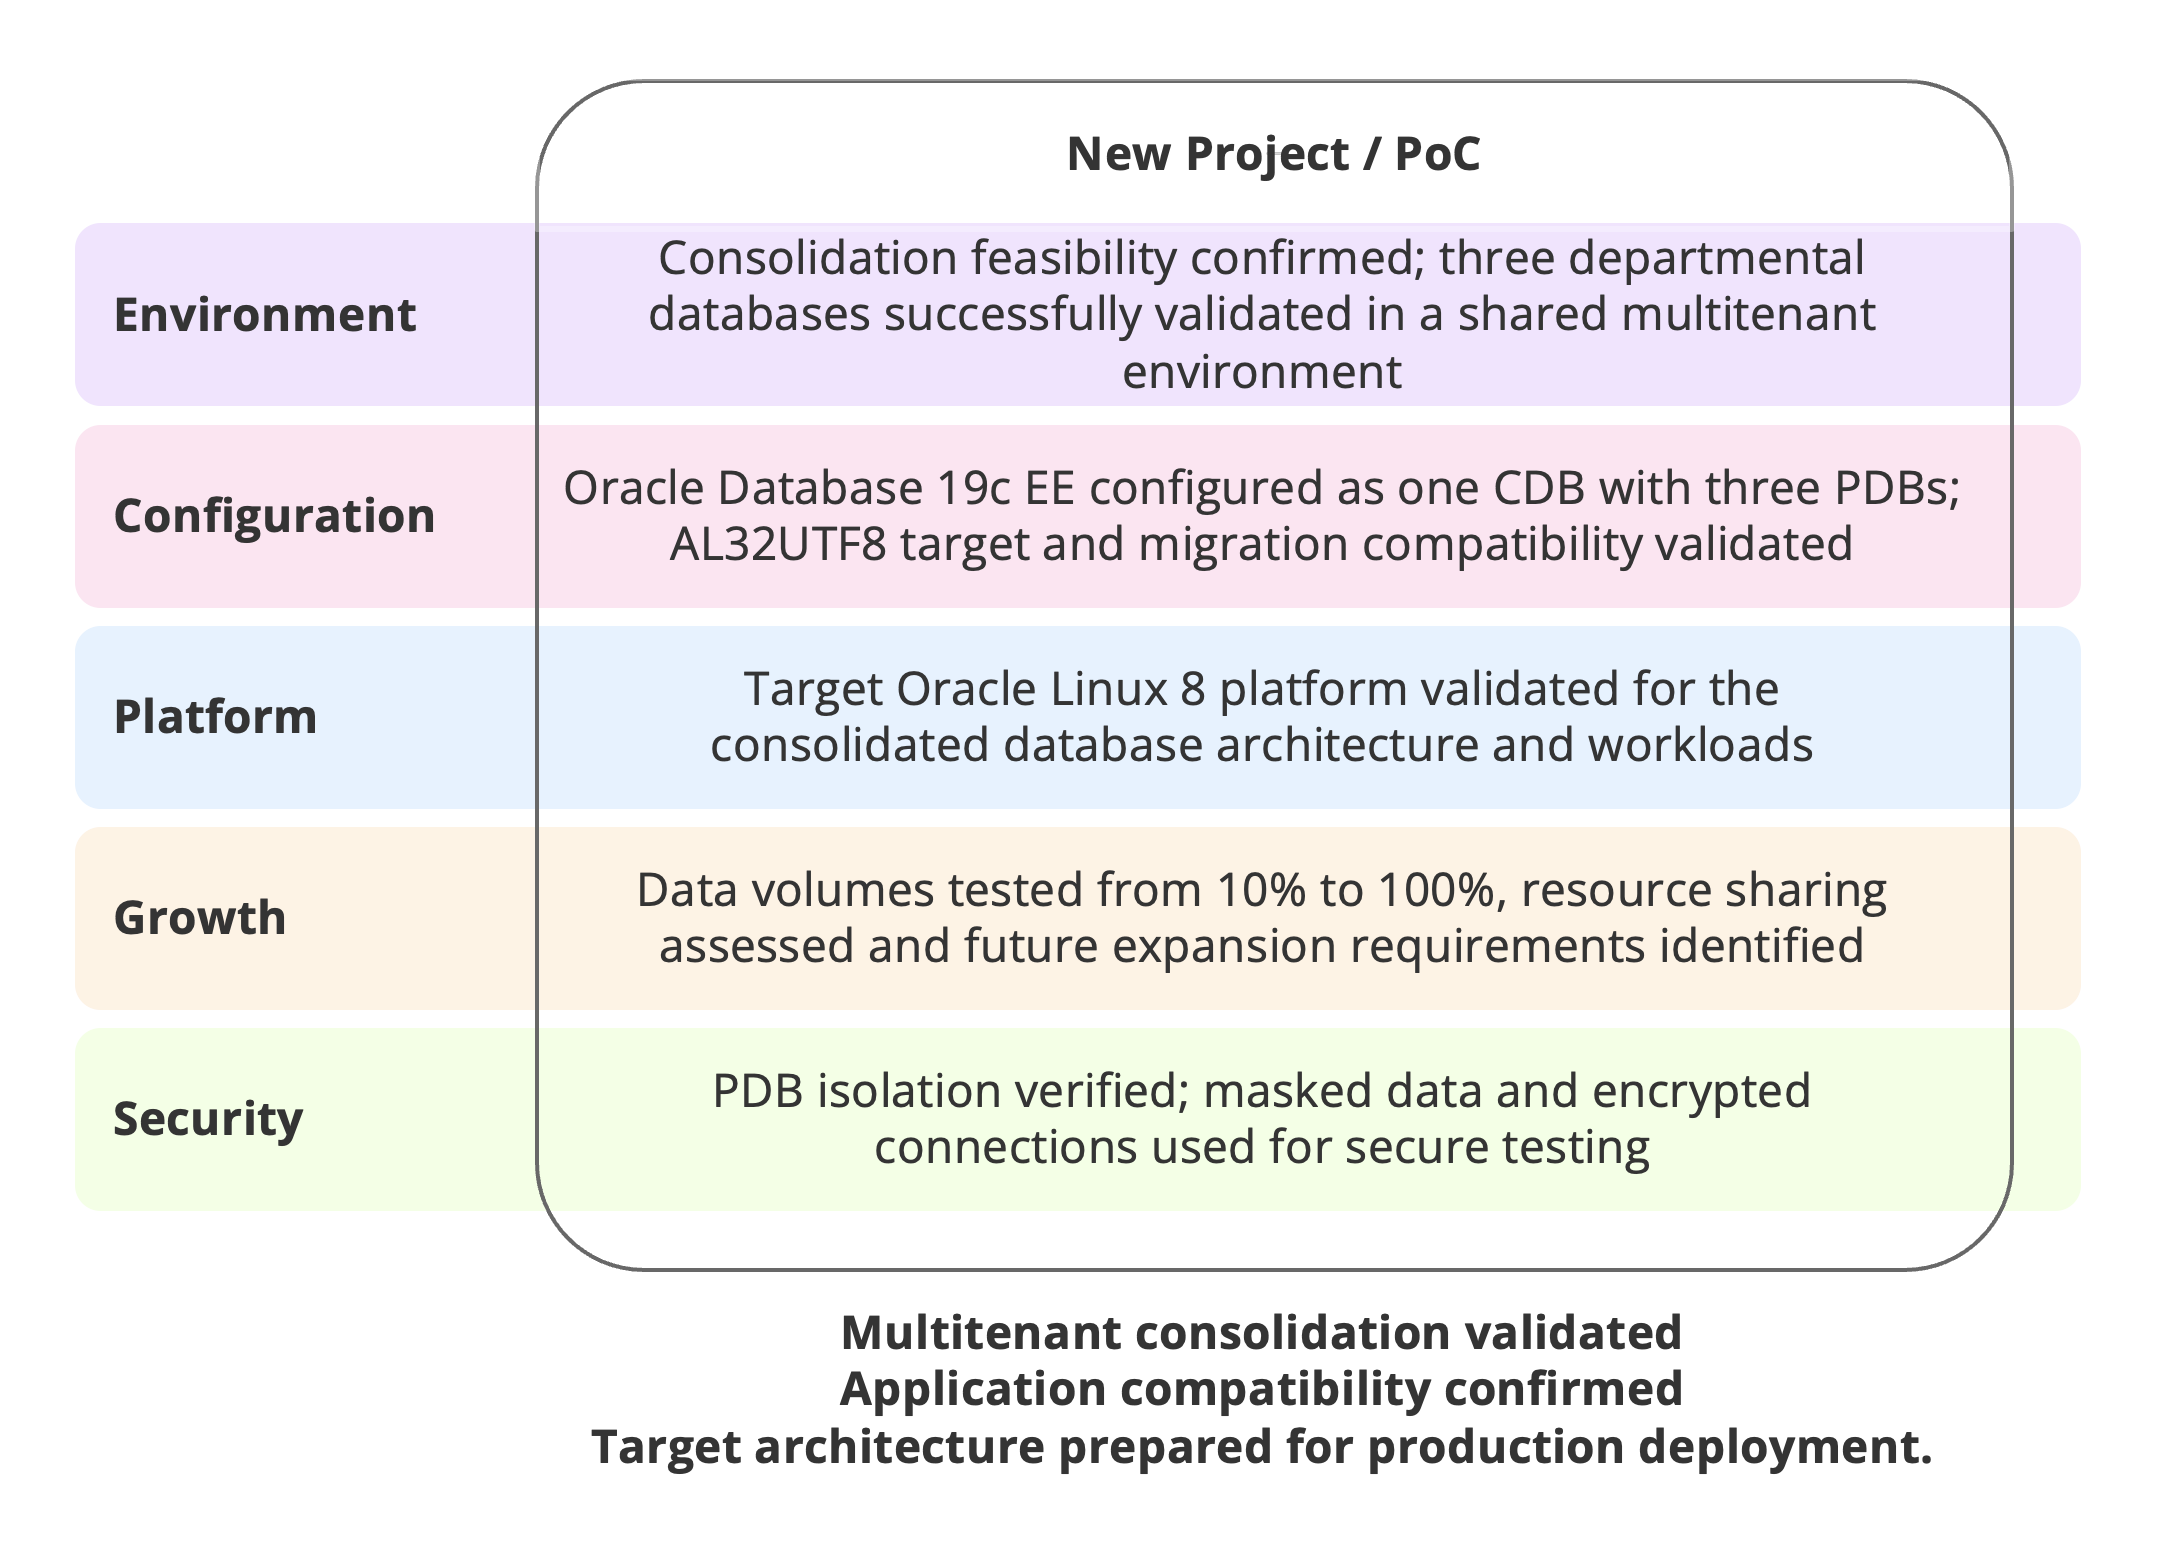
Exhibit 116: New Project / Proof of Concept – Results
The results supported the proposed consolidation. They did not settle production sizing or migration planning. Those decisions remained open after the proof of concept.
5.7.3 Sandbox / Learning – DBA Training
Project Context
The DBAs needed to practice installation, configuration, administration, and recovery without touching operational databases. A separate learning environment that could be reset after each exercise was used.
The training started with the sandbox described in chapters 1 to 4: Oracle Database 19c Enterprise Edition on Oracle Linux 7.9 in VirtualBox. It provides a practical starting point for hands-on exercises.
The objective was to give DBAs practical experience in a controlled environment where they could test configurations, observe database behavior, and learn from errors without affecting production systems. Each exercise could begin from a known configuration, allowing participants to compare results and repeat procedures independently.
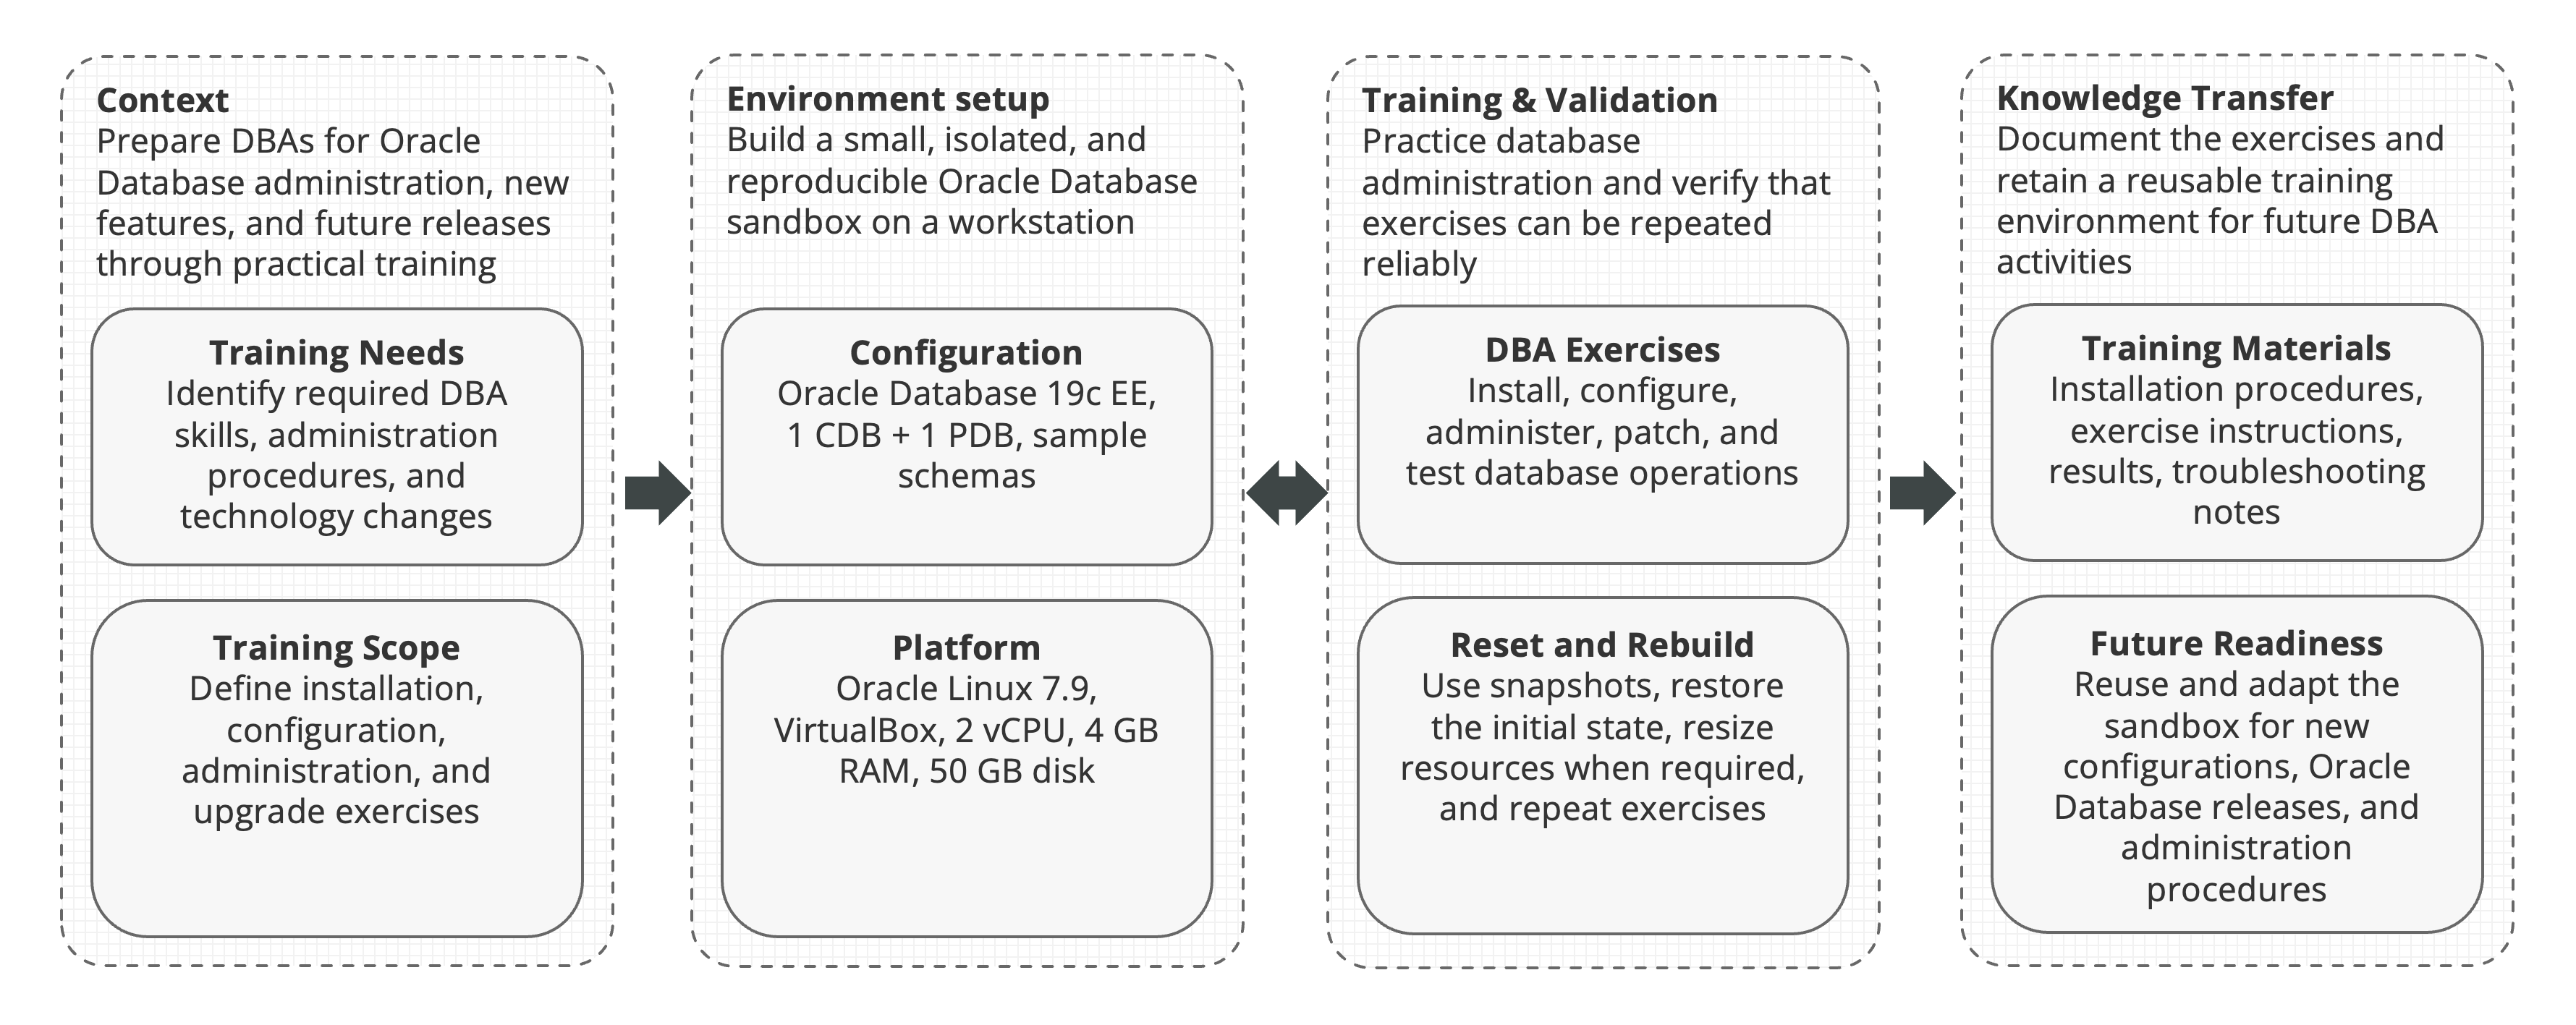
Exhibit 117: Sandbox / Learning – Overview
Training on another database release would require a separate configuration with the appropriate operating system and platform prerequisites.
Key Points
The training used a small VM and documented exercises that could be repeated by junior DBAs from a known starting point.
-
Build and configure an Oracle Database 19c multitenant environment, including a Container Database (CDB) and a Pluggable Database (PDB).
-
Practice routine administration tasks, including user management, privileges, database monitoring, and backup and recovery.
-
Perform configuration changes and operational exercises using virtual machine snapshots to restore a known starting point.
-
Extend the training environment for more demanding exercises or evaluations of other Oracle Database releases when additional resources or different platform configurations are required.
The sandbox provides a repeatable training environment without requiring dedicated production-like infrastructure.
Environment
The team reused the documented reference sandbox so that DBAs could follow the installation steps and repeat the same exercises.
The environment included:
-
One Oracle Database 19c Enterprise Edition installation
-
One Container Database (CDB) with a single Pluggable Database (PDB)
-
Dedicated administrative and test accounts
-
Synthetic datasets for administration and SQL exercises
-
Virtual machine snapshots to restore the environment between exercises
The exercises covered database installation, instance and PDB administration, user and privilege management, SQL execution, and backup and recovery procedures.
The environment could be reset or rebuilt when an exercise modified the database configuration or required a clean installation.
Configuration
The reference configuration used Oracle Database 19c Enterprise Edition with one CDB and one PDB. The training activities included:
-
Installation: Practice Oracle Database software installation, database creation, and initial configuration.
-
Multitenant administration: Create, open, close, and manage PDBs, services, and database accounts.
-
Security administration: Configure users, roles, privileges, and authentication settings.
-
Backup and recovery: Execute RMAN backup and restore exercises using dedicated test data.
-
Database operations: Practice parameter changes, database monitoring, SQL execution analysis, and routine maintenance procedures.
Each exercise started with a documented configuration. For a different database release, a separate environment would first be prepared and its prerequisites checked.
Platform
The initial sandbox was designed to run on a DBA workstation rather than dedicated server infrastructure.
The reference platform used:
-
Virtualization: Oracle VirtualBox 7.1.6
-
Operating system: Oracle Linux 7.9
-
Database: Oracle Database 19c Enterprise Edition
-
Compute: 2 vCPUs
-
Memory: 4 GB RAM
-
Storage: 50 GB virtual disk
The reference platform is intentionally lightweight:
-
This lightweight configuration was intended for installation, configuration, and basic administration exercises rather than production-level performance testing.
-
Virtual machine snapshots allowed DBAs to return to a known configuration after completing an exercise or encountering an installation or configuration issue.
-
The workstation-based approach made it possible to repeat exercises without provisioning a new server for each training session.
Growth
Resources were increased when a training exercise needed more memory or disk space. Such a sandbox environment is disposable and can be easily recreated.
For example, a Data Pump exercise involving a 20 GB application schema required a larger configuration:
-
Memory: Increased from 4 GB to 8 GB RAM
-
Storage: Increased from 50 GB to 80 GB
-
Dataset: A 20 GB test schema used for export, import, and verification exercises
The larger VM supported Data Pump export, import, and object checks on the 20 GB schema. The larger environment allowed DBAs to practice Data Pump operations, monitor storage consumption, and validate the imported database objects. After the exercise, it could be discarded and the reference sandbox restored.
Security
The training VM was kept separate from operational systems and used synthetic data.
The following security measures were applied:
-
Use synthetic datasets rather than production data for training exercises.
-
Assign dedicated test accounts and passwords that were not shared with operational environments.
-
Exclude production database links, credentials, and direct connections to operational databases.
-
Restrict network access to the services required for the exercises.
-
Restore or rebuild the environment when configuration changes or test activities could compromise its integrity.
Project Result
The DBA training sandbox was configured with Oracle Database 19c Enterprise Edition, Oracle Linux 7.9, and VirtualBox 7.1.6.
The environment was used for installation, CDB/PDB administration, user and privilege management, SQL analysis, and RMAN exercises. Virtual machine snapshots provided a recovery point between configuration changes.
For a Data Pump exercise involving a 20 GB test schema, the virtual machine was configured with 8 GB of RAM and 80 GB of storage, compared with 4 GB and 50 GB in the reference configuration.
The reference sandbox remained available for later sessions. The result was a reusable training environment.
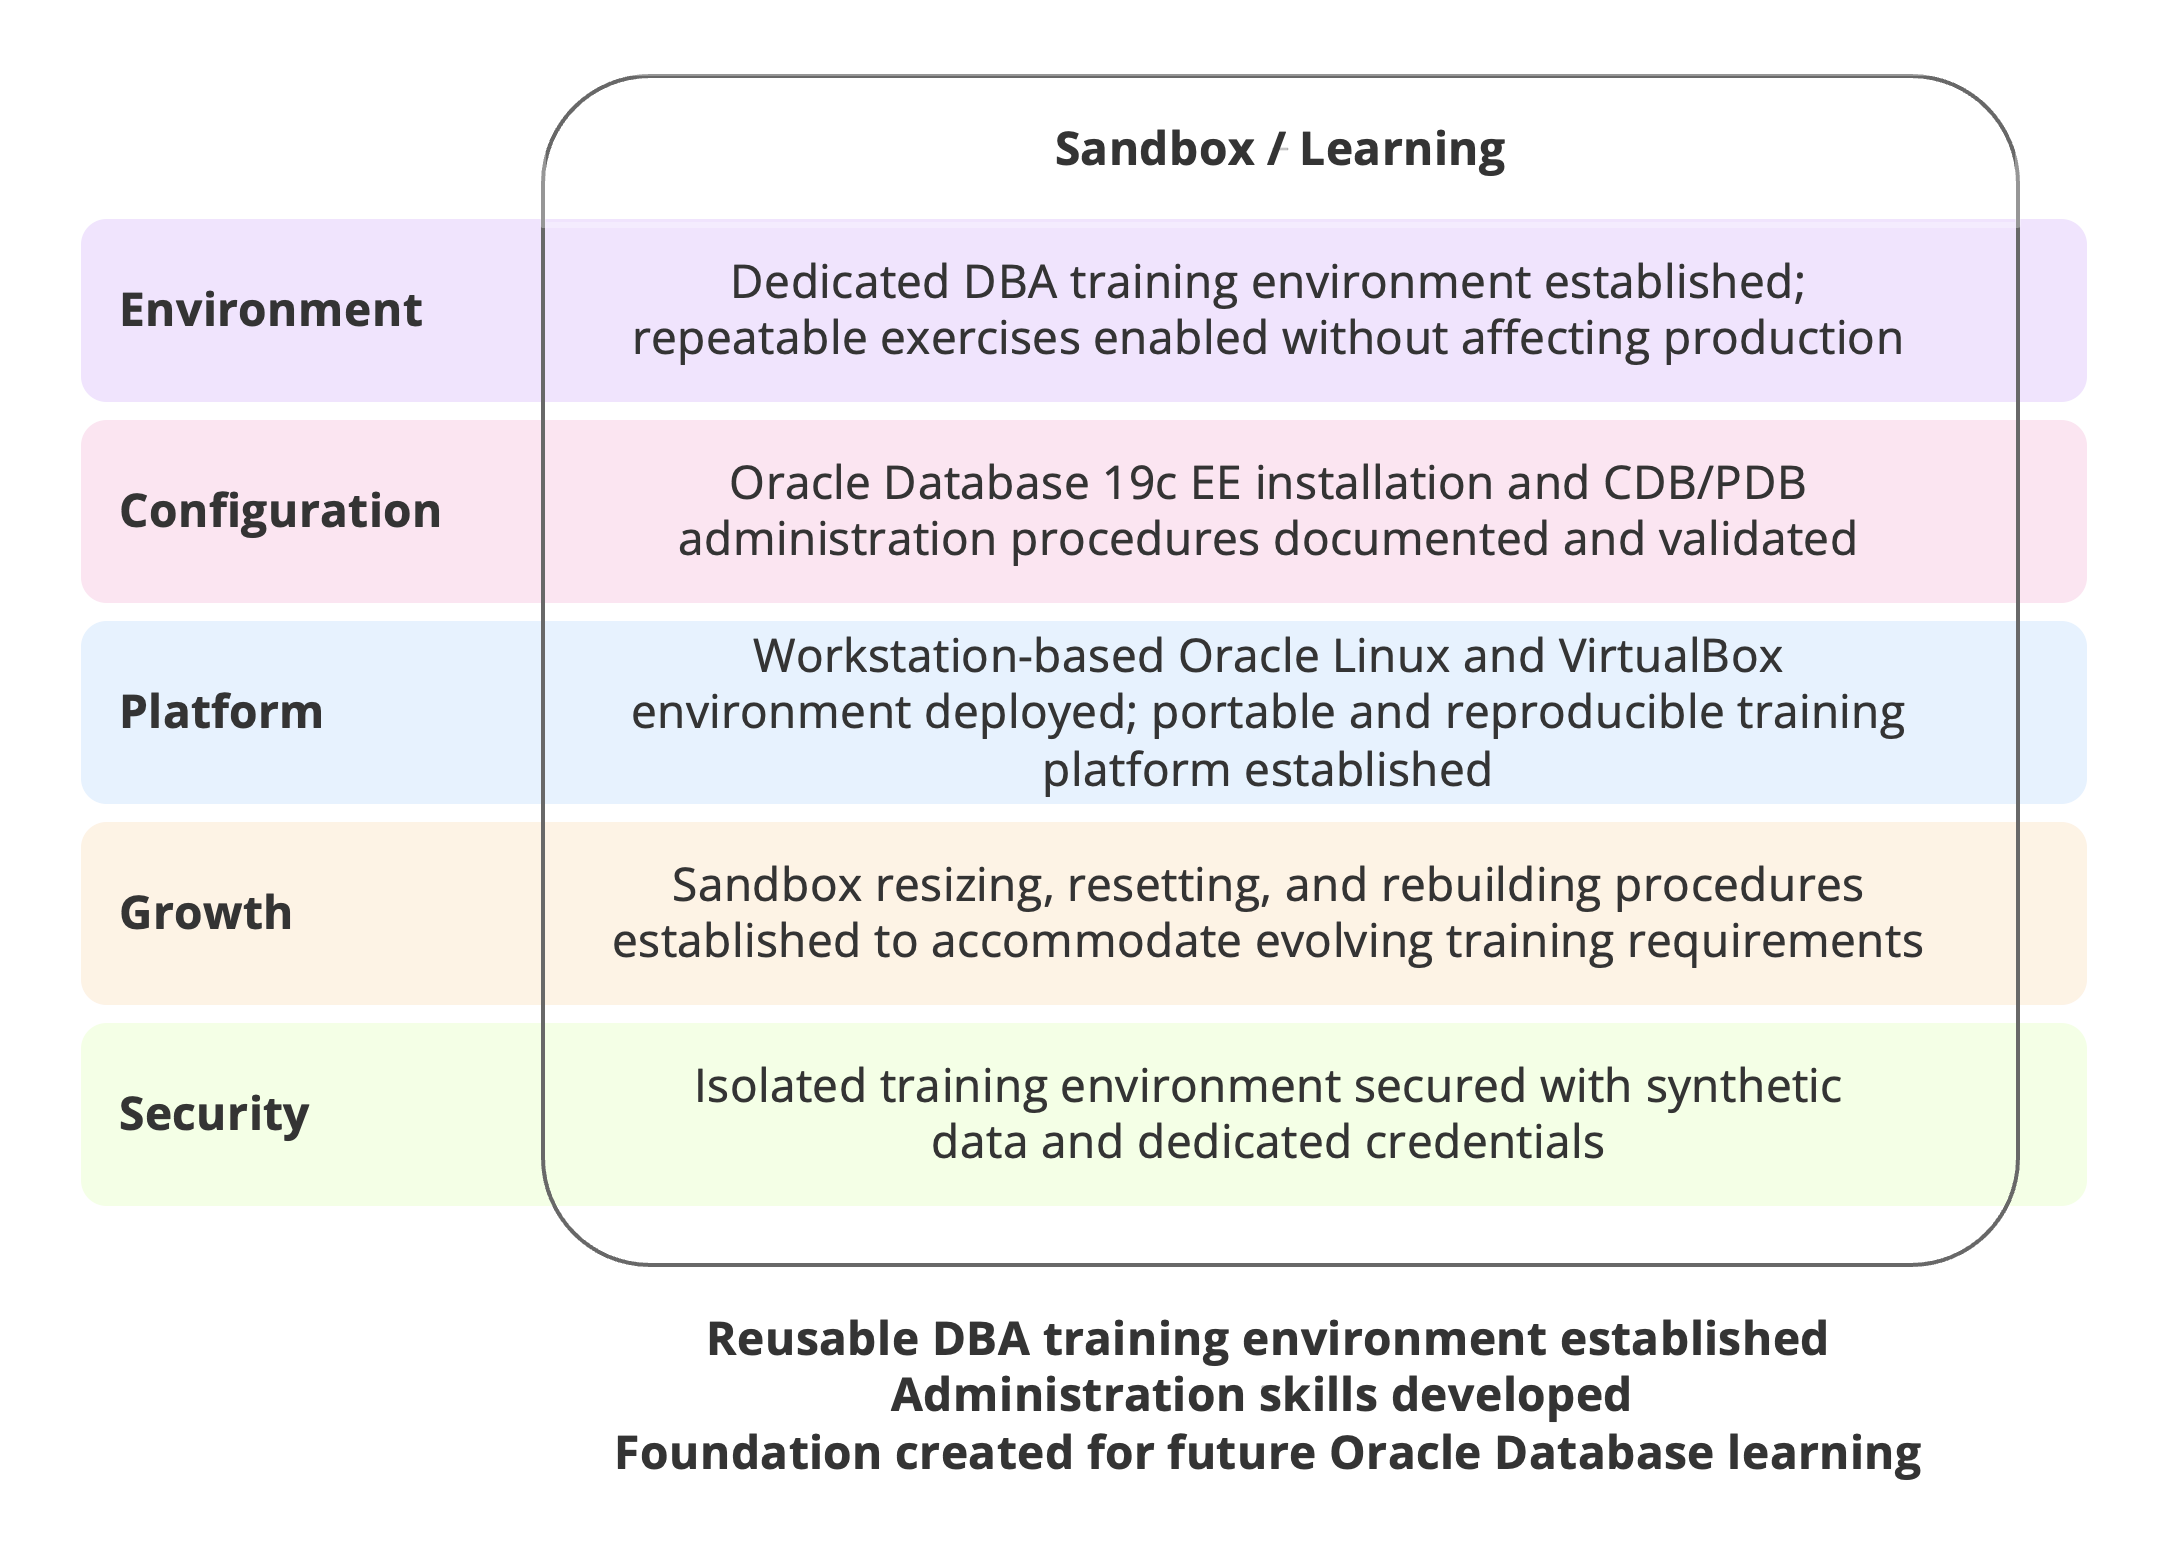
Exhibit 118: Sandbox / Learning – Results
5.8. Comparing the Three Projects
The three projects used the same five design decisions, but they answered different questions.
The table compares their scope, tests, and results. It also shows which conclusions remained outside each project. The comparison highlights how the same design framework was adapted to different project objectives, constraints, and validation requirements.
|
Question
|
Why did the batch slow down after RU 19.24? Could it handle twice the data within four hours?
|
Could three Windows non-CDB applications move to one CDB with three PDBs on Oracle Linux 8?
|
Could DBAs repeat practical exercises without affecting production?
|
|
Test scope
|
Batch SQL, schemas, statistics, and the two largest tables at full volume. Application servers excluded.
|
Application copies, Data Pump migration, character set conversion, and concurrent workloads in three PDBs.
|
One CDB and one PDB. Installation, administration, SQL, RMAN, and Data Pump exercises.
|
|
Platform and data
|
Oracle Linux 8, UEK, VMware, and the production SAN tier. Masked production data.
|
Oracle Linux 8; 8 vCPUs and 64 GB RAM. Masked application data.
|
Oracle Linux 7.9 and VirtualBox 7.1.6; 2 vCPUs, 4 GB RAM, and a 50 GB disk. Synthetic data.
|
|
Larger test
|
100%, 150%, and 200% of production data volume.
|
10%, 50%, and 100% of the largest application’s production volume, with workloads in the other PDBs.
|
20 GB Data Pump schema; RAM increased to 8 GB and disk to 80 GB.
|
|
Result
|
SQL plan baseline resolved the regression. At 200% volume, the batch finished in 2 h 50 min, within four hours.
|
The tests supported the consolidation design. Migration, application behavior, and resource sharing were tested.
|
The sandbox supported the exercises and remained available for later training.
|
|
Conclusion and limit
|
The correction met the batch target under the tested conditions. Whole-application performance was outside scope.
|
The target design was supported by the PoC. Production sizing and migration planning remained open.
|
The VM was suitable for these exercises. Production capacity was not tested.
|
Exhibit 119: Project Examples – Comparison of Scope and Results
For the batch investigation, the environment needed to reproduce SQL behavior and storage conditions. For consolidation, it is needed to test the target architecture and the three applications together. For training, a small VM that could be reset was sufficient.
Chapter Outcome
Start with the question the project needs to answer and define what a successful test must show. Build the environment around that scope. Record the configuration and results, then state what they support and what still needs testing. The glossary and sources that follow provide the terms and references used throughout the guide.
6. Glossary
CDB Root | The root container of a Container Database (CDB). It contains Oracle-supplied metadata and common objects shared across the CDB.
Container Database (CDB) | In the Oracle Multitenant architecture, the database container that includes the CDB root and can contain one or more Pluggable Databases (PDBs).
DBMS_XPLAN | Oracle package used to display SQL execution plans and related execution information for analysis.
Network Address Translation (NAT) | VirtualBox network mode that provides outbound guest connectivity without placing the VM directly on the local network. Inbound connectivity requires configured forwarding or a different approved mode.
Non-Production Environment | An Oracle Database environment used outside live production, for example for development, testing, proof of concept, training, validation, or technical replication. The label does not determine the applicable licensing rights itself.
Oracle Automatic Memory Management (AMM) | Oracle Database memory-management mode in which the database automatically adjusts the System Global Area (SGA) and Program Global Area (PGA) within a configured memory target.
Oracle Data Pump | Oracle tools for exporting and importing database objects and data, commonly using expdp and impdp.
Oracle Enterprise Option | A separately licensed Oracle Database capability available with Oracle Database Enterprise Edition, such as Oracle Partitioning or Oracle Real Application Clusters (RAC), subject to the applicable Oracle licensing terms.
Oracle Management Pack | A separately licensed group of Oracle Database management or diagnostic capabilities, such as Oracle Diagnostics Pack or Oracle Tuning Pack, subject to the applicable Oracle licensing terms.
Oracle Multitenant | The Oracle Database architecture that uses a Container Database (CDB) with one or more Pluggable Databases (PDBs).
Oracle Optimal Flexible Architecture (OFA) | Oracle-recommended directory and naming conventions for organizing Oracle software, inventory, and database files.
Oracle Universal Installer (OUI) | Oracle installation program used to install and configure Oracle software homes and, in this guide, to install Oracle Database 19c.
Oracle VirtualBox | An open-source virtualization platform developed by Oracle that allows users to create, configure, and run virtual machines on a host computer. It supports multiple guest operating systems and provides virtual CPU, memory, storage, and networking resources.
Oracle VirtualBox Extension Pack | An optional host-side package that adds VirtualBox functionality and is governed by licensing terms separate from the open-source base package. Included features vary by release.
Oracle VirtualBox Guest Additions | Drivers and utilities installed inside a guest operating system to provide integration features such as improved display handling and shared folders, depending on the guest operating system and VirtualBox release.
Pluggable Database (PDB) | A portable database contained within a CDB that stores application data and metadata and can be managed independently within the multitenant architecture.
Recovery Manager (RMAN) | An Oracle Database utility used to back up, restore, and recover databases. It supports full and incremental backups, backup validation, and automated recovery operations.
Red Hat Compatible Kernel (RHCK) | The Oracle Linux kernel line designed to maintain compatibility with the corresponding Red Hat Enterprise Linux kernel.
Release Update (RU) | A cumulative Oracle Database patch level for a release. Later RUs include the fixes delivered by earlier RUs for that release.
Sandbox Environment | An isolated, controllable, and usually disposable environment used for learning, experimentation, demonstrations, installation practice, or other activities that do not require full production fidelity.
Secure Shell (SSH) | SSH is the encrypted protocol used for remote command access and file transfer; sshd is the server daemon that listens for and handles incoming SSH connections.
SQL Plan Baseline | A stored set of accepted SQL execution plans used by SQL Plan Management to help control changes in optimizer plan selection.
sudo | Linux command that permits authorized users to execute a command with the privileges of another account, typically root, under configured policy rules.
Unbreakable Enterprise Kernel (UEK) | Oracle-maintained Linux kernel for Oracle Linux. A supported UEK may be selected when it meets the Oracle Database release and kernel certification requirements.
Virtual Machine (VM) | A software-defined computer with virtual CPU, memory, storage, network, and other devices on which a guest operating system and applications run.
Virtual Network Adapter | A software-defined network interface that connects a virtual machine to a network. In VirtualBox, it supports modes such as NAT and Bridged Adapter, which determine how the VM communicates with the host, local network, and external systems.
7. Download the Publication Package ZIP-File
Download the publication package (ZIP-file) to access the sources used in this publication, available at:
https://omtco.eu/publications/how-to-build-an-oracle-database-non-production-sandbox-environment.zip
Content of the ZIP-File
The publication package file contains the documentation, diagrams, and screenshots used in this publication. The file is organized into the following directories:
00_Read_Me – The ReadMe_Archive.pdf file, documenting the archive structure, individual source files, retrieval dates, and original source locations.
01_Licensing_and_Terms – Oracle Database and VirtualBox licensing documentation, including the Oracle Technology Network (OTN) Developer License Terms.
02_Oracle_VirtualBox – Oracle VirtualBox product documentation, download references, release archives, and installation guides.
03_Oracle_Linux – Oracle Linux product documentation, installation guides, download references, and installation media information.
04_Oracle_Database – Oracle Database software download references, technical documentation, and installation guides.
05_External_Links – Collection of external links used in this publication. As these links will change, this file will be maintained. This file provides the source URLs for Link references #01 – #23 cited in this publication.
06_Publication_Images – All diagrams and screenshots used throughout the publication, organized into two subdirectories:
-
Subfolder Diagrams: The architectural diagrams, decision trees, workflows, and other technical illustrations reproduced in the publication.
-
Subfolder Screenshots: All screenshots reproduced in the publication, including those documenting software downloads, installation steps, system configuration, and validation procedures.
8. Index of Exhibits
Exhibit 1: Sandbox Design – Five Decisions to Build the Environment
Exhibit 2: Environment – Sandbox Design Principles
Exhibit 3: Sandbox Design – Define and Validate the Environment
Exhibit 4: Configuration – Reference Sandbox Configuration
Exhibit 5: Oracle Database Architectures – Non-CDB and Multitenant Comparison
Exhibit 6: Platform – Reference Sandbox Platform
Exhibit 7: Sandbox Architecture – Reference Technology Stack
Exhibit 8: Growth – Resource and Lifecycle Principles
Exhibit 9: Security – Sandbox Security Principles
Exhibit 10: Security – Controls and Validation by Data Sensitivity
Exhibit 11: VirtualBox – Download VirtualBox
Exhibit 12: VirtualBox – Select the Platform Package
Exhibit 13: VirtualBox Installer – Launch the Installer
Exhibit 14: VirtualBox Installer – Select the Installation Destination
Exhibit 15: VirtualBox Installer – Review the Default Installation Type
Exhibit 16: VirtualBox Installer – Review Custom Installation Options
Exhibit 17: VirtualBox Installer – Install VirtualBox
Exhibit 18: VirtualBox Installer – Complete the Installation
Exhibit 19: Oracle Website – Open the Oracle Website
Exhibit 20: Oracle Website – Open the Oracle Linux Page
Exhibit 21: Oracle Website – Select Download Oracle Linux
Exhibit 22: Oracle Website – Open Oracle Linux Downloads
Exhibit 23: Oracle Website – Open the Oracle Linux Media List
Exhibit 24: Oracle Website – Select Oracle Linux 7.9 Installation Media
Exhibit 25: Virtual Machine – Define Configuration Parameters
Exhibit 26: VirtualBox User Guide – Review the VM Creation Procedure
Exhibit 27: Virtual Machine – Name the VM and Select the Operating System
Exhibit 28: Virtual Machine – Allocate RAM and CPU
Exhibit 29: Virtual Machine – Configure the Virtual Disk
Exhibit 30: Virtual Machine – Review the Configuration
Exhibit 31: Virtual Machine – Create the Virtual Machine
Exhibit 32: VirtualBox Manager – Verify the Virtual Machine Configuration
Exhibit 33: Virtual Machine Settings – Configure the Network
Exhibit 34: Virtual Machine Settings – Open Storage Settings
Exhibit 35: Virtual Machine Settings – Select the Oracle Linux ISO
Exhibit 36: Virtual Machine Settings – Attach the Oracle Linux ISO
Exhibit 37: Virtual Machine Settings – Set the Boot Order
Exhibit 38: VirtualBox Manager – Start the Virtual Machine
Exhibit 39: Virtual Machine Startup – Boot from the Oracle Linux ISO
Exhibit 40: Oracle Linux Installation – Select the Installation Option
Exhibit 41: Oracle Linux Installation – Run the Installation Media Check
Exhibit 42: Oracle Linux Installation – Select the Language
Exhibit 43: Oracle Linux Installation – Select the Disk and Partitioning
Exhibit 44: Oracle Linux Installation – Select the Software Configuration
Exhibit 45: Oracle Linux Installation – Configure Network and Hostname
Exhibit 46: Oracle Linux Installation – Review the Installation Summary
Exhibit 47: Oracle Linux Installation – Set the Root Password and Create a User
Exhibit 48: Oracle Linux Installation – Set the Root Password
Exhibit 49: Oracle Linux Installation – Create the User Account
Exhibit 50: Oracle Linux Installation – Configure Advanced User Settings
Exhibit 51: Oracle Linux Installation – Complete the Installation
Exhibit 52: Oracle Linux Installation – Select the Boot Kernel
Exhibit 53: Oracle Linux Installation – First Login to Oracle Linux
Exhibit 54: Oracle Linux Initial Setup – Review the Configuration
Exhibit 55: Oracle Linux Initial Setup – Accept the License Agreement
Exhibit 56: Oracle Linux Initial Setup – Return to the Login Screen
Exhibit 57: Oracle Linux Desktop – Login
Exhibit 58: Oracle Linux Desktop – Complete GNOME Initial Setup
Exhibit 59: Oracle Linux Desktop – Open Getting Started
Exhibit 60: Oracle Linux Desktop – Open a GNOME Terminal
Exhibit 61: Oracle Website – Open Products, Solutions, and Services
Exhibit 62: Oracle Website – Open the Database Software Download Page
Exhibit 63: Oracle Website – Select Oracle Database 19c for Linux x86-64
Exhibit 64: Oracle Website – Download Oracle Database 19c Media
Exhibit 65: Oracle Website – Accept the Oracle License Agreement
Exhibit 66: Oracle Website – Open the Database Installation Guide for Linux
Exhibit 67: Oracle Database Preinstallation – Run the Yum Command
Exhibit 68: Oracle Database Preinstallation – Check Package Dependencies
Exhibit 69: Oracle Database Preinstallation – Confirm Package Installation
Exhibit 70: Oracle Database Preinstallation – Complete Package Installation
Exhibit 71: Oracle Database Preinstallation Check – Verify the Oracle Groups
Exhibit 72: Oracle Database Preinstallation Check – Verify the Oracle User
Exhibit 73: Oracle User Configuration – Add the Oracle User to the Wheel Group
Exhibit 74: Oracle Database Media – Copy the Media to the VM
Exhibit 75: Oracle Database Media – Verify the Media in the Oracle User Home Directory
Exhibit 76: Oracle Database Installation – Create the Oracle Directories
Exhibit 77: Oracle Database Installer – Launch the Installer
Exhibit 78: Oracle Database Installer – Select the Configuration Option
Exhibit 79: Oracle Database Installer – Select the System Class
Exhibit 80: Oracle Database Installer – Select Enterprise Edition
Exhibit 81: Oracle Database Installer – Specify the Installation Location
Exhibit 82: Oracle Database Installer – Configure the Oracle Inventory
Exhibit 83: Oracle Database Installer – Select the Database Type
Exhibit 84: Oracle Database Installer – Configure Database Naming and Containers
Exhibit 85: Oracle Database Installer – Configure Database Memory
Exhibit 86: Oracle Database Installer – Select the Database Character Set
Exhibit 87: Oracle Database Installer – Configure Sample Schemas
Exhibit 88: Oracle Database Installer – Select the Datafile Location
Exhibit 89: Oracle Database Installer – Configure Management Options
Exhibit 90: Oracle Database Installer – Configure Recovery Options
Exhibit 91: Oracle Database Installer – Set Schema Passwords
Exhibit 92: Oracle Database Installer – Select Operating System Groups
Exhibit 93: Oracle Database Installer – Configure Root Script Execution
Exhibit 94: Oracle Database Installer – Review the Installation Summary (1 of 2)
Exhibit 95: Oracle Database Installer – Review the Installation Summary (2 of 2)
Exhibit 96: Oracle Database Installer – Install Oracle Database Software
Exhibit 97: Oracle Database Installer – Confirm Root Script Execution
Exhibit 98: Oracle Database Installer – Complete the Installation
Exhibit 99: Environment Design – Five Design Decisions for an Oracle Database Environment
Exhibit 100: Environment Selection – Purpose Decision Tree
Exhibit 101: Environment Selection – Scenario Objectives and Design Implications
Exhibit 102: Database Selection – Evolution of Oracle Database Editions
Exhibit 103: Platform Selection – Selection Workflow
Exhibit 104: Platform Selection – Recommendations by Scenario
Exhibit 105: Scalability – Growth Triggers and Available Responses
Exhibit 106: Scalability – Resource Recommendations by Non-Production Scenario
Exhibit 107: Security – Controls by Data Sensitivity and Validation Requirements
Exhibit 108: Security – Control Recommendations by Non-Production Scenario
Exhibit 109: Database Selection – Release Recommendations by Non-Production Scenario
Exhibit 110: Database Selection – Edition and Features by Non-Production Scenario
Exhibit 111: Platform Selection – Operating System Recommendations by Scenario
Exhibit 112: Scenario Illustrations – Three Examples Applying the Five Design Decisions
Exhibit 113: Production Replication – Overview
Exhibit 114: Production Replication – Results
Exhibit 115: New Project / Proof of Concept – Overview
Exhibit 116: New Project / Proof of Concept – Results
Exhibit 117: Sandbox / Learning – Overview
Exhibit 118: Sandbox / Learning – Results
Exhibit 119: Project Examples – Comparison of Scope and Results
9. Trademarks
The following trademarks are referenced in this publication.
macOS is a trademark of Apple Inc., registered in the United States and other countries and regions.
GNOME is a registered trademark of the GNOME Foundation.
IBM is a trademark or registered trademark of International Business Machines Corporation in the United States, other countries, or both.
Intel is a trademark of Intel Corporation or its subsidiaries.
Linux is the registered trademark of Linus Torvalds in the United States and other countries.
Microsoft and Windows are trademarks or registered trademarks of Microsoft Corporation in the United States and/or other countries.
Oracle and the Oracle product and service names referenced in this publication, including Oracle (AI) Database, Oracle Linux, Oracle Cloud Infrastructure, Oracle VirtualBox, Oracle RAC / Multitenant, are trademarks or registered trademarks of Oracle Corporation or its affiliates in the United States and other countries.
Red Hat and Red Hat Enterprise Linux are registered trademarks of Red Hat, Inc. in the United States and other countries.
VMware is a trademark or registered trademark of Broadcom Inc. and/or its affiliates.
All other company, product, and service names may be trademarks or service marks of their respective owners.
10. Authors and Notices
Authors
|

|

|
|
Matthieu SIMONNET
Master’s, Audit & Consulting,
Engineering Degree, Cognitive Science & Computing
CTO, Paris Office
Email: matthieu.simonnet@omtco.eu
|
Uttam PANDA
MBA, Bachelor of Engineering
Consultant, Munich Office
Email: uttam.panda@omtco.eu
|
About OMTCO
OMTCO specializes in Software Asset Management (SAM), software licensing expertise, compliance audits, and SAM tools, helping organizations manage software assets, optimize costs, and maintain licensing compliance with major software vendors including Oracle, IBM, and Microsoft. OMTCO is independent of any software vendor.
More about OMTCO at https://omtco.eu/services.
For tailored advice, contact OMTCO at office@omtco.eu.
Statement of Independence
OMTCO is fully independent of any software vendor, including Microsoft, Oracle, and IBM, as well as any external interests. OMTCO does not sell licenses, maintenance, or support contracts from any third party, nor does it work for any software vendor. Professional and respectful relationships with software vendors are maintained solely for the benefit of clients. As a 100% employee-owned company, OMTCO does not rely on external interests and holds no stakes in any external company or interest.
Full Statement of Independence:
https://omtco.eu/StatementOfIndependence.pdf.
Statement of Confidentiality
OMTCO applies strict confidentiality to all information entrusted to it in connection with its professional activities. Client information and other non-public information are protected against unauthorized access, use, or disclosure.
OMTCO publications and other publicly available materials are based exclusively on public information, OMTCO’s own knowledge and methodologies, internal analyses, synthetic examples, and anonymized information. Confidential client information is not incorporated into publications or public materials.
Full Statement of Confidentiality:
https://omtco.eu/StatementOfConfidentiality.pdf
Disclaimer
This publication is provided by OMTCO for general informational and educational purposes only and does not constitute legal, contractual, financial, tax, procurement, or licensing advice. It does not take into account the specific circumstances, agreements, or licensing position of any particular organization.
The information reflects OMTCO’s professional interpretation based on publicly available information and vendor documentation as of the publication date and may change over time. It is provided “AS IS” and “AS AVAILABLE,” without any warranty, express or implied, to the extent permitted by applicable law.
The legally binding licensing position of any organization derives from its own executed agreements and the applicable software licensing terms. Readers remain responsible for verifying the contractual terms and Oracle documentation applicable to their specific situation before making licensing or commercial decisions.
Full legal notice and disclaimer: https://omtco.eu/disclaimer.
Oracle Trademark and Association Notice
This publication is an independent work and is not affiliated with, sponsored by, endorsed by, or otherwise associated with Oracle Corporation or any of its affiliates.
[END OF DOCUMENT]